Leaderboard

Popular Content
Showing content with the highest reputation on 05/27/17 in all areas
-
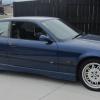
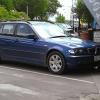
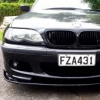
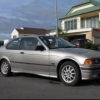
8 pointsI just got home from a road trip to drive the Gentle Annie. Huge thanks to @TermiPeteNZ for organizing this. Met everyone in bulls for a coffee and chat then we headed of to Taihape for breakfast then it was off across the Gentle Annie towards Napier for lunch. Was real nice to meet those of you I hadn't already and nice to see those of you I met previously. Standouts for me were the 2 M5's and the red 535i M Sport. Oh, cant forget Eli in the drivers seat of a very nice 330i. What a fantastic road to drive and I'm thinking more than a few of you had some real fun in your cars. Unfortunately my passenger suffered from a queasy stomach so it was just a nice cruise for me..lol Heres the few pics I took. Feel free to add your own. :-)
-
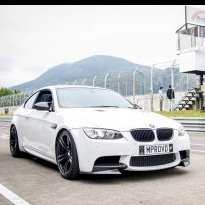
6 pointsHey guys - another update. A few weeks ago I was lucky enough to take an E46 M3 with a CSL airbox for a drive. And as you could imagine I was hooked on the raw induction sound. I had often heard how awesome this intake was but always thought it was unobtainable endeavour due to the cost mostly, and second the complexity. After talking to the owner (M3 power) he explained actually how simple it really was mechanically. I had already seen the magical wizardry that Tom was capable of but when he said he'd help me out with the CSL tune and ECU. It meant that what I thought was unreachable now didnt seem so far away. And as the stars aligned a Geoff Steel airbox came up for sale so I had to snap it up. I got to work and started ordering the bits I needed to put it all together. With many texts to the experts, I soon had the bits and started. Instead of buying a lot of the genuine parts, I used some aftermarket options. I had to slightly bend the oil dipstick to accomodate the airbox but soon realised that the bonnet wouldn't close and I didnt want to bend it anymore so I cut the top off and put a key ring though it. Second was the adding the map sensor. I used the cheaper gm map sensor but had to add 6mm pipe to supply the sensor so using the ttfs rail as basis I made my own budget rail. But I have to thank the wizard himself, Tom (M3 power). If it weren't for him I wouldn't have been able to do this. So thanks for being a top bloke and helping a meer mortal. Anyway, pictures tell the rest. Enjoy!
-
5 pointsWhat a great roadie, that's a fantastic bit of tarmac for our ultimate machines. I had as much fun as a slightly dodgy clutch would allow... Had a comfy trip home up north, rain/low cloud/fog from half way to Taupo onwards... M5 all washed and tucked away. It was great to meet you all. Cheers.
-
5 pointsLets just say I may at times of been boardering on far too much fun, had great time and awesome to meet everyone. thanks Pete, you can rest assured that your efforts on making this happen were greatly appreciated Cheers Paul
-
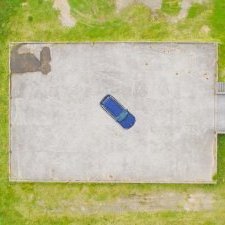
3 pointsYep lucky with the weather (well except in the Wairarapa and over the hill! ) I certainly wasn't the first for the elevated shot ... but I did get there .....
-
3 pointslooks like a bloody brilliant day out! awesome. love the pics too, Dave! I paricularly like the elevated shot above. Really sorry I missed this one.
-
3 pointsUpdate #16 We're closing in on the finish! Next weekend we'll hopefully be putting the car back on the ground :-) Today wasn't entirely without trouble however, but I'll get to that soon enough. Dad did a heap of stuff during the week :hattip:: Rear brake discs, calipers and pads on. Emergency brake reinstalled. The rest of the engine bay stuff back together. Front under-tray cleaned up. Finished cleaning up the exhaust. Today we started off with reassembling the drive shaft. We started by attaching the new CSB, and then bolted the two halves of the drive shaft together. Then we bolted the flex disc (guibo) in place. (Note that the arrows on the flex disc need to point to the mounting on the drive shaft) All torqued up We then discovered that we had missed ordering a new gasket to go between the driveshaft and the input flange on the diff. Unfortunately the local dealer didn't have any in stock, so one is on order from BMW NZ and I'll pick it up on Monday. I took the opportunity at this point to take a few more photos underneath the car before we put the reinforcement plate back on... Steering guibo and new engine mount: Steering rack and boots (with temporary "clamps" until the wheel alignment is done): Front control arm: Front left hub assembly: Front left strut: Fuel filter: Rear brakes: Next up was reinstalling the front reinforcement plate. Here it is, ready to go on (a bit shiny-er than when we took it off): And here it is installed and torqued up: We then moved on to bleeding the brakes. Takes a little while, but all went smoothly, and now they're all ready to go. We also adjusted the emergency brake. After lunch we got stuck into cleaning the wheels up. As was to be expected there was a lot of brake dust and tar to clean up. There was also a lot of sticky from balancing weights to clean up (always fun :raspberry:). Several rounds of wheel cleaner got most of the brake dust off. Then we used desolv-it to soften the sticky from the weights so that we could clean it off, then kerosene to take the tar spots off. The wheels cleaned up pretty well, the gunmetal grey colour looks great when it's cleaned up. What's not great is that at some point in the car's past the rear tyres appear to have been changed by someone who didn't know how to change tyres on mag wheels properly. Teeth marks gouged into the wheel, and a giant scrape where it appears the teeth let go and scraped the inner circumference of the wheel :shifty: That and the fact that someone has touched up the outer rim of the visible face of the wheel with silver paint, and didn't mask properly, so there's sliver paint on the gunmetal parts of the wheel have left me less than impressed with said person's work and attention to detail :facepalm: Fortunately the wheels are in pretty okay condition overall, at some point I'll have them properly reconditioned, but cosmetic stuff is still of secondary importance at this point. Here's a couple of shots of the wheels in the middle of the cleaning process. You can see the gouge marks in this photo... :shifty: While I carried on with the wheels Dad cleaned up the boot and reinstalled the carpet, etc. It looks like someone had spilled something on the left hand side of the boot as evidenced in this photo: So Dad cleaned that up, as well as thoroughly cleaning the battery compartment, brackets, etc. Posed photo of Dad cleaning: And here's everything back in place (unfortunately I didn't get any photos of the compartments all cleaned up - I was busy cleaning wheels still!!!): By the time it got too dark to see, I'd got the two rear wheels pretty much done, but I still need to do the kerosene step on the two fronts, which I'll do next weekend. Next weekend should be the last day of assembly on the car, we're hoping to get the drive shaft, heat shielding, exhaust, brace & faring all back in, and a rudimentary wheel alignment done with the car on blocks, before we lower it to the ground, torque up a last couple of things and fire it up! Getting pretty close to the end now! I'll finish with a pic of the engine bay - everything back together!
-
3 pointsWe may be moving a little further south, to help cover the gap between here and Wellington.
-
2 pointsGet it properly scanned by someone with the proper gear and the knowledge - it will save you lots of money. Glenn at Botany Motor Worx is a forum sponsor and is recommended.
-
2 pointsGot my new battery in my motorcycle... wouldn't start. Removed all the fairings etc looking for issues. Was the clutch switch, so I needn't remove anything.... So why is this in "Life is choice bro"? Because I fixed it and it starts and runs beautifully now! I can finally get some practice and go for my full class 6! Oh and an SV400s is a million times the motorbike a GN250 is!
-
2 pointsSweet, we've pretty much got the North Island covered for ball joint seperators!!
-
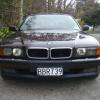
1 pointHey - signed up a few months ago and have been stalking since - thought it was time to introduce myself! Picked up my first BMW, a 2000 E46 325i touring a couple of months ago. Got off to a rough start (literally, though still haven't 100% solved it) but have completely fallen in love with it. Cheers, Dan
-
1 pointFor the 8ers out there, this is a must watch... hope you enjoy In celebration of the impending launch of the new '8'
-
1 pointCheers bro, so stoked
-
1 pointYup all done bar one oem hose im waiting for it to arrive. If you look closely you can see it
-
1 pointand with a barn for extra billeting, a lower-north roadie destination!
-
1 pointsell the lot, buy an e60 545i and that 4x4 you were thinking about. "suits you, sir" sorted!
-
1 pointJust use a hammer, and the tie rod will drop out.
-
1 pointWhat charger did you use ?? AGM batteries will not charge properly with a trickle charger. They need 14.5-15 volts to charge them correctly. If the battery is more than 4-5 years old it's probably had it anyway. The smart battery system needs the correct type/ size battery to work correctly and will need registering or coding if you change the battery type/Ah . If you have done something wrong you'll need a tow truck
-
1 pointSorted for another time.
-
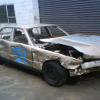
1 pointTsk tsk Olaf, some people actually prefer the 4 cylinder model. I'd say not even that Mothers can fix that paint tho...
-
1 pointI love how he has 6 Photos of the car, and 8 Photos of the polishing machine and accessories.
-
1 pointAwesome build. Have you checked with BMW if your car had the bearing recall done? It would be interesting to know I contacted them and was given the below detail which was really helpful... Below I have enclosed your vehicles recall status. Defect Code Defect Description Done 0011760100 E46 S54 Big-end bearing Yes 0011950100 E46 S54 Replacing big-end bearing shells (2. KDB) Yes 0032480200 E39 E46 E53 Fahrerairbag prüfen ggf. ersetzen (Ersatzteile) No 0072410100 E46 replace front passenger airbag No
.thumb.jpg.04807d42ad69838062fa7df5f4a7a884.jpg)