Leaderboard


Popular Content
Showing content with the highest reputation on 06/04/19 in all areas
-
6 pointsSo I've recently acquired an F10 550i ex Jap with CIC. Now as most of us know, them dealers don't like selling these with NZ Radio converted, its an extra option you need to pay for. So after a week of listening to 88.6 Mai FM, i had about enough and decided to contact 2 or 3 places to help with the some issues I had, Radio and Bluetooth. While making contact, i gave up my rego so they could grab the VIN and provide me with a quote. Quotes came in between $900 and $1200. Feeling the pressure of having to listen to Mai FM for any longer, i decided to pull the trigger and contact one of the places to book the car in, but before doing that, i decided to see how involved it was to re-code the car to fix the Radio and Bluetooth myself. Google helped along with YouTube and i set out to DIY-it. I pulled out my old laptop, install some software and built my own comms cable. The only thing i paid for was the resistor i needed for the OBD-II connector, it was 70cents. After everything was installed and built, i plugged the make-shift setup into the car and tested. Everything worked like a charm. I was able to read all the available modules and also code. Changing the radio to NZ and activating the Bluetooth for audio streaming, along with allowing multiple devices so the wife's phone could also connect, took about 60 to 90 minutes (most of which was spent reading the instructions from The Google and getting familiar with the structure of the software) I now have all available NZ frequencies and full Bluetooth streaming. I've also enabled the Bluetooth streaming on my mates F11, who was also quoted $800 to have this done. Im not sure how the heavy prices are calculated, but if anyone needs the above done on their F-series that cant quite afford the $1k mark, feel free to drop me a PM and ill see if i can help ?
-
3 points
-
2 pointshttps://www.trademe.co.nz/motors/used-cars/bmw/auction-2174665878.htm?rsqid=492ad823916a4185a864ce15b2520352-003
-
2 pointsIf the guy got it certed it would be so much easier to sell, or get a higher price.
-
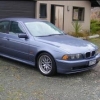
1 pointHey Guys, It's time to let my pride and joy go to another home. Me and the wife are cutting back on costs and are dropping down to one car, I now e-bike into work and this just sits in the garage and only gets used occasionally on the weekends. I've loved every minute of ownership, and I hope to find another home on here for it rather than have to put it up on Trademe. I have full service history for it in my ownership, prior to me there was one other NZ owner, and originally from Japan. Recently done the brakes/rotors (all around) 60,000km's left in them Near new front tyres Rear tyres have plenty of life left in them No modifications apart from blacking out the kindey grille, and white angel eyes Recently serviced 102,000km Always garaged and washed meticulously every fortnight! There are no issues that i know of with the car except that it could do with a transmission fluid change as it very occasionally hesitates in 6th gear at around 2k RPM. I had it checked at Auckland City BMW who had it on their computers, checked all the gear ratios, torque converter etc etc and said it was perfect, just needs a fluid change, this would be at a cost to the new owner of around $1000 Due to the above, i will let it go for $14000 If you would like to discuss further please get me on mobile (Zero 2 1 Two three Zero 3 0 7 7 ) Or, email me - adam @ mada . co . nz
-
1 pointDon't see many of these for sale. Nice looking roadster in Black/Red. Similar performance/$ compared to a convertible M3 @ $25k https://www.trademe.co.nz/Browse/Listing.aspx?id=2159720007
-
1 pointThat’s what she said ?
-
1 pointI went back to the workshop last night, used a sharp blade to trim the runs, and gave it a gentle rub with a scotch-brite. I gave them another coat; one of my earlier mistakes had been not pulling the tops up to full extension, and painting the tops (up, down), then the bottoms. This laid too much paint in the middle, as too many overlaps. Second coat was continuous, up, down top to bottom. It wasn’t pretty... but then these aren’t concourse! It’s the cheap metal enamel (Galmet metal protector) that they sell at NZ Safety Blackwoods, about $10+GST per can when it’s on sale, from memory. It doesn’t flow like Rustoleum, but it’s way cheaper and I don’t have much call for yellow. This morning it had settled in and flowed out pretty well. I’ll give it a quick rub with 600 wet and dry tonight, hit it with 2 thin coats 10 mins apart. Job done! In other news, I picked up more etch primer from Bunnings on the way to work this morning. Hooray for 0700 opening, eh? I’ll be needing that for the strut housings. I’ve also dreamt up a booth solution for painting the brake parts. Watch this space.
-
1 pointsame exact wheels on my old E46. (the car suspension was unsettled when photo was taken so looks a little high) so it does fit, not perfect but it does and can work depending on your tyre size and camber setup.
-
1 pointNot my thing but its the E12 suspension design so maybe not to worse thing you could do to it. Yeah looks tidy on the outside but no mention of any other work done and too many wanky exterior photos with little else.
-
1 pointDepends how it's been done but easier to track down some replacement struts, same sort of set up as e30 so likely to be welded in the front, and then remove the compressor, tank and lines.
-
1 pointmaybe it cant be certed or needs more work so its being sold as is & "DYOR"
-
1 pointe46 antenna is in the rear glass., believe the antenna amp is in the C pilar as well. The grom works, it's cheap and cheerful but has limitaitons. For example mine never seemed to turn off when the car turned off and the phone would stay connected to it. There may be clones on aliexpress (haven't looked) for cheaper still.
-
1 pointwould look good on the e91 coupe also
-
1 pointFinished stripping the brake parts. No time to degrease and set them up for painting (or the bars), so I prepped the rear Konis with the flap disc and applied Rust Converter, instead. ... and because you mentioned it Colin @Young Thrash Driver, yep it’s a No. 2. ? better get my arse to work. PS: “uh huh huhhhh huh... he said it, he said ‘number two’”. I had to get that Beavis and Butthead moment out of my system.
-
1 pointWonder what these would look like on the e92 ?
-
1 pointRight, well a few evenings spent on the car, and then today being Saturday just a wee bit more. Front jacked up in the air, to remove the lower steering linkage. Didnt take any pics of this sorry. Has a lot of play in one of the two universals so it is out so i can rebuild it. got it half out and realised it is a wierd universal i havent seen before, and i havent had expereince rebuilding one before. When you do an M52 swap, or indeed any motorswap, its necessary part of the conversion on a Right hand drive car. typically you would also convert to an E36 or E46 steering rack too. What i usually do is remove and drop it all off an Howatt Engineering in Naenae to do, so i havent had experience doing it. still deciding if i tackle it or find a shop to do it. Remove the right front wheel as it has a puncture in it. Jack up the rear, move the left rear wheel to the right front. Temp bolt on right front to the left rear. Lower Jack. Get front off Jack stands and onto the two good tyres, jack up the back, and remove both rear wheels. the right rear, and the left rear (which was the right front) both have punctures / slow leaks, so those into the 500 to get sorted out. Start on removing the Subframe. Right off the bat, i knew this was going to offer up some surprises. subframe removal on an E30 is usually a piece of piss. 1,5 hour job max. I was advised by a local "buddy" (canadian for m9) to start on the rustiest stuff first so you know how your day is going to go, and also buy a flame torch, it will be your new best friend, so i brought a propane torch, (quite right in hind sight, awesome tool. no pics of it but you will probably see it in the back ground of the below picks) right then, crack off the subframe main bolts then. the 22s came off easy, to get to the 8mm allan bolts for the support i needed to half remove the side skirt. and bam, just like that, 5 minutes in, first problem. on the left hand side, one bolt completely snapped off (prior), on the right hand side, both had gone, so bracket offering no support at all. Okay, no problem, i can order that. removed the brackets so i had them on hand for ordering (there are two types so good to make sure you get the right ones, and then just put a few threads onto the 22 and gently loosened the subframe so i knew it would come away. cool. Move on to the exhaust which comes off easily, then remove heat shielding and then the drive shaft bolts. i wasnt really thinking, this stuff should be easy since the car has had an engine conversion, so not 30 years old, none the less, needed to be done. next step, remove the lower shock bolts. easy enough, but found the right rear shock is totally blown. i have never seen a shock with zero resistance before until now so thats up for replacement. and then disconnect sway bar, and then remove the spring. Here is the the bad news... spring on the left comes out just like normal. one on the right falls out, with the upper locating pin still in the spring. wtf. look a bit more carefully and what do we have here. picks taking after probing about with a screw driver. whats worse is there is f**king gorilla foam in there so someone knew it was there and did a bodgy... not happy, but such is life. fortunately the body seems to be alright, but the lower piece is no longer avalable from BMW. i did actually think about using the head from a jack as a replacement, as it would be a perfect shape..... Move on to loosening the diff mount. at first i was like wtf somone has put an imperial bolt in... never mind, some of the bolt head crumbled away, turns out it was a 19 all along... also loosened the brake lines and ABS sensors (yes it has ABS, the E30 was the second BMW to have ABS after the E28 5 series), and was happy the assembly was ready to come out. In the shower cleaning up i realised i forgot the hand brake cable so will do that when i get back to it. Right off topic for a bit, but what i been up to none the less. (goes back to E30 soon!!) next day, decided i better work on the Cinquecento since i did say i would do it while missus is away. It hasnt locked since she got it , that was a door card off and a tiny black clip that wasnt seated right, and back on and good to go. and onto replacing the rear brake pads. "babe my car is making a bit of a grinding noise in the back recently" take it to work and barely got out of the street before i knew the brake pads had all they had to give taken and then some..... have you ever seen brakes so smol?? realised the 500 was the same bolt pattern and center bore very close as the E30 so why not chuck them on for a nosey...... Local constabulary dropped by for a yarn. they either drive Ford Expeditions (think Escalade or Suburban size), or they ride Harleys. and they are called the OPP here. every time i hear that i cant help but think of the irony since OPP also means Other peoples property in the rap song from like the 90s, which of course gets in my head every time. Strawberry then got a detail down at work. in the back ground is the CN tower, and the yellow building is the pub i sometimes go to after work. and yes going off topic so will come back to what you came here for lol. We are up to today now. Subframe removed. Crusty old bushings. nasty, Now normally you would press these out properly. I do have the proper BMW in my garage, but thats 14,000km away and cost about $450 or so to buy. since i expect this to be the only time i do this job, i decided to do it the Hori way. its pretty well documented that this way works, and i had everything i needed already to try it so thought why not. FIRE I would imagine this would work for many of you guys so i will detail the process. 1/ Turn on Rock Music 2/ Grab a can of low rent beer, or something someone else has left in your fridge. 3/ Soak bushes in WD40. 4/ Make sure your partner is not home, and if pre planned, buy her some new oven trays because you will be using two of hers. 5/ aim gas torch at bushes. how long it takes them to start going depends on your flame. mine took a good 2 or 3 minutes of heat before they would stay alight on thier own. keep the loose stuff clear by flicking it out onto the tray. remember, the objective isnt to burn every last bit of rubber, just to remove the bush. When they start popping and crackling, they are hot enough to keep going on thier own. Once they are lit, have some of the beer. Man has created Fire. after your second one is lit, go back to the first, you will find the center part has melted enough you can clear out and knock out the center with a screw driver or some such. bear in mind that the flame will increase at this point as a lot more rubber is exposed to oxygen. the center piece that falls out onto your tray you can put out using some of your rubbish beer. Eventually the outer race or whatever its called for a bushing cannot withhold gravity and will fall out by itself, giving you a nice empty housing (well after you clean up the last little bits) On to the control arm bushings. basically the same process although they are only an inner and rubber with no outer on an E30. they will start spewing themselves out, three of mine spat the center out by themselves, one needed a bit of persuasion. next step is let them cool. its probably lunch time by now anyway. then press in your new bushings. on an E30, the subframe bushings do not go in all the way to the collar. they are only supposed to go as far as the top of the housing is level with the top of the rubber part of the bush. in hind sight the photo i took isnt the best, but if you look at 4 o clock in the photo you will see its level. 2 oclock is still down as its got an indicator on it. this means there will be a 10 mm or so gap at the bottom. you will find that they wont want to go any further as they flare. Originally, this was designed so it could be leveled in situ, but even BMW removed that from the service advisory, the part was never updated. as a side note, if you were to do poly bushings, they do not have this gap, so you MUST fit E36 compact lower braces (the rusty brackets i mentioned above) which are stepped rather than flat. trailing arms arent complicated at all, if you have a brain. One of the great things about Canada is that the weather and the seasons are very decisive. if it snows, it snows. if its sunny, its 30 degrees (as it was this morning). and if it suddenly gets cold and there is a clap of thunder, you have about 20 minutes to pack your sh*t up and get inside before god turns on the hose. so quickly threw the subframe back together with the new bushes, packed up and got my ass inside. I was intending to take photos of the assembly together, and also one showing the trailing arm bushes . VERY IMPORTANT to just do one or two threads on the trailing arms to the subframe so they are very obviously loose. this is because they must only be tightened when the suspension is loaded. This applys to all BMWs, and most probably all cars in general. this also applys to contral arm bushings in many models. I will try to remember to take pictures tomorrow. and then a pic of me when i saw myself in the mirror. LOL i guess it was all that black smoke!!!! 'til next time
-
1 pointNice E39 540i Touring in silver going like the clappers on the Taupo-Napier Road tonight in the rain. I was hard pushed to keep up, and then the passenger seat handbrake got pulled on.
-
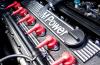
1 pointHey Team another small update. Throttle bodies machined.