Leaderboard


Popular Content
Showing content with the highest reputation on 07/27/20 in all areas
-
5 points2001 BMW 530i touring in Titan Silver Metallic. 292,xxx kms. 1 year wof done in May. Rego expires October. This has been a restoration project for me and the time has come to let a new owner enjoy this modern classic. A pretty extensive maintenance regime has been undertaken... Suspension wise I have fitted new shocks, Front springs, ball joints and control arms. The rear subframe bushes (common issue on e39 touring) have also recently been replaced with more durable solid rubber. She now handles and rides superbly. New rear discs and pads along with hoses and fresh brake fluid. M54 Engine maintenance is all up to date. Vanos overhauled, complete cooling system overhaul including the 2 plastic pipes under the intake manifold. Valve cover gasket replaced and new plugs. Lots of time and money invested. Not your average e39 that’s well overdue for maintenance. I’m asking $7500. See my project thread for details.
-
5 pointsDamn... I didn't think I'd win this... anyone need a 130i? @Cammsport ??? ? Edit: now I'm bummed I sold those 17's... ?
-
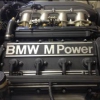
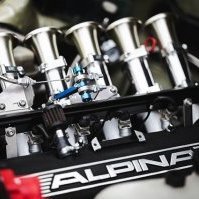
4 pointsJust bought myself a e28 m20b27. Planning to change to 885 head, manual swap, change to b25 ecu and put xyz adjustables on it. Bit of a noob with mechanical side but am learning.
-
4 pointsPut some Euro Plates on today - a nice finishing touch IMO, although did have to drill and screw due to the raised mounting points on the rear. Some white head screws will look better. All going to plan will be installing new shocks springs this weekend with fresh mounts / reinforcement plates / bumpstops and CABs.
-
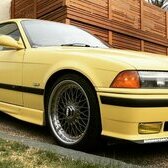
3 pointsI've been meaning to post here for ages, but finally getting around to it now! After owning a few Audis and VWs I was itching to get back into a BMW, and really wanted to be driving a manual again. I had several E30s when I was younger and wanted something with that kind of small car feel, but more modern, safer, and with 4 doors for getting the kids in and out of their car seats. Pretty quickly I realised the 130i fitted the bill perfectly. Great daily driver on the commute, even better for a weekend back road blast, and with enough room to fit the kids in too (just). After looking for a short while, I managed to pickup this 2007 LCI, with the all important hydraulic power steering, with 125000km on the clock for $8500. Bargain!! That was back in April 2019, and I pretty much immediately set about with the "improvements." To be honest, I've gone a bit overboard and spent significantly more than the purchase price again, but man what a fun car! Puts a smile on my face every day in a way my old Golf R never really could. The mods done are as follows: Engine: Simota intake Supersprint backbox with resonator delete MILVs purchased but not yet fitted. To be done soon when I do valve cover gasket, then a tune to follow... Drivetrain: BMW performance short shifter CDV delete plus braided clutch hose Quaife LSD Redline gearbox and diff fluid Suspension/Chassis Birds B1 dynamic kit - Biltstein dampers, Eibach springs and H&R sway bars E9X M3 front control arms and radius arms Camber pin mod, and max front camber Whiteline rear subframe inserts E81 rear chassis brace Brakes 135i brake upgrade - 6 piston front and 2 piston rear calipers with dimpled/slotted discs and EBC redstuff pads. Calipers painted brembo red with brembo decals (just 'cause :-p) Braided hoses all round Wheels and Tyres BBS RE 847 18 x 8 ET35 Front, and RE 848 18 x 9 ET45 Rear. Lightweight forged BBS Japan goodness! Goodyear Eagle F1 Supersport tyres - 225/40/18 Front, 245/35/18 Rear. These tyres are AWESOME, can't recommend highly enough! Styling Carbon front splitters and carbon mirror caps outside BMW Performance shift knob and alcantara shift boot, plus BMW performance alcantara handbrake Other than that there have been a few maintenance items to do but nothing interesting. It's pretty much perfect now, from my perspective. Just got to get those MILVs fitted plus the tune! Maybe down the track I'll think about headers too, but that's well into the too hard/expensive basket for now. Here's a couple of pics I took post-wash last weekend. Let me know what you think ? Only letting me upload 3 pics for now, so more soon...
-
3 pointsA few more pics...
-
3 pointsNot really as usual it just doesn't agree with your narrative so therefore you dismiss it. Same old Ron.
-
3 pointsTried again to get the fan off the 330d wagon so I can replace the serpentine belt, thing is tighter than a tight thing, can't really get at it from above so tried underneath - and managed to drop a spanner onto my face. Luckily it was only a small spanner - not, 32mm bugger. Still no joy getting it shifted so had to purchase a second 32mm spanner to hold the water pump pulley whilst trying to coerce the fan nut off (in the opposite direction as it's LH thread...). So gave up and went to get a beer instead. Whilst in the process of buying said new spanner, also bought a sheet of hardi-board for the fence panel that's buggered. Found out the rear hatch of a G21 Touring doesn't take a board 1200mm wide. More cursing and swearing. Then towed a trailer for the first time with the 116d - with the board in it. Was a very light load, so apart from the noise of the trailer and the rear PDC beeping a lot I didn't really notice the trailer. Need to try something a bit heavier in the trailer next time to see how grunty the 1er is when towing.. Got there in the end, but a lot of buggering about in the process. Hopefully something "task" related will go to plan in the near future to give me a little bit of encouragement. On a happier note - bought an E30 M3 Sport Evolution - unfortunately it was only on Gran Tourismo and not in real life but you can always dream.
-
3 pointsPut some Euro plates on the 330ci, nice little finishing touch.
-
2 pointsNup, didn't expect to win if for that. I have no idea what I'm going to do with it but it's for sale.
-
2 pointsWhy not get europlate holders? No drilling required
-
2 pointsWashed the car for first time in several months! (Was relying on Winger doing it when it went in for EGR cooler recall but wrong part ordered -> no clean car)
-
1 pointPicked this beauty up in Rotorua from a forum member on here. What a rare colour being Malachite Green Metallic. Nz new. I plan to do a manual conversion and mtech kit on it and some nice wheels although the basket weaves look amazing. It will eventually get a full repaint. Too. Who else has an e28 or a lead on a manual conversion. The 535i has nice power I must admit.
-
1 pointI'd prefer a blue one Kyu but I'd have to swap all the bits over! At least I can compare mine to stock at my leisure. A Bimmersporter was bidding and had I known that I probably wouldn't have played. He can have first option. I'll get it home, give it a good looking over, plug it in to the computer and probably do an oil and filter change and go from there.
-
1 pointJust finished installing an MHD stage 1 tune on Boyties M135i. MHD tunes never cease to impress me with the performance improvement. First efforts resulted in a blown charge pipe but we fitted a CTS pipe which looked quite well made and we were rewarded with a very noticeable increase in power. For those that have done this (including myself) the torque increase is really noticeable but on Boyties car the hing that got me was how good that ZF8 speed box is. The close ratios keep it at near max power for each change and the little blue hatch just keeps accelerating. Very impressed by that gearbox.
-
1 point12k ono? ?
-
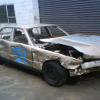
1 pointFinally assembled the engine crane I’ve had for almost two years and took the motor out the back of the van destined for the compact. (Watch this space) Started the e30 for the first time in 18 odd months. Fired up first pop being jump started off a Milwaukee drill battery and moved it 1m to place said motor out the way. Got a replacement hatch for the compact and swapped it over so doesnt have a big primer spot over a rusty hole. Then smashed the old one and cut it up so would fit in the wheelie bin ? And Drove the M3
-
1 pointRed E30 318iS and an E24 on Alpinas at the wof station.
-
1 pointRiding my BMW GS through the Valley on Sunday and I see an Audi R8 come round the corner, then another and another. 5 in total. Not something you see every day.
-
1 pointDoes the spare have to be a remote key? Can get a non remote or a plastic valet key from BMW for cheap enough
-
1 pointyou missed the obligatory blurb: "dont let the kms fool you, drives like its on rails"
-
1 pointIR is garbage and belongs in the bin with all the other jap import 'features'. Converting to RF shouldn't cost more than $200. RF Antenna, run a few wires, key cut then swap transponders or cut and reprogram new ones with AK90.
-
1 pointOr even better, use 3m tape.
-
1 pointAll been there! Just rock up to your local dealer, they give them away if you don't mind their name on them
-
1 pointDidn't realise there was such a thing - only the surrounds? may have got a little excited when they arrived earlier than expected this morning...
-
1 pointFinally got round to doing the exhaust swap on the car, its been on the cards since I purchased it in December last year. Did the brake fluid at the same time. This was a both cars on the lift job, exhaust removed on my black one and stock exhaust waiting to moved over on the white 130i. Pricey SuperSprint backbox was removed, was absolutely filthy so gave it a quick general clean and then polished the tips! Came up nice and shiny. Final tightening on fitment, went and redid the tips so its got a bit of residue from the polish in this shot. Wasn't able to get a shifter bushing fitted, as the top one, which I had a new replacement for, looked alright and wasn't causing any play. There's a bit of side-to-side movement in the gearshift that I'd like to remove So will be on the lookout for a full shifter bushing kit to be fitted up. Have now done all the things that were pressing on the car so will enjoy it for a while, hopefully move on my other two then start looking into shifter bushings and tidying the outside of car with some dent removal and cut and polish.
-
1 pointIt moved under it's own power for the first time in a year! Hopefully warranted by the end of the week if I have time before I start my new job next week
-
1 pointTalk to Express Keys in Penrose. The blade keys should only be used as a back up. The remote key should be used all the time .
-
1 pointYep, been there done that. Daughters E46 is a Jap import with IR remote locking. We ended up buying a second key from BMW. The one without the IR remote locking, lots cheaper. A very good second key to get you out of the crap when you loose the main key. The only way to get a fully functional IR master key is to go to BMW and bend over for the $. Should you need it, attached is the pairing procedure for the IR keys. Its got one extra step that the normal pairing instructions for the RF keys don't have. Infra-red key reprogamming instructions.pdf
-
1 pointSounds like you need the right 32mm spanner, the one i use is 420mm long, and near 10mm thick at the jaw. Combined with a whack from a mallet or sledgehammer they are always defeated.
-
1 pointhttps://www.fcpeuro.com/BMW-parts/325i/Brake/?year=2006&m=20&e=2053&t=5&b=5&d=700&v= We will all agree with Jacko. Shipping from the US from FCP is not that bad. I made an order from them on Saturday. Estimated to arrive on Thursday. Also Life time Warranty. Nobody offers that here in NZ.
-
1 pointIn an effort to stamp out the issues this car has, it was time to tackle the most serious issue; The front control arm bushes. It was noted in the PPI from the seller that the front control arm bushes were "split". What it didn't mention was that they are completely buggered. This would become a WOF issue in the near future, and wouldn't be helping the handing, so I had to fix it. Its a well known issue with the R5x Mini, and fairly easy to test by kicking the front of the front wheel and seeing how far back it bounces. Kicking my wheel revealed a ton of play. The internet widely regards the Powerflex PFF5-101 as the solution to all issues with the control arm bushes. Not only is it an upgraded poly bush, but it'll last for ages and is much easier to press into the housing than the OEM metal sleeve bush. The Powerflex bush is a three-piece design and doesn't need to be located in a certain location like the OEM ones. The original plan was to replace the bushes without removing the front subframe. This turned out to be the wrong idea as I just couldn't get the control arm to break off the taper of the inner ball joint, and as it turns out, all the ball joints were all stuffed and needed replacing too. You cannot remove the inner balljoint without lowering the subframe to some degree (and even if you could break the 100NM bolts free with limited space, you would have issues torquing them up again), so it's easier just to drop the subframe completely. It's not much more work to drop the whole subframe. My Quickjacks were perfect for this job, fitting the Mini jacking points and giving me a decent working height. You wouldn't want it any lower than this, or there may be clearance issues when pulling the subframe out from under the car. Obviously the first step once in the air is to get rid of the front wheels. It's amazing what these little 15" wheels and runflats weigh, they're probably the heaviest wheels I've had, and I've had those horrible things on the M328i and MX5. With the front wheels off it's time to start popping the ball joints. The tie rod end, swaybar link, and outer ball joints all need to be disconnected. I used the old loosen the nut and hit with a hammer method to remove these, but since I now have a splitter kit I will be using that from now on The inner joint I just could not pop. No amount of hammering would split the taper This is the point I just decided to drop the whole subframe. Thankfully the engine isn't mounted on the subframe, so its a matter of dropping the subframe with the steering rack attached and that's really it. There is a bunch of stuff that needs to be disconnected but otherwise it's all straight forward. One very helpful resource for this job is the Mod MINI Youtube channel. There is a specific video for doing this job, which I followed along as I went. To remove the subframe you need to remove the front bumper. Sounds weird, but the front crash tubes are attached to the subframe. And the crash beam needs to be removed next This is more or less the Service Mode for the front end. If you needed to do the radiator or supercharger, this is the minimum work you would need to do. With the beam off, unbolt the crash tubes, remove them, and start to unbolt the subframe. Don't forget to disconnect the ABS sensors from the subframe uprights, and the power steering pump. Check your O2 sensor wiring isn't clipped the to the PS hoses under the reservoir. Support the subframe on a jack with some wood to spread the load, and lower it down. That's it out. Now there is ample access to the arms, bushes and joints. This is the bastard. Unbolting these two bolts, and the two on the swaybar mount will allow you to remove the arm complete with bush and ball joint. Do note that if you have Xenon lights as I do, the sensor attached to the ball joint in the photos below is the auto levelling sensor. You MUST fit the correct sided ball joint to the arm (it has a locating hole drilled in it), and remember to fit this sensor during reassembly, as you'll be dropping the subframe again if you don't. There is also a small 10mm holding the sensor arm to the control arm, which will need to be removed. The bushes are well buggered. Both have little to no resistance to the arm being moved around, and you can see through the rubber in one. I'm not sure "split" is the word I would use if I were doing the PPI. With the arms removed and on the bench I could try popping the taper of the inner ball joint. First I tried a normal splitter. It just wasn't big enough, even with some modification with a grinder. The inner joint is quite limited in its access, and needs both a long reach splitter and one that opens wide. This resulted in me spending some more money and buying a kit of splitters, which had slightly larger splitter like the above, but that just kept popping off. The real deal was this big boy press with adjustable arms. It clamped perfectly onto the arm and with some rattle gun hammering, the splitter fell off. I thought it had slipped off, but it actually fell off when the taper popped on the joint. Finally! Removing them confirmed to me that I made the right decision; The inner joints were stuffed. Very floppy with almost no resistance. In contrast, the new ones are very stiff. In went the new ball joints torqued to 80NM. Next was to tackle the bushes. The obvious thing here is that you need to press the bushes off the arms first. If they were bad enough you might be able to just pull the outer part of the bush off leaving the inner on the arm, but mine needed to be levered off in one piece. This was done with my biggest prybar, levering between the bush and the flat on the arm. These are a metal sleeve bush pressed into a housing. This is what I was dealing with, big splits in the rubber all around and very little resistance to movement. Apparently these are fluid filled originally, but I couldn't see any fluid left in them. They were the original bushes To remove them, either use a big workshop press, or a reciprocating saw and metal blade. I chose the latter. There are two layers. The first is the inner rubber section, which also has its own metal sleeve in it. Using your saw, cut through this until you can use a chisel to force it out of the outer metal sleeve. Once that's out, carefully cut a slot into the outer metal sleeve. You don't want to cut into the housing. With the slot cut into the sleeve, it was easy to use a chisel to push the sleeve out Now it was time to press in the new bushes. I used a length of m12 rod, some washers and a pair of 15mm galv flanges as a makeshift press. This worked perfectly. A deadblow hammer was employed to push the bush in just that little bit more to make the lip pop out the other side Using lot of the supplied grease, grease the bush and fit the purple insert. Fit the washer to the arm, and then slip the arm into the bush. Done. A pair of reconditioned arms. Before I could reassemble I decided to replace the outer ball joints, and swaybar bushes. The swaybar bushes weren't too bad, a little smooth but minimal play and no cracking. They were the original bushes. I tried to get some poly bushes for this, but couldn't get any locally, and didn't have the time to order from overseas. The 24mm MCS standard bar seems to be odd, as few places listed that size, instead only having the smaller Non-S bushes listed. Torquing up the inner ball joint and swaybar bolts was a battle. The ball joint bolts were 100NM, which is quite a bit, but the swaybar/control arm bush mount bolts need 165NM. I had to get the help of my lovely Wife to stabilise the subframe whilst I swung off the torque wrench. I think that is the highest my torque wrench has been. The last thing to do was the outer ball joints. These are a pain because they press into the bottom of the knuckle, and are exposed at the top, allowing them to rust into the housing. There is also limited access. I managed to get the old ones out by using a punch and hitting the exposed parts of the flange. You can see the two shiny areas where I was hitting. You can see the rust that was binding it in place. I have heard of people replacing knuckles because their joints just would not come out One of the old joints was very loose and the other was actually OK. Best to replace in pairs though. I greased the surfaces of the new joints thoroughly and used the bolts to slowly draw it into the knuckle. Hopefully this one won't seize in there. Now that the subframe was complete, it was time to refit Remember to reconnect the power steering wiring and feed the PS res back up through the gap. Don't forget to torque everything up. Refer to your workshop manual for torque settings as there are a few. The gist is that the big bolts are 100NM, the small bolts/joints are 56NM. The previous owner identified that the power steering fan wasn't working, so included a replacement with the car. Since you have to remove this to remove the subframe, it was a good time to replace it. Four screws hold the fan in place. The old one was very gritty to spin. A quick dip through the parts washer to get all the old dirt and grease/oil off the bracket, and on went the replacement fan. Another reason the fan wasn't working was the low speed on the radiator fan also wasn't working, and the two are linked. A quick check at the radiator fan plug showed an open circuit on the radiator fan resistor, indicating the resistor had failed. Another common issue, and something the previous owner was preparing for as the car also came with an external replacement resistor. This external resistor mod is a common way to fix this issue without having to remove the radiator fan shroud, which requires a lot more work. It also allows the resistor to use the car body as a heatsink, and keeps it out of the path of weather, which is generally what kills the old resistors. A quick snip of the wire, some soldering, and the resistor was wired and mounted to an existing unused threaded hole. There is plenty more information out there on this mod, but a good thread is this one. The low speed fan now operates correctly when the AC is running, but I still haven't seen the PS fan operating. I'll need to keep an eye on that. I did replace a blown 5A fuse for the fan, so need to check if that blew again. A couple of other small things I did before taking the car for a test run, was the replace the cabin filter. The old one was manky as hell. Packed with dirt and leaves. I also fit the replacement vinyl red S logos that were missing from the car. Just looked weird with no colour on the rear and sides. I purchased them from this Etsy store. They have a whole range of different colours available. And finally, I replaced the park light bulbs with LED. I noticed when I had the front off the car that there are resistors tied into the park light wiring. I guess this is why the park lights were always super dim with the bulbs. I can only presume this was done in Japan and the LEDs were removed for compliance during import. The resistors will be there to trick the car into thinking the bulb is OK, otherwise it will usually trip a blown bulb warning with LEDs. After all that, the results were almost immediate. There is far less play in the steering, its nice and tight now and the car kinda rotates on its own axis when turning. This is a feature I remember from my old R50, but this car hasn't felt like that until now, it always felt unsure and vague. The thumping coming on and off accelerating is greatly lessened, and changing gears feels more direct. There must've been some sort of clunking or noise previously as there is that feeling of "huh, suddenly the car is quieter" even though I don't recall any noise when driving; much like when I did the rear arms in the Saab. It's a lot more fun to drive. Much more surefooted and confident. It's what a Mini should drive like. I can highly recommend refreshing the front end if it hasn't been done before. Even with only 127,000km on this car, it was all very worn out. I'm starting to feel less disappointment and regret with this car. It's just a shame its costing time and money to put it right just so I can enjoy it.
-
1 pointSaw one of these on the motorway yesterday - https://www.bmw.co.nz/en/all-models/x-series/x7/2018/bmw-x7-inspire.html I had to take a second look, thought it was one of those offbrand chinese copy things of other prestige cars.. but it was a real BMW... BMW have seriously lost their way, what a monstrosity.
-
1 pointQuick update on the M5... All put back together Has been on a ~100KM run - all good The tints have been removed and *thankfully* the rear demister is still working - always a risk when tints are removed. I had a look at the standard glass on another E60 M5 and thought 'that will do' - so I haven't bothered getting new tints added back on. new LH wing mirror glass is in - much better it has a shiny new bonnet badge - the old one was, well a bit old and sad looking I asked Jon to replace the LHS fuel sender to try and deal to the occasional stalls I had - so that's going in next, along with... a replacement fuel tank! Jon noted the significant suction when taking the gas cap off to refuel - and knew straight away that there's a problem with the tank. He found a crack and it is deformed around the LHS sender. Fortunately, he was able to source a 2nd hand tank. So had hoped to get it back this week but looks to be early next week instead. Oh well
-
1 pointDepending on what year is the vehicle. Personally, if it got a factory immobiliser, that's good enough for insurance purpose. Good installer/workmanship is more important than fancy features on the hardware. GPS trackers, you can have managed ones that you subscribe on a monthly fee and some self-managed ones basically put a SIM card and GPS receiver in your car. Latter ones are cheaper to run but you need to remember to top-up the SIM card for it to work properly.
-
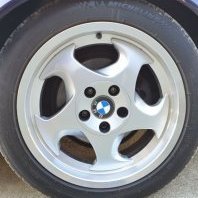
1 pointAll those out there running BBS RS reps on their E30s take a long hard look at yourselves. See what you have done!! But seriously, I would suggest trying to compete against the reps / fakes / copies is proving harder and harder for them. Not sure which (if any) of the current BMW wheels are BBS as OE, will have to try to find time to have a look see.
-
1 pointSo... today the 330ci got some overdue love and attention. I've been getting gloss withdrawals due to the Auckland water shortage but decided to buy some rinse-less wash and give it all ago. So gave the car a wash, dry, light hand polish, IPA wipe down, trim restorer then a fresh coat of sealant. Went to town on the interior glass too and got rid of the last hardest to reach glue remains from tint I removed as well. Had to take a few snaps of course to justify the effort
-
1 pointcouple of real tidy E36’s in Dunedin. Anyone on here?
-
1 pointGave back some respect to the M3 by replacing the 1er style 207's with a spare set of style 24's and semi slicks I had lying around. Much better.
-
1 pointahhh I recognise that spot. Seen a bit of that car lately, good to see. Is it an iS?
-
1 pointIt's still a good one. And could be a primo example with minimal work. Well looked after E30's have still had the sh*t thrashed out of them. Anyone who tells you otherwise is lying. They were designed to be thrashed. That is also why we love them.
-
1 pointI've been running gull 98 in all my beemers for years with no issues. I did a test and used BP 98 for several tanks in a row but noticed no difference except to my wallet so switched back to gull.
-
1 pointrd_key, 1. the antenna amp you got (6906074) WILL work with a 433mhz key. But to change to this amp, it requires a power wire, a ground, and a signal wire to be added as your car with IR does not have the wiring for it. It means running additional wires from the C pillar to the fuse box and body (GM) module. 2. Your car has already has the ring antenna at the key barrel to charge the a diamond key. But you require a key that is rechargeable. Not all copies are rechargeable, but some are - you must search carefully for the correct one. You then need to either pair the new transponder keys to the car OR you can remove the chips from your IR keys and put them in the new RF keys, that way you won’t need to reprogram the EWS (security) module. The RF learn procedure requires no special equipment etc, it’s just a sequence procedure.. I have done this mod myself and got 2 new recharable keys, a new antenna amp, and keys cut for less than $200. - I did the wiring etc myself and I have a ak90 key programmer. You can have both IR and RF systems working together. Ie 1x IR key as a spare and a RF key as your main key. Any questions please ask.