yng_750 247 Report post Posted August 19, 2014 Penetrating oil on all the exhaust bolt for a day before couple of resprays if possible. One exhaust bolt took as much time as the whole rest of the dissassembly Quote Share this post Link to post Share on other sites
yng_750 247 Report post Posted August 19, 2014 You could do valve stem seals but its a big job. Only reccomend if its been smoky already. Personally i would do the valve adjustment while its out. Heaps easier out of car and stops the rattle m20 are known.for Do oil change at same time as crap will get in it. Dont.forget its a torx head socket to do up the head bolts. Quote Share this post Link to post Share on other sites
Kepes 231 Report post Posted August 20, 2014 Will buy a torx socket set. I'll also need a torque wrench so I'll get ome of those. Haven't had luck with valve adjustments on the e30 thus far. Have done it twice and still taps. I'll try with the head off. Quote Share this post Link to post Share on other sites
yng_750 247 Report post Posted August 20, 2014 Try to get a half inch drive torx socket. I did mine with a 3/8 but it felt a little sketchy. Quote Share this post Link to post Share on other sites
Kepes 231 Report post Posted August 25, 2014 Thought it would be a good time for an update Good news, I think.I've been driving her a bit. All the symptoms I previously had are now all but gone. There is still some white steamy smoke out the exhaust, but that's how it was before this happened.... No more loss of power. Not loosing anywhere near as much coolant as I was. About the width of 2 fingers worth of coolant a week. So it's not great, but it's better.Then there's the idle. Before all of this happened I would idle at around 500rpm when warm. Now it sits perfectly at 750. I have done nothing with the engine. Not sure what happened ???Anyway, I've ordered all the bits - including a torque wrench and some torx sockets. The total for everything (and some new BMW badges) was a bit under $500 NZD landed.I look forward to working on it. Never have I done any 'major' engine work like this. This is my first car after all. I've got a bentley manual and such so should be not too bad. My uncle might help me too. He's never pulled the head off a car - but he's 56. I figure all those extra years must help for something Wish me luck! Quote Share this post Link to post Share on other sites
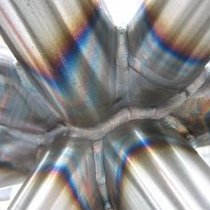
Kepes 231 Report post Posted December 11, 2014 Hello, it has been awhile but I'm full steam ahead with the head gasket job. Head is off, going to the machine shop tomorrow to be checked over. However, I would like to get a few opinions on the condition of the pistons/block. My uncle reckons that they are stuffed (he is no mechanic though) and i've never done anything like this with any car let alone an E30 so have no idea what to look at/for. I've attached pictures, let me know what you experts think! :~) Quote Share this post Link to post Share on other sites
will 169 Report post Posted December 11, 2014 Nothing wrong with those pistons and bore from what I can see. There is also no real evidence of coolant getting into the cylinders as it would normally clean up the top of the piston it is leaking into, although the gasket does look a bit iffy between the water jacket and the bores in some cylinders (3, 4, 5). A very small leakage of coolant into a cylinder would not be that obvious from the cleaning of crud from the piston. There is still the possibility of a crack into the upper part of the head. Did you find evidence of oil/water sludge buildup under the rocker cover? 1 Quote Share this post Link to post Share on other sites
BMTHUG 942 Report post Posted December 12, 2014 Ive seen this time and time again when doing pre purchase inspections on vehicles for my clients. The gold glitter you describe is most likely a head and block sealer product such as RISLONE. Usually when a headgasket blows it seals up the part that is blown using the bits of copper in the additive. Sounds like the previous owner or mechanic has put this stuff in. It usually lasts around a year. I had a client come in with 2005 Range Rover with 290k on it with this head and block sealer in the expansion tank. I advised him against buying it as one of the headgaskets would eventually blow but he proceeded to swap his Honda S2000 and payed the guy $6.5 k his way. The head gasket blew the next week and there it sat in my shop until we rebuilt the motor on the Range Rover. was an expensive fix so you are lucky it's just an E30. The cost to rebuild the engine should be quite affordable. Quote Share this post Link to post Share on other sites
BMTHUG 942 Report post Posted December 12, 2014 by the way those pistons are not screwed. A little bit of carbon deposits but that is to be expected given the age of the vehicle. The bore looks satisfactory also. Good on you for rebuilding. If you were in auckland I could of got you a really good deal on machining the head and crack testing Quote Share this post Link to post Share on other sites
Kepes 231 Report post Posted December 12, 2014 Thanks for the info! Glad the pistons are ok, was a little bit worried I'd be in for a new engine :/ I'm up at my uncle's place in Levin because he's got a nice big garage. Met a good guy here who likes what i'm up to and giving me a great deal, as well as plenty of advice on how to clean up the block. The head had a bit of corrosion on the cylinders which made little holes but he can weld them up for me. SJ you couldn't be more right! It was my first car so I didn't have a clue really. Car had fresh coolant in it when i got it. After almost a year of ownership the stuff must have come loose. Fortunately this car only cost me $1500 so it's not a bad deal!! bit better than the guy with the range rover ha. I cut the cambelt off so i could get the head of to take it this morning because I didnt have a 32mm spanner for the fan clutch. Getting the head back on tuesday so i've got some time still. Bought one from Supercheap but it's too wide. Might grind it. Otherwise (it's a longshot) but does anybody know where I could get a thin spanner from in Levin area?? It's all going well though, at some points I was questioning what i got myself into haha. But not too far to go now!! Quote Share this post Link to post Share on other sites
Kepes 231 Report post Posted December 12, 2014 There is still the possibility of a crack into the upper part of the head. Did you find evidence of oil/water sludge buildup under the rocker cover? Nope, looked surprisingly normal. I'm not sure what was going on tbh, but I was loosing a lot of coolant so something wasn't right. Lets hope it comes right Quote Share this post Link to post Share on other sites
allan 295 Report post Posted December 12, 2014 You seem to be going in the right direction with this project keep at it. Was beaten to it by Will but as he stated the cylinders and pistons look good a little carbon never hurts and no funny scores in the bores is even better. Would say a bit sus on those marks between the water passages and cylinders 3,5,6. could be nothing. As for the pin holes in the head and welding it is it cast iron or alley?. The reason I ask is it is important to get the correct ph balance with your coolant as this can course all sorts of trouble if not correct and alley heads are generally the first thing to get attacked. Quote Share this post Link to post Share on other sites
Kepes 231 Report post Posted December 12, 2014 You seem to be going in the right direction with this project keep at it. Was beaten to it by Will but as he stated the cylinders and pistons look good a little carbon never hurts and no funny scores in the bores is even better. Would say a bit sus on those marks between the water passages and cylinders 3,5,6. could be nothing. As for the pin holes in the head and welding it is it cast iron or alley?. The reason I ask is it is important to get the correct ph balance with your coolant as this can course all sorts of trouble if not correct and alley heads are generally the first thing to get attacked. Thanks mate, I sure am learning a lot. The marks are where the head was corroded away, so i think perhaps coolant was sneaking through there, however I'm not sure. Head is alley. I've got prestone coolant to go in afterward. Quote Share this post Link to post Share on other sites
Ahmedsinc 414 Report post Posted December 12, 2014 Order the genuine BMW coolant from your nearest stealer. Costs about the same but is slightly different in composition - will be better suited to your engine as far as corrosion goes and is less prone to rot out the engine plastics Quote Share this post Link to post Share on other sites
allan 295 Report post Posted December 12, 2014 Just a thought is the firm who have your cylinder head able to pressure test it. Some times alley heads can be porous and under pressure this may reveal any faults if present. Just mention it due to you saying about the pin holes found in it and having to be welded. Also you may have a good coolant additive which is good to see but you still need to get the ph level right. Quote Share this post Link to post Share on other sites
will 169 Report post Posted December 12, 2014 As above, a pressure test needs to be done on the head as there does not seem to be any obvious leakage point. 1 Quote Share this post Link to post Share on other sites
Kepes 231 Report post Posted December 12, 2014 Yup, the head is most definitely being pressure tested. Did plenty of research and learnt it would be silly not to pressure test it. Also the head was a little warped, not sure if that would cause coolant to get places it shouldn't, but that will come right once it's resurfaced.Thanks for suggestion re pH level/coolant. Never really looked into that but will definitely do some research into it. Also I know I should be using BMW coolant but I just couldn't find it anywhere. Anyway, I'll be sure to use it next time Quote Share this post Link to post Share on other sites
will 169 Report post Posted December 12, 2014 I see you have head bolts on your earlier list (which is good). If your current head bolts are a standard hex head, they must be replaced. The later torx head ones can be reused if they measure up. When you have finished cleaning the block, you need to make sure the threads in the block are cleaned out thoroughly. All debris and oil/water must be removed. If any is left inside, the bolt can bottom out and give false torque readings, which will result in a blown gasket (or worse). I always run a bottom tap to make sure the threads are clean. Lightly lube the threads of the bolts and the surface between the head of the bolt and the washer before assembly. This will stop any binding and ensure that you will get the correct torque on them. Quote Share this post Link to post Share on other sites
allan 295 Report post Posted December 12, 2014 keep the whole thing clean and tidy helps in a whole lot of ways. Quote Share this post Link to post Share on other sites
Kepes 231 Report post Posted December 13, 2014 (edited) I see you have head bolts on your earlier list (which is good). If your current head bolts are a standard hex head, they must be replaced. The later torx head ones can be reused if they measure up. When you have finished cleaning the block, you need to make sure the threads in the block are cleaned out thoroughly. All debris and oil/water must be removed. If any is left inside, the bolt can bottom out and give false torque readings, which will result in a blown gasket (or worse). I always run a bottom tap to make sure the threads are clean. Lightly lube the threads of the bolts and the surface between the head of the bolt and the washer before assembly. This will stop any binding and ensure that you will get the correct torque on them. Yes the old ones were the 17mm hex and they are being replaced with victor reinz torx bolts. The guy at the engine shop mentioned the importance of making sure the threads were clean. He suggested compressed air, which i don't have. He also recommended using brake cleaner, so I'm going to use that for now. Any other suggestions? Also I googled bottom tap, but still not sure what they do/how they are used? Would lubing it with engine oil be adequate or do I need special assembly oil? keep the whole thing clean and tidy helps in a whole lot of ways. Totally agree! Have made sure I keep everything nice and clean/organized so far, reassembly should be easy. I'm back in Wellington as I have work tomorrow, but I'll head back to levin afterward. The plan is Sunday night clean the block, Monday get all the belts etc off (just going to grind my 32mm wrench as it's too wide to fit over fan clutch), Tuesday get the head back and on, then hopefully reassembly will all be finished by Wednesday! Edit: I've been forced to drive like a grandma since I started loosing coolant back in August. Once it's all back together, is there some sort of break in procedure/period, or can I clean out the cobwebs right away? I can't wait!!!! Edited December 13, 2014 by Kepes 1 Quote Share this post Link to post Share on other sites
hotwire 352 Report post Posted December 13, 2014 Bottom Tap that Will refers to. Is running a tap down the threads. Good idea. I don't normally unless I see an issue though. Yes a light coating of engine oil on the threads & contact face. Re 32mm spanner - a Stahlwille spanner works fine. Inferior spanners are always thicker to make up for their inferior strength. Refacing what you have will be fine for the fan. REMEMBER - fan hub is reverse thread. Quote Share this post Link to post Share on other sites
Kepes 231 Report post Posted December 14, 2014 Bottom Tap that Will refers to. Is running a tap down the threads. Good idea. I don't normally unless I see an issue though. Yes a light coating of engine oil on the threads & contact face. Re 32mm spanner - a Stahlwille spanner works fine. Inferior spanners are always thicker to make up for their inferior strength. Refacing what you have will be fine for the fan. REMEMBER - fan hub is reverse thread. Returned the one I bought from supercheap auto, going to buy a genuine BMW one, around the same price as a quality 32mm spanner and it's something i'll use more than once, if only every 4 years! hah Quote Share this post Link to post Share on other sites
Kepes 231 Report post Posted December 15, 2014 I'm having a killer of a time getting the 32mm nut off of the fan clutch... I've got the proper bmw wrench but I just cnt get it to move without the pulley moving with it!! I need a way to secure the pulley, or since I'm replacing the waterpump too so can I simply remove the waterpump with the fan still attached? Cheers :-) Quote Share this post Link to post Share on other sites
will 169 Report post Posted December 15, 2014 (edited) You need to make a tool like this.. bit of flat bar, drill 2 holes, cut out a semicircle, job jobbed. BTW, you do know it is a LH thread? Also, you need to shock the spanner with a hammer to free it from the pump shaft. Edited December 15, 2014 by will Quote Share this post Link to post Share on other sites
Kepes 231 Report post Posted December 15, 2014 Good idea. Shouldn't be too hard. Will try and do something like that tomorrow. I'm also thinking I could use a monkey wrench to hold to pulley still while I undo the 32mm nut? Quote Share this post Link to post Share on other sites