
Evo30
-
Content Count
76 -
Joined
-
Last visited
Everything posted by Evo30
-
Got asked a couple of questions, so I thought I'd share. "Why didnt you wirebrush the sealants completely off?" - It's more work... simple as that. And more chances of actually introducing more rust. On that note, if you are going to remove the sealant with harder wirebrush bristles it may strip the etch coating. You will need to use vinegar water mix to ensure that the surface is clean and back to bare (or for smaller areas you can use molasses mix). You can use other solutions, but vinegar water works perfectly fine. DO NOT WAX AND GREASE REMOVER after you treat the rust. It leaves a film that may reject your etch primer, just wash the vinegar water off with small amount of water and use paper towels to dry. Then etch primer is a must. If there are more pointers I can give you with rust treating, do not use bare hands. Always wear gloves. Your sweat and oils leave flash rust on newly treated metal. Try it out sometime, buy metal and treat it with vinegar. Then touch with an open palm, you will see your hand print the next couple of day as flash orange rust. "How do I know I have rust all under there??" -The sealant was not pulling off easy when I was using a soft bristle wirebrush. If sealant easy pulls off it means you have rust under the sealant. I had a few spots like this thats why I went over the whole underbody with a wirebrush on my drill. "What is that silver paint?" - POR15 is a great product, I dont often product endorse but if you are going to do rust proofing then it pays to look in to POR15 and/or WATTYL. Both are great products, I just get POR15 cheaper "WOW good work, with the rust what did you do after?" - Etching primer. Doesnt really matter which etching primer you use, but if you are going to apply 2k on your paint then I would not use acrylic laquer as this takes time to fully cure, and may cause bubbles on your 2k coat. I've always kept to the rule. * If painting topcoat with 2k, I prep with ALL 2k. * If painting topcoat with acrylic, I prep with 2k or acrylic. If I use acrylic, I would usually leave it to dry for a few days. Some other people here may have better advise for anyone that will approach a rebuild like mine. Any advise would be appreciated though
-
Thats wicked bruh, Have you got more pictures? Mind sharing? I was thinking of going this sometime soon, I just bought proper Spot welder remover drill bit. And are you using rivet nuts to be able to bolt them back in?
-
Thanks _BRS_ hahah fairly decent efforst, the only removable part left over is the wiper arm and motor haha.
-
It's been ages! Well sorry for lack of updates, been busy helping people with their cars. So here's some updates on my own progress... It's slow cause its damn cold in the garage! Everything has been removed it's a shell again. I'll upload the dismantling pictures later, so a couple of months ago this all started with my brake cylinder leaking fluid inside the cabin. One way to clean the fluid out I guess. Stripping Clean up The difference... after a clean and stuff - i thought the car underbody was originally black... And kinda just looks like this at the moment... These are just a single coat of rust proofing at the mo That's POR15 I am using at the underbody, rails, engine bay etc etc. Might paint strip the roof, quarters and panels later. The engine is currently being looked at for iso dipping, since a mate is starting a new business my engine might be the test dummy. till next time. Cya!
-
It does nothing for performance, I was admiring the work that they can do buddy. Craftsmanship is something that lacks in these "quick and easy chinese made" era. Nor do people appreciate these types of fabrication any more. Probably the wrong place to post things like peoples handy work here since.. well it was not a purist bmw part. Sorry. Also making oil pumps and water pumps to handle excess of 12000 rpm for 4g63t. Which is pretty insane.
-
No probs. Nice and easy fix huh
-
Gees sorry I though "IS" on his line was a typo, don't need to rant more. Anyway bruh, if you want a front lip for your PFL I have a spare can take a picture if you want, can upload later tonight.
-
E30 rear strut tower reinforcement
Evo30 replied to Blackfrogg's topic in Brakes, Suspension & Steering
Make it yourself, its what I did. Measure and make templates with cardboard if you have no access to any tools, all you need to do the mod is an angle grinder, a measuring tool of some sort, a marker, scissors, cardboard. Cut your shapes out and copy them over to a 5mm piece of steel for the FLAT plates on the camber and toe support (5mm is usually what certifiers like to see) for the rest of the work like welding take it to a shop you are confident with their work. I don't believe you need a certified welder to do this work for you, so your back yard mate with that gasless mig welder should be able to do it for a box of piss, it wont be pretty though. But don't quote me on that, do get pissed anyway.. just not when using that angle grinder. You can do all your measuring while the trailing arms are on the car and test out templates and pre cut met pieces. So you do not need to rush. Take your time get it right. North Shore Steel cuts to length but not to fit, meaning they wont make funky shapes for you. They will just cut squares and sh*t. 1. Remove trailing arms - optional to remove half shaft, but if you replace bearings you might as well. 2. Buy new trailing arm bushes might as well splash out a little here while you are at it. Maybe some rear bearings to do, also look in to stainless steel brake hose while you are at it. 3. Make the middle bar using a squashed pipe since it will have a nice fit in to the centre of the trailing arm. It's called an "A" frame btw due to shape for bonus knowledge points on the subject when you brag to your mates. 4. Make a plate, weld this at the bottom of the shock bolt to the trailing arm. 5. Make another plate, weld this from the back of the hub to the trailing arm. 6. Wirebrush everything, remove old rusty dodgy patches and stuck stones from that 20 year old trailing arm 7. Paint, I splashed out here and used VHT high temp paint due to resistance of the coating... but you dont need to. Enamel will be fine, super cheap deals. For extra added reinforcement if you are cranking high torque/hp (commonly done by v8 swaps) is to reinforce the subframe mounting holes are they rip to shreds on high horse power. Good luck. -
facelift or PFL? I have a PFL one sitting at home gathering dust.
-
Sexy fabrication is it not? Impressive in my books. I give this a double thumbs up. Here are some more samples. This is the interior of the Cam Cover shown above. All items below have been CNC'd and brutally tested on several machines. You won't break any of these parts. If you do, then you probably installed it wrong. Cam cover no.2 4g63t: Internal section cut, Cam cover 4g63t How about a CNC dip stick? just cause. Coil over Plug conversion: Did more work in the engine bay, forgot to bring the photos. Oh well I guess that's on the to do list. -Removed pedal boxes -Removed heater hose lines temporarily -Removed all brake lines -Removed life and insert fight with mrs. -Fabricated blanking plates for shitty engine bay holes -Re-route wiper water drain -Fabricate new master-brake booster relocation bracket + fabricate and weld squash tubes -Stare at empty engine bay for an hour, trying to figure out how to completely remove the radiator/bonnet... it sucks.. its huge.. I don't need it. Benefit is easy engine install... Hmmmm removing the bonnet support still has a large chunky piece of metal. Don't really need it. Looks like its all just spot welded. So many spot welds on it, reminds me of a mini. HAS ANYONE DONE THIS BEFORE? look below.. there must be somebody out there. Would like to pick your brain.
-
I would presume you have an alarm? Seems like the immobilizer is on. Your alarm seems to be triggering when you open the door. If you are not aware you have an alarm, check if there is an alarm horn in the engine bay anyway. It could be they chopped the wires to the siren hence no noise.
-
Engine build targets: Mitsubishi 4G63 2.0-litre DOHC 16V inline-4 Block: JE forged pistons shot-peened VR-4 rods DIY polished crank DIY polish crank case powder coat cast iron block DIY relieve and polish oil feed ports Relocate dip stick and turbo oil return install oil cooler fittings Cylinder head: DIY port + polished cylinder head DIY install New valve guides DIY install New valve springs DIY install New valve stem seals DIY install New valves DIY install New lifters DIY relieve and polish relieve oil feed ports DIY Lap new valves Cam regrind WOW Fork out for new awesome cam cover? Fabrication heaven. check it... if you do not appreciate engineering and fabrication, this is probably just a metal box to you... Other: Modify radiator to incorporate thermostat water plumbing outputs for heater - an fittings for e30 heater unit Make new water intake pipes Make new oil sump Make new intake manifold The build will be similar to Brett Lee Sang's evo.
-
Forgot about this page, we brought our v8 back to life and racing. Sooooo... the e30 has gone through other plans. Anyway, some changes has happened. Pretty much another rebuild. Chillin with the hondas Got bored, rather slit wrists with a rusty spoon. This happened... Clutch Cylinder broke, brake fluid leaked in the carpet. Carpet had to be removed. So it starts again Now the house looks like pick-a-part Anyway a few hours later or days... They all blend in now. Clutch rebuilt. I used a LOCK WASHER to fix it. The rod came out of the piston, it replaced a thin piece of metal that bent over time while using a 5 puk. Also made 2 penis oil return lines, I dont know why, I probably won't use it anymore I will be making a new sump anyway... Made these too, forgot how much crap you can make with a laser cutter. What else can I make? hmmmm The evo30 is looking a little sad. That engine bay is yuck. I didnt like it. So... this happened. Yeah yeah you probably got a couple of things to say about how it was moved. But it works and I am rebuilding the fusebox later anyway. This is handy for now. Start delooming... I'll take a picture of end product later. It looks pretty factory in there. Still not happy with it, I never am... But... Got better sh*t to do. There's this massive metal thing in the engine bay. That's gotta go for now... maybe rebuild? 700hp? who knows. There's more pictures. I will update when I do port and polish tutorials, crank case rebuilds and casting clean up - this is to improve oil flow and to decrease knock when boosting.
-
Been a while since last update. Subframe done and installed New exhaust manifold done New shock bushes done New as brake lines arrived along with a few new bits Anyway... And a 190e kit that I've been working on while waiting for shipments.
-
I saw the Haltech Platinum Sprint on Trademe for around $1500, I got offered a link g4 Strom for the same price. Which would be better? I read the stats very similar. The only other I saw that was better was the vipec i44, which can peak hole injectors which is pretty nice. Though that gets pricey. Any recommendations? Most people said link is easy to learn and lots of help available. Also I wanted to make my own cluster. Since my rev counter don't work instead of converting ohms to volts etc I might go ahead and replace the whole lot. What fuel meter gauge did you use? I forgot the brand you mentioned when we met up. Cheers bruv.
-
E30 Subframe bushing replacement - help
Evo30 replied to Evo30's topic in Brakes, Suspension & Steering
Sweet! Good to hear buddy! Yeah cant wait to finish mine, in the next week it should be done. The puller i made cost me $5 I dont own a gas torch. Wanna swap? my puller for your torch muhuahhahahaha -
Sounds like my e30 1.8 now, after I over heated the engine. The big end bearings wore out. I hope that's not the same issue you got.
-
Hahaha I just clicked Hi Steve! It's been a while bud, mos def will have to catch up with you soon. Planning to get that long awaited Link ecu that I have been procrastinating on getting.
-
- Cheers bro was worth a pretty penny. But sure is a lot better spool than my old turbo. Steve still does rebuilds, so if youre looking he's still chugging along. -Haha yeah, I had a bit of a work log but never really put them up anywhere. So I'll be updating more from previous work done keep an eye out I suppose as I collect the photos from my older phones -JOM's have a threaded colar that goes in to your standard strut that holds down the shock insert, then you have a sleeve that also has threads inside which locks up on to the colar. I will provide a photo when I find one for you. Very easy to set up. You can although have other alternatives with building your own shocks. Most people diss the Alloy sleeve which is actually not too badly constructed. You can upgrade to steel weld in colars which is very cheap to purchase on trademe. The shock was already shorter than the original I had. I could get it shortened another 1" but that will affect overall use I intended it for, i.e. if I ever wanted to raise my car for a race event of a particular kind, it will be limited, like gravel. If you do buy other sleeves, then you may want to shorten the shocks to achieve bump stop status. To give you an example, helped a mate drop his car to the point it is undrivable. But it looks cool static. Anyway, He had JOM's also. I found some steel sleeves which were 52mm diameter. This then inserted over the colar and strut nicely. Weld that sucker in there, you now have an extra 2" drop. On the last 1" of thread on the sleeve, the car already cannot move we cant even get the jack off the car. So we raised it a little bit lol. We did though on both our cars, upgrade the rear springs to harder loads. Found the springs on handbrake turns and high speed turns that it tends to be too soft. All together, it cost around $500 - $600 which also includes harder springs for the rears that I found for a Honda. Same inner spring diameter, 5" long. If you do have a grand to spare, then buy after market coil overs, you get the handy adjustable shocks etc. I'll probably upgrade later to them, but my set up now is fine. No issues since the rear springs were replaced. I did this for experience and learning curve at least now I know about drop height, spring ratios, shock dimensions etc.
-
Had an old turbo. So I spoke to an old friend. Hunted down Steve Murch. New turbo: Here's how it went down: Turbo off: Manifold off, might as well paint it etc. Steve advertising my turbo, felt kinda happy and sad. Happy days
-
Some time earlier in the year, cruising with the mrs. Floored it. Heard a pop. Intake manifold blown. The blow off valve got stuck because it was made in China. Upgrade to OBX, can you say old school 2004? Rat rod intake. Cause. Lazy. Before: Also Chinese BOV After: New BOV
-
June progress: Friends overseas hooked me up some Pressies came over. Thank you fam bams for the support. Was give JOM adjustables. Most people frown on these due to it's apparent cheap price. I've installed a couple in other cars. The only issue I've come across are that sometimes, the springs are too soft. So here we go: First I bought 51mm front struts Cut the spring plates Clean up, paint, assemble Installed I can sack the car down to the sump, but there's no point to that. Done in 3 days. The lengthy wait was only for paint to dry.
-
July progress / now complete: Relocate ECU from driver side to glove box. This has been moved and working but will be removed later this year for Link G4 install. Not really that hard but if you are not good with electrical and troubleshooting this can be a nightmare. Anyway... Pushed wires through to the bay: Clean up unwanted wires: Push through to a new hole in the firewall: Rewire your heart out: Why? Cleaner space under the steering column. Easier access to ecu for tuning and wiring. That's about it. Took me 2 weeks on and off taking my time.
-
August / September progress Subframe rebuild - Subframe broke apart due to torque. So now I decided to redo the bushes, maybe do the brake lines but feeling lazy. The aftermath of tuning: Purchased e36ti subframe, a lot less rusty than most e30 ones I have seen. New items to be installed: -Condor riser bushes & Diff spacers -Nolathane trailing arms -Reinforment plates for Subframe and trailing arms Just a small snap shot below of trailing arm reinforcement bar, this is just a mock up of plans still have to cut and weld.
-
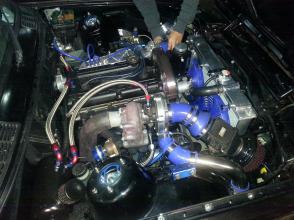
Hi, just posting up a work log on the net so others and I can have access to it at anytime. Aim: E30 that I can drive down to the track, race, drive home. Simple right? Cosmetics: Just simple look so far... due for full respray. -Eye lids -Recaro reclinable seats + rails + sliders -Alpine stereo + 6x9s -Pedal covers cause it makes it go faster. -17" mags ... though this will be changed shortly. Brief modification list: -4G63T RWD conversion -Apexi turbo timer -Turbosmart 2 stage electronic boost -Turbosmart 38mm external wastegate -T3/t4 turbo re-cored to holset 35r 500hp -D1spec fuel pressure reg -Autogauge boost gauge 2" shadow -HKS fuel rail -HKS clear cam cover -550cc injectors -New rear shocks and coil overs -Custom oil catch tank -OBX lightened cam pulley -OBX "Hellfire" 2 stage blow off valve + trumpet -2 x 1" spacers 4x100 57.1mm hub centric int, 56.1mm outer. -70mm throttle body -Apexi safc neo -Apexi RSM -3" straight through exhaust -2x new 12" radiator fans -Adjustable coil overs -Front camber plates -Reinforced rear strut towers -Offset FCAB -Relocated master brake cylinder -a fair bit of nolathane goodies Current progress / Still to install: -Condor Riser bushes -Subframe reinforcements -Nolathane trailing arm bushes -Modify strengthen trailing arms / reinforce toe and camber -1L or 2L surge tank with new internal/external pumps -Link G4 ecu -Oil cooler / sandwich plate -Install/paint Mtech 1 sideskirts -Install/paint Mtech 2 rear bumper I'll upload more picts of its progress over the past year.
