
sweetm3
-
Content Count
604 -
Joined
-
Last visited
-
Days Won
4
Posts posted by sweetm3
-
-
Cheers Dave
It's amazing how over time you can get a customed to things, slowly lossing your eye sight your hearing etc (you can tell I'm old
 ).
).After driving your bady around, I was reminded of how refined a BMW E36 M3 can be........ jesus mines a beast.....but I love it.
Now get some race pads, rubber and lets go have some fun at the track mate

-
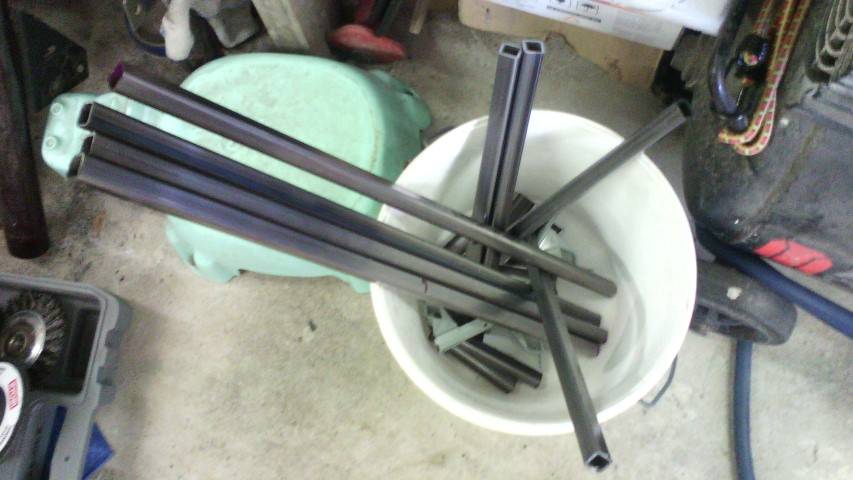
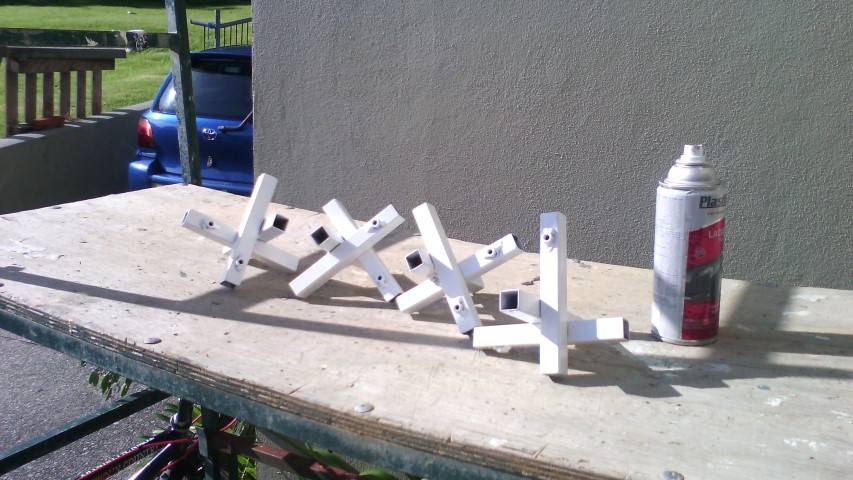
Front sub frame engine mounts
Rear sway bar mounts
Rear trailing arm mounts
-
Rallyroad.net
-
Started it after approx 3 months,
got oil pressure
:)Now to
Get the wheels on
Go for a drive and see how the clutch feels
Give it a clean
-
-
Just on the off chance
Part # 11411317650
Cheers
-
Having a coffee, Dave the car is lookinnn good.
Half way through installing my con rod bearings.
I can see the light
-
When I spoke to him, I'm sure he was waiting for it to turn 20 something (I think) so it was classed as a classic and then it didn't require certain paper work to do with the left hand drive.
Now I could be wrong, as my eye were glazed over looking at the strut bar

-
That was at the dealers when I brought "Minnie Me", at that stage he was waiting for it to pass a certain age.
I was after the strut brace

-
Yes, Mark's is an S50B32.
Cheers Dave
Sorry Beeker2
-
My 97 # 1 405 229 9E1
-
Nice mate
Adjustable drop links ?
-
Good work Mark, top effort for a one man job!
ETA for back on the road?
ETA who knows
I don't (month maybe) -
quick up date, things are progressing (see first post)
-
Happy New Dave
I lube mine 4 time a year, no biggy
-
Looking decent so far. Where did you get them QuickJacks from? How much weight can they hold?
How long to raise car up? 10 seconds
How much $ depends where you buy
Where from? Online
Sulco nzhow heavy are the units? Postage weight total approx 60kgs,
Load limit 3500lbs
Cheers
-
-
Here's is a link to Part 1
http://bimmersport.co.nz/topic/43521-m3-evo-32-1997-hackar/
So here's a reminder of what I'm up to Dec 2014

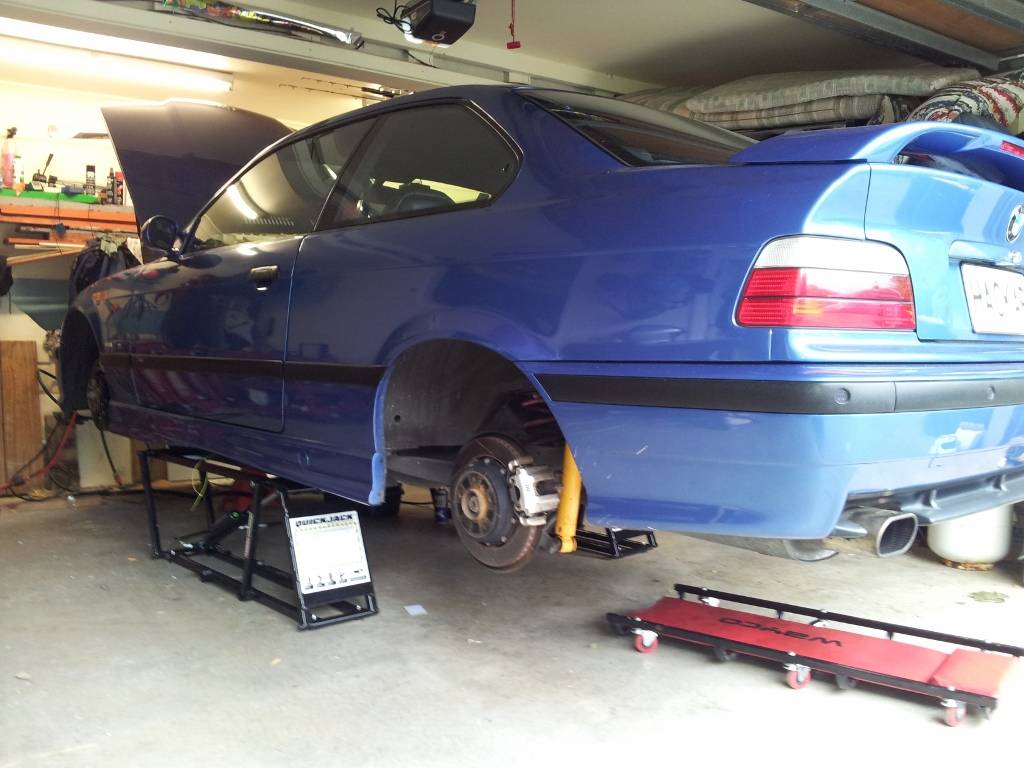
My baby up in the garage on my Christmas present to myself (QuickJack 3500)
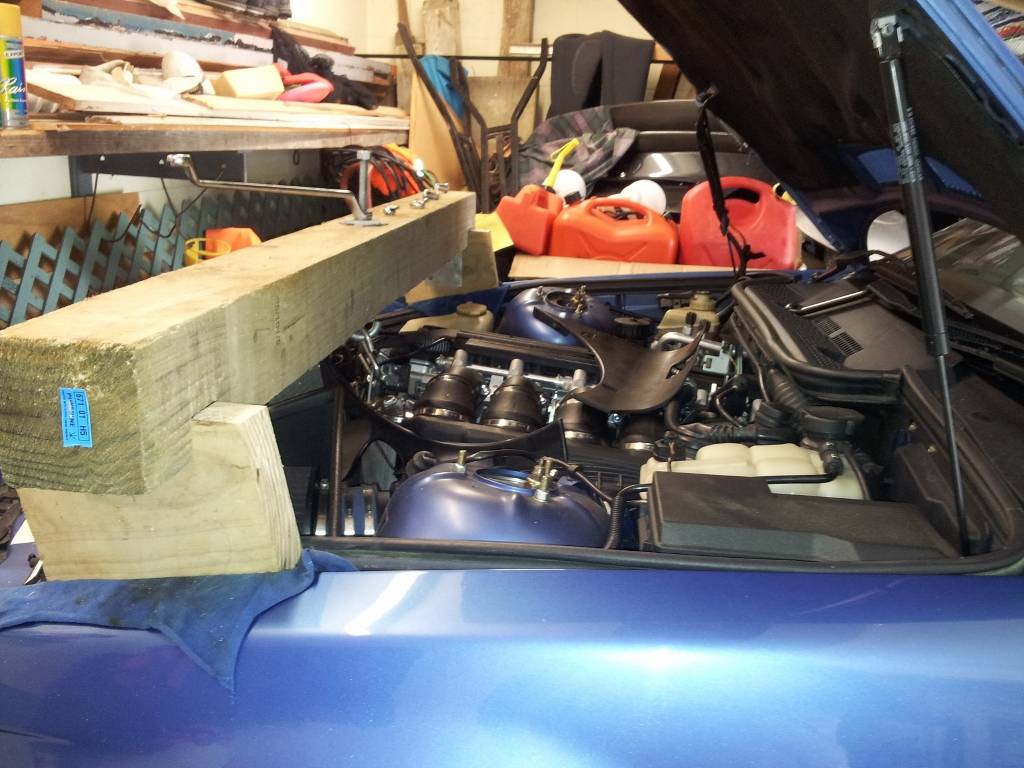
Motor supported
At this point the jobs not done, but thanks to Google and BMW forums thing are moving along.
I'm not in a hurry but here's the progress so far.
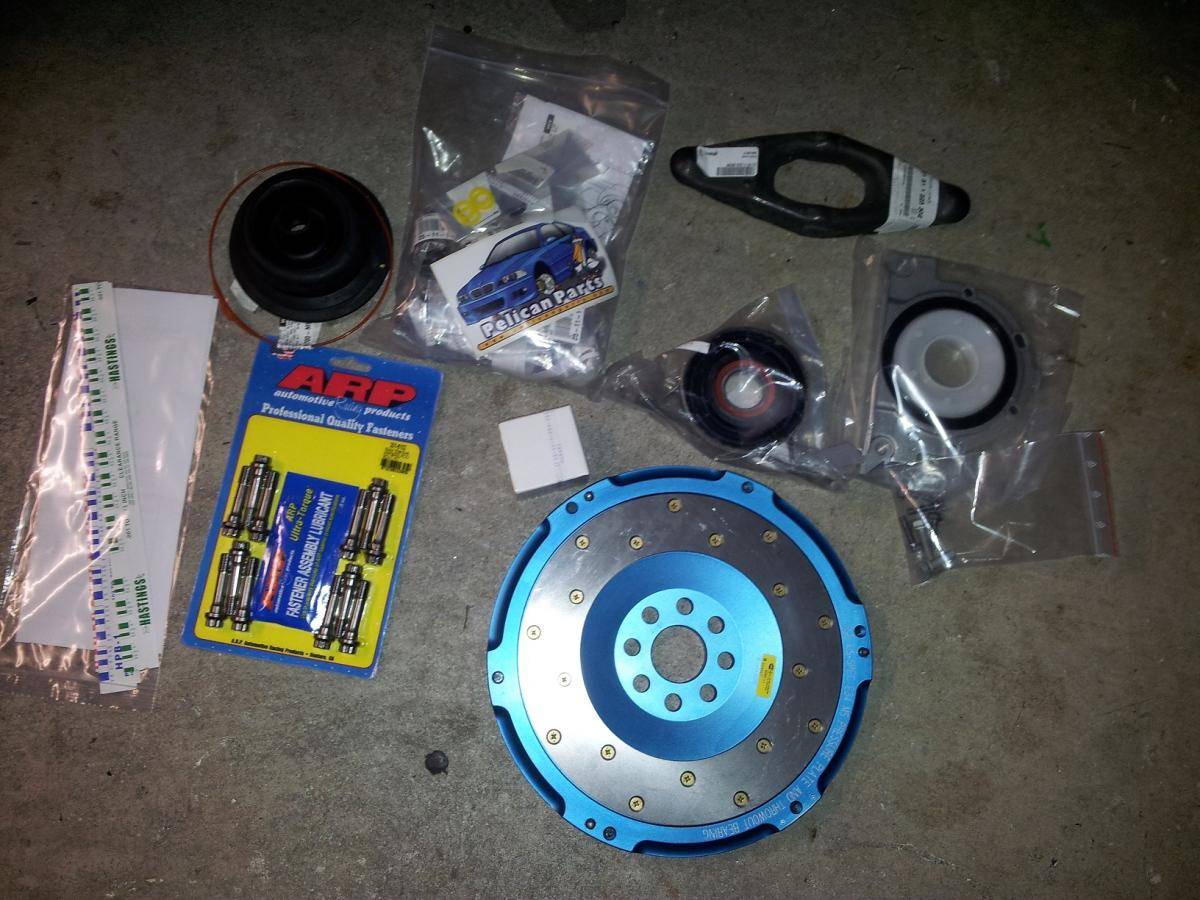
The gearbox is out, Clutch and Flywheel as well.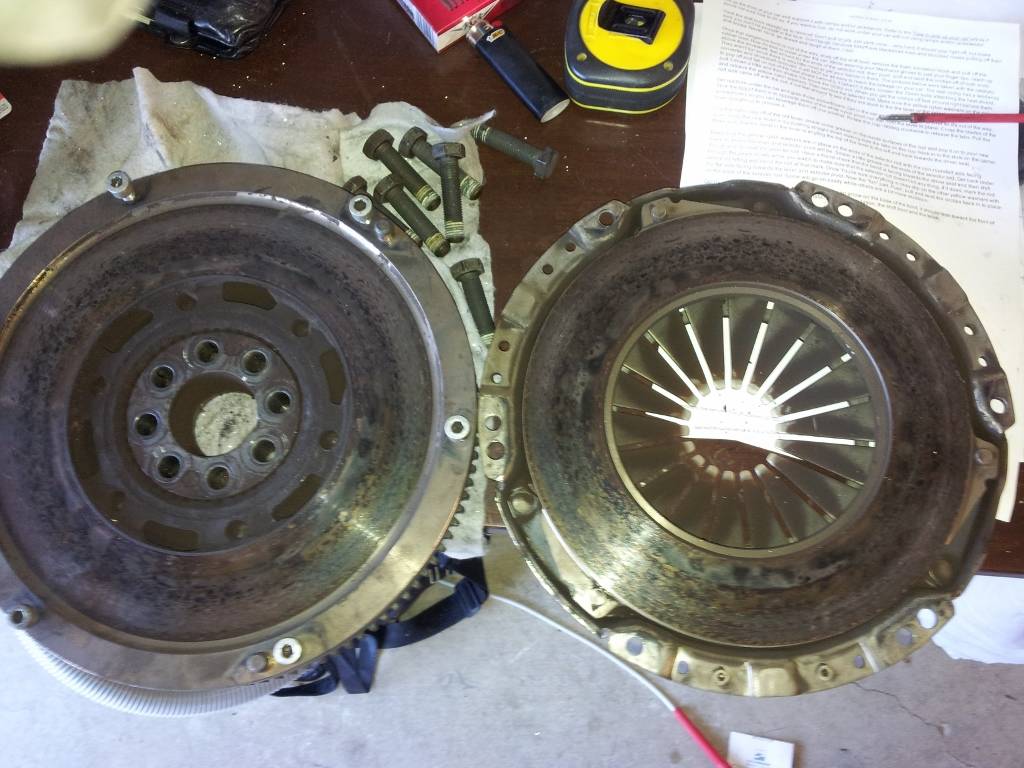
Perfect timing, while I'm at it I'll replace all the gear shifter bushes as well.
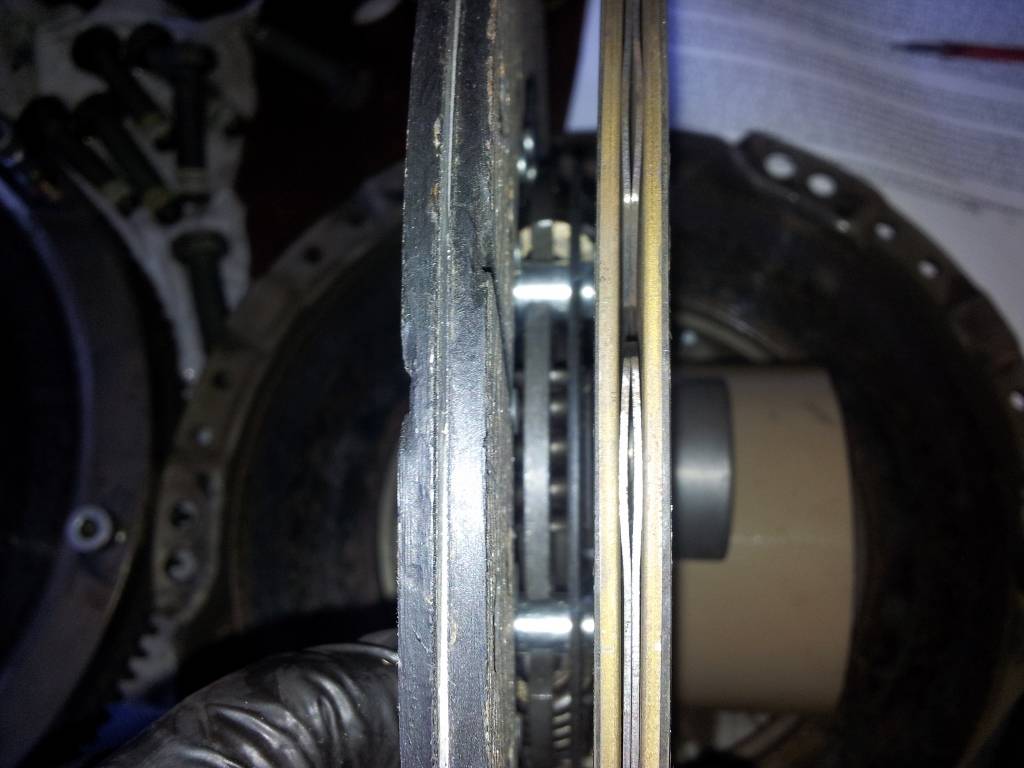
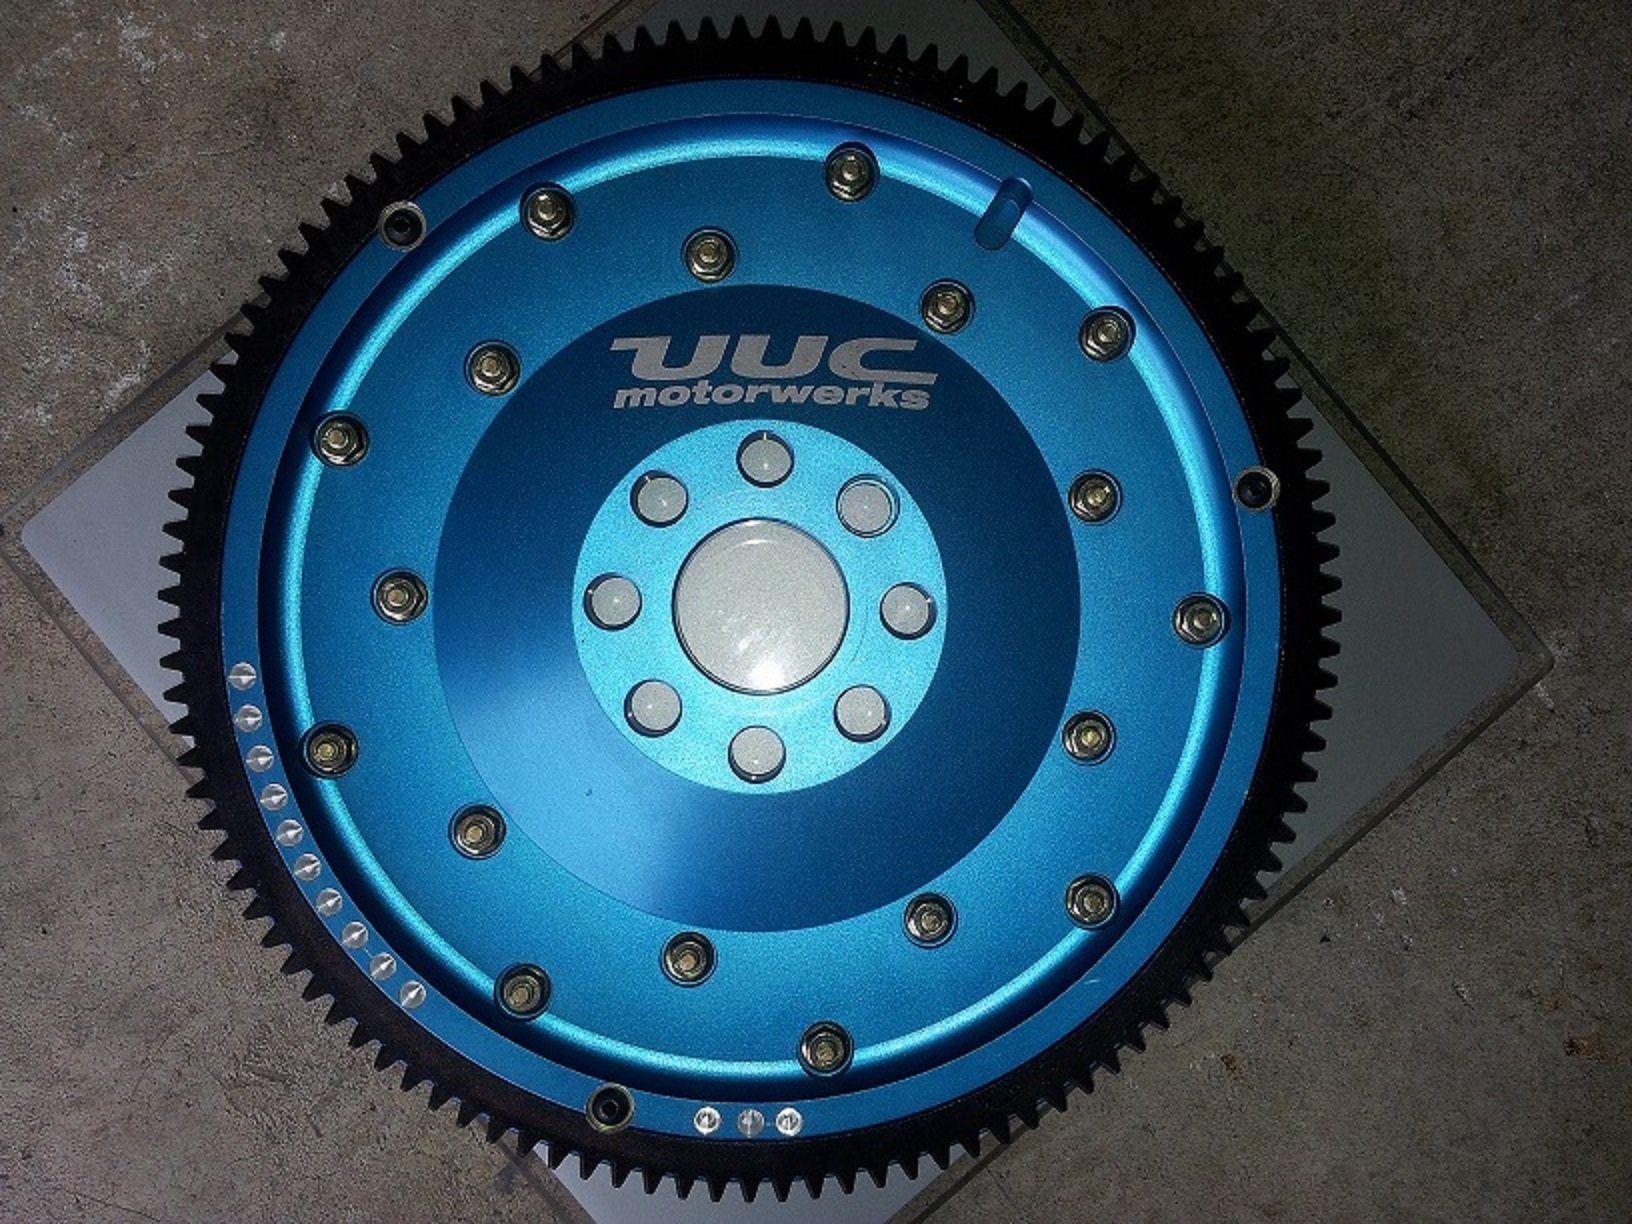
UUC Stage2 Balanced. Thanks for the advice Josh


Can you guess what these are. Big thanks to Rockwell for saving me so close to Christmas
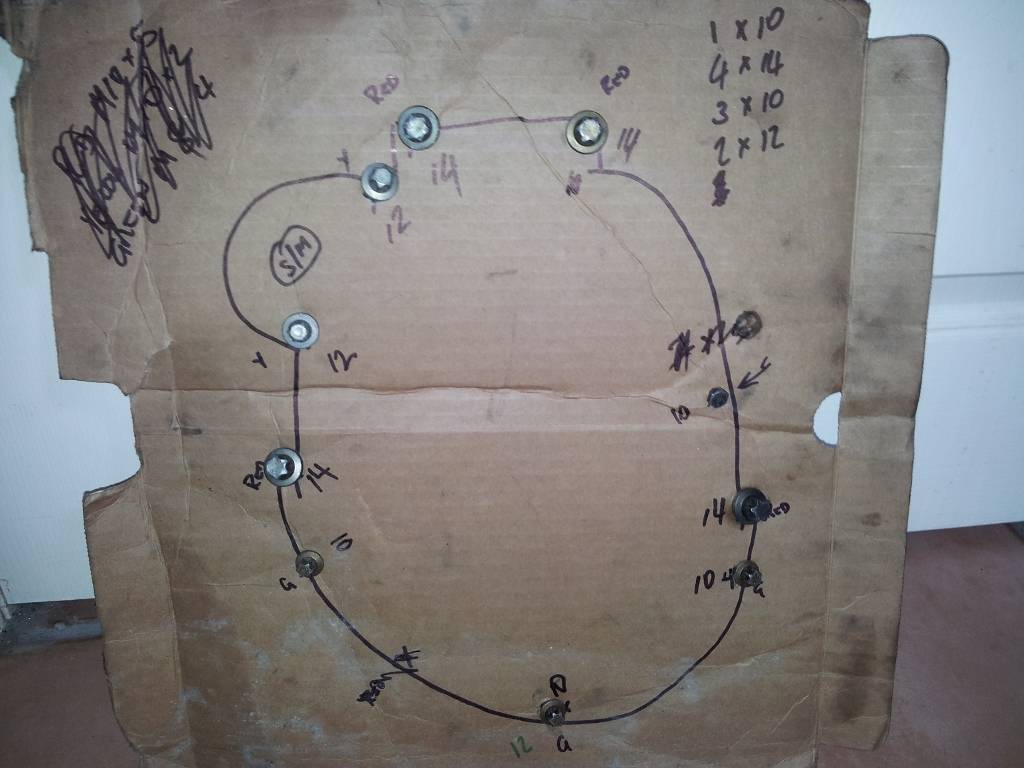
Bolt layout and sizes, I spent 3hrs with torch on head, mirror in mouth lying on back towards the rear of the car trying to get the top left bolt out (miss info from net on size)
The 14mm at 9 o'clock was pain 5 shops and I couldn't find a wobble head to work. Had to really lower the engine even more.
Looking up her skirt
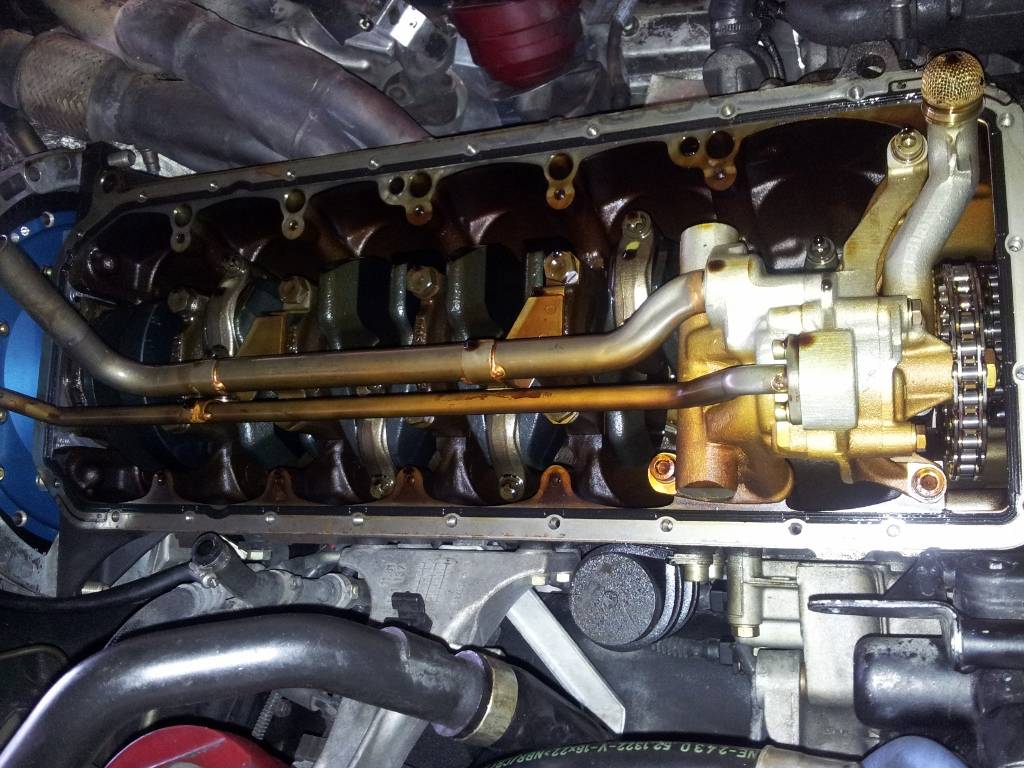
Secondary air pump oil leak (gone now)
Rod bearings replaced and ARP bolts installed, the old shells had approx 100k on them but looked fine.

Dismantled the oil pump, no sign off wear.
Don't forget to pack it full with vaseline so it's primed if you don't it may not pick up the oil in the sump. Remove fuel pump fuse or remove coil pack so the car won't fire/start.
Starting the car for the first time was the most terrifying part, turn the car over for 5-7 seconds approx 6-10 times and breath again
when you see the oil pressure get to a safe level.(remembering I have an oil pressure gauge installed)

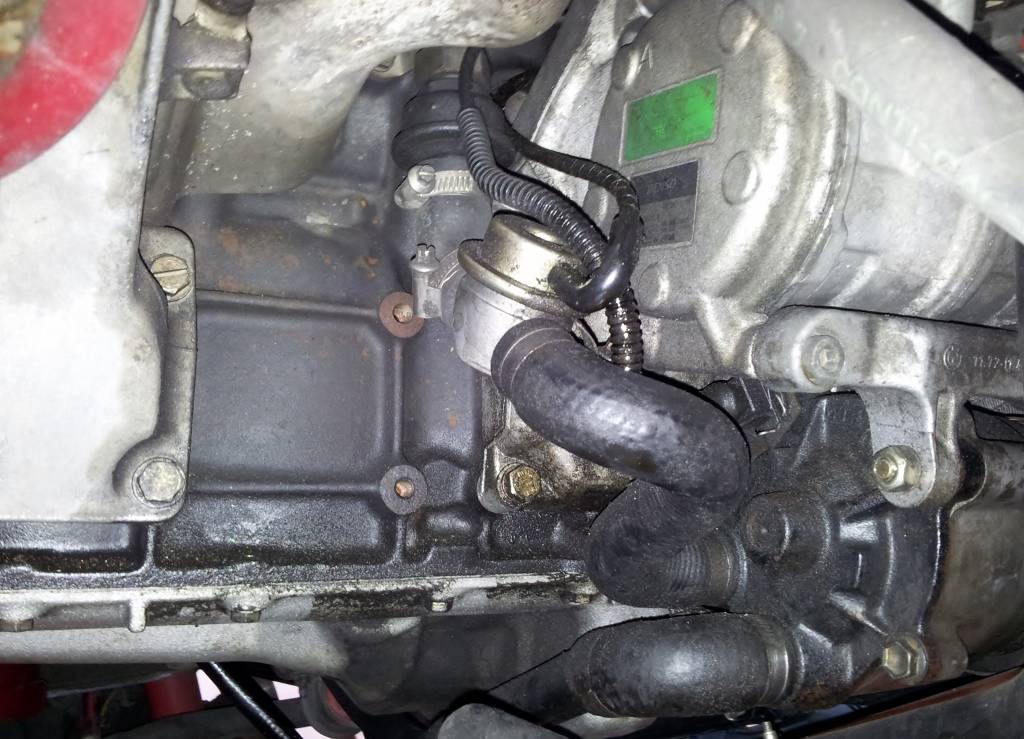
Lower chain tensioner wear, decided while it's open I'll replace it. while waiting for the new part to arrive.
I grabbed front and rear reinforcement plate kits I had and welded them in.
.thumb.jpg.ae0317bc7a450b3d50b74b17609097a2.jpg)
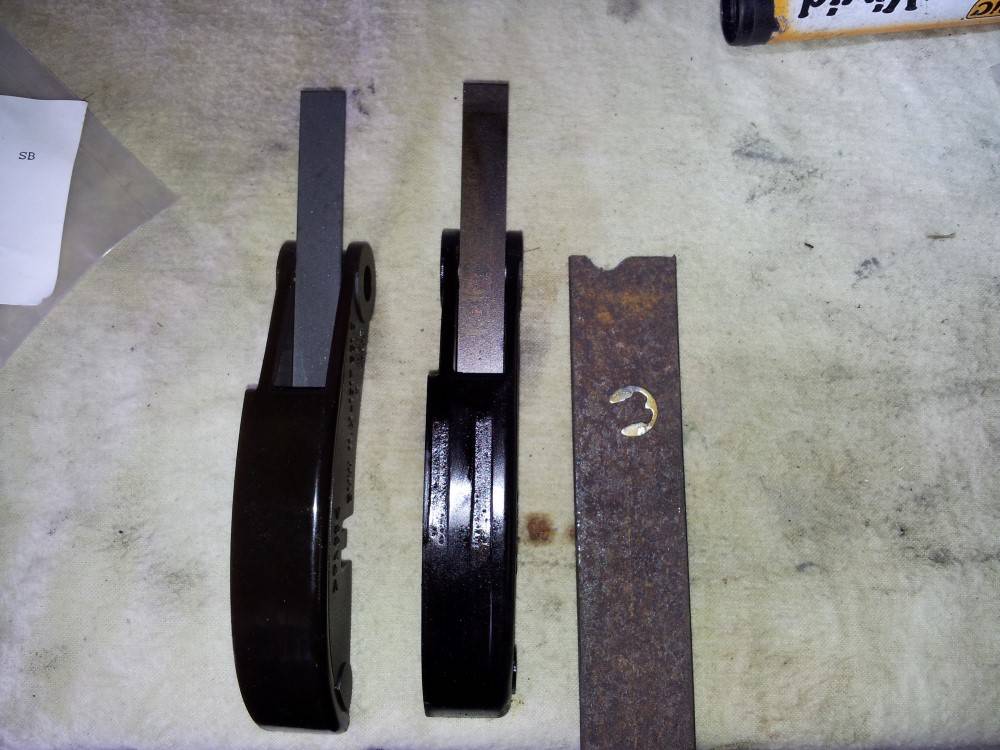
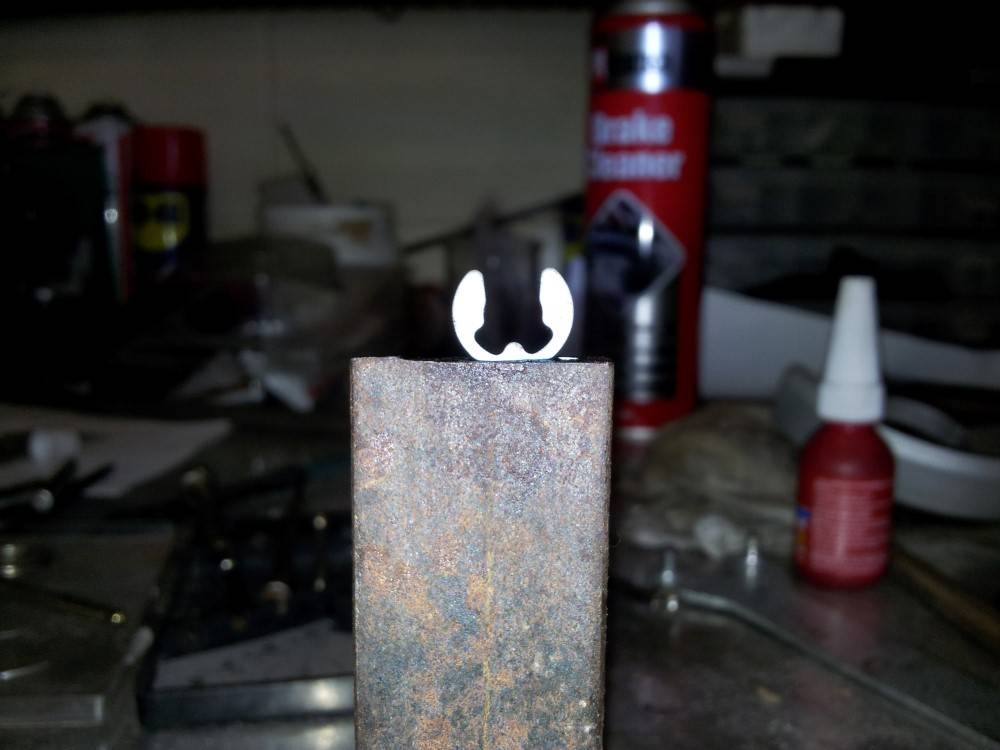
Below the old and the new, as well as the tool I made for removing and installing the clip shown. A piece of flat bar, shaped as you see to remove, slotted on top to install second picture down.
On the net the DIYs say that the front cover has to be removed. I did mine from underneath, it is tight up there.
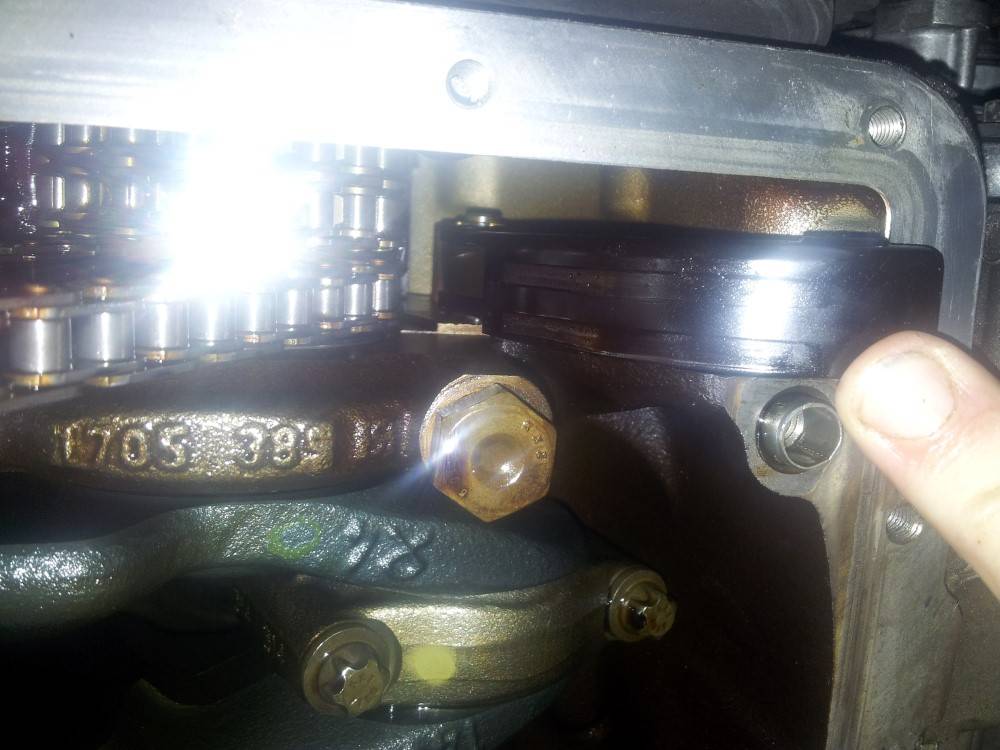
Here's the trick the metal springs/lever is actually two levers separate them and have a look. Put it back together, but.
Leave the low one out 60% but so it's still under the other. Install the bracket on the pin and manipulate/slide the upper lever into place.
Once the upper lever is in place you just have to push the second lever up and it's guided into place by the first lever............... The will make sense I promise
Feb 2015
Dual pickup fuel pumps, along the lines of the Pumpkin setup.
This pump sit in the passenger side tank with the engine return feeding into the filter. This pump then feeds fuel to the engine pickup pump sump.
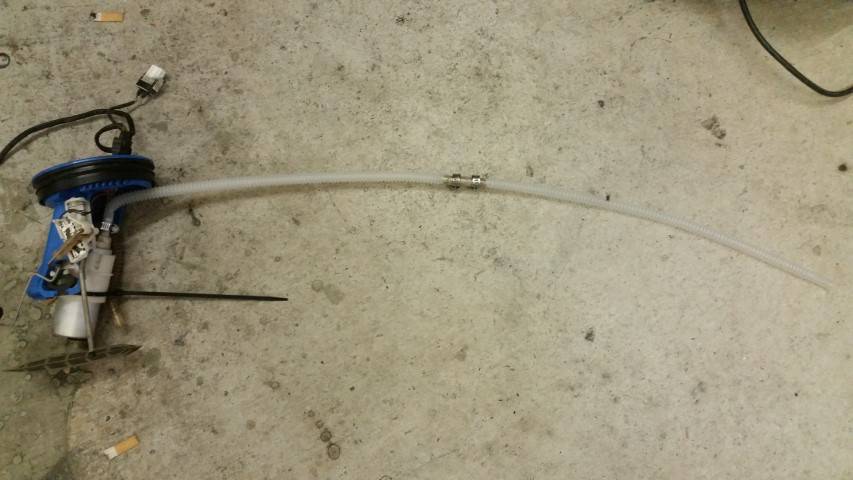

Finished product, does it work as of 2017 I haven't had a chance to see. Just some notes after multiple attempts at trying to get the fuel gauge to work constantly I gave up.
It works most of the time, but now I also use the trip meter as a back up.

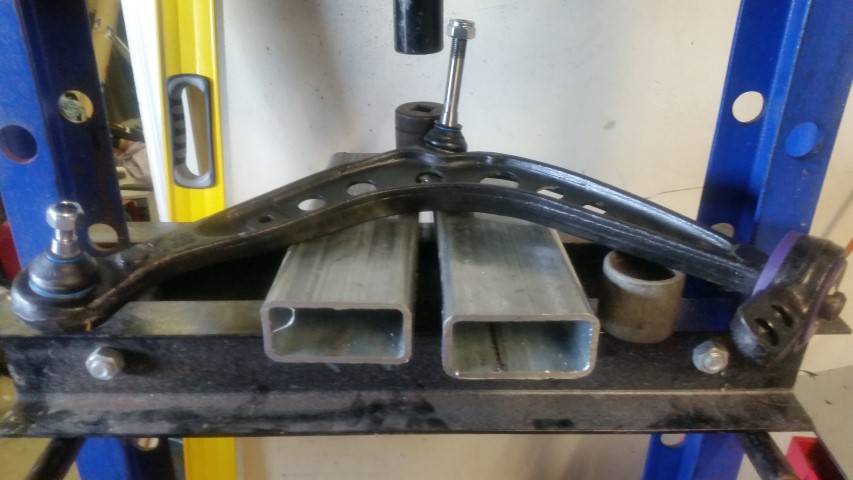
Brought a 20 ton press
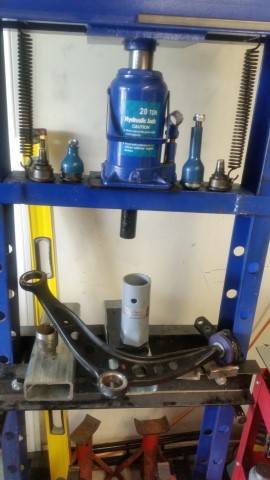
New Ball joints for my front control arm, they deserve them after 170km
Nov 2015
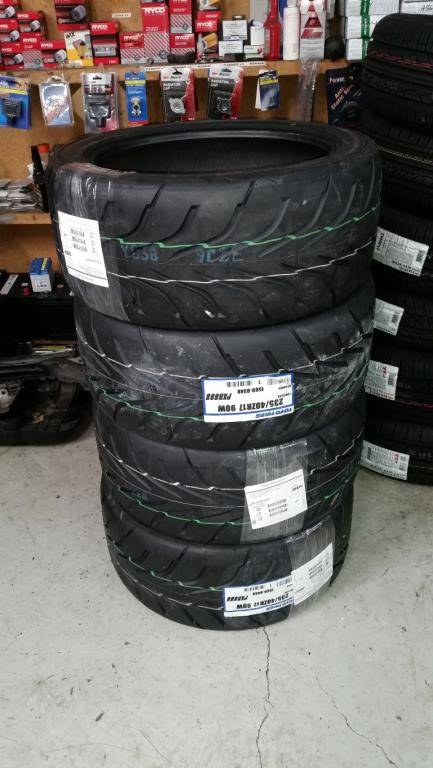
235 x 40 x 17 R888 (god I love the smell of new rubber)
Jan 2016
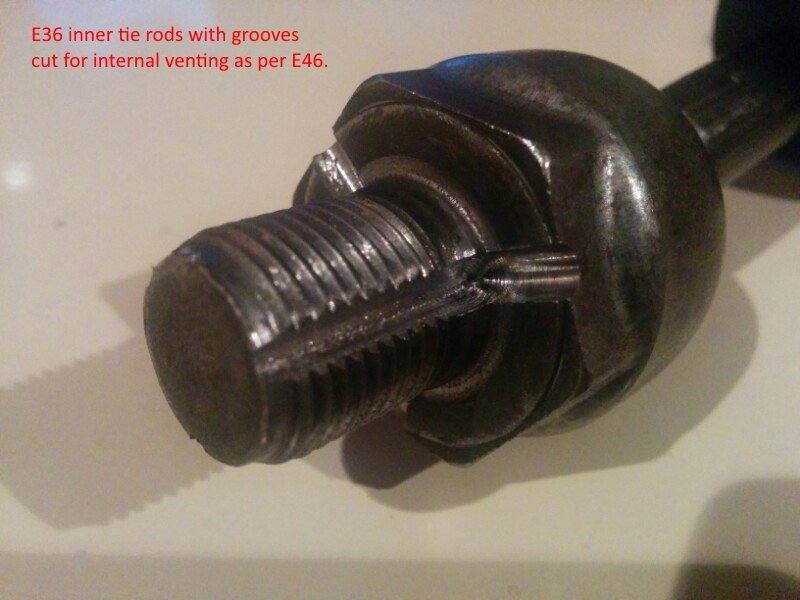
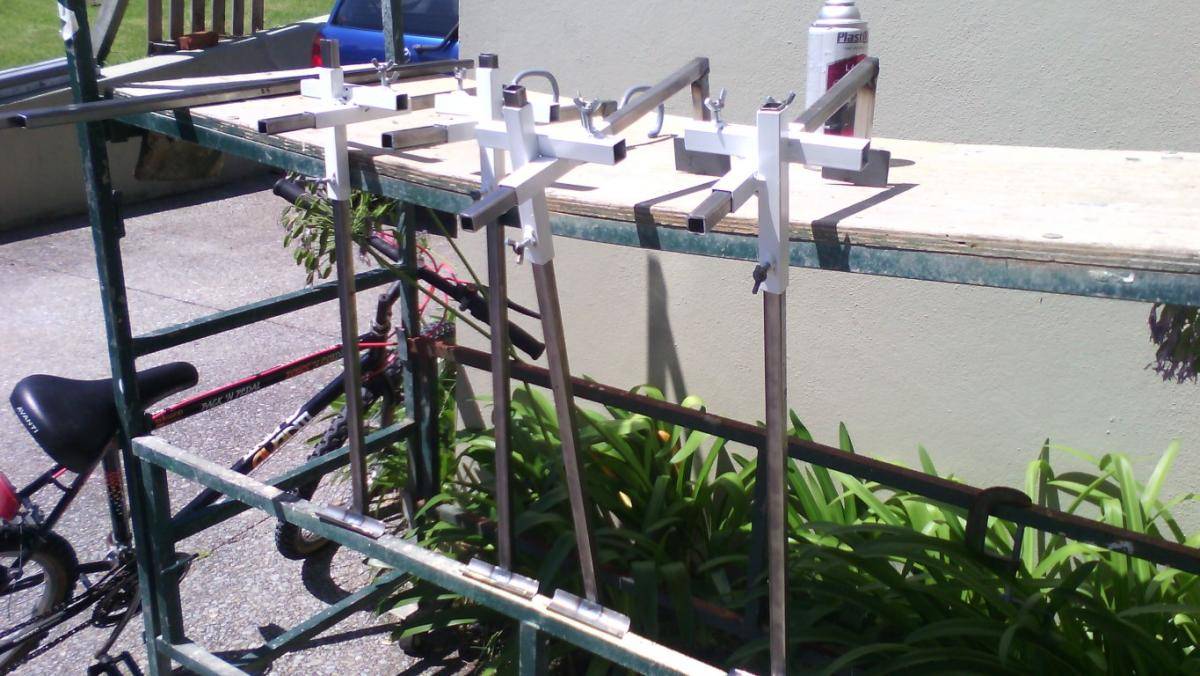
Made myself a String Alignment Box, why New Tie Rods


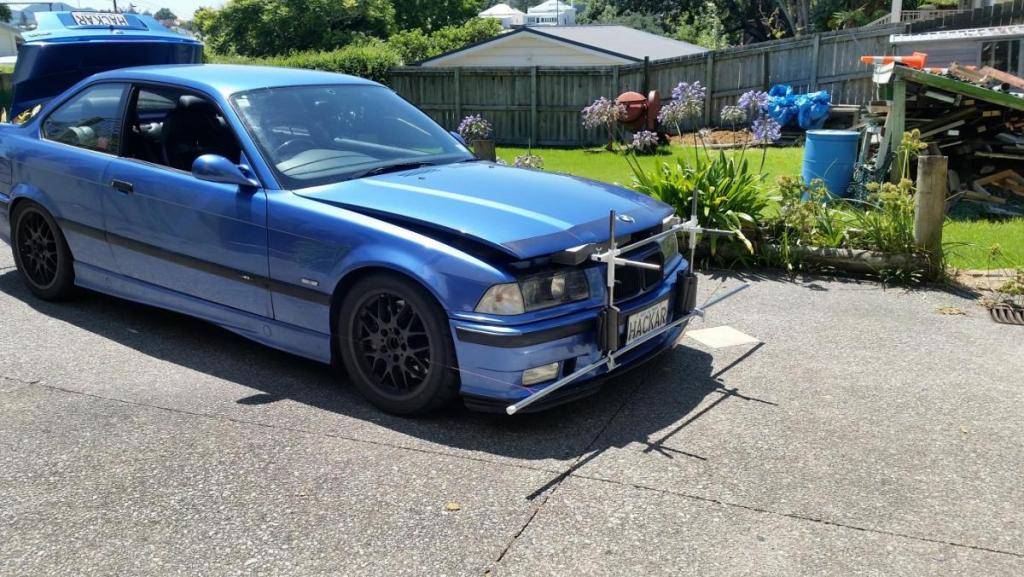
Digital C/C Gauge w AccuLevel™ and Quick Set™ LW Adapter
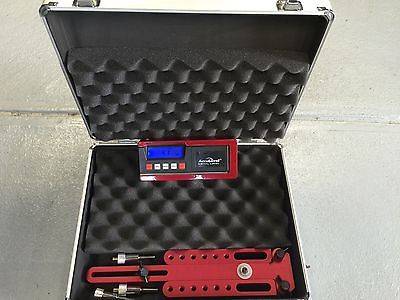

Bottom line ..... if I had a pit it would be great, my car is to low for me to adjust the toe without jacking. Easier just to take it to an Alignment shop.
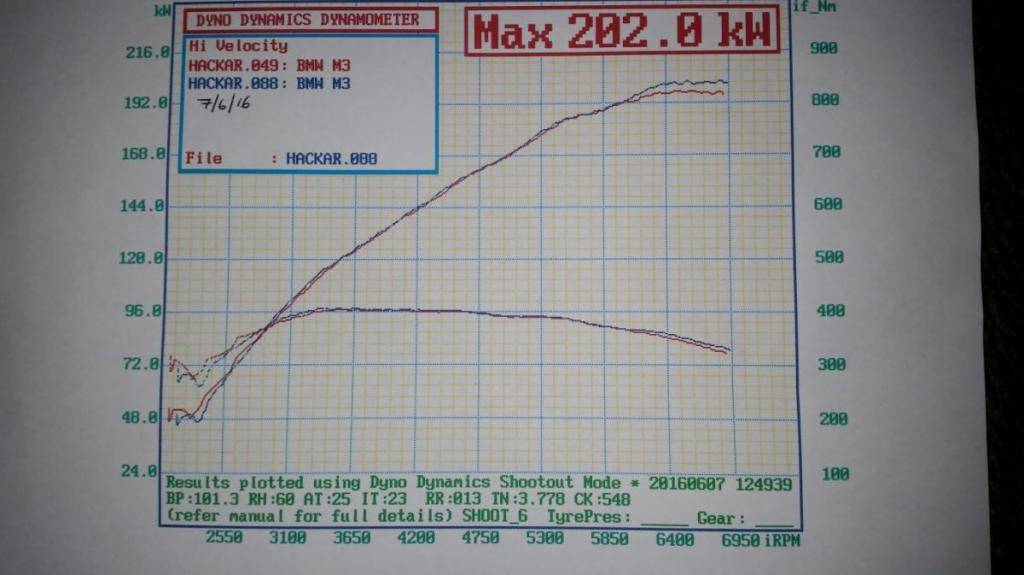
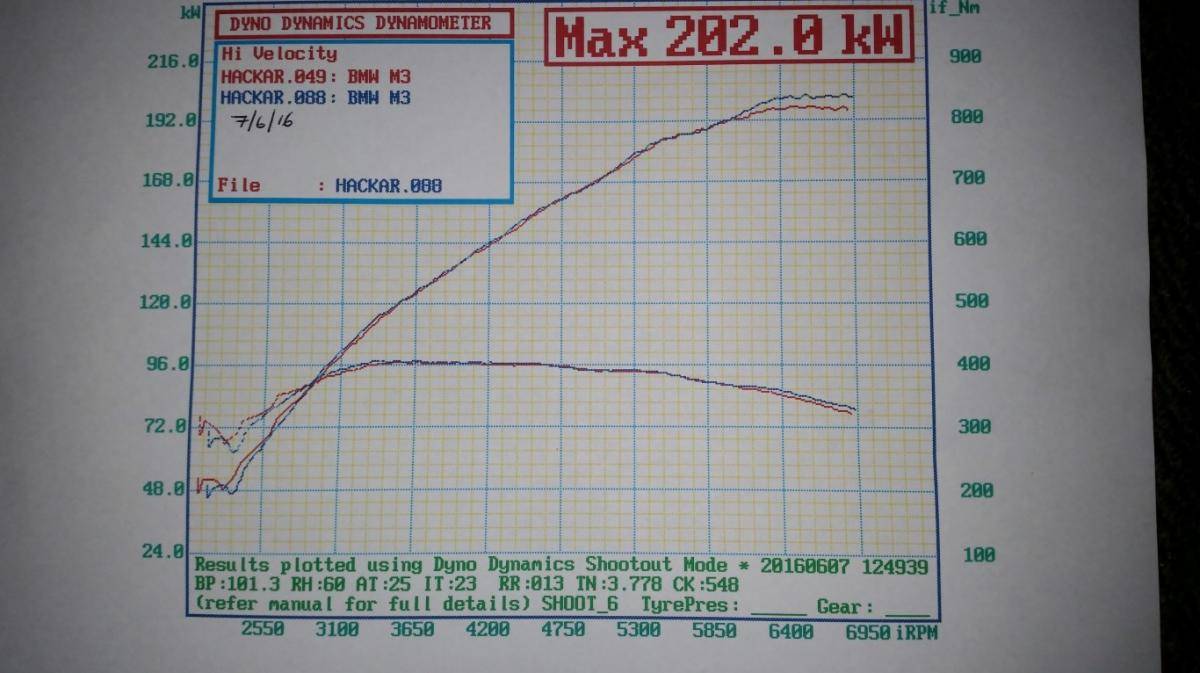
Jun 2016
After my weak performances at Hampton Downs in Jan & Feb driver training, I gave up trying to diagnose the problem.
Booked into Gavin's he's the man, he did his magic and now we've cracked the 200 (ye baby)
2017 update got a chance to get back on HD now because of conditions no lap records were set but, I ran out of 3rd gear leading up to the big sweeper and changed into 4th only a quarter of the way up the hill on the front straight. But interestingly still only managed 193km at end of the front straight taken from GPS (speedo read 200km)
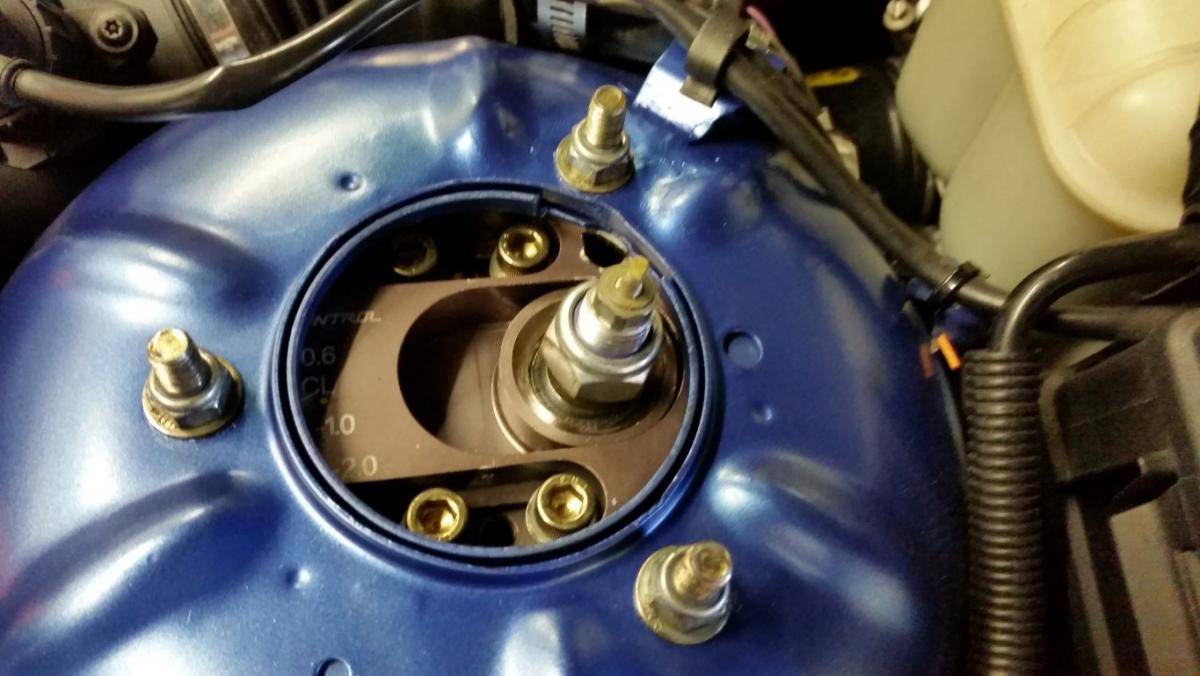
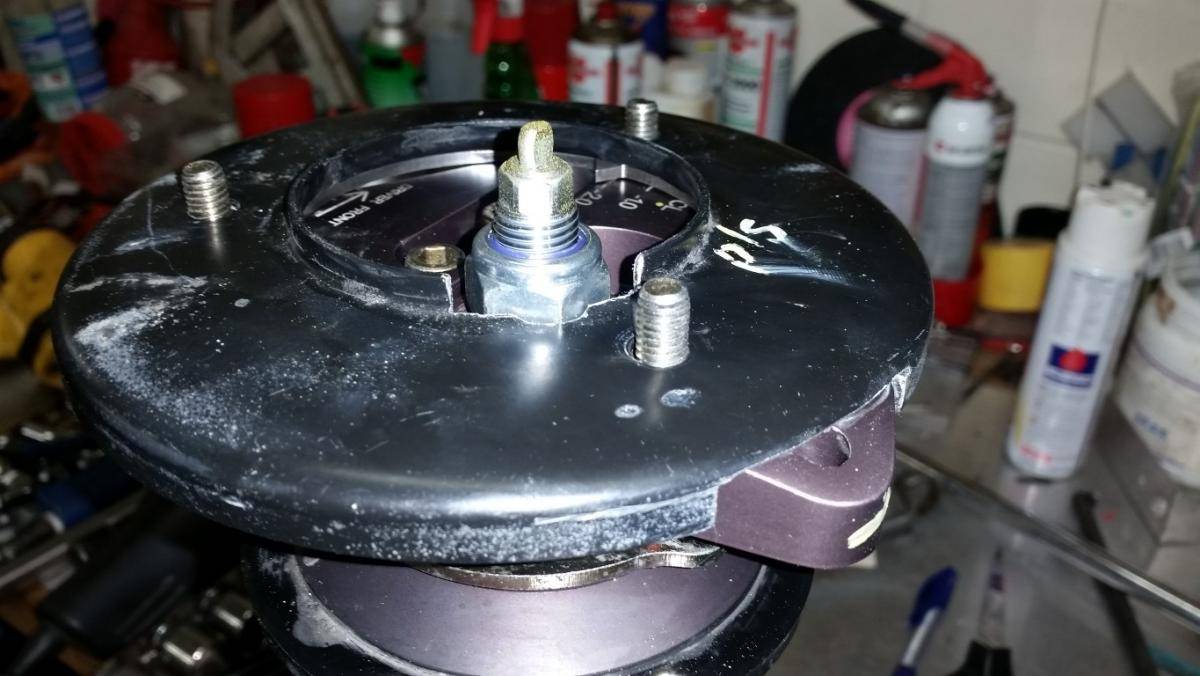
Package from Ground Control, upgraded to adjustable Race inserts and a pair of adjustable rear control arms.

Now you know why, both the front and rear passenger side shocks were leaking

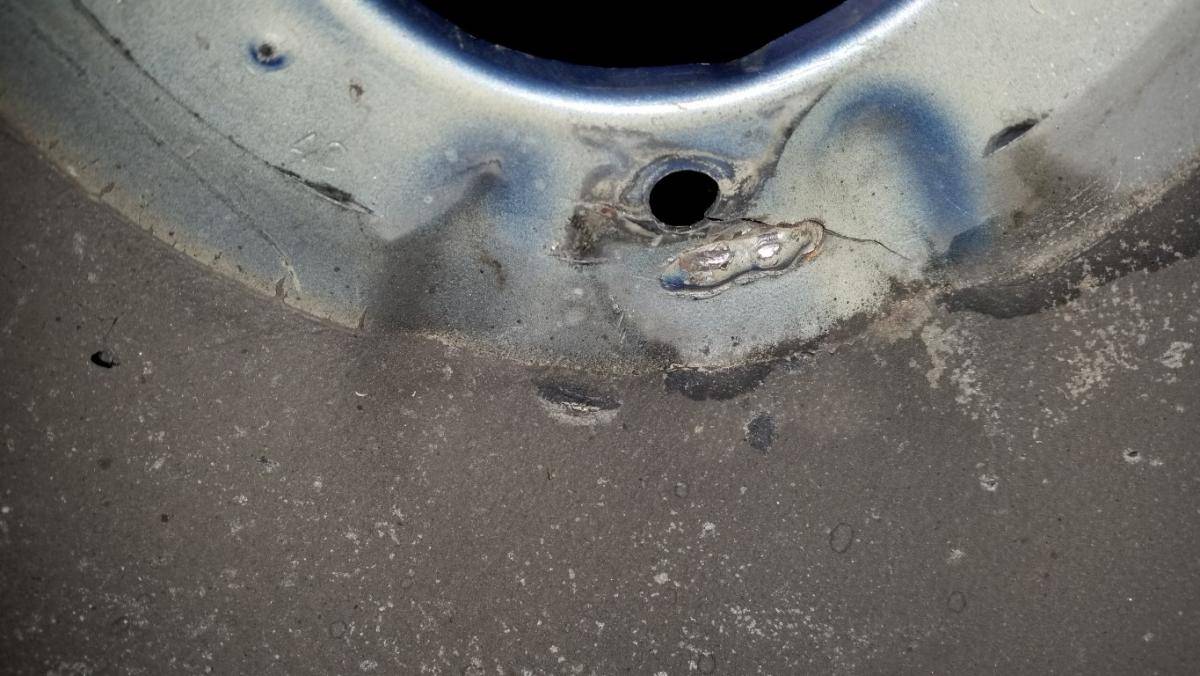
During the changeover I found this a small crack, I believe it is from me adjusting the camber and with the camber plate sitting on that weld it gave way.
I've ground down the weld, but I wasn't allowed to do the repair welding as the expert didn't trust me.

I found my old tower reinforcement plates and modified them to allow for full camber adjustment. Why didnt do this previously I don't know


Aug 2017
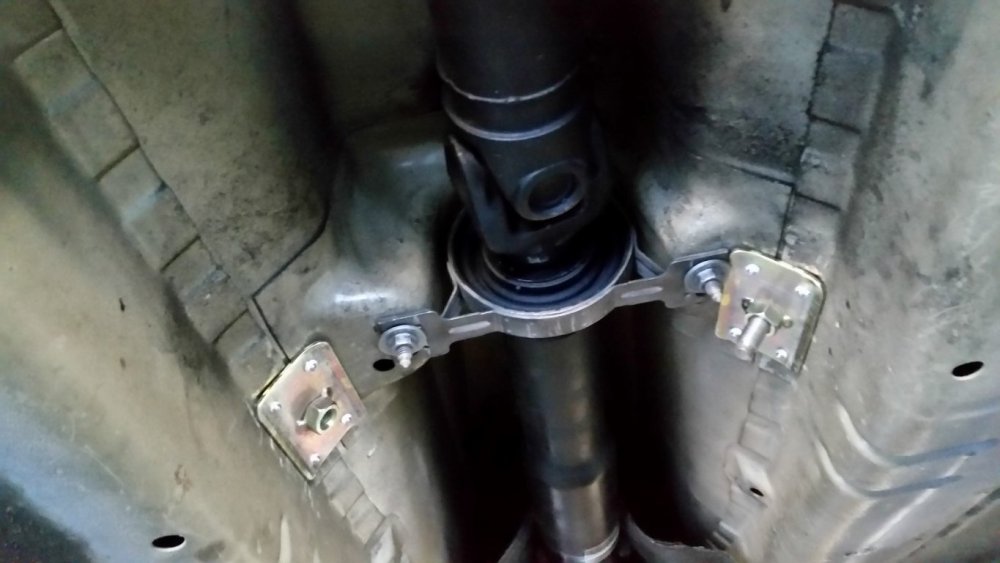
RallyRoad front strut bar and rear end Black Powerflex bushes.
.thumb.jpg.56e51c655c1d594d5810b6a31eddb854.jpg)
RallyRoad strut bar installed not the 5 min job I thought. Needed to order the special nuts and had to trim them as they sat proud. (sorry the part # for the nuts is missing forum change platforms and lost most of my writeups)
.thumb.jpg.b18031bc0a8526bc6024b8ccc1ad5a37.jpg)
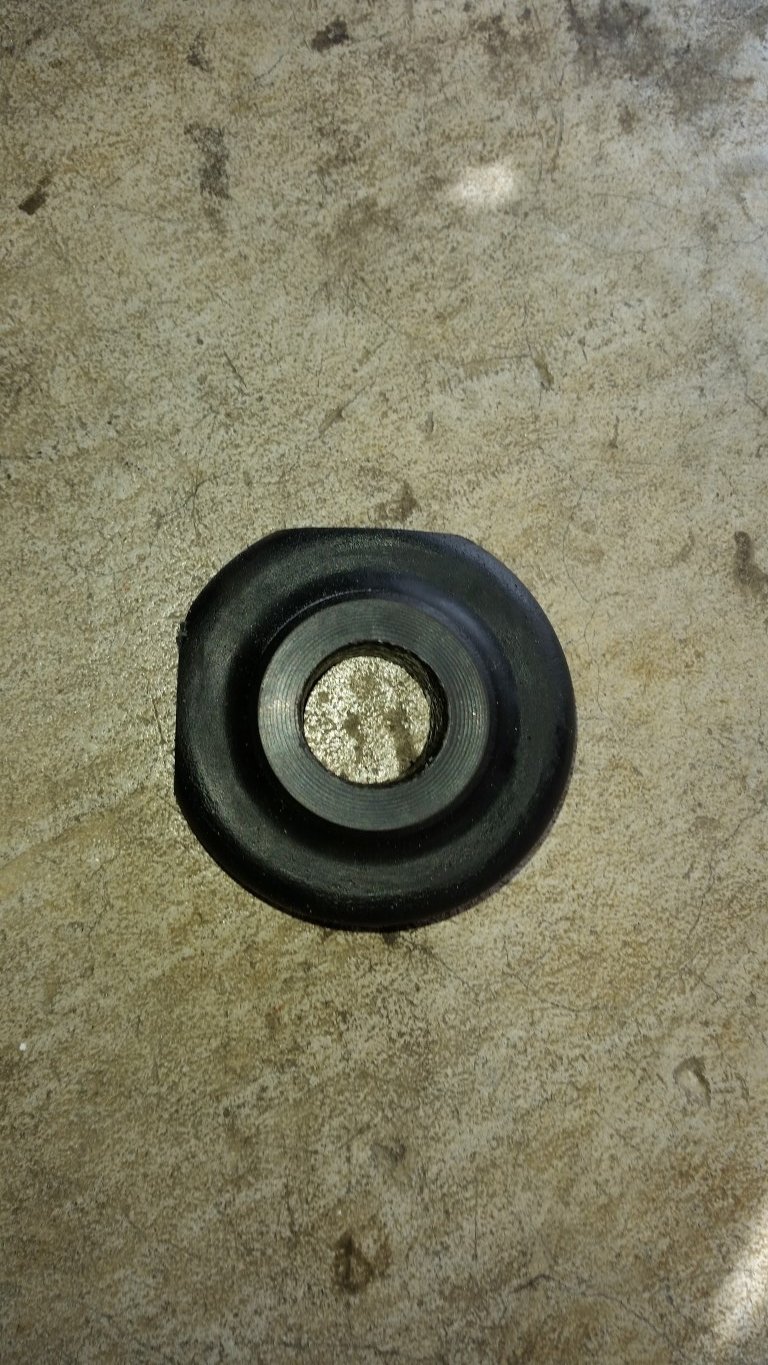
Rear end removed, time to install the Powerflex Black Bushes
.thumb.jpg.3f0a2b38e98d998075da979d8aa9a9f5.jpg)
9
Tried the drilling out.............smelly and messy
.thumb.jpg.91f436577e12760c37d7f0b211fd5b6c.jpg)
Went back to the 20 ton press, gave up the first time because of some of the fun angles and packing I tried seemed dangerous.
Second time was just as scary, I hid round the corner a few times.
.thumb.jpg.0b7eab5adb47c2c2dbfea031117f218c.jpg)
.thumb.jpg.e0074324700401dd38307060088d93af.jpg)
When fitting the GC adjustable control arms, I needed to adjust both the lower bush and the control arm opening so it didn't bind.
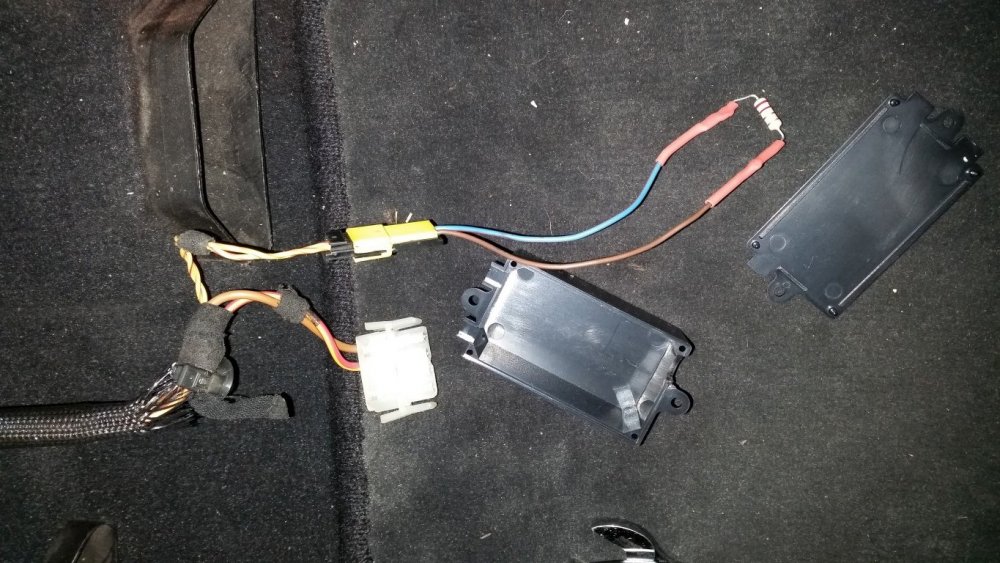
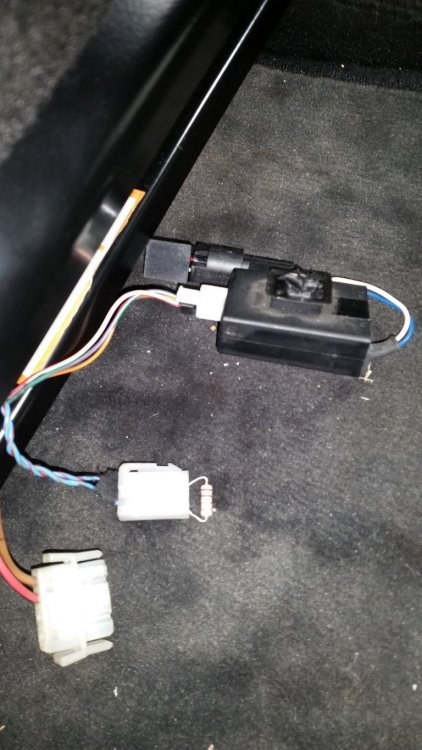
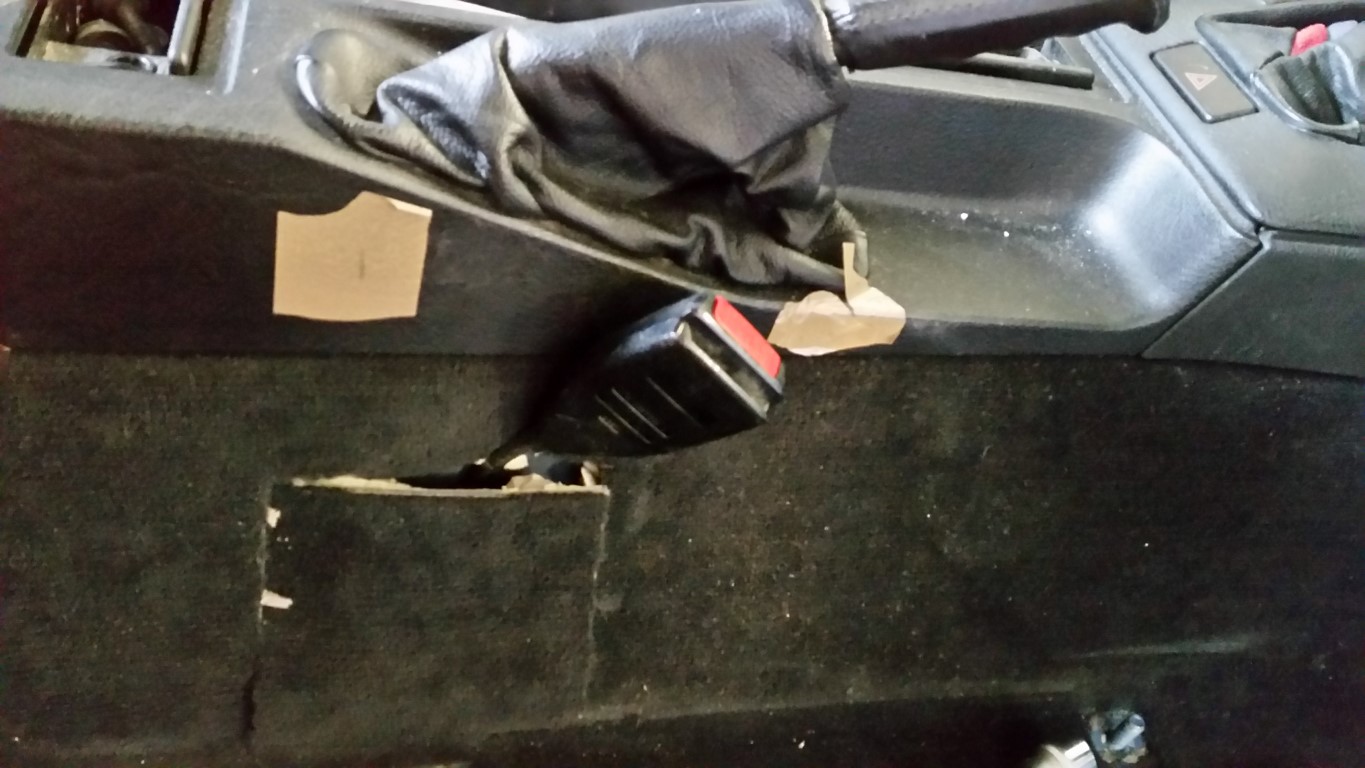
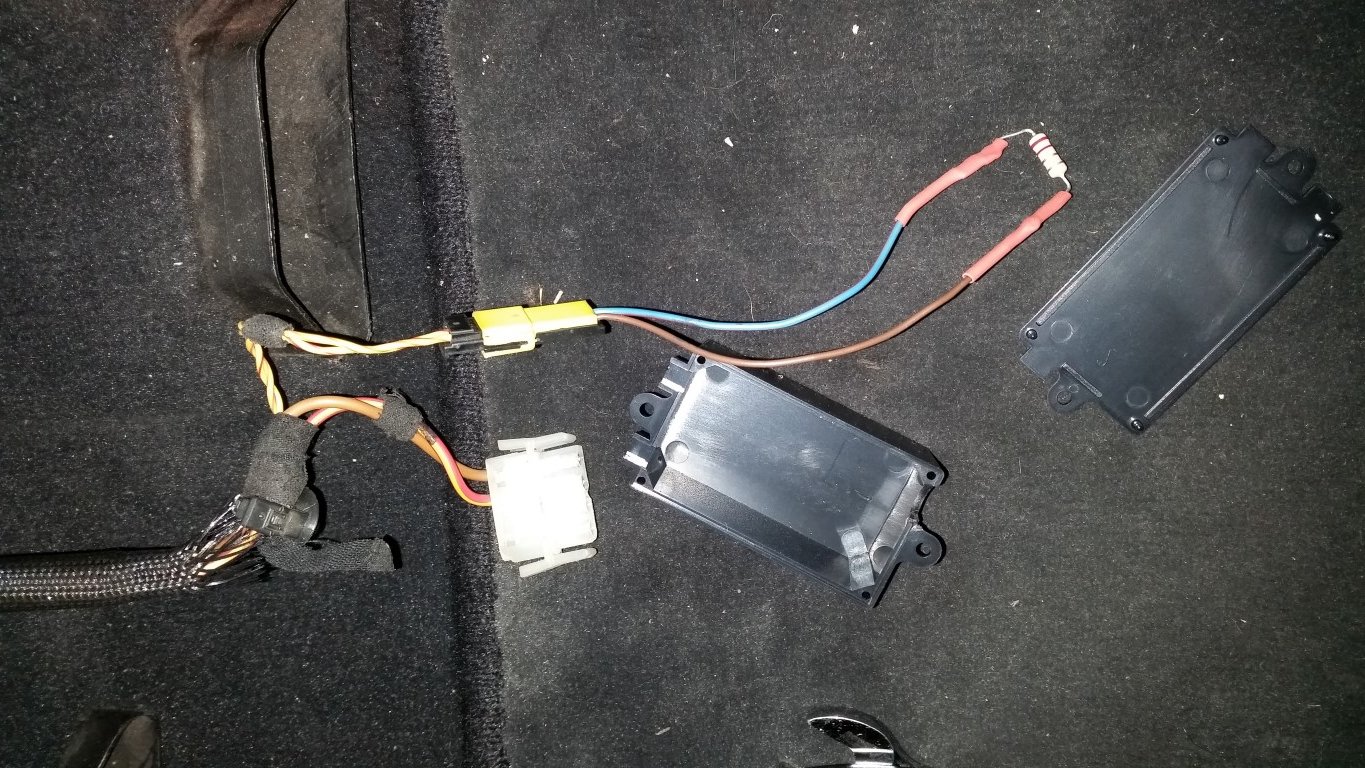
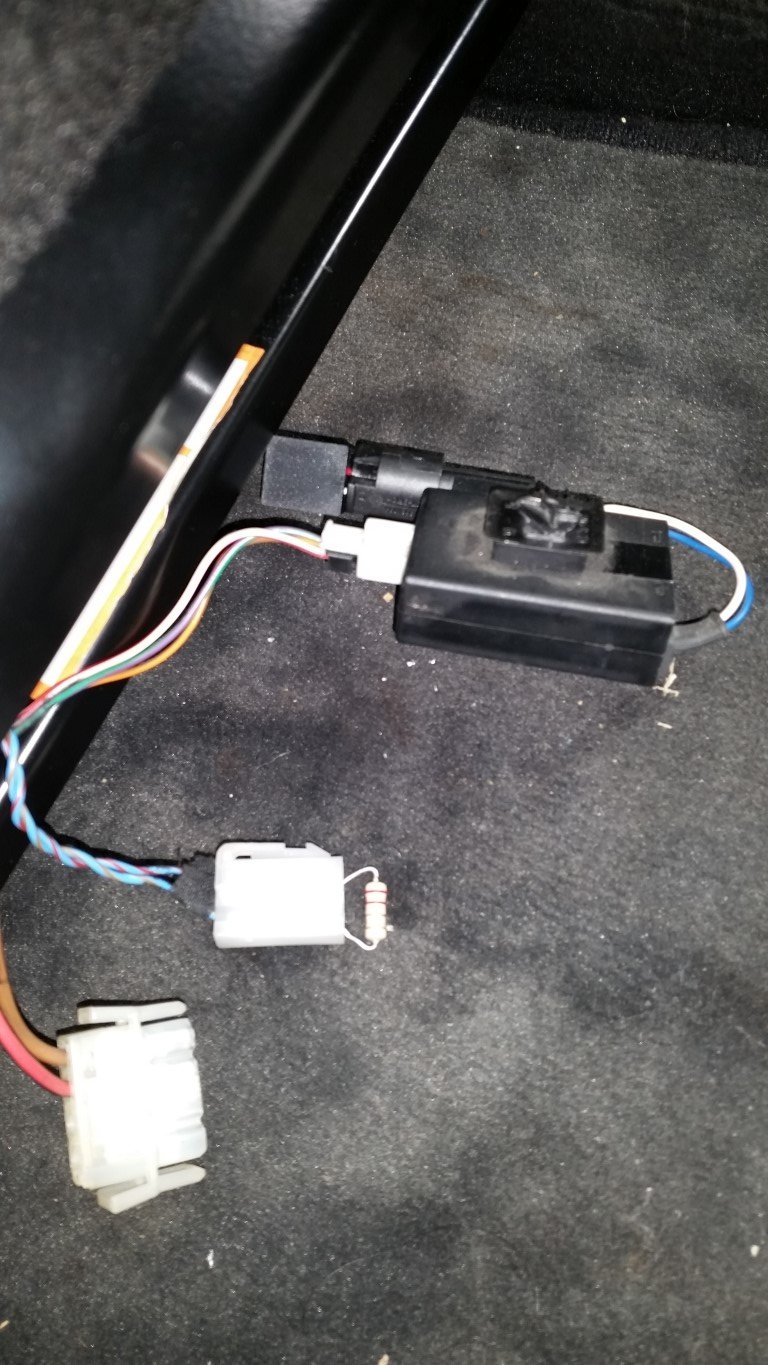
Replaced my boot loom, don't remember what I had in the write up sorry.
Thanks to Dave (M3AN) as I said to you didn't need to provide me with a new loom but it is appreciated.
.thumb.jpg.5dd4c2db8eb37e0039789204a3100673.jpg)
Sep 2016
I know it's not Christmas or did it just come early. But these were listed on Trademe for the second time this time I had to have them.
Recaro CS Sportsters full leather, heat........................
.thumb.jpg.f7584c9645b03111b0fca63edd9995e2.jpg)
(Medium).thumb.jpg.ff1aa301cb5edec466d6aefbe242df75.jpg)
Weight saving only 12kgs total
.thumb.jpg.46abb0ea4f3f544d76746c63519370a7.jpg)
As these are not standard BMW E36 M3 seats here in NZ you need to get any modification Certified, including my rear adjustable control arms.
The first certifier I went to was a total num nuts. His requirements, required me sending numerous emails to recaro germany, spending days fabbing up slider releases (which I got to work)
But I was still 15mm short of exist distance on the drivers side and germany wasn't helping with the other request removal of airbags.
In the end I rang Wellington spoke to LVVTA, then went to another certifier all the above was a waste of time and stress. If it doesn't sound right just call Wellington it's worth it.
Just for the record
no95% of aftermarket seat mounts/sliders are not certified, which means you cannot mount your safety belts to them.All modifications Certified, I got my little piece of paper and cert plaque riveted in my engine bay
Below give you an idea of what's required, you will need to go to LVV site download the H template and instructions to work out your individual seat belt receiver location and height.
Lower/Upper Plates were from Auckland Seat Belts, in Glenfield. They sell them as a kit.

Needed a spacer
H points marked

Airbag occupancy light removal: no dash light, air bags are always active.
March 2017
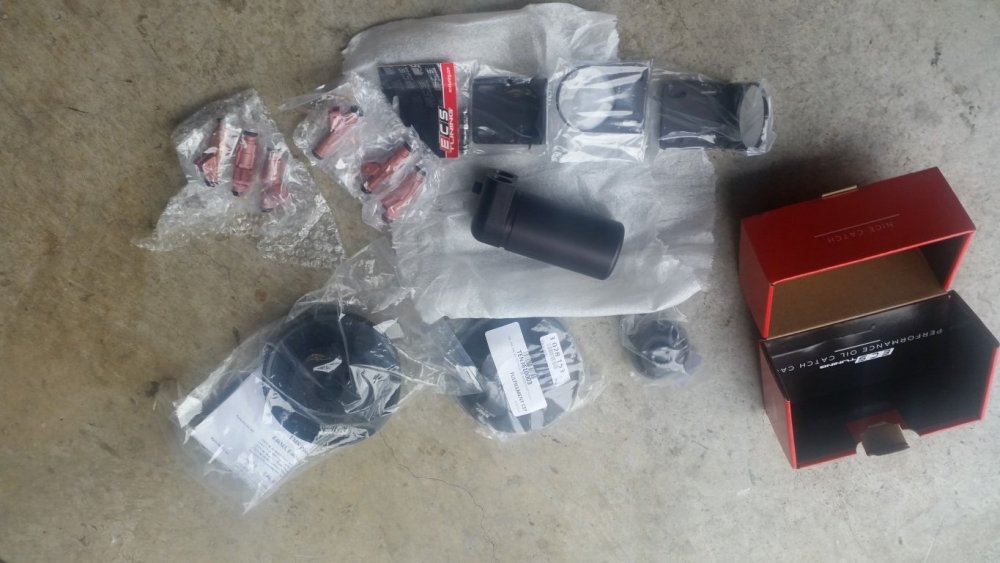
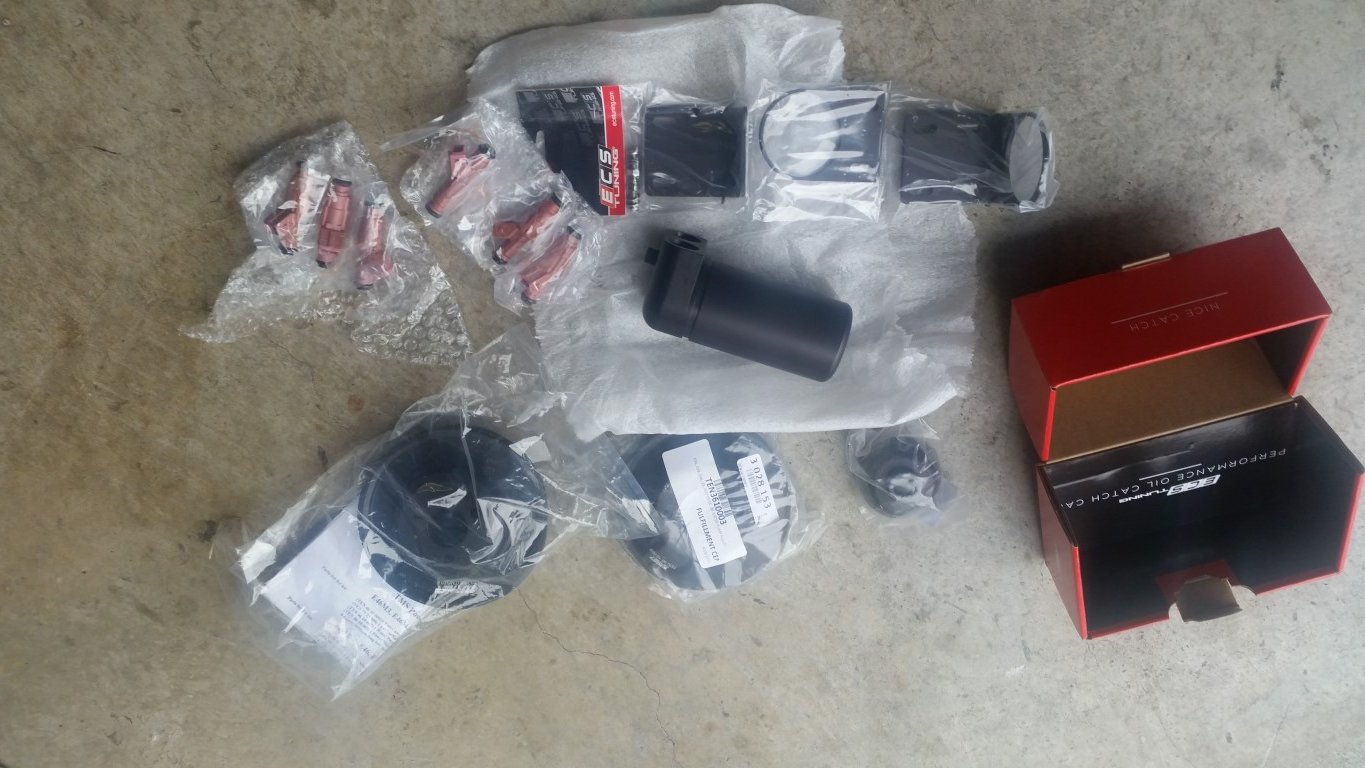
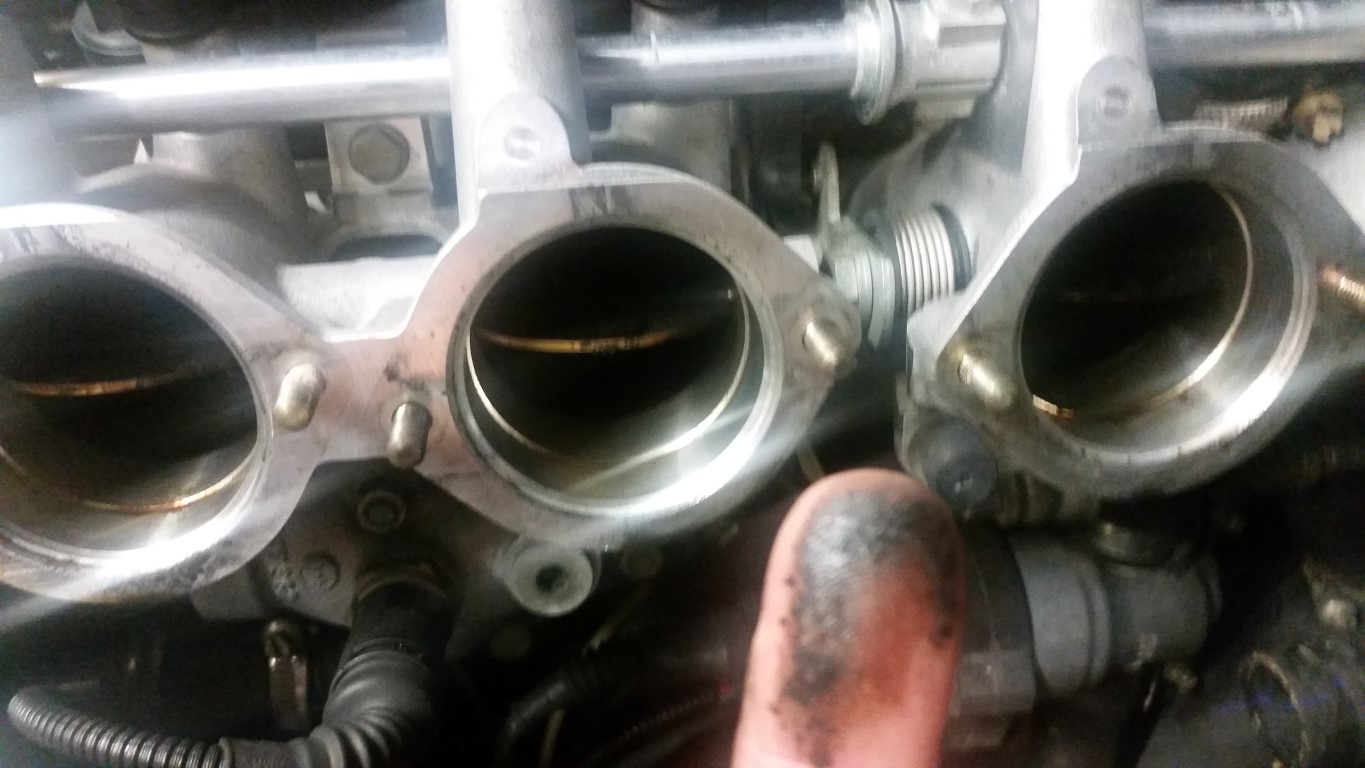
During regular maintenance back 2016, I came across some oil in my Plenum.
So for Christmas I got a ECS oil catch can
So decided to remove the plenum, check the throttle butterflies and install the ECS oil catch.
(You may also notice the Power pulleys from ECS as well, but they manufactured for TMS which don't fit Euros. Well the power steering does and is now fitted.)
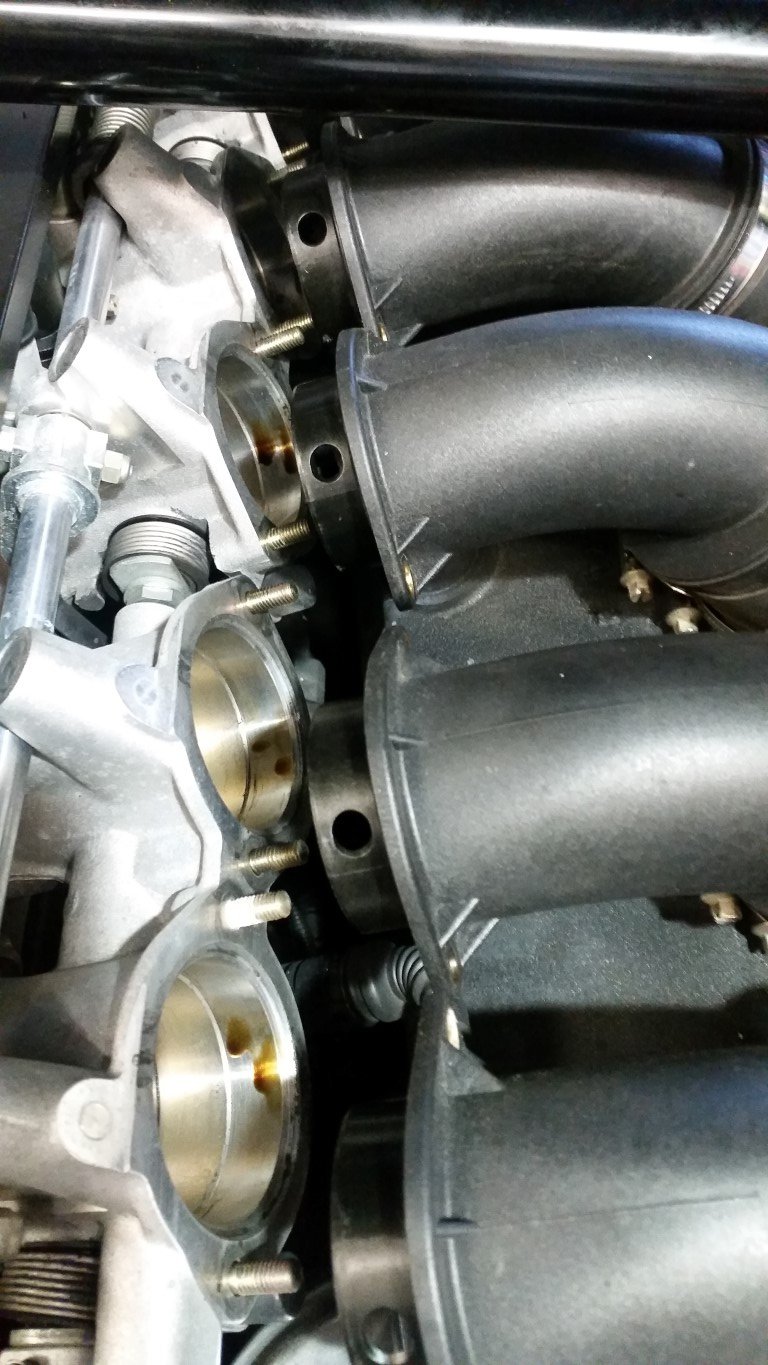
On inspection 1-2-3 were dirty but 4-5-6 butterflies were a real mess. Throttle body cleaner and toothbrush to the rescue. The vanish in 4-5-6 was impossible to remove.


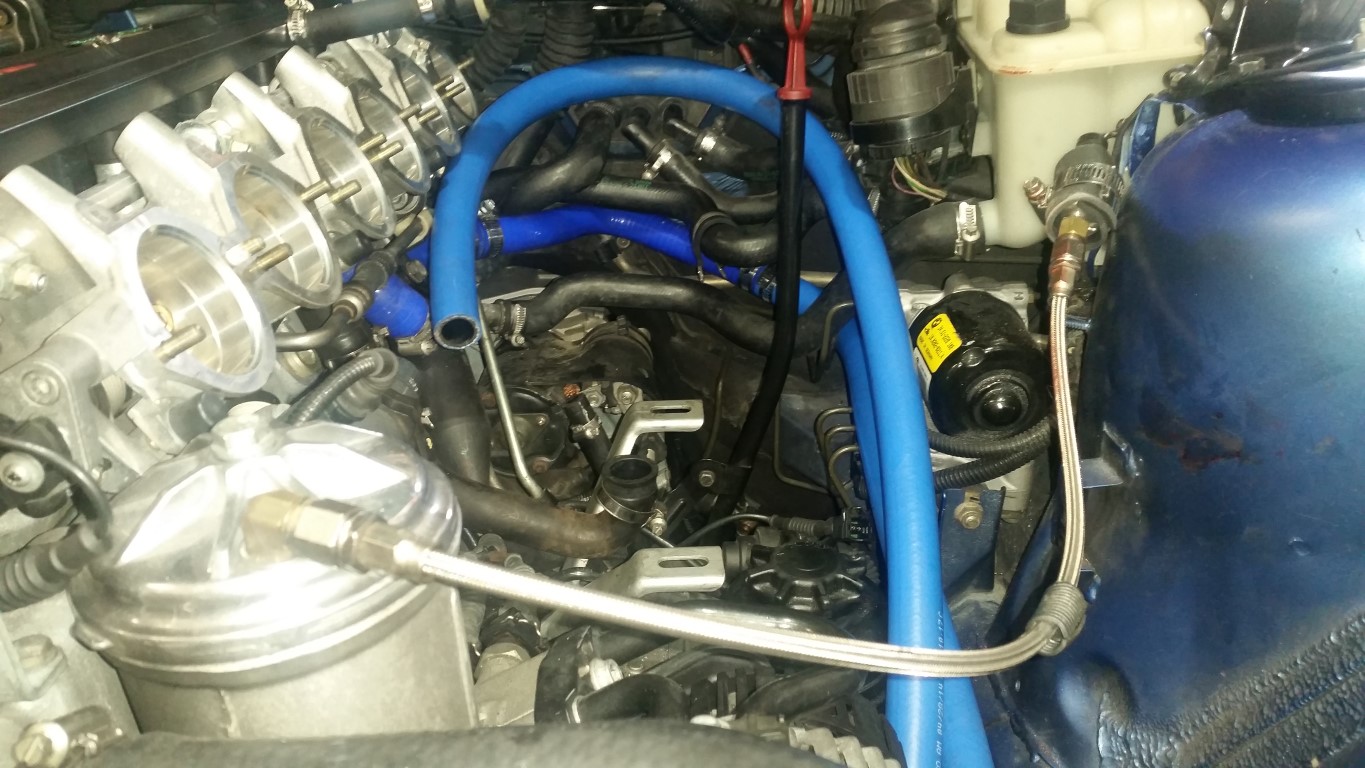
Location of catch can
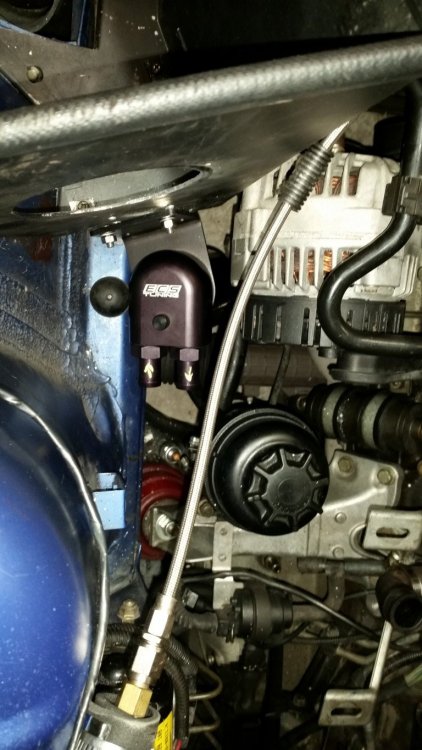
I cleaned the IRV and oil separator, replacing the hose # 5 as it was very mushy. As you can see I have left the OS in place and have just added the catch can inline.
Routing the hoses was fun setting the hose clips, so they didn't rub or impede putting the plenum back on took a couple of tries.

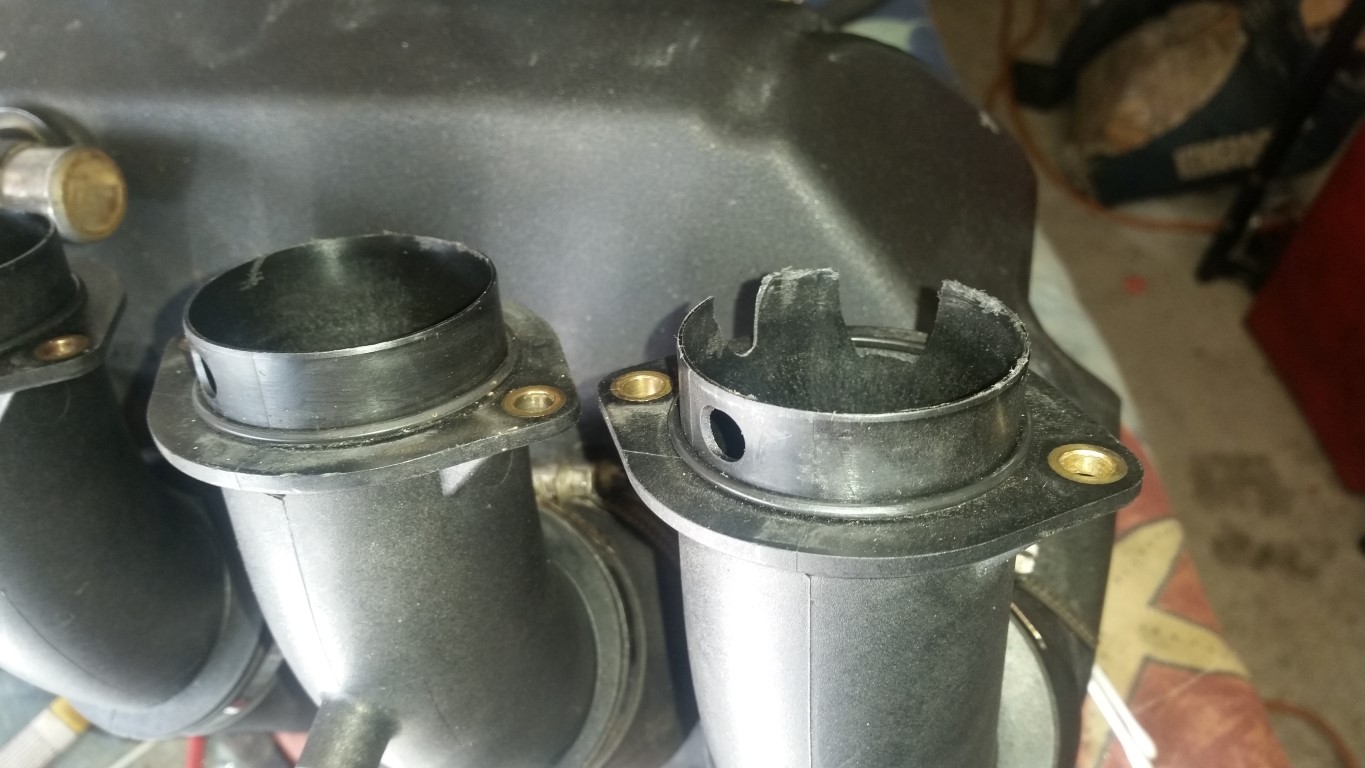
This was a resolute of plastic fatigue
not a hose clip for a coolant hose on the back of the plenum and me having too much spinach.
Many thanks to Aronn for sending up his spare. Means I'm driving my baby 7 days early.

Installed, will update after a few Kms, late April update I have not removed the lower canister, but after approx 700ks and a driver training day there is no sign of oil on the dipstick.
.thumb.jpg.9ccdcde9f8adaef9f2c0c7fc4ea57b80.jpg)
At the last monthly coffee meet, I mentioned to the guys that even though I loved the sound of my car. I was driving like a nanny because it drew to much attention.
Here's my first attempt, start with the tail pipe got some silencer packing cut it to fit the inside made a cage and slipped it in. I couldn't get the cage to fold nicely around the ends so just cut out a panel and fitted it in.
Result: did take the edge of the exhaust tone. UPDATE..... April 2017 driver training, blow the cage and packing out of the tail pipe
.thumb.jpg.29dcab62158900c2fb0be79140c3a135.jpg)
.thumb.jpg.61022e71b703ed33045cc41092c5cf25.jpg)
Next idea, now I know that Scorpion exhausts are guaranteed for life but mines dated 23-99 so I thought maybe the silencer/sound packing had maybe disintegrated.
I did some research ordered 3 x Acousta-Fil Boa bags from GB @ $18 each NZ, $100 with delivery.(once again NZ company did themselves out of a sale $69 a bag)
A bag of 35mm stainless steel plugs and borrowed a mini camera.
.thumb.jpg.e6680fd5f4403d065e337efdf00545a9.jpg)
Here's where I'm going in
(Small).jpg.e90a7be64fc0274d03a203eecde8b0d8.jpg)
(Small).jpg.b301ab3bb315b08da1a167d3144c096a.jpg)
I couldn't believe how much packing I got out, took a couple of hours. I had to make up some hook tools. So much for the silencer packing being disintegrated
.thumb.jpg.f27969bb0d8bdd487ff31cd779d3379d.jpg)
Used all three bags, inserted the plug with some high temperature silicone.
.thumb.jpg.413acaaf79b94ef2ee0ebb5f57357f4c.jpg)
June
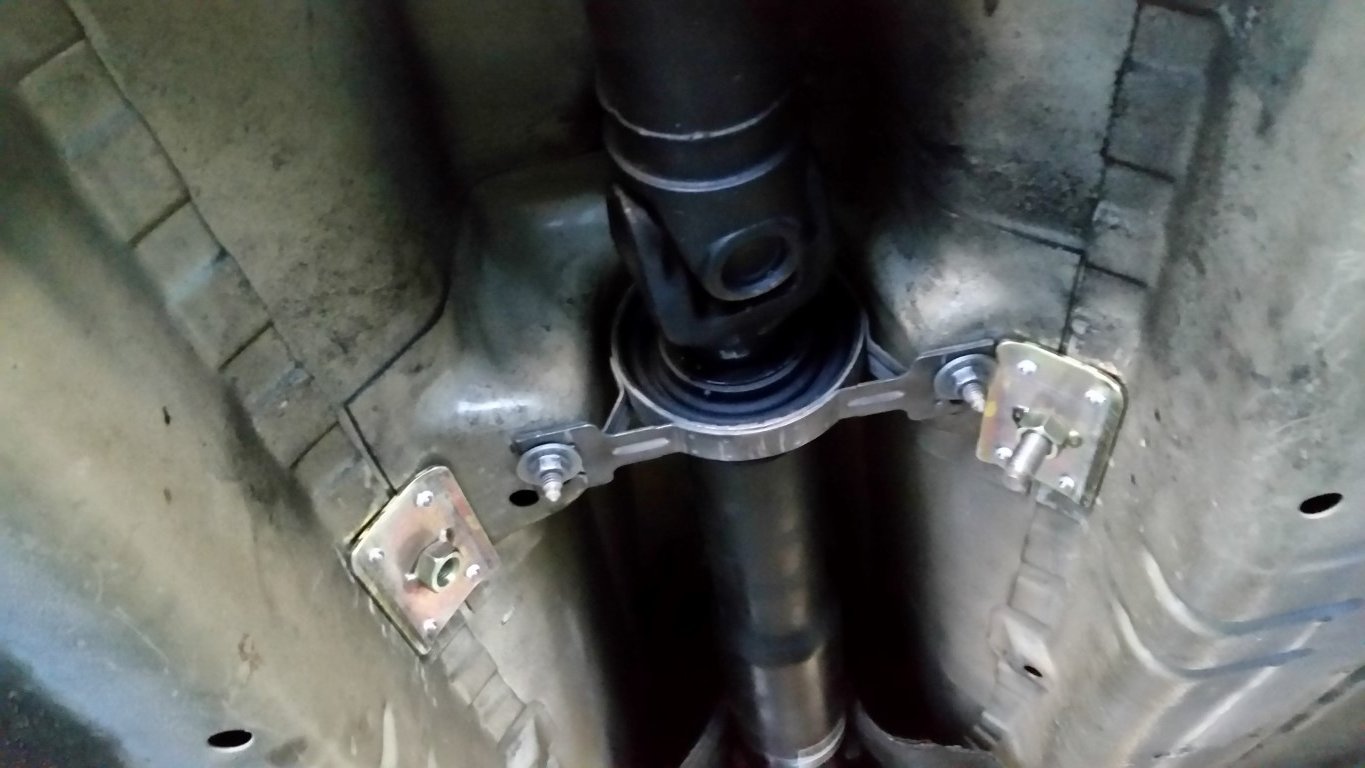
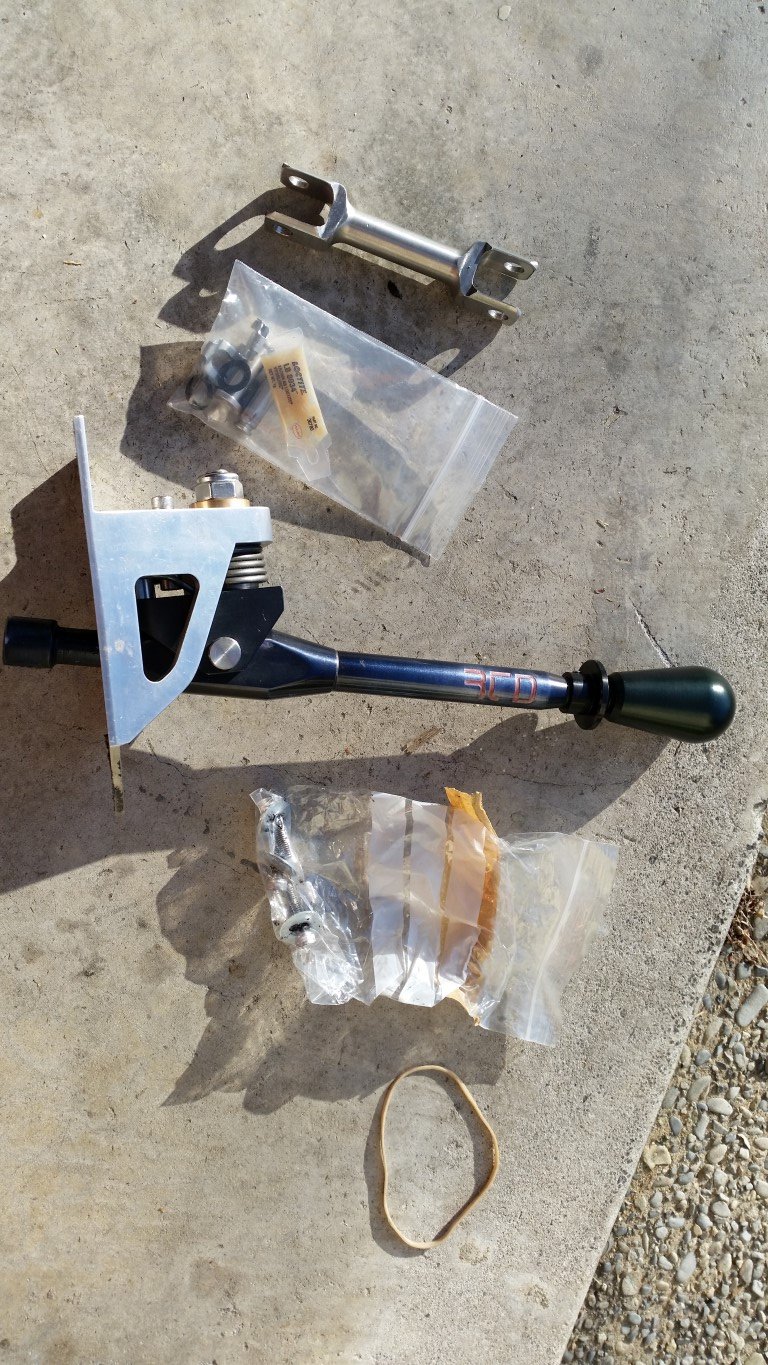
Was looking at CAE & RTD shifters online a month ago. Then blow me down a RTD was put up for sale on here...
 Couldn't help myself.


Spent some time trying to contact the manufacturer. So I could buy the RTD DSSR ,spoke with John he recommended just going with UUC.
Installing was a PITA only because I know better than most (right) and installed both pieces with the exhaust and drive shaft still in place.
It's tight under there and the tolerances are also amazing. I needed to remove the gear selector input shaft joint and sand the bush slightly to get fit the DSSR to fit.
Reinstalled the DSSR, then spent a couple of hours trying to get the DSSR and RTD lower arm to match up for the connecting pin I could get it within 1.5mm
I ended up making a temp pin approx 0.5 smaller with the leading edge chamfered.
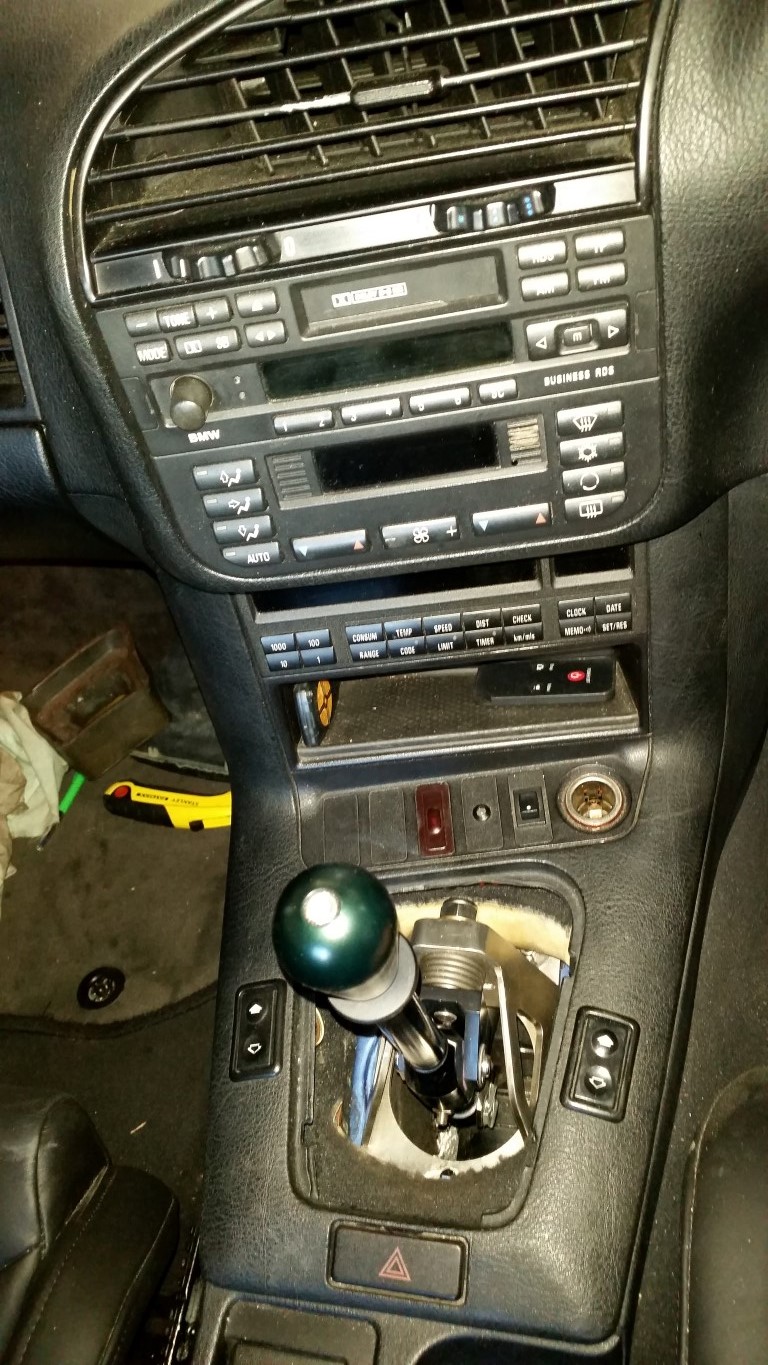
Got it back together went for a drive but got the first base location wrong couldn't get into 2,4,6th.
The bolt on the hazard light end of the base only just catches the base plate. The OEM knob sits slightly skewed to the left.
Time for a drive up around the bays, interesting totally different from standard very precise you need to shift quickly when I shifted at a leisurely pace I'd get lost

Drivers training in 2 weeks need to work on the muscle memory till then

Driver training
 after a dozen emergency braking exercises I once again lost 2nd, 4th and 6th gear. On inspection I cannot tell if the units base has moved.
I'm guessing as the fixing locations are maxed out, once things hot up it moves outside of useable tolerance.
July
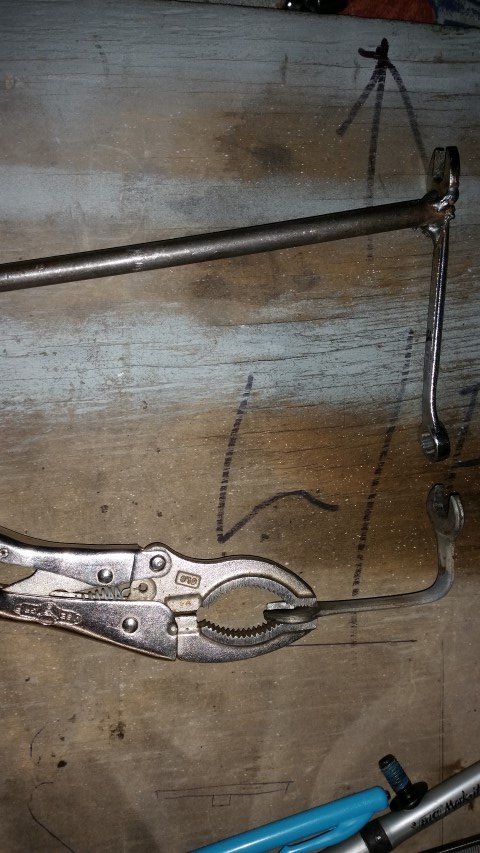
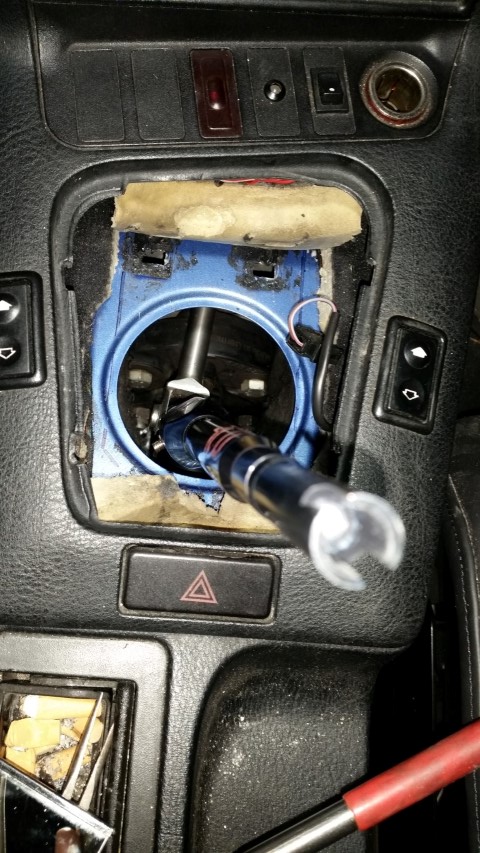
Keeping to my philosophy of there must be an easier way............... e.g. not removing exhaust, driveshaft etc to remove shifter
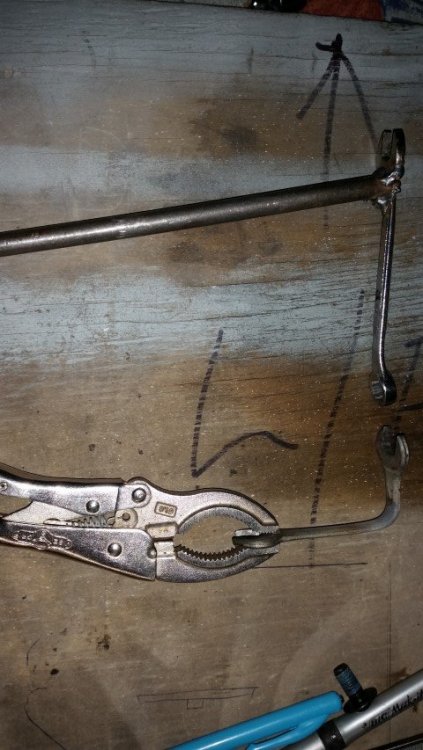

Tools I adapted to reach nuts from inside the cabin. With the base in place. Marks on tunnel not centred misaligned offset to the left
.thumb.jpg.a3d9547ed3dc655738b482fe9d9992f7.jpg)
(Small).thumb.jpg.6cbd53a51b12bd0a429b25ec3f881b22.jpg)
I forgot to take photos, one day.
So the plan was as above extend both top slots and angle them slightly to centre base, just slotted them as above.
Didn't extend the sides but extended the rear nose (now a closed in slot) and have had washers and nut bases welded together to reinforce the tunnel sheet metal. Upsized the nuts and bolts to from 6mm to 8mm. Also made reassembly from inside the cabin a breeze. I have only cruised around Devo, but changing gear, finding gears is much easier. But won't know if the reason I did this works till some spirited driving is done. (see update below)
Dec 2017
Coolant flush and new thermostat.
29th Dec driver training.
Good stuff first, RTD shifter is superb. I love it .
As always 1st session was just a shake down, second session pushed a little harder 1.19:5 but then
sad to say only lasted 1/4 of the 3rd session before this happened
(640x480).jpg.fea2f0ee5dd103a2f5c6eb21924ae5e6.jpg)
(640x480).jpg.15ebc6faf4d33849dc35aed8aff6743a.jpg)
Damaged my radiator, rad shroud, fan and oil cooler lines. Waiting now on parts
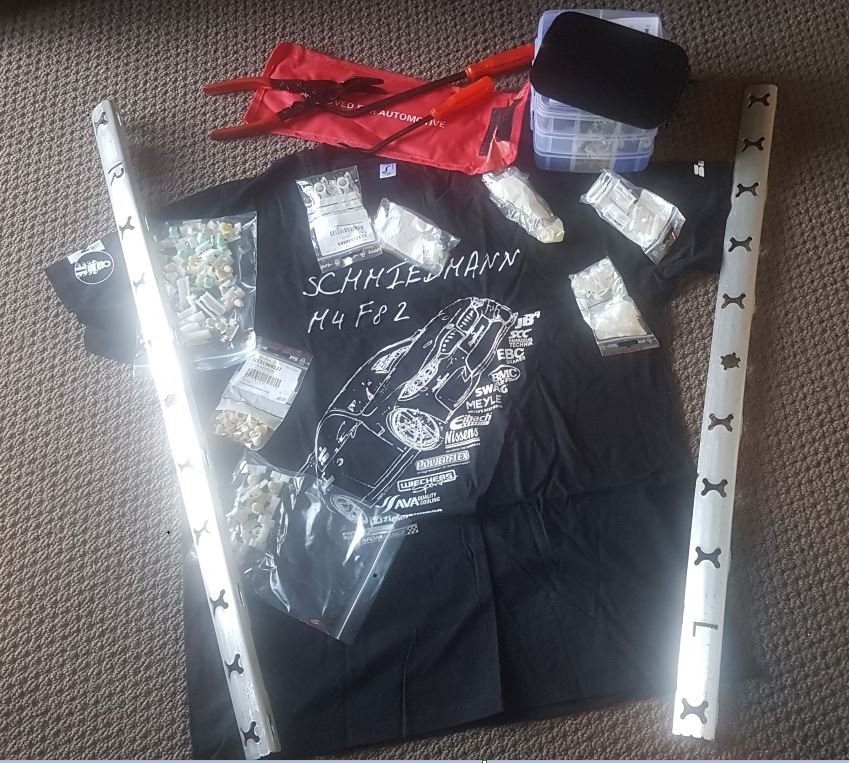
These arrived today Vibra-Technics BMW362MX
.jpg.4b6f0e348c2402232ca290cd09b1b5ba.jpg)
.jpg.8bc98c3666aeeaa75eaed67ffe6ad057.jpg)
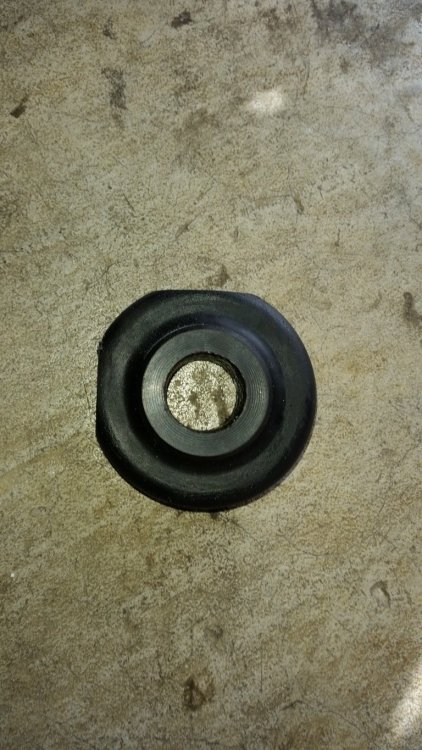
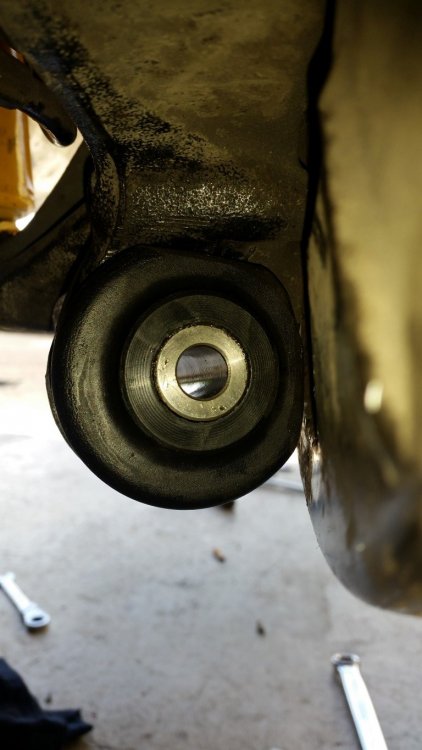
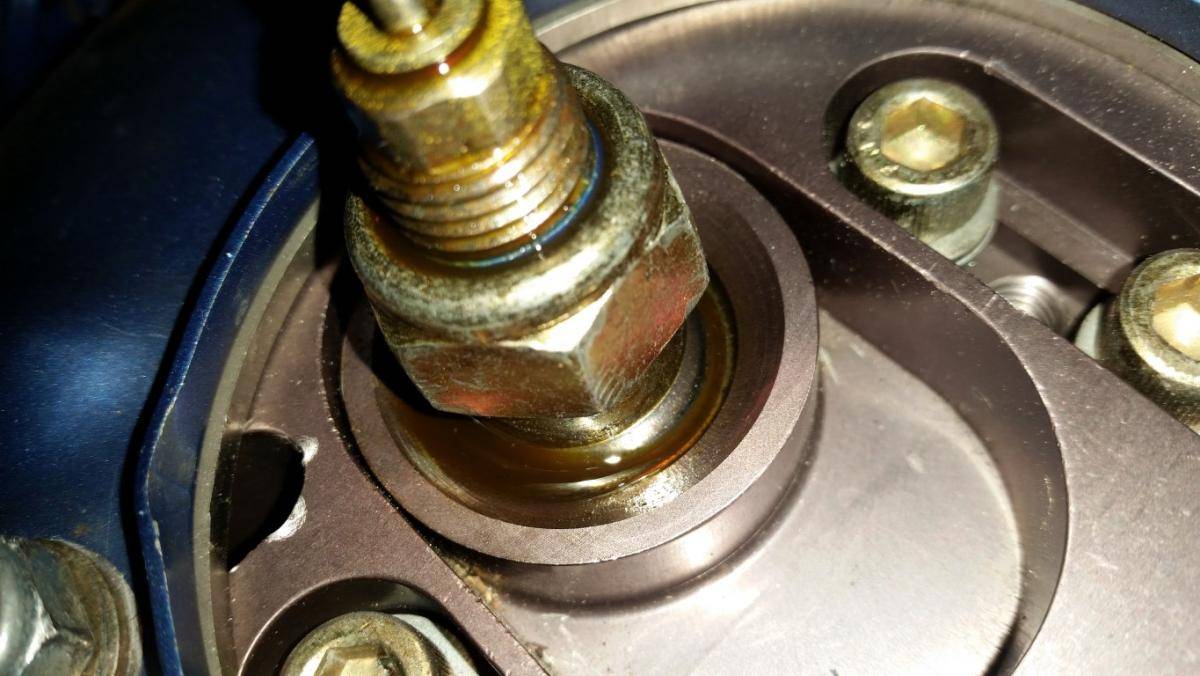
Removed Poly Engine mounts
(Small).jpg.0000dea153ba518a06ce06433bc4dad7.jpg)
(Small).jpg.9d89c275ce68ddb8caebadd589b85741.jpg)
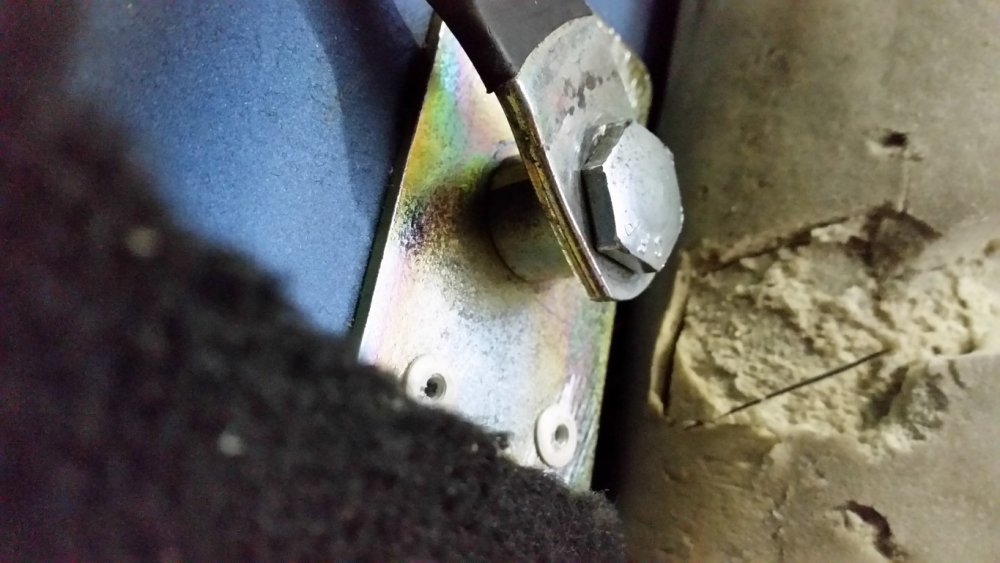
Well a picture or two are worth a thousand words: No heat shield to speak of (top right), the poor old passengers side bolt & plate have moved under the strain.
.jpg.1d8d99b6e8a4ebf1e79264d55b4c15fa.jpg)
(2).jpg.1654ed545c451a6a4e3f1b8d1ab611cc.jpg)
New parts in waiting, over the top heat shield for drivers side engine mount. Think I'm going to have to strap it in place.
Feb 2018
Installed finally, engine mounts, uprated heat shield drivers side, oil cooler pipes(4wk wait) radiator including mounts, vent pipe, fan and shroud.
As a precaution after the failure of the engine mounts, I loosened the gearbox cross member and gearbox mounts and re-adjusted them.
May
New Crankshaft sensor
August
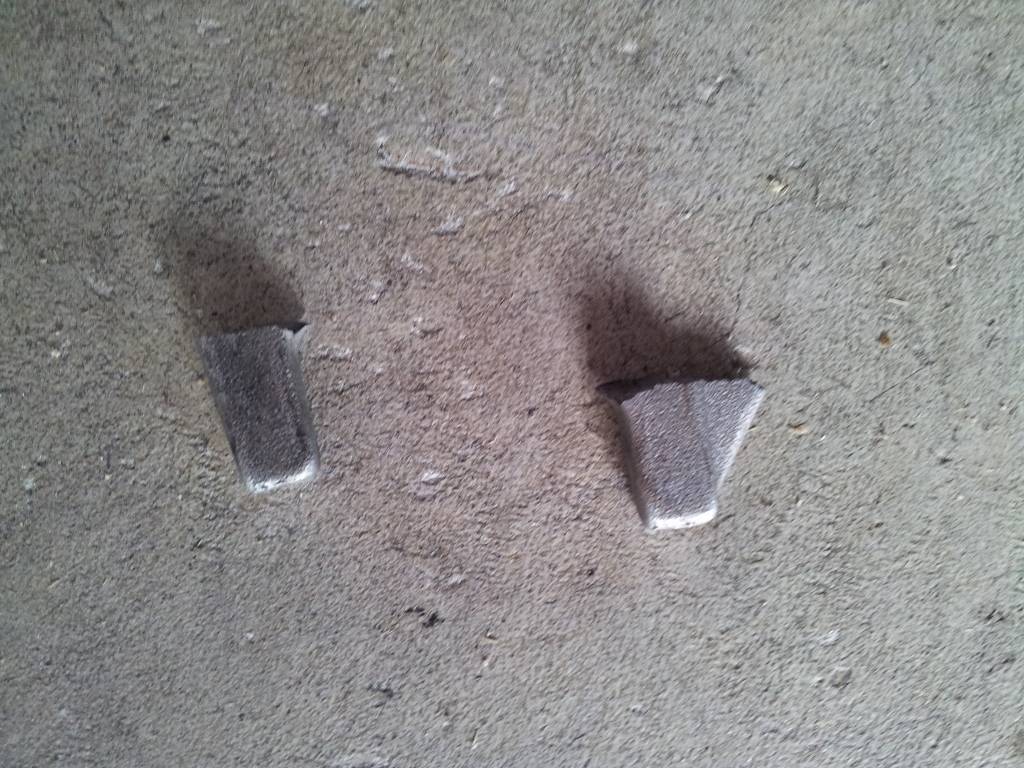
Driver training on Sat 11th at Hampton Downs was existing to say the least.
New Best Lap 1.17.65
On the next lap this happened at the turn in of Turn 4, poor RacingBrake.com couldn't handle it.
The RacingBrake front rotor exploded.
.jpg.2bfddeda529d3477ff36045074bb909b.jpg)
.jpg.7c1515453eaf20f8a5189b74fdb54d97.jpg)
.jpg.ef3dd0e3ac625a7383f2595cf26406fe.jpg)
.jpg.110812a3977c1836d233f23ba070c6a9.jpg)
.jpg.af9f583d847fc938e0e74bf99ee55453.jpg)
.jpg.9651e837b6f0e72e05cfe1cab57fd6af.jpg)
So after contacting RacingBrake.com again, I received no reassurances from RB as to the quality of their product.
Hell, they didn't even reply to my requested for an invoice for Oil and Dust seal kits so I could recondition my calipers.
October 2018
So the quest began, as my existing calipers and brackets fit my wheels. The need to buy a full new front BBK wasn't a requirement, I only needed to decide on the rotor size (existing 328x28) and buy new hats.
I've decided to go with APRacing CP3580-2900, 330x28. As always buying from oversea looked good, but shipping, gst and the exchange rate bumped the price up considerably. So I approached Aaron from Race Brakes NZ and the prices was competitive. ( update ) After receiving the hats, I received a VAT refund. So if you minus VAT of the rotor price/costs. Importing would have cheaper.
The hats were going to be a one off and there would be a min of 6 weeks wait if I was lucky. So I contacted AP in Britain, they recommended BG Developments in the UK who said they should be shipped in 2-3 weeks. (Took 3 1/2 wks) I wanted my car back on the road, so even though it was more expensive, I put time over cost. .
Old Rotor and hat ........6.4 Kgs (a side)
AP Rotor and hat .........6.7 Kgs
Also replaced the front brake lines.
Reconditioning my front calipers myself didn't work out 1 piston on the passenger side leaked, 2 on the drivers side.
.jpg.6f031f2e128c05bf3d6ce8bcb413829e.jpg)
.jpg.9246c3e2e0aecde72d13f445523bb154.jpg)
Advanced Seals and SVS in Albany are making up a new full set of Dust and Pressure seals.
Nov 2018
I installed both sets of seals only to find that the dust seals lip was to thick so I couldn't insert the pistons.
All sorted.
Full fluid change, diff, gearbox and engine.
Feb 2019
Replaced my twin coby SLC10 with SLC16 approx 6 decibels quieter.
March
Tried and failed to de-stress my front rotors at 11.00pm on the Northern motorway doing a dozen 100kmh to 50kmh hard braking trying to get the rotors to 435F or 225C
De-stressed my front rotors at Pukie on the 9th,
Purple steering rack installed (thanks Dave M3an)
New PS Reservoir, (looking forward to putting it in ) as I'm replacing my rear SS brake lines decided to renew the caliper bush guides as well.
Changing my silver pedal set to black
(Custom).jpg.424a7b966f986bdc9b83671978d7214e.jpg)
June
Driver Training Hampton Downs, the new rack was nice it was also nice to complete just about a full day.
Fuel starvation raised it head again during the last session (Turn 1 & 2) approx 20 litres still left in the tank.
New time 1.17.165
July
Driver Training Hampton Downs, only change replaced my front pads Hawk DTC 70 with DTC 60
New time 1.17.01 (I'm back
)
.thumb.jpg.b7a4cc523443b9a18a8b02e0a19fd95e.jpg)
August 2019
Custom J Hook Machined Reyland Motorsport 7.2kg each, E36 hats but E46 diameter.
.thumb.jpg.3c4bd7b3da8f0381a8070a2e6e49f782.jpg)
September 2019
A set of Aluminium doors (Thanks to M3an for the heads up)
Aluminium Door 13.3kgs with Window regulator attached.
.thumb.jpg.153347fe0a7706e208a46f6d1634da0c.jpg)
New Fuel flap, clips and fasteners. Turtle Laboratories door card repair brackets

Aluminium Door 13.3kgs with Window regulator attached.
Steel Door 20.0kgs with Window regulator attached.
6.7kgs saving per door
Oct 28
As you can see from the timeline there has been some delays. I started on the passengers door swapping over the internals, adjusted the door alignment and window. Tried to install the weather strip clamps, first problem steel doors are 2mm thick, Alloy doors 3mm. Thanks to M3an, Dave used his vin in Realoem and found an extra part number. During this time I start dismantling the Driver door only to find, when my drivers door window was replaced the repairer had rounded the two countersunk screws that hold the glass to the rear track slide. The the door handle chassis had broken in the usual places and the door handle cover had been glued in place.......... So a second lot of parts were required and received. Missing from the photo is the new drivers side door handle.
As for re-installing everything: I needed extra shims for the hinges, I found that because of the extra thickness of the alloy panels, I had to file down the door handle pin body location so the clip would slid onto the pin. Also the door handle cover top claws needed a light file to widen the opening.
.thumb.jpg.7b19d7e7dde10870b530975f3b2aad57.jpg)
Below Steel v Alloy door clamp (Part # 51418187492)
.jpg.ab3821438bf789e20ec40ad765566b38.jpg)
Nov
So I received some advice about installing the door bump strips. Unlike steel doors where you just line the clips with the holes and whack them with the ball of your palm, with alloy doors you need to support the skin from the inside (so you don't install the door cards) and of course the skin is slightly thicker than steel.
Well what I thought would be a 15min job
took a bit longeeeeer. She who must be obeyed was not impressed. As we struggled with the last clip on each end of the doors. I tried supporting, but the internal frame shape...., grabbing them with pliers and melting a hole, threading a wire and pulling, removing the condom to no avail.
Here's how I got it to fitted, install the green plug and also install the condoms and white clips in the holes at each end of the doors. Let's revise this, worked on one door the other had popped out overnight.
What a Btch, broke 4 new clips had to use 1 of my old ones on the drive side below the door handle it was a PITA. But finally got it.(Famous last words)
(Custom).jpg.4bbe4cc8c7df844478715c3261080474.jpg)
Install the rest of the clips onto the Bump Strip as normal.
Get your helper with the hole support, ( I used a 13mm socket on a 200mm extension).
Start from the middle and work your way out to the ends, using the ball of your palm.
(Custom).jpg.785b04214ac9e47d191b8724621eedbb.jpg)
Dec 2019
Christmas Present (couple of days late) Porsche 996 Rear Calipers off a 2001 Porsche Carrera 911
.thumb.jpg.c799d4cc068ba14df9cb4b66936876e6.jpg)
Jan
.thumb.jpg.cabe7cfeabed69189bd2aed0fc575830.jpg)
Sanded 200 and 400 grit then Masked
.thumb.jpg.1f6e1cdd2c83e7d952caf0034f44ea3a.jpg)
Finished with VHT caliper paint, Gloss Black and Gloss Clear 3 coats of each
.thumb.jpg.e312b824cb2f3ac5f9826180fb990b87.jpg)
Helpful Hints,
Painting, don't get to excited/heavy with the last coat. I did Black x3 the same for Clear coats. Have some clear coat runs.
I replace the piston seals after painting, as it turned out my masking was good. So doing the change pre-painting would have been more relaxing.
I did bake them in the BBQ for an hour at 90-100c
Make a jig as in the photo this allows one side to full eject but still hold pressure, flip it over and it holds your loose pistons in place and rejects the other side. Remove jig pistons pull out by hand.
I found it easier to leave the dust boots in place, they pop off when using the jig.
Jig 25mm thick x127 long x 50mm. Recesses 4mm and 6mm
.jpg.2828bce5c7f6a501c343e6046a030b26.jpg)
.jpg.eee556a140655551ff300cb0d0b6c8e1.jpg)
Update: Porsche 996 rear brakes Jan 18 2019
Had drivers training on Saturday at Hampton Downs, giving the new rear calipers a good shake down.
Average time was down 2sec.
Data showed braking forces peaked at -1.06g which matched earlier visits.
My 888s felt very slippery, they have passed their best and I was a bit cautious, braking earlier for the corners. (Data shows everything)
.thumb.jpg.9514b443924cd58d485fd9dbe1e49444.jpg)
Not sure the caliper colour or the decal will ever be the same
The J hooks were brutal, brake dust like I haven't seen before. She who must be obeyed is not happy with the state of the driveway. After washing the rims.
.thumb.jpg.783c2bfc25bb11926805790460a02e2f.jpg)
Had a slight lip on the top of the ( D737-7606) pads, it may change once the paint and clear coat wear off the mounting pins. The 996 caliper, pad setup makes it a breeze changing pads in and out. Lov it.
April 11 2020
I did a search of my garage and found 2 sets of Bushes for the pedal supporting bracket.
.thumb.jpg.eefaf0a3bdc3e4078abfc52151ba403b.jpg)
On inspection of my clutch and brake pedals, only the brake pedal had any play (sideways movement) The removal of the pedal arms is well covered on the net, so we'll skip that.
.jpg.24f3416968c818c9c9a5a00fd48808d8.jpg)
I removed the clutch pedal and installed the bronze bushes, then removed the brake pedal.
Here's what I found
.thumb.jpg.dcf67112f0ca7f702343b118a67b0a8c.jpg)
.thumb.jpg.d24bf504da205b6c5a6ed8d071d039ce.jpg)
So I have to make a Brake master cylinder and pin connection, brake switch trigger bracket bush. Now known as a BMC PC BSTB bush.
I started with a 35mm length of 13mm OD, 11mm ID copper pipe, the pin is 10mm OD. The brake arm hole is approx 11mm.
I started by cutting along the length of pipe with a hacksaw then compressing it in a vice, followed by another run though with the hacksaw blade and compressing it again in the vice. This made the outside diameter very close to a perfect fit, I touch-up the outside with sand paper to get it perfect.
I then cut the pipe to 15mm in length and tapped into place with a dead hammer
.thumb.jpg.a6e4002b3007f2330412cbb4b253d401.jpg)
I then run a 10mm drill bit down through the inside of the bush (pipe), it was a perfect fit for the connection pin
I fitted a M10 nylon washer to each end of my bush
Lubed the bush with anti-seize
.jpg.3c604a2957f711208116001e4fdb1be7.jpg)
.thumb.jpg.df522041ef9408675cd0e9158599654b.jpg)
Installed Delrin bushes. Reinstalled the brake pedal, no play in either pedal.
Fitted new black pedal set.
.jpg.e75893c98b1b2dd7d9b531b953c3a460.jpg) All's good in my world so far
All's good in my world so far
Old/new CD43
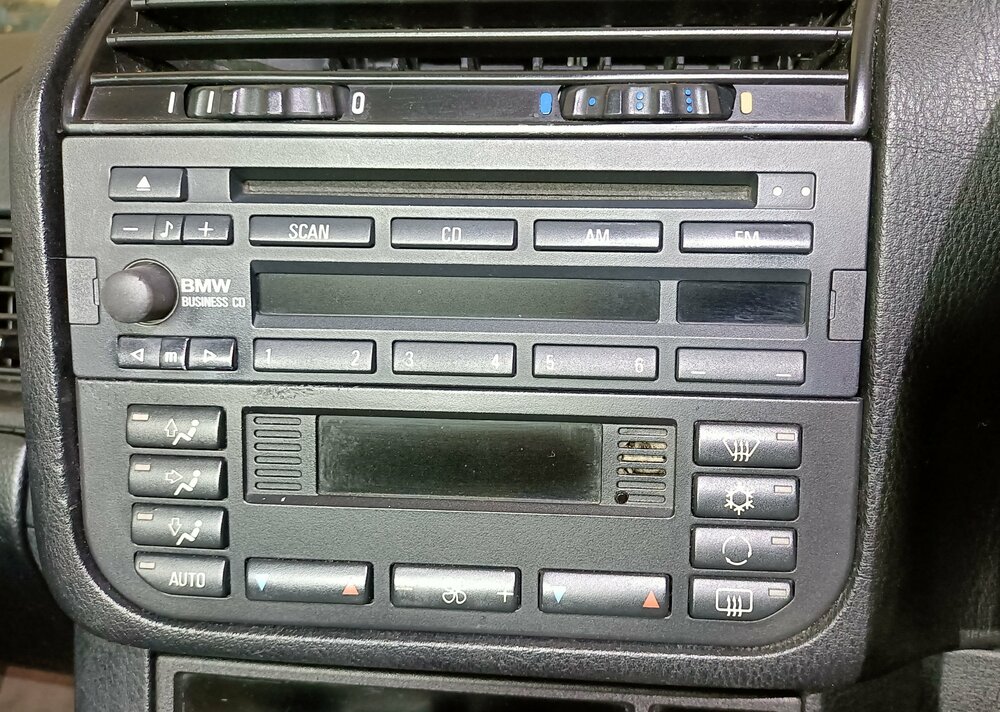
.thumb.jpg.67431dff5df88882dd6c7d0b223c14c6.jpg)
-
 11
11
-
-
The open track days organised by the Playday guys are run pretty well imo and if anyone is being a wanker/dangerous they will tell you to piss off , I was worried about that sort of issues as well , but done numerous track days with them and haven't had any sort of issues tbh with the drivers there
I agree with the above,
Playday also has sorted groups.
So Amber, you can start slower and work you're way up. As your comfort level increases.
-
You're welcome to visit anytime Dave
Cheers for the thread feedback
-
Photos added
M3 up
Puck location change
-
Updated
Will add full photo of car up on jacks later.
I will also put a semi full write-up in the Race series tech section with a couple more photos.
-
Standard M5
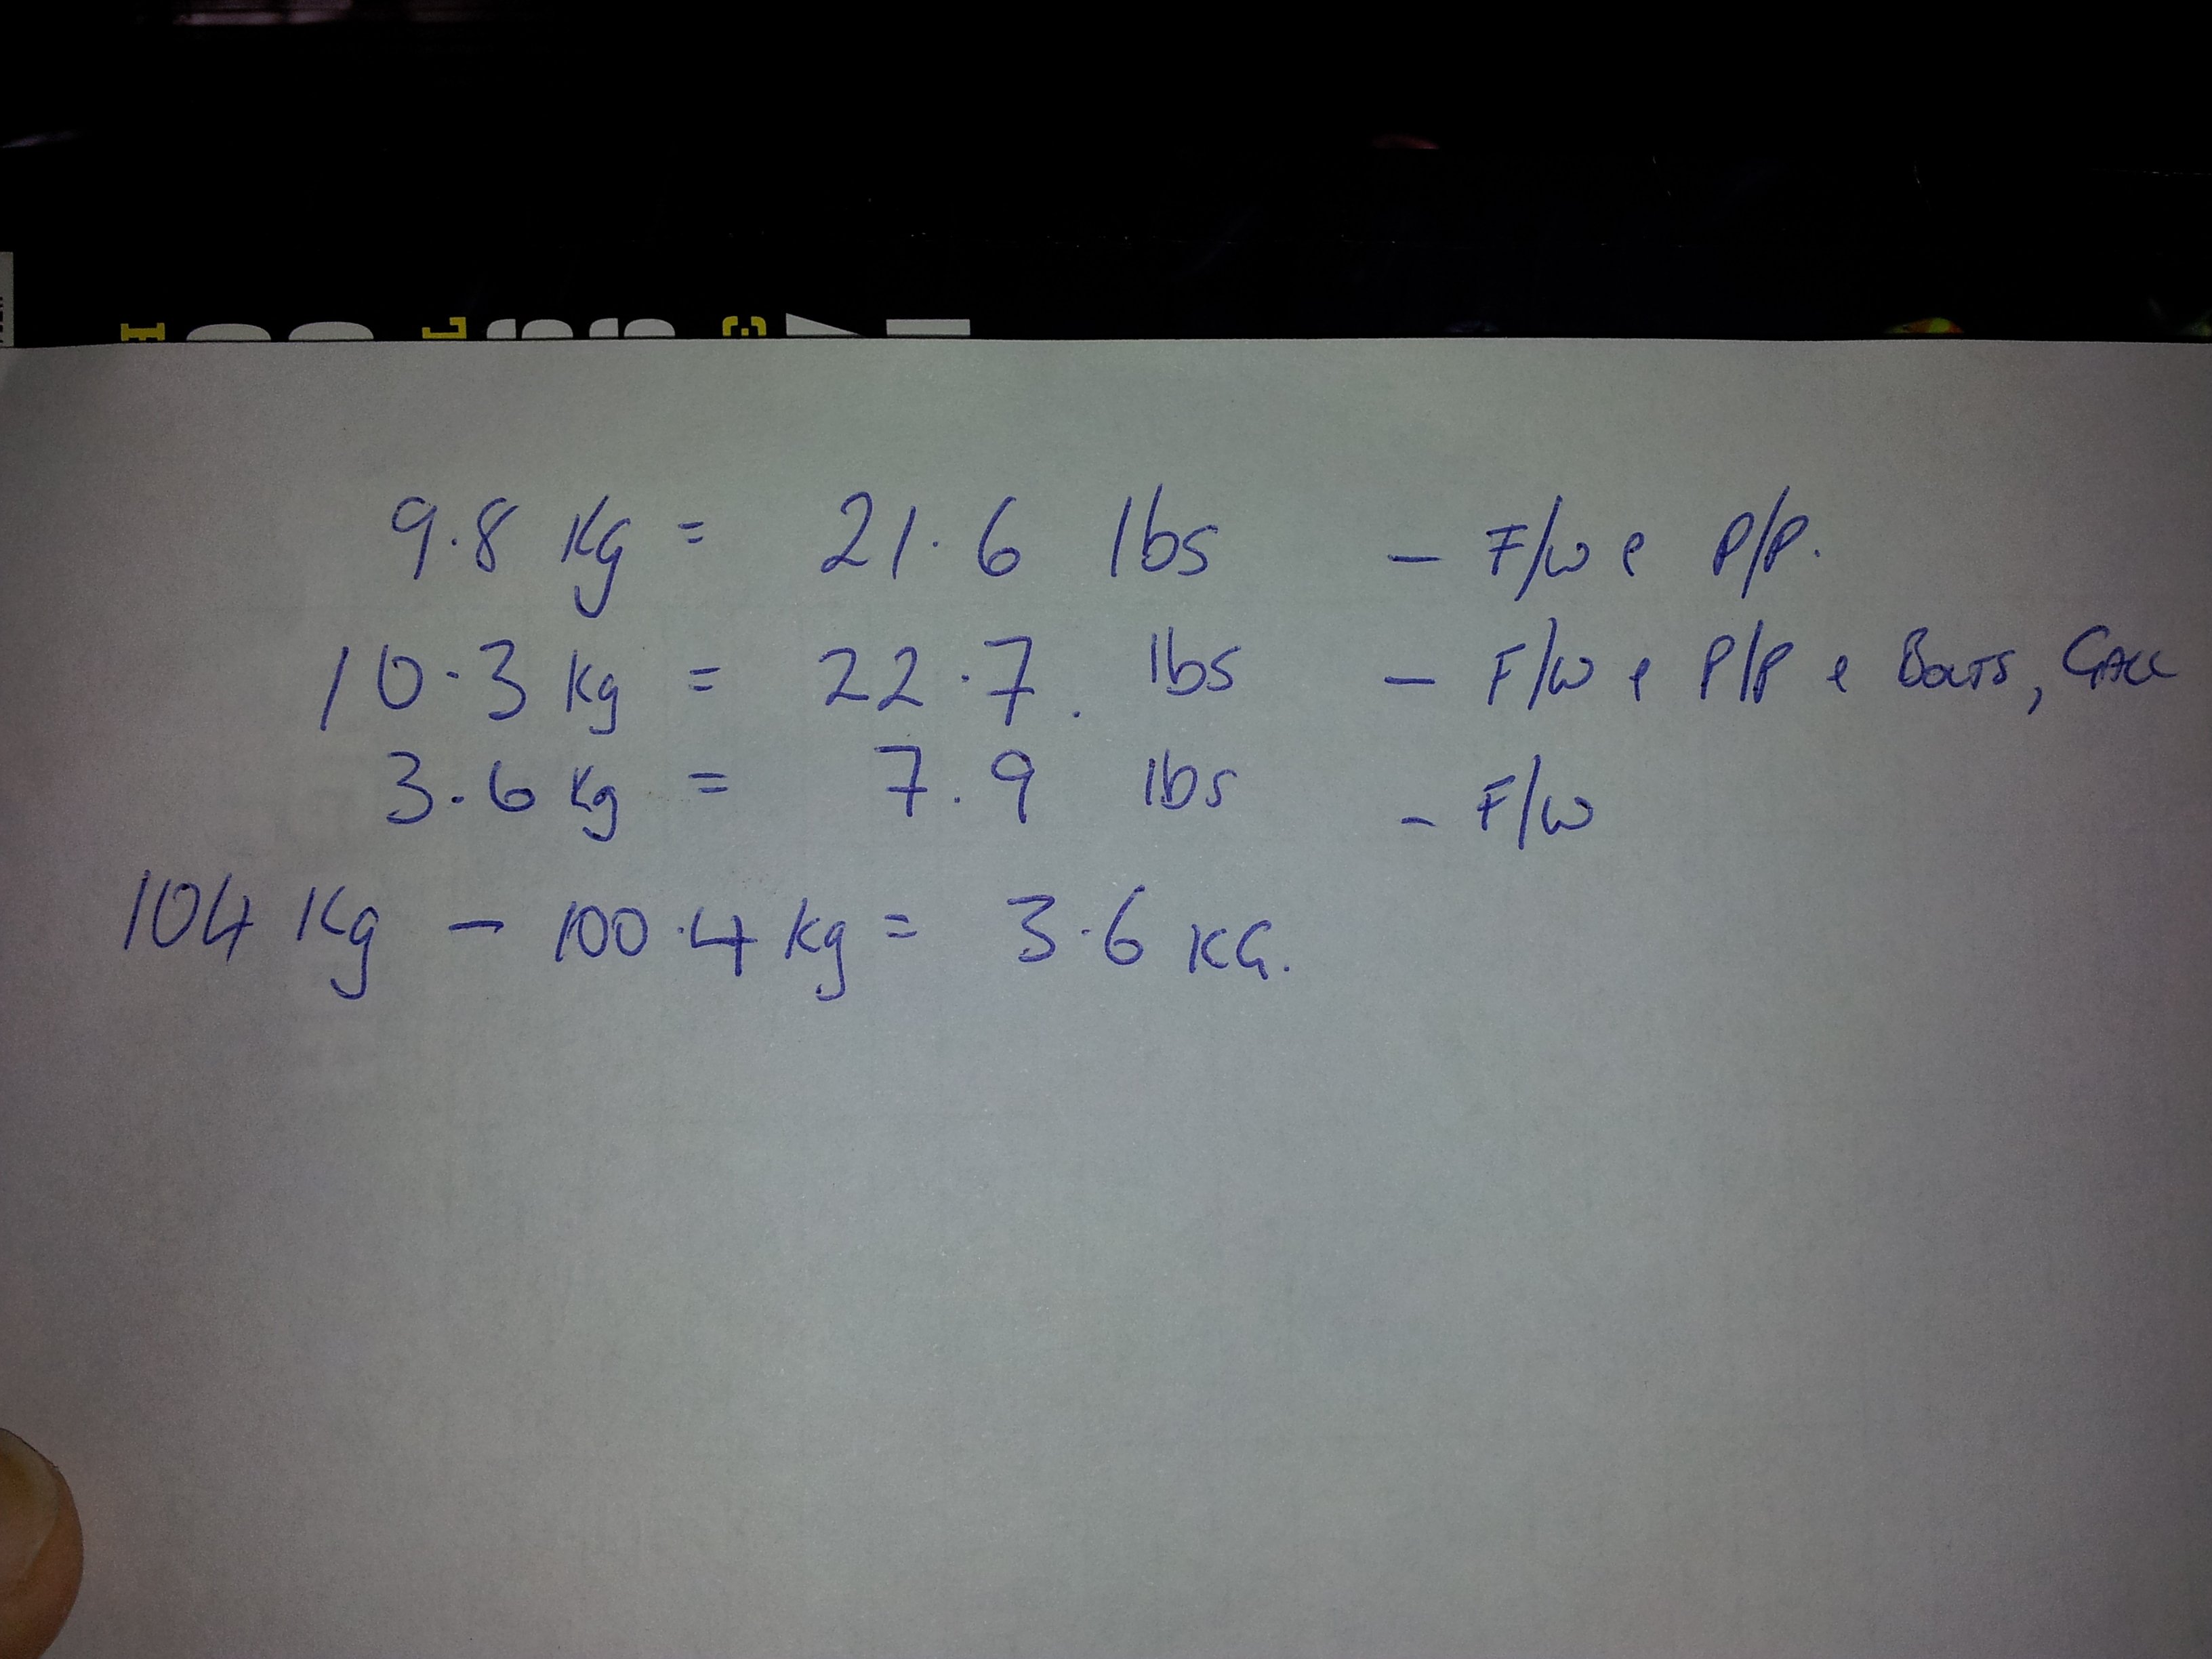
To be honest I am little worried that with fly wheel now at 7.9lbs that it maybe to light only time will tell
-
You are correct Bearings and ARP Crank bolts
.jpg.ac488cba5a538ef9761a97709f1881f0.jpg)


.jpg.ffe1167b7fb88d85cac34dd879e16d0e.jpg)
.jpg.f7a04fbd6ce4887e2ee7bbc5a55a29e5.jpg)
.jpg.457426e821107ece0b250ec1e156b899.jpg)
.jpg.08b13b2e0a448eebee68dabc91be90cc.jpg)
.jpg.e78860ac91949dea770f06a48dfa2b5f.jpg)
.jpg.def3090650993530815099e98e902d83.jpg)

.jpg.0f021b941e683c42ed6ae89b91f22e7a.jpg)
.jpg.0a23157b1d60b3704ed1cfac2e4cdc30.jpg)
(Medium).jpg.7c1d410a738525e91d33122d9ffced4b.jpg)
.jpg.6e762dd1d51d0784fbd06718068fab0a.jpg)


.jpg.828bfbb5bdebb55a57b0eb2b862a3aa1.jpg)
.jpg.d12751766c0aef0d79b7cf2176506659.jpg)
.jpg.9c294846c8dd3feaf38301ebc860fa43.jpg)
.jpg.3e13b53b025e54f5e20dfe68aed88966.jpg)
.jpg.55c61e527592e669b88d026fe2968879.jpg)
.jpg.7061976d75b8ff84f54827ee55ef77bc.jpg)
.jpg.8f8aa270d6f0741bb9673eaeba7b272e.jpg)
(Small).jpg.556997f44ddcb96a77d382e5c5dbeeb5.jpg)
.jpg.97519a8637ba965546d346f793c2c13b.jpg)
.jpg.76076b38c4e7523a42eb8c7e02e0f236.jpg)
.jpg.822b307ad11a93fd22fbfb8dc6cd9b1b.jpg)
.jpg.9b1a68733a59db1b83d6369645a70137.jpg)
.jpg.4ad602099702a6463c1d3107efab22af.jpg)
.jpg.10824486b7a57faeb82adb617d8eedf6.jpg)
.jpg.41f32414046252bd80ca300e2e34df2b.jpg)
.jpg.5d9c3f0543ec783fe24e190ebc526f8c.jpg)
.jpg.d52082f087b76ba6268261fd1ecfde01.jpg)
.jpg.7731ec9f609d83a45fd45c0d9957f08d.jpg)
.jpg.b0962d3c09ff0f69656b68d82f7920d4.jpg)
.jpg.57f309a04ede22bbac11eddc79261a1b.jpg)
.jpg.73a4f703301a74296902c319e31701bf.jpg)
.jpg.7d7a5473835a01cc1924a61213a212b9.jpg)
.jpg.01e69c8cdce42962186cc75542a1ed40.jpg)

.jpg.db143f51e987607205f8a0cc3fa93804.jpg)
M3AN E36 M3 PLOG (Project Log)
in Projects
Posted · Report reply
Evening all, today Dave and I swapped cars. Not for long but I wanted to check out the new rack and Dave wanted to check out my lightened flywheel.
What a difference between the two rakes his is so positive with mine seeming to be so lazy.
As for the driving experience I would describe Daves car as refined. It was sporty, comfortable and quiet.
Keep up the great work mate