

Vass
-
Content Count
834 -
Joined
-
Last visited
-
Days Won
74
Posts posted by Vass
-
-
Could be a number of things.
Might be a random stab in the dark but one possibility is the ignition switch. Had that on my E46 a couple of years ago, would just intermittently not even crank until I cycled the key 4-5 times, became more frequent as time went on. Cleaned it out and has been fine since. Could also just replace it as they're fairly cheap. Haven't checked but fairly certain it'll be a very similar part on the X5, if not completely identical. Worth cleaning out regardless as they can cause a number of weird electrical issues, access should be pretty easy too, just need to remove the bottom cover from the steering column.
-
 2
2
-
-
I didn't even know clownshoes came with non-M engines... Why would you even bother
-
 1
1
-
-
https://www.trademe.co.nz/5368550104
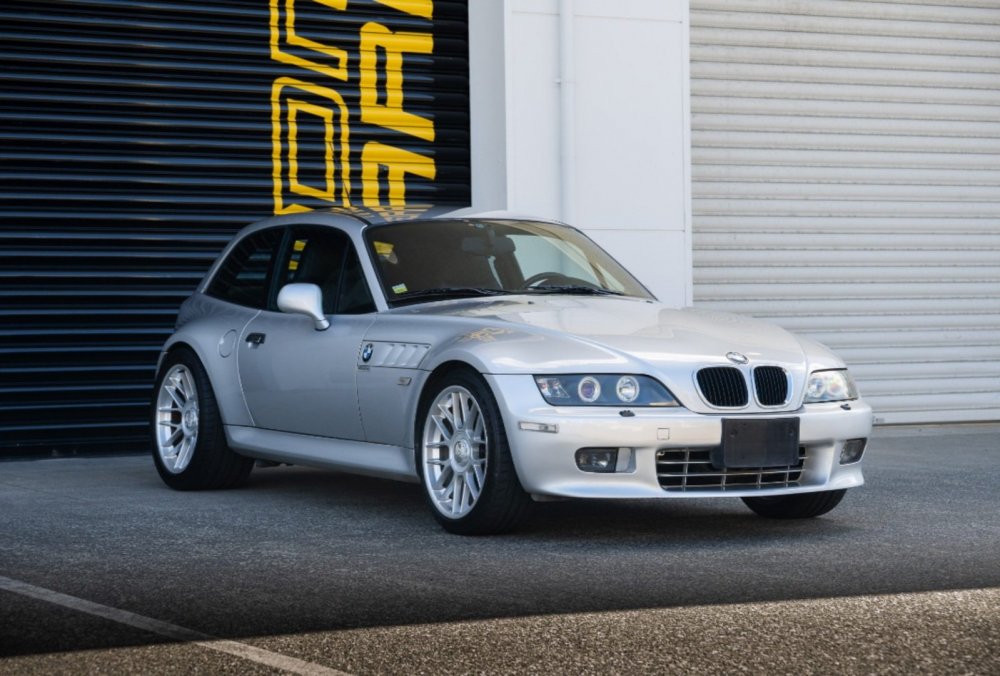
What am I missing here? Yeah, it's a clownshoe, which is rare I suppose BUT it's an M52B28 automatic...? LHD, imported in 2020, never registered in NZ and by the sounds of it whoever buys it will have to take it through compliance themselves... All that for $30k!?
Is this insane or am I?
-
You might as well just get an automatic one and get it modified, can't imagine it being too costly. Main reason you wouldn't do it is that they'll require driveshaft hoops if modifying a driveshaft but since you're increasing power by over 50% you will need then anyway?
-
^ That looks like a good jack but feels way overpriced for what it is. Might not be spoilt for choice down Otago way but I'd wait for a bigger sales event at Repco or Supercheap. But that's just me being a bargain hunter, hardly ever pay full price for any tools nowadays.
I myself have one of these. Cheapish no brand but probably made in the same factories as most others on the market, just without the brand name slapped on. I tend to look after my tools but a few mates have the same ones and they've hurled a tonne of abuse at them, still going strong. Find it to be good value, not sure if they do shipping tho or what shipping something this heavy would cost.
-
I got one of them adapters when doing mine, can't remember where I got it from but looks identical. Paired it up with some ancient, fairly low profile trolley jack I borrowed off a mate, but that's not the point. The whole thing ended up being too damn fiddly to use... Trouble I ran into was, even with the car raised to the max height allowable by the jack stands, the combined height of the trolley jack and the adapter was such that even lowered all the way, the transmission was left wedged in the transmission tunnel with no way of wheeling it out. It then became a whole new mission lifting up the transmission while trying to slide out the trolley jack from underneath. In hindsight, would have been much easier without that adapter, either resting the rear of the transmission directly on the saddle or a wider block of timber and manhandling the bellhousing end. Unless you've got some extra tall jack stands, I honestly wouldn't bother. Only ever "used" that adapter once and now it's essentially scrap metal on the shelf somewhere.
-
2
-
-
Was at barber shop last month, grabbed a magazine to flick through while waiting and stumbled upon this article, my turn came up just as I finished reading it. Very cool to see such well looked after oldies.
-
30 minutes ago, adro said:Nice work on the headlights. Look forward to hearing this new exhaust on cold startup.
Thanks mate! Me too.
On a side note, I found it rather amusing how we're moving in polar opposite directions on the exhaust front. Saw you were diagnosing the exhaust flap vacuum solenoid the other week to quieten yours down whilst I'm here raging about mine not being loud enough

Also, happy birthday buddy! Have a good one, hope you get spoilt by the fam!
-
1
-
-
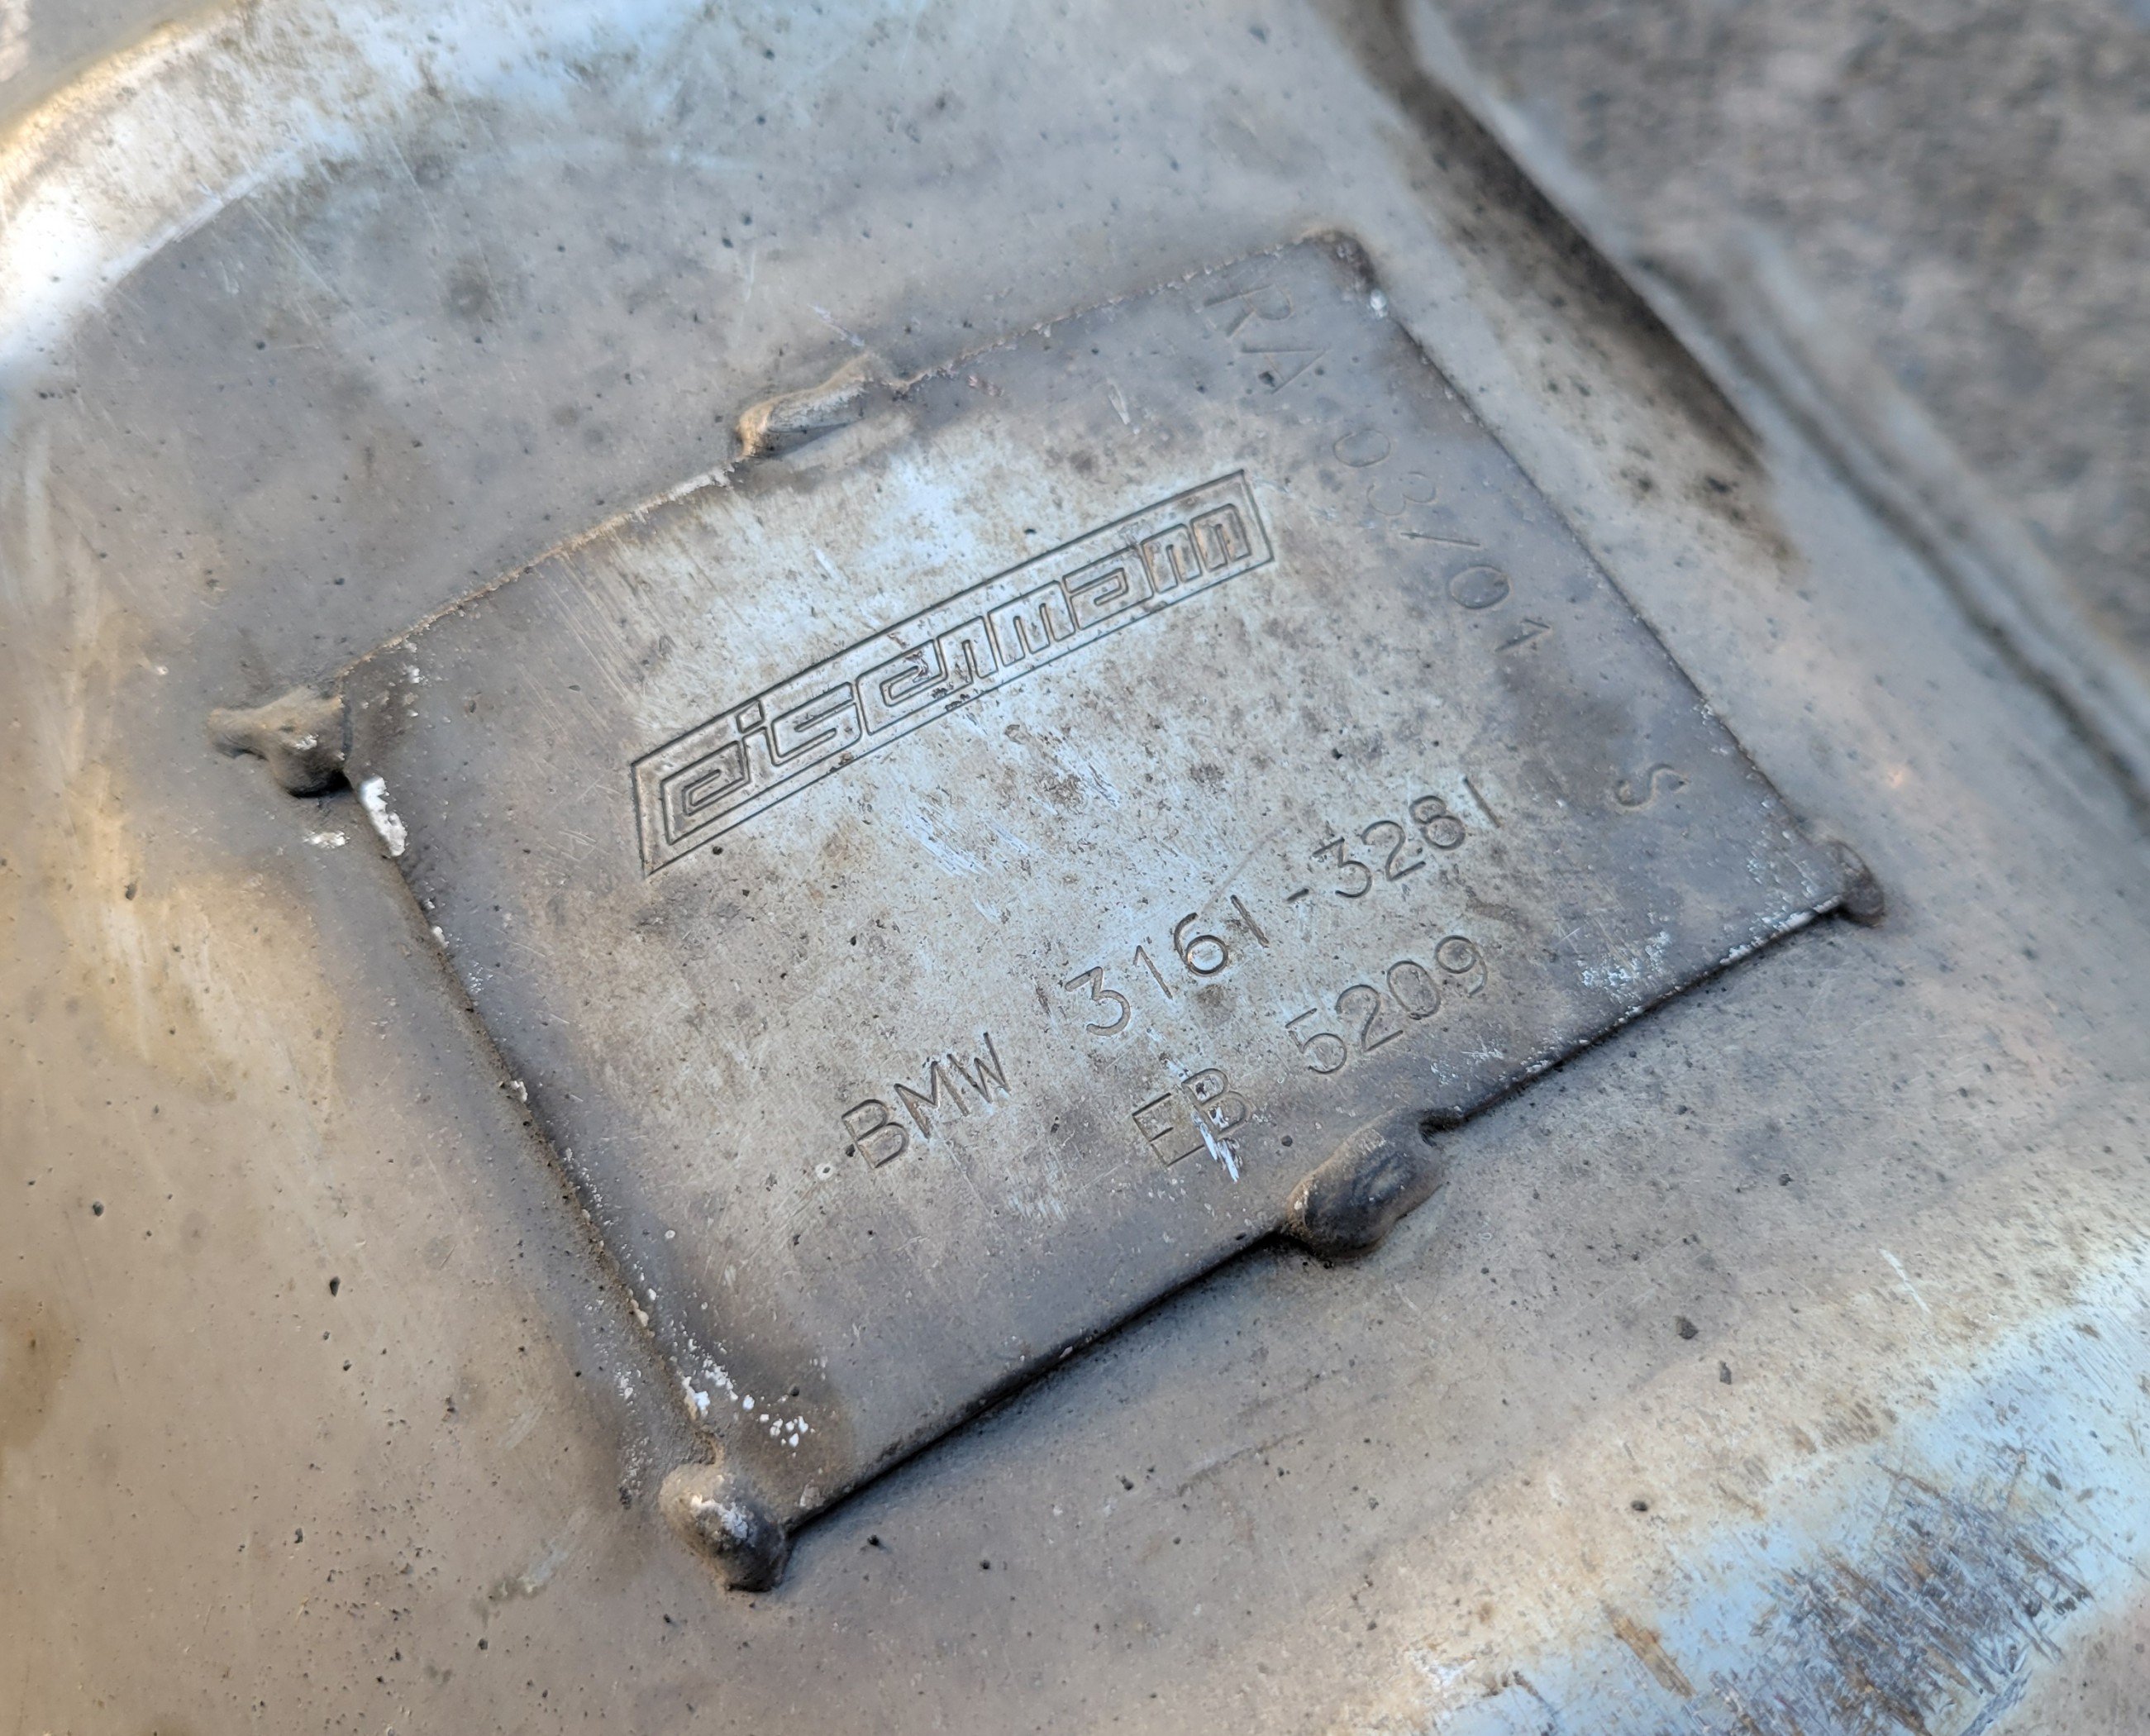
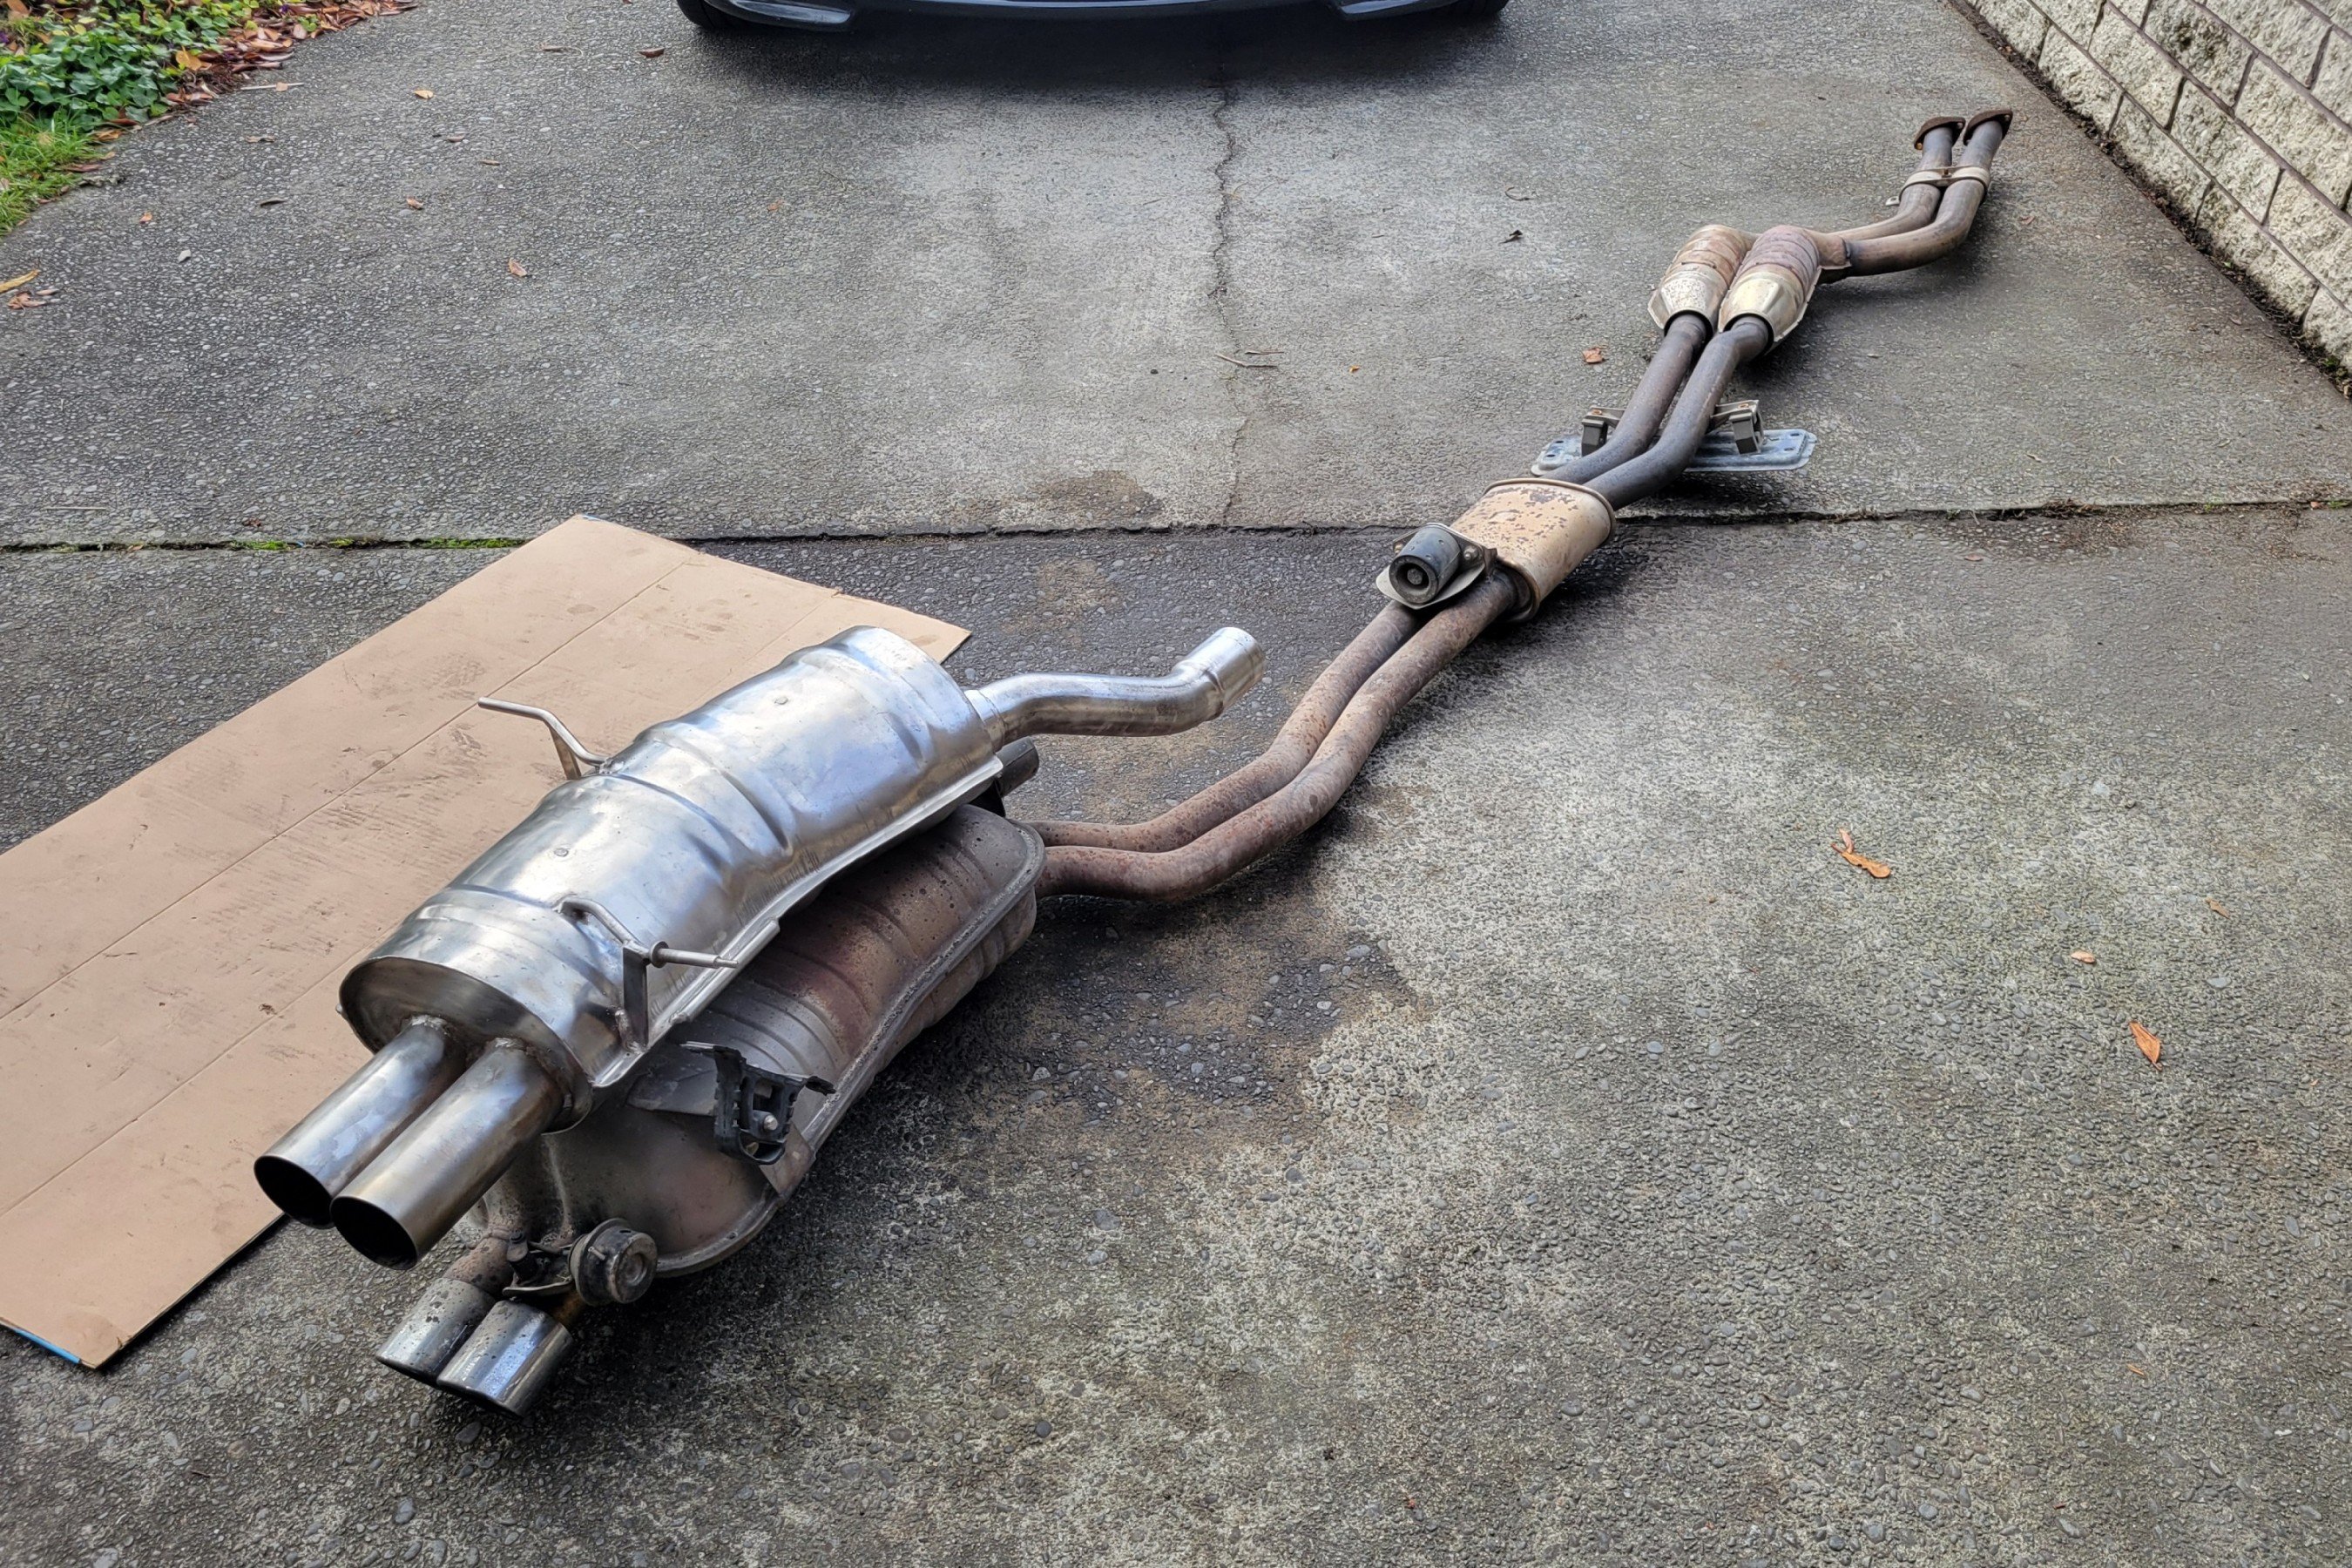
Had the pleasure of meeting @Gaz the other week. He reached out to see if I wanted to check out an Eisenmann muffler from a 330i that he's parting out, which naturally piqued my interest. The exhaust was still attached to the car, the exhaust nuts at the back of the headers had of course rusted themselves on and rounded out when trying to remove them so instead we fiddled around unbolting the stubby headers from the head and removing the whole exhaust in one piece. All part of the fun. The rest of the exhaust had rubbed through from dragging on the ground but I happily walked away with the muffler. Has lived a life but cleaned up quite nicely. Will give it a nice finishing polish prior to going on for good.
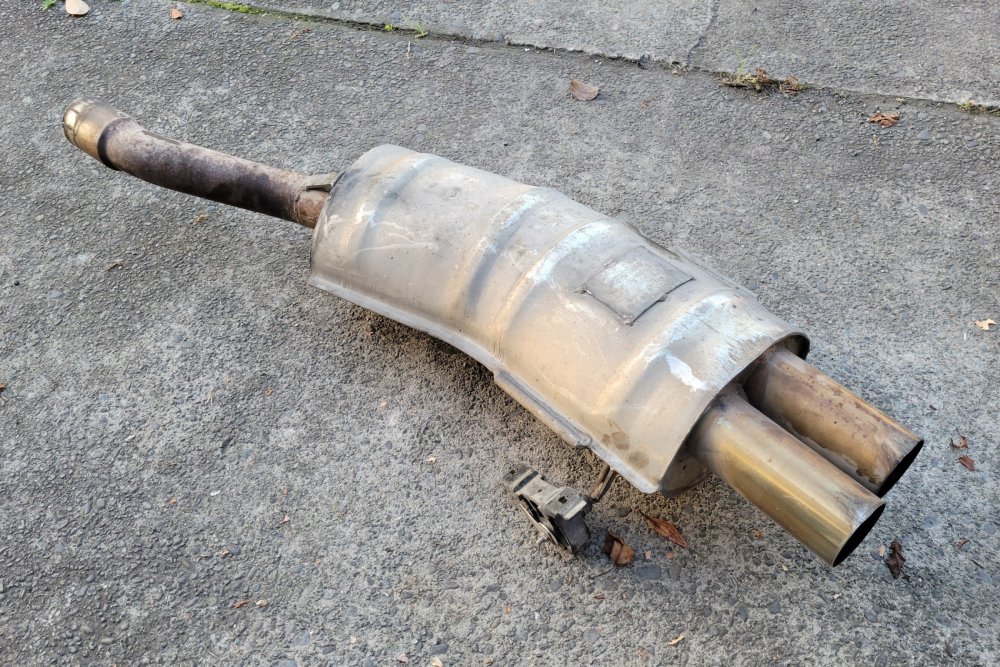

The donor was an earlier, PFL 330i and the exhaust setup on it was different to mine, whether from factory or from being modified at some point to make work with the muffler. The main difference being the Eisenmann muffler being a single 59mm OD entry whilst my setup is twin 50mm OD pipes running all the way to the stock muffler. This would mean a reduction in overall cross section area so technically introducing a restriction but it's probably not enough to even notice in real life, not exactly a race car after all. The muffler itself is technically meant for a 316i-328i but did come off a 330i so will send it and see how it goes. I've got a spare stock exhaust setup laying around that I'm happy to have cut up.
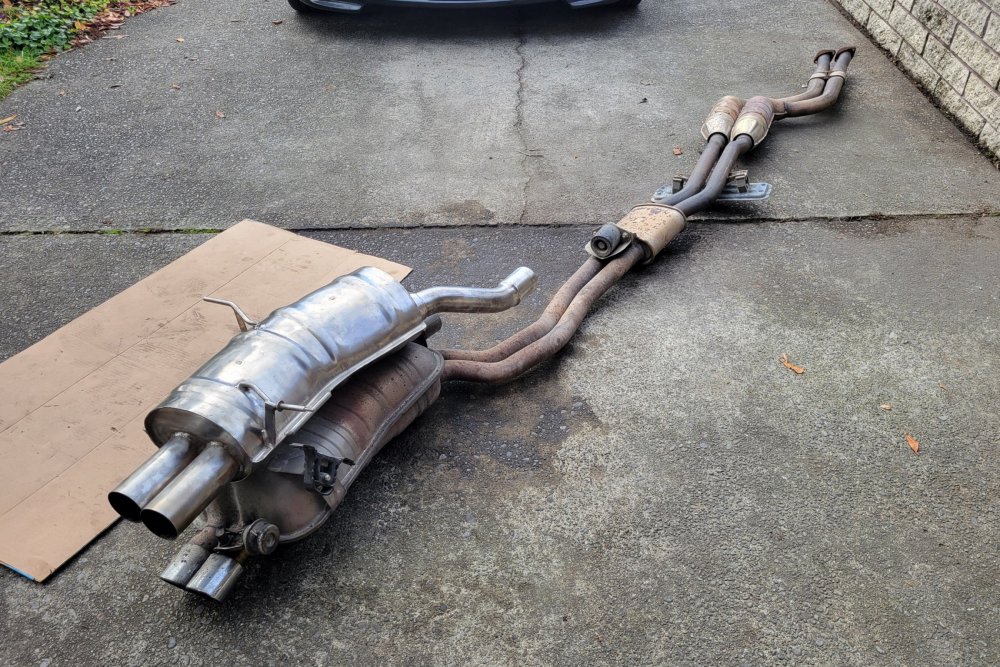
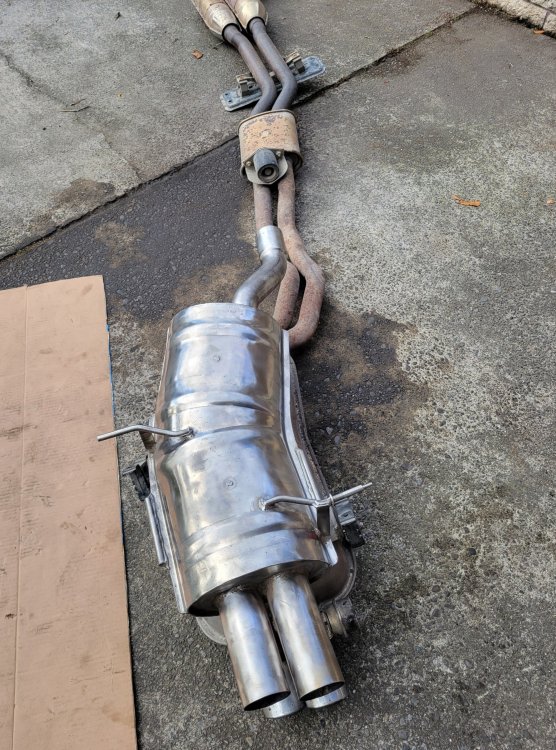
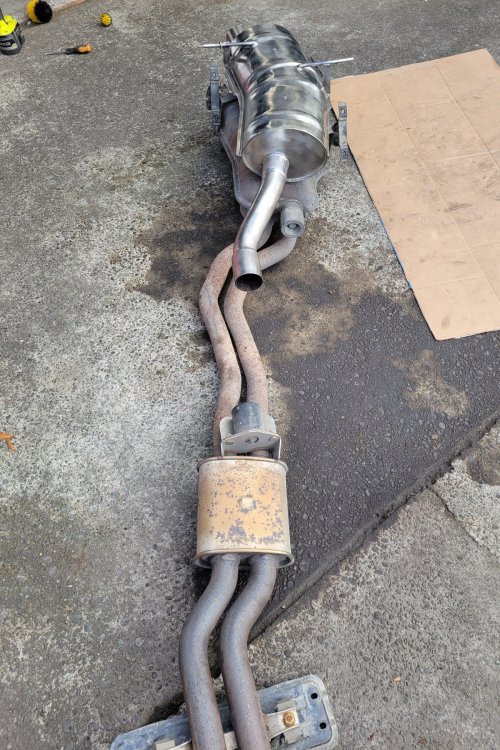
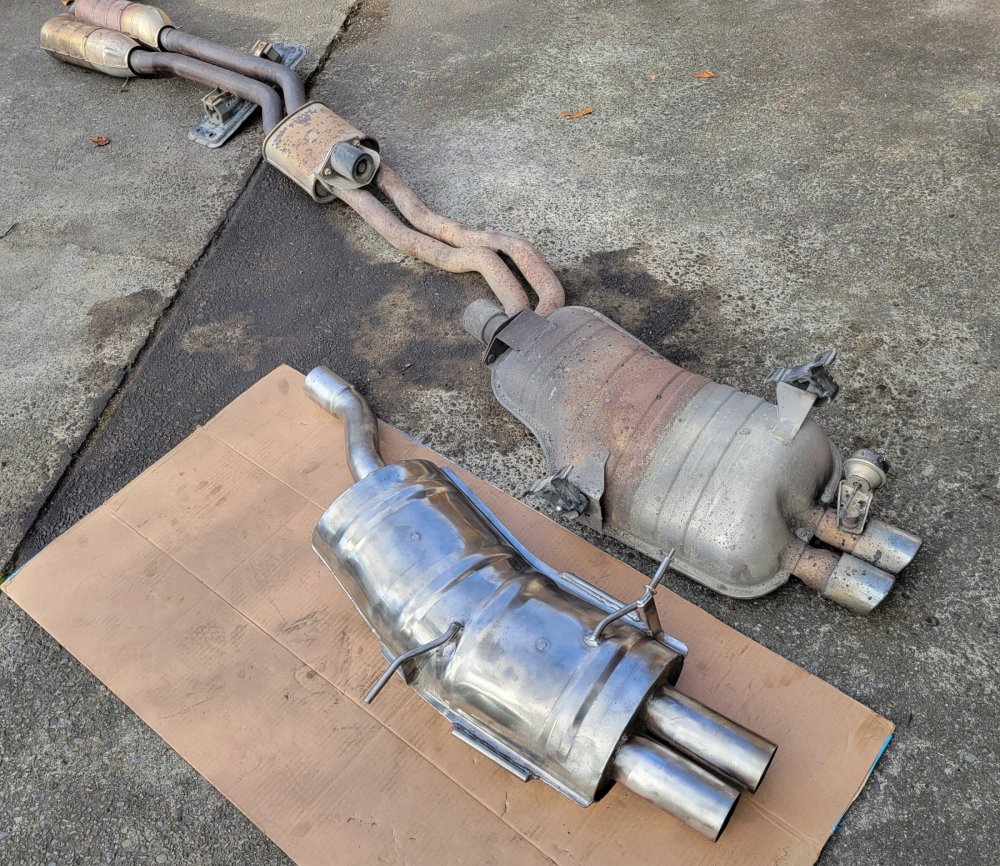
Have booked in with Flame on the 16th to get this thing made to work. I'm thinking retain the cats, cut out the resonator and put in a Y-pipe somewhere along the way. Can't wait to hear the result. Will no doubt be rowdier than it is, hopefully not too obnoxious tho. Will still keep hold of the stock setup just in case.
-
5
-
-
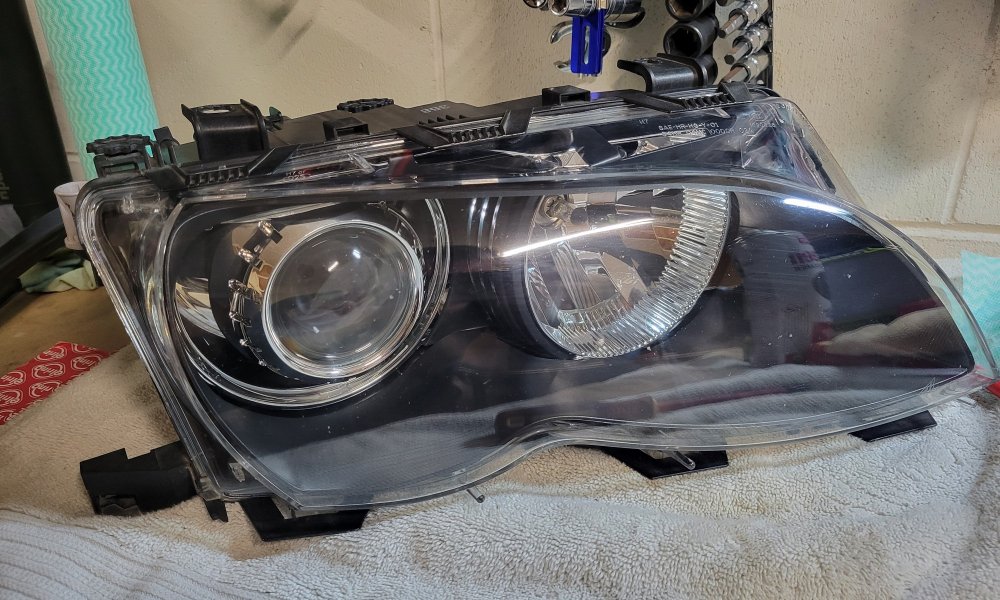
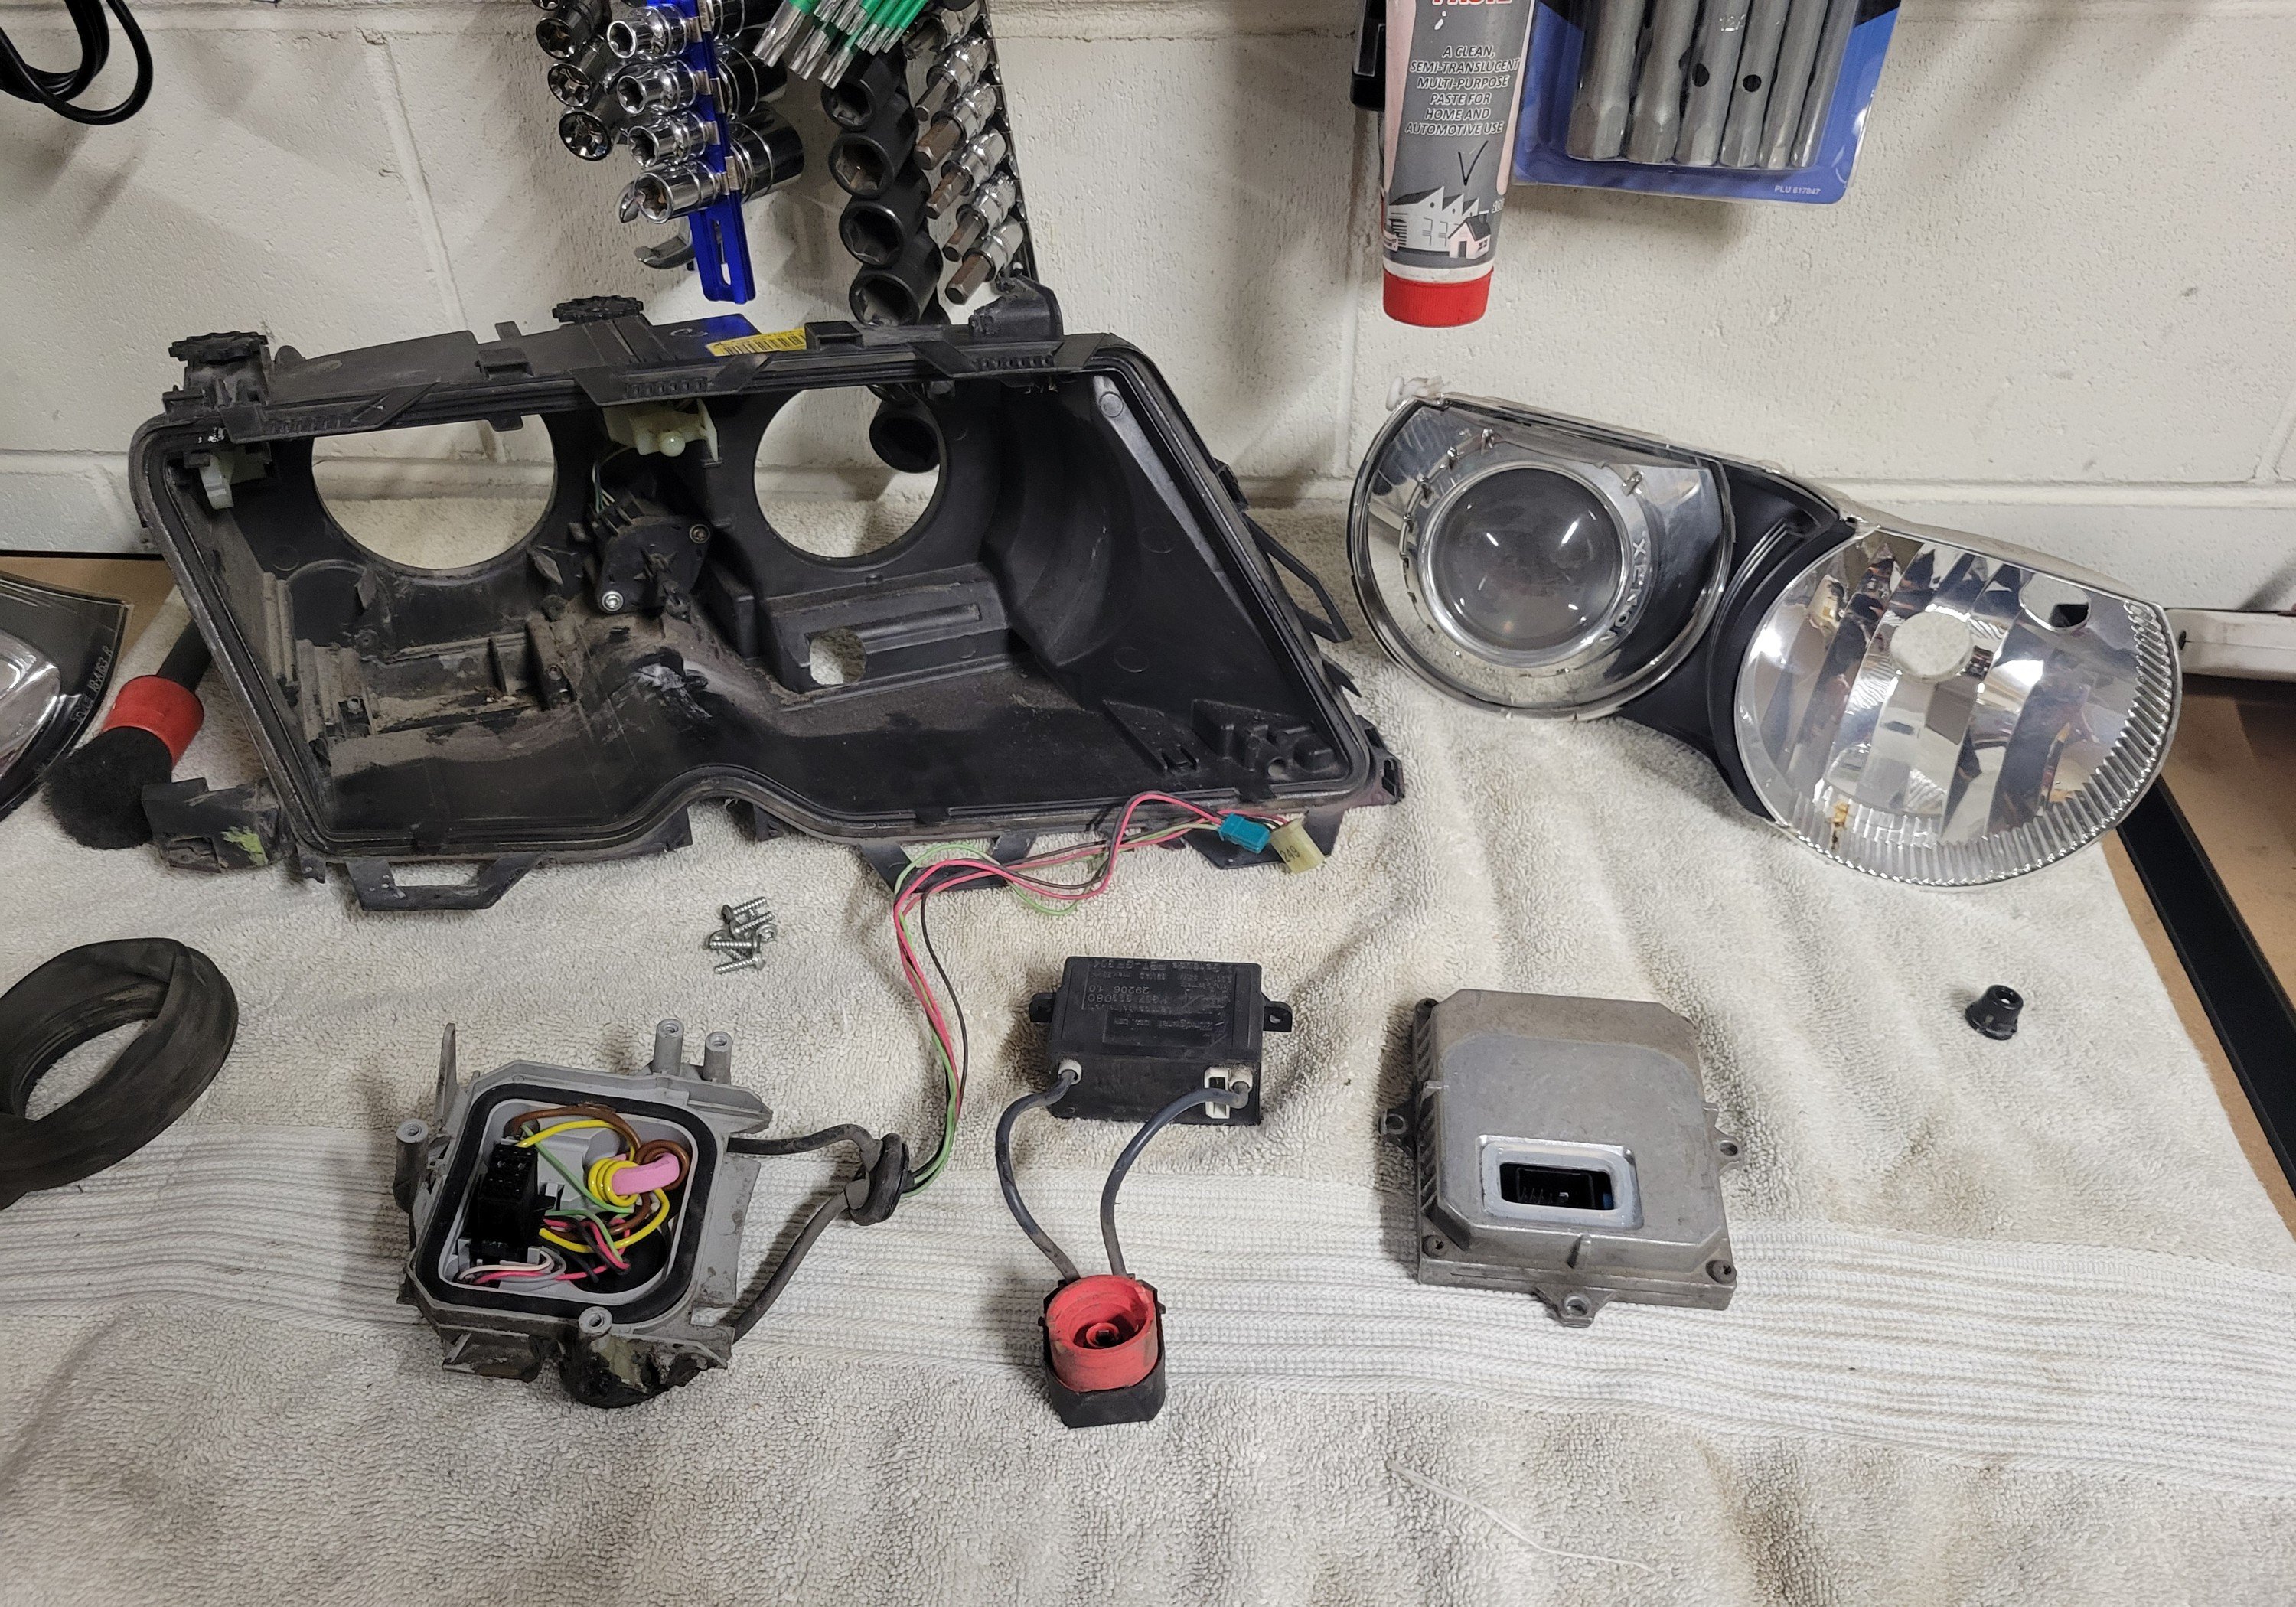
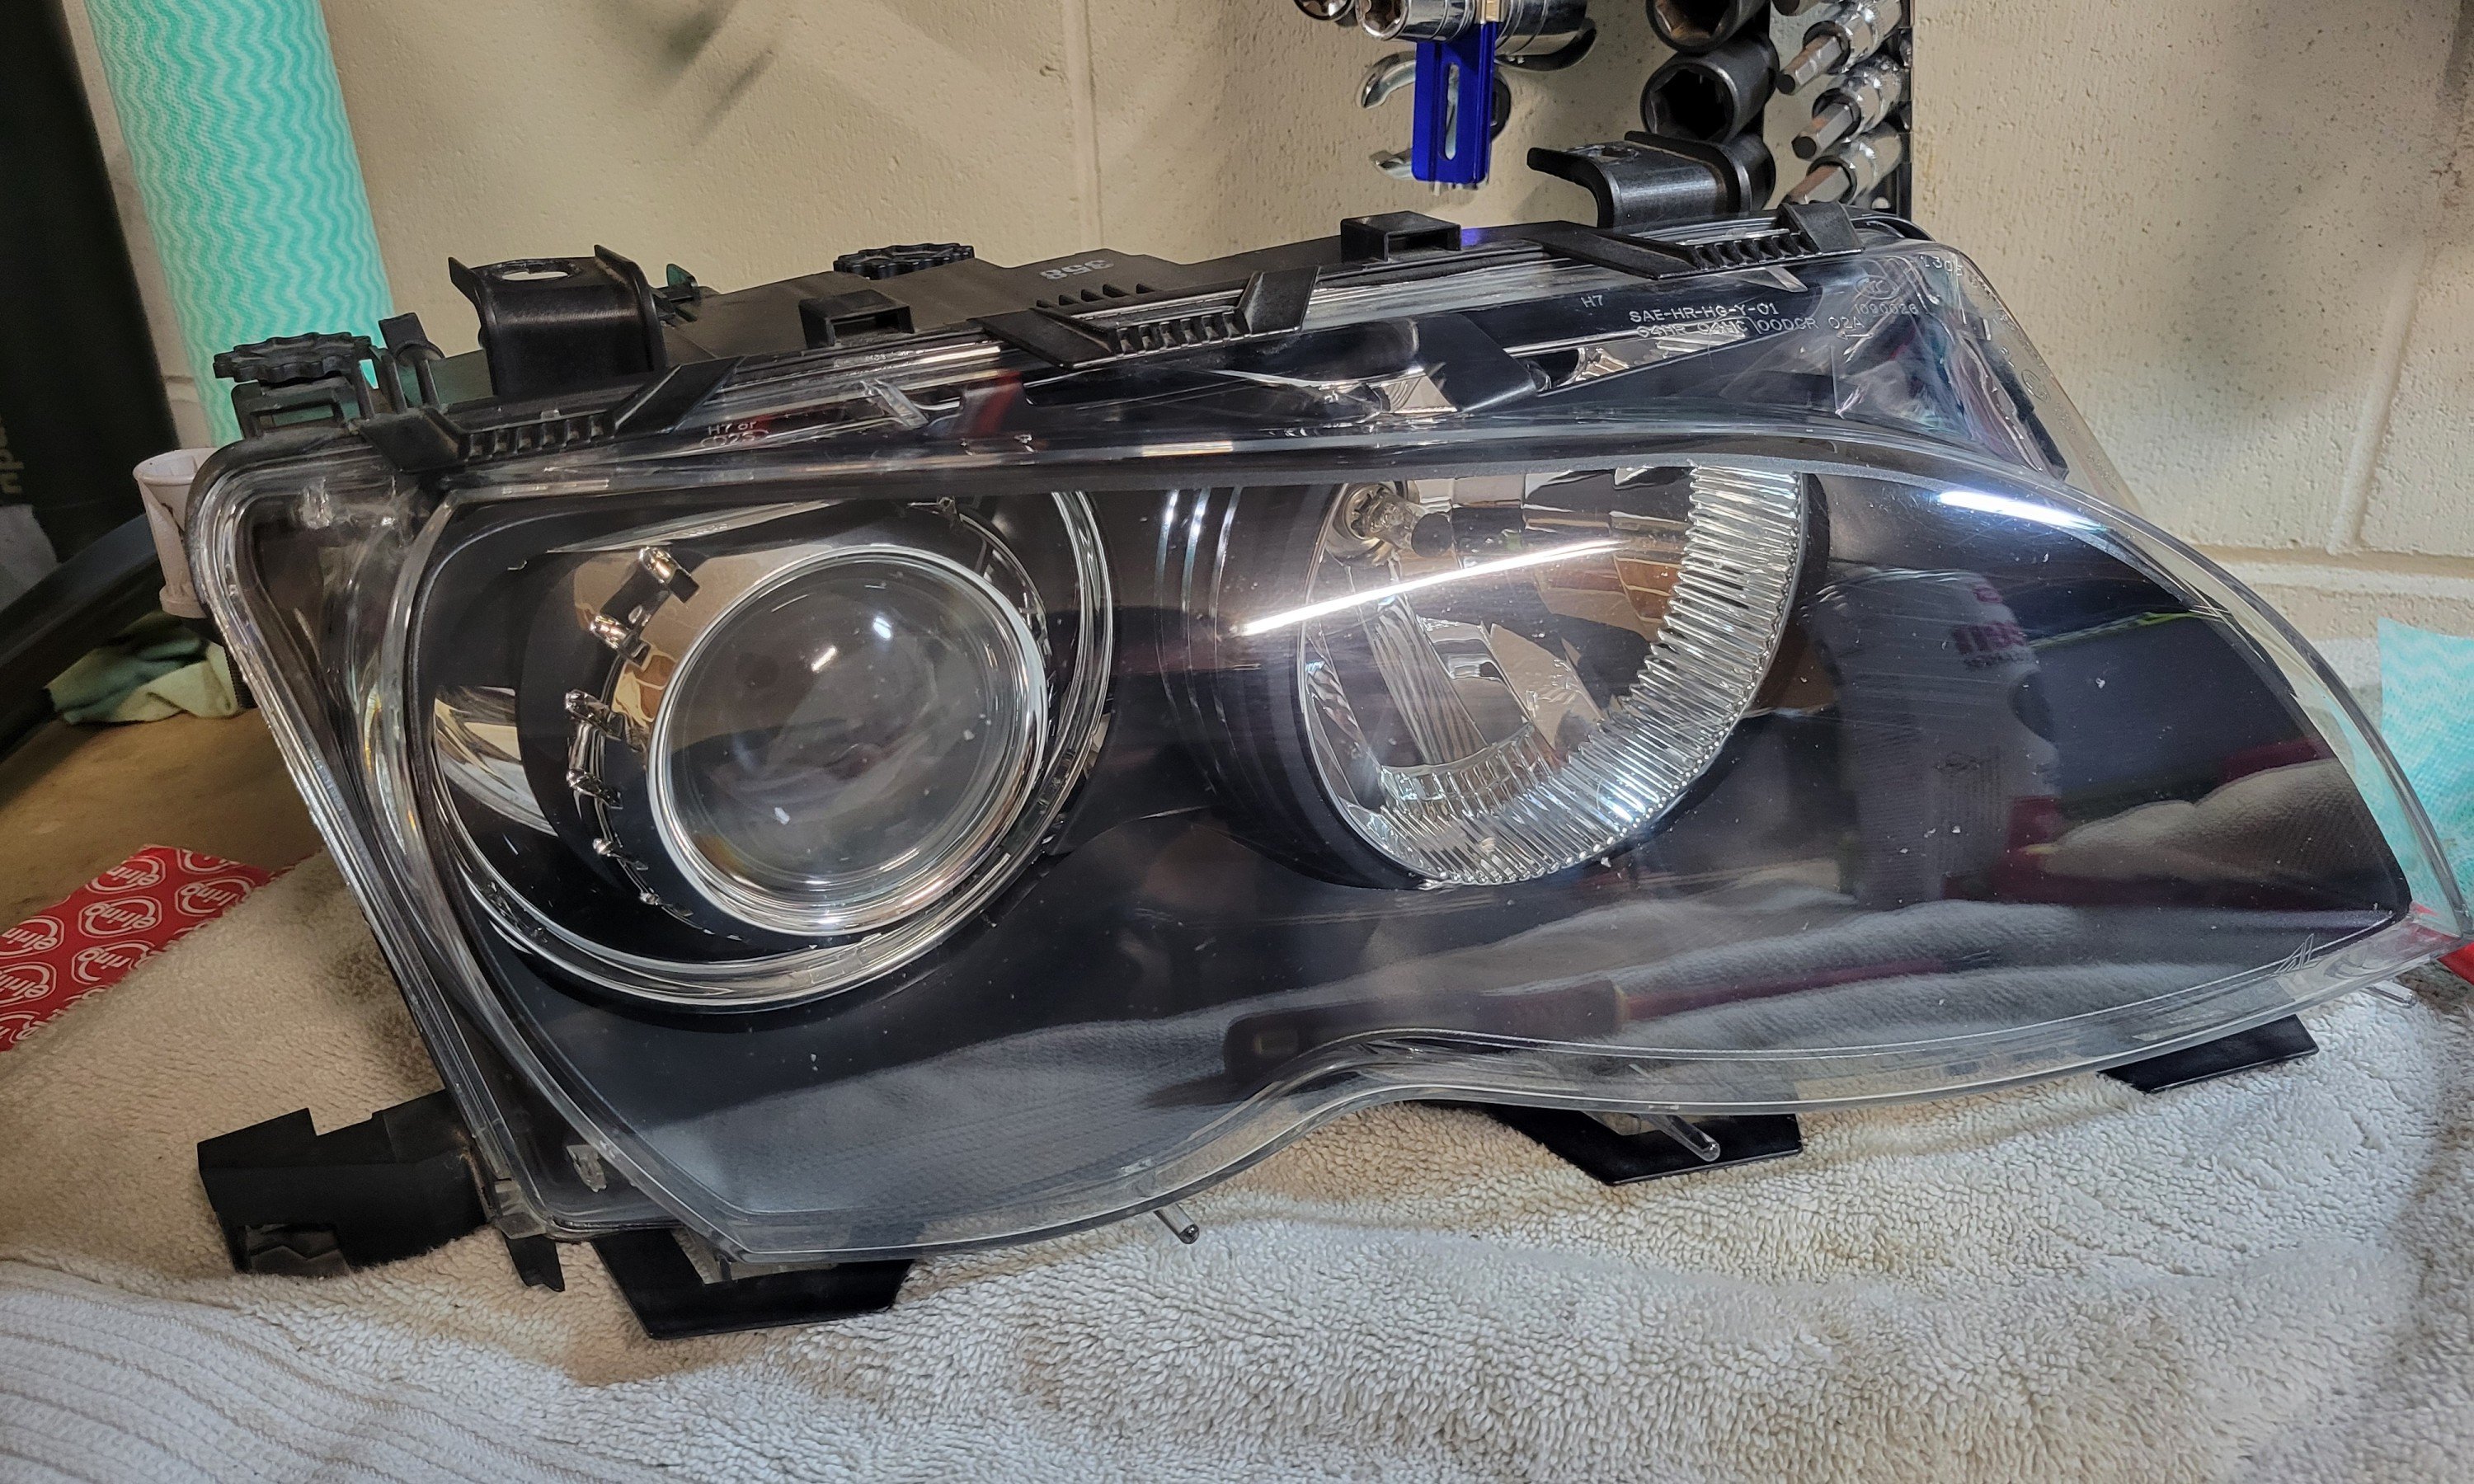
The driver's side headlight had fully deteriorated to the point where it wouldn't light up at all anymore, wet or dry, so it was time to properly address it.
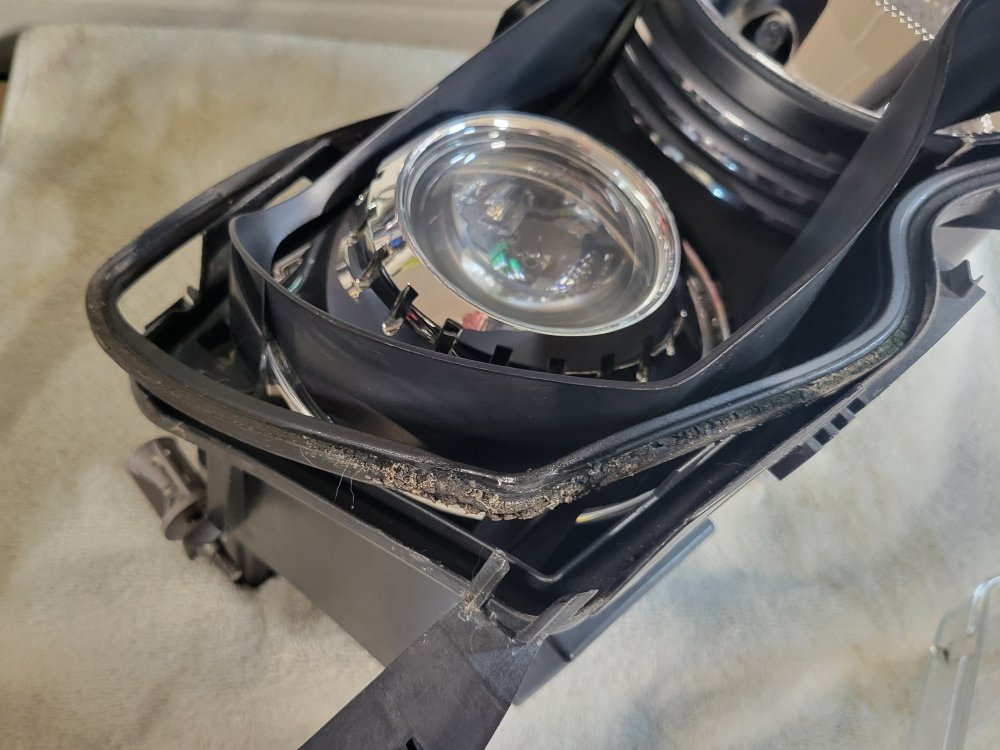
I picked up a rather rough, but fully operational spare xenon headlight from Pick-A-Part a few months back used it as a donor to repair the existing one. The donor had unfortunately had a rough life with a bunch of clips broken and bulbs held together with some RTV-like goo so it was just too beat up to throw straight in.
The headlight disassembly task turned out not to be as daunting as I had feared. Was good being able to practice on the spare unit before moving onto the original one. I made several marks on the casing and adjustment dials to make sure it all went back together in the same way.

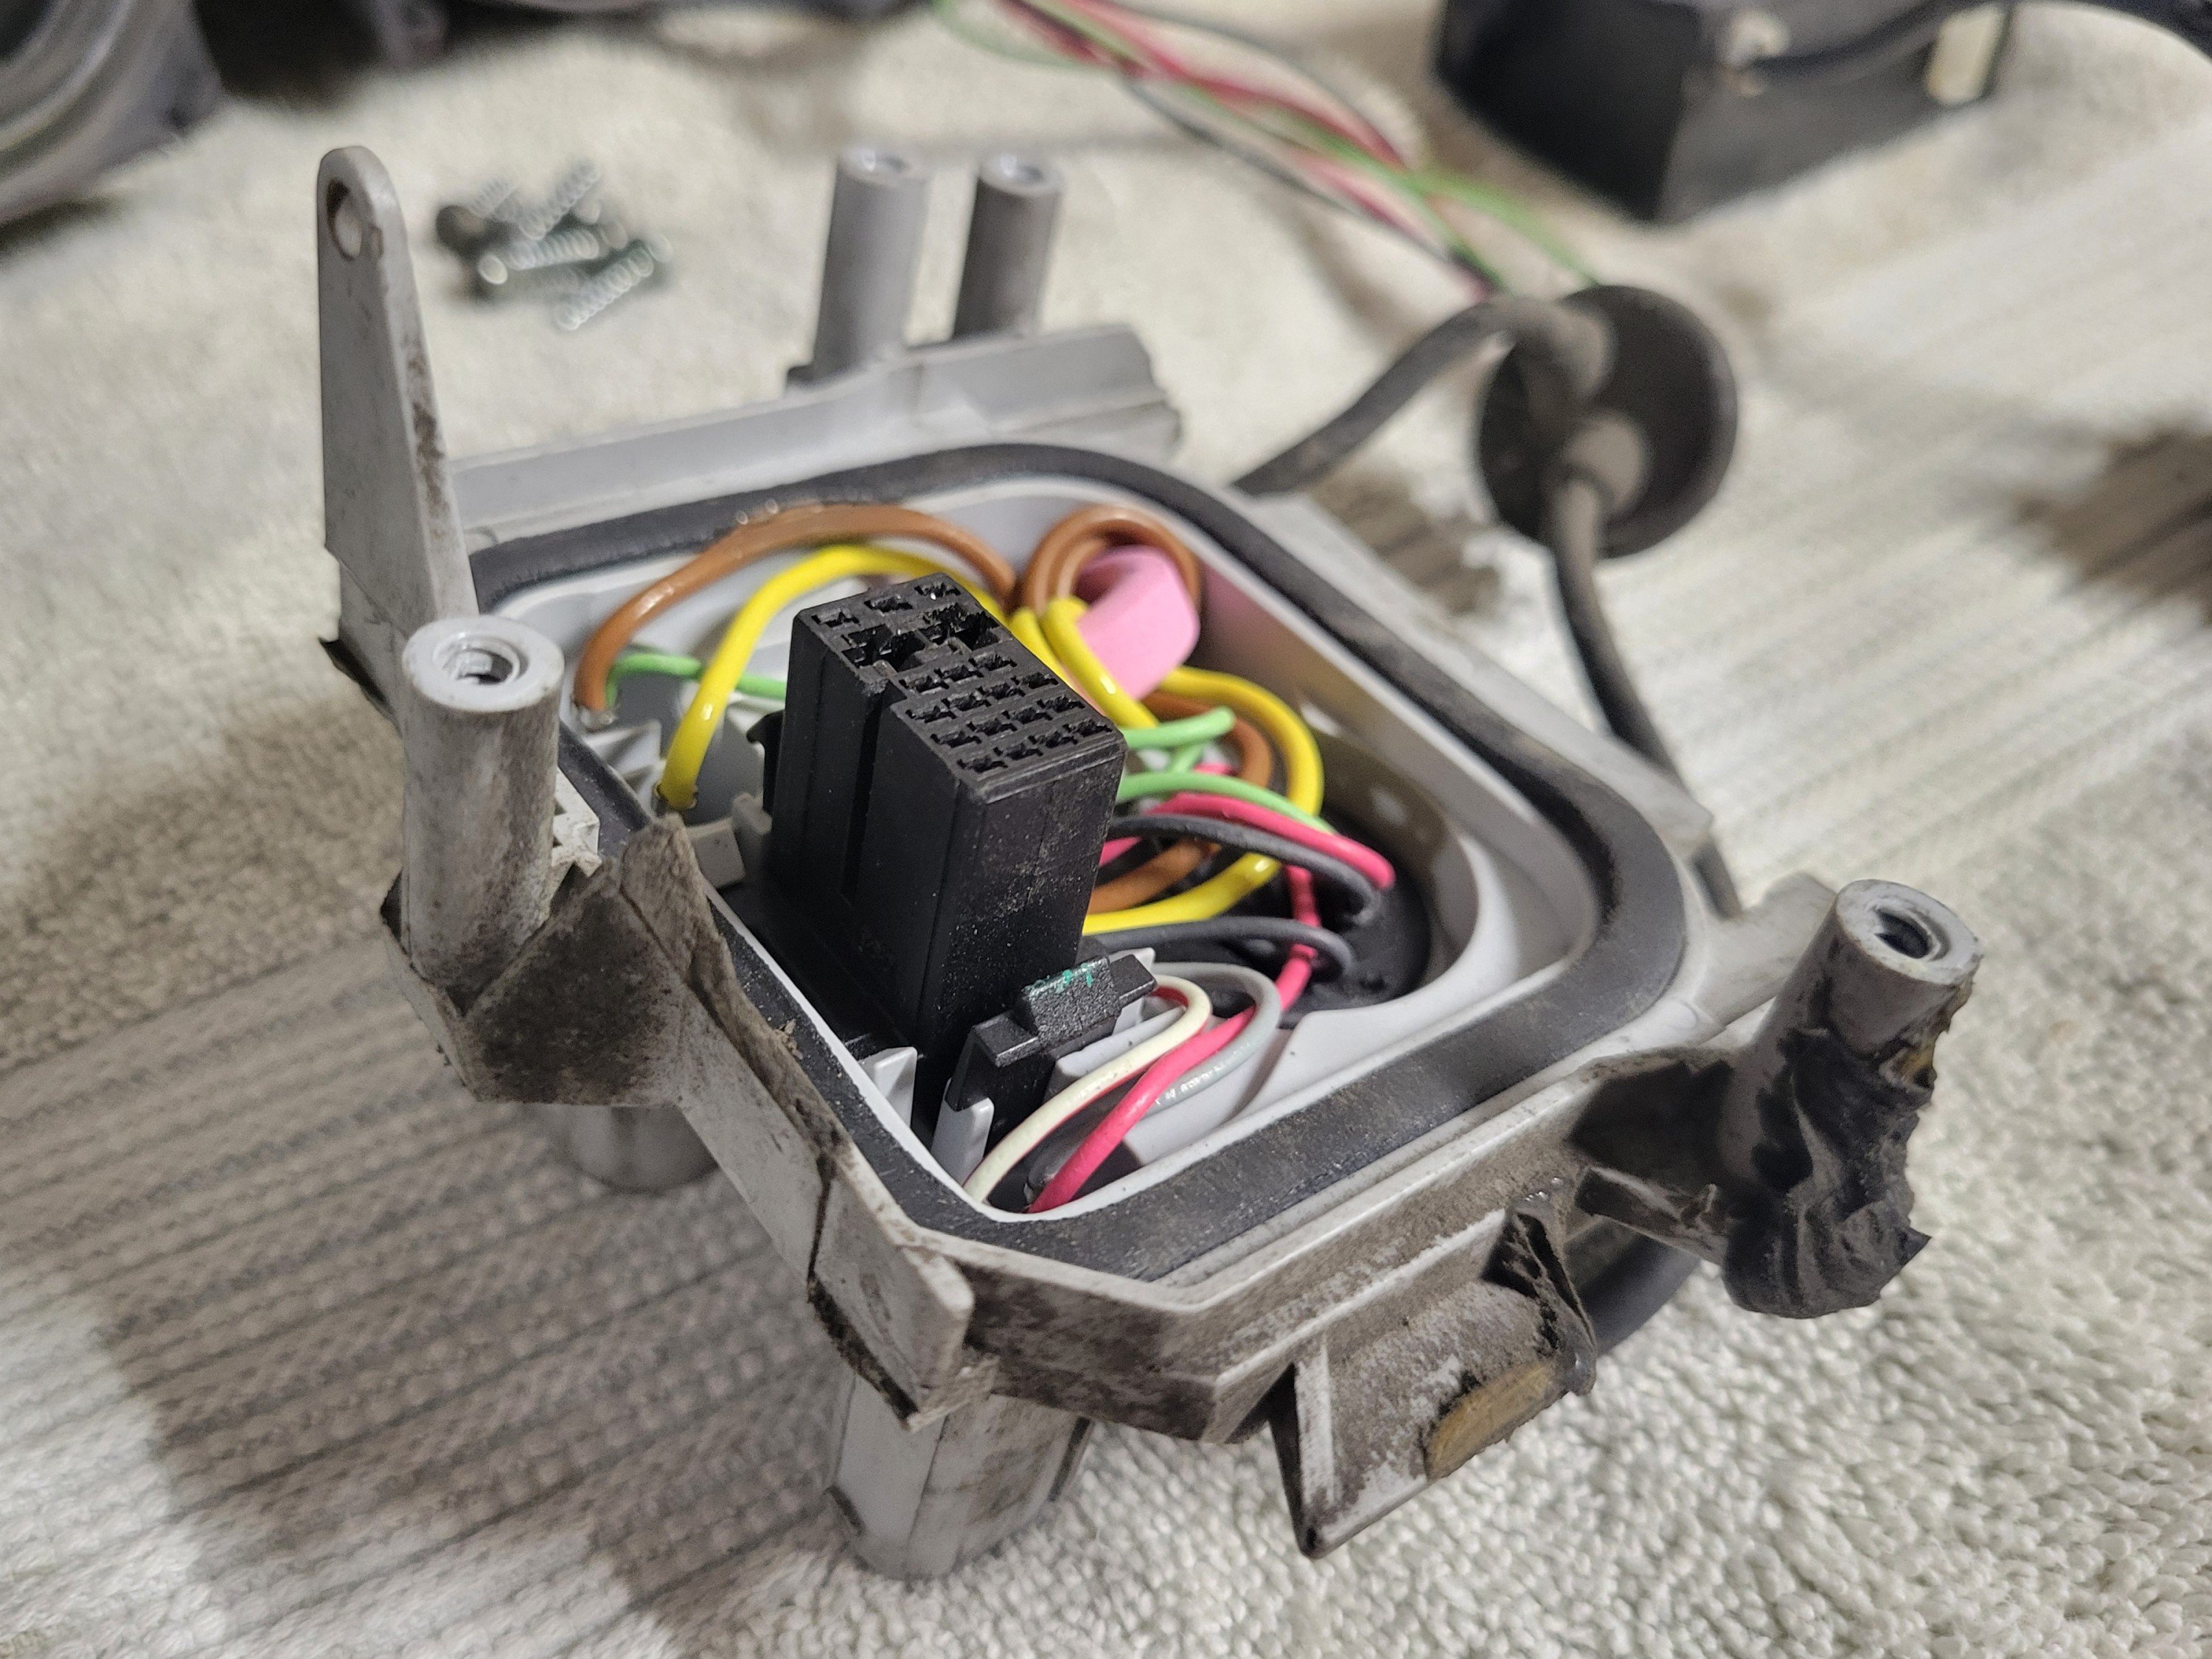
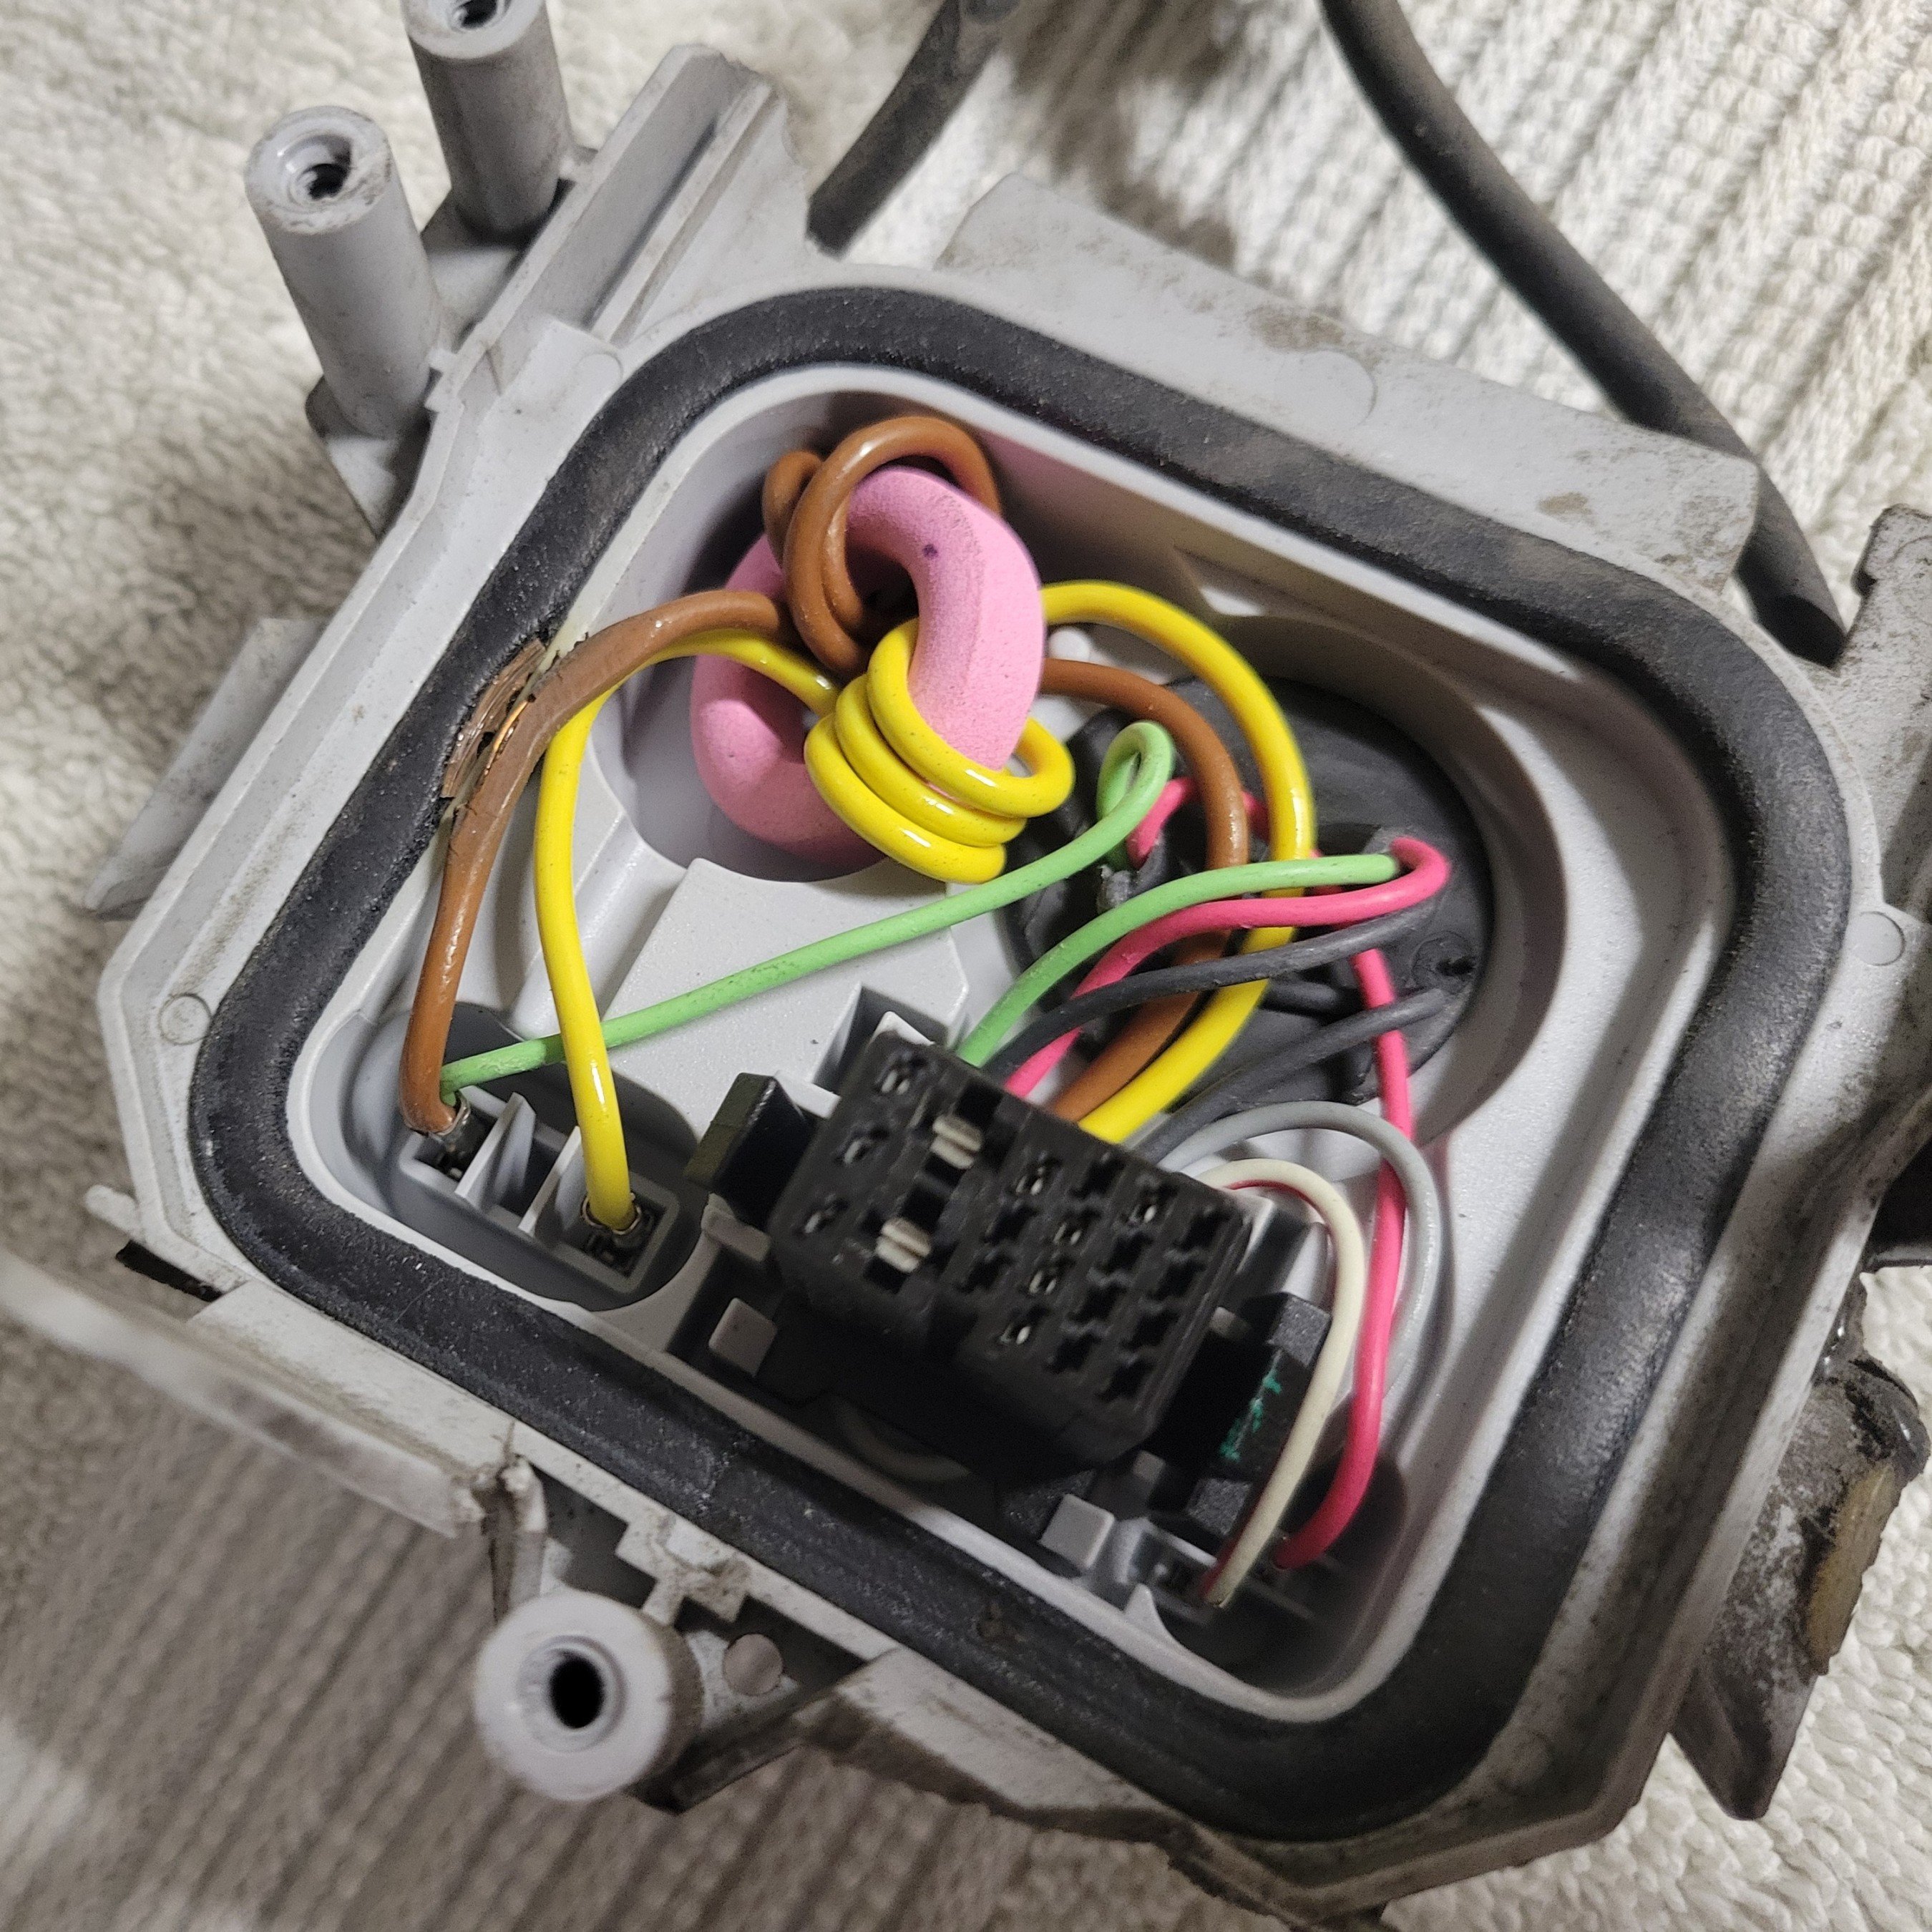
Ideally, I would have swapped over the main wiring casing where the ballast plugs into but it was in a rather shoddy state with the casing cracked, bits broken off and goo holding it to the headlight housing instead of screws. The brown wire had also been pinched on the seal and cracked in exactly the same place as on the original headlight. Third unit I'm seeing it happen on now so looks to be a very common thing, weirdly enough.

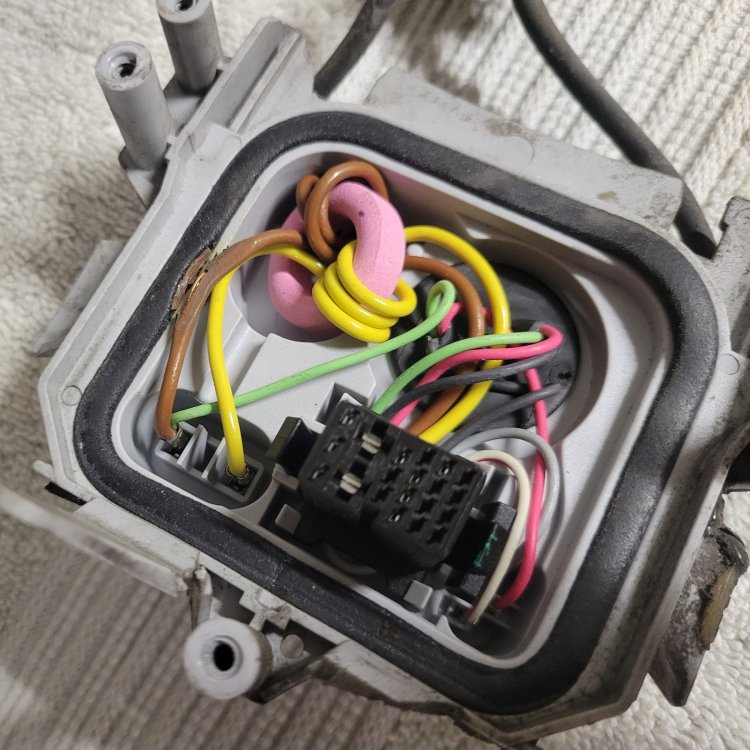
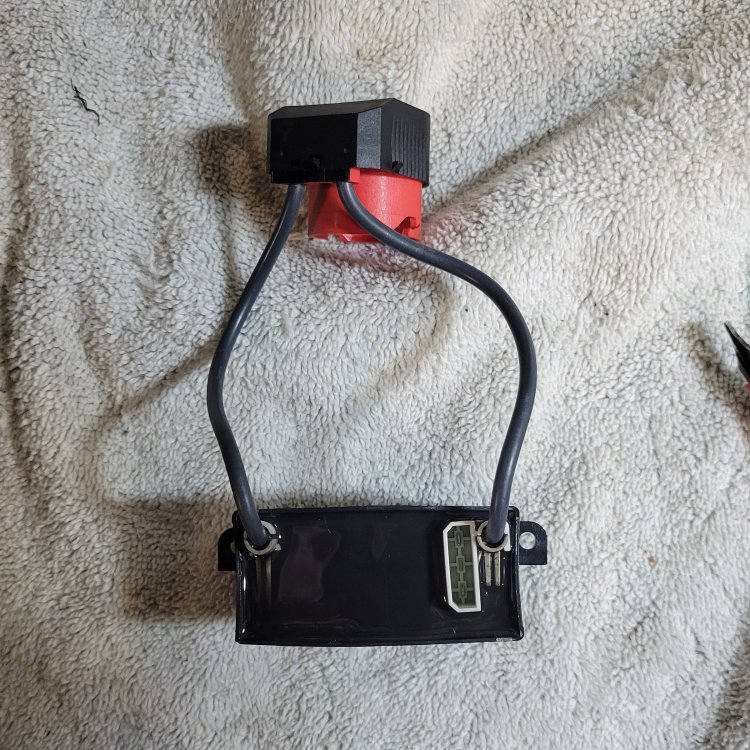
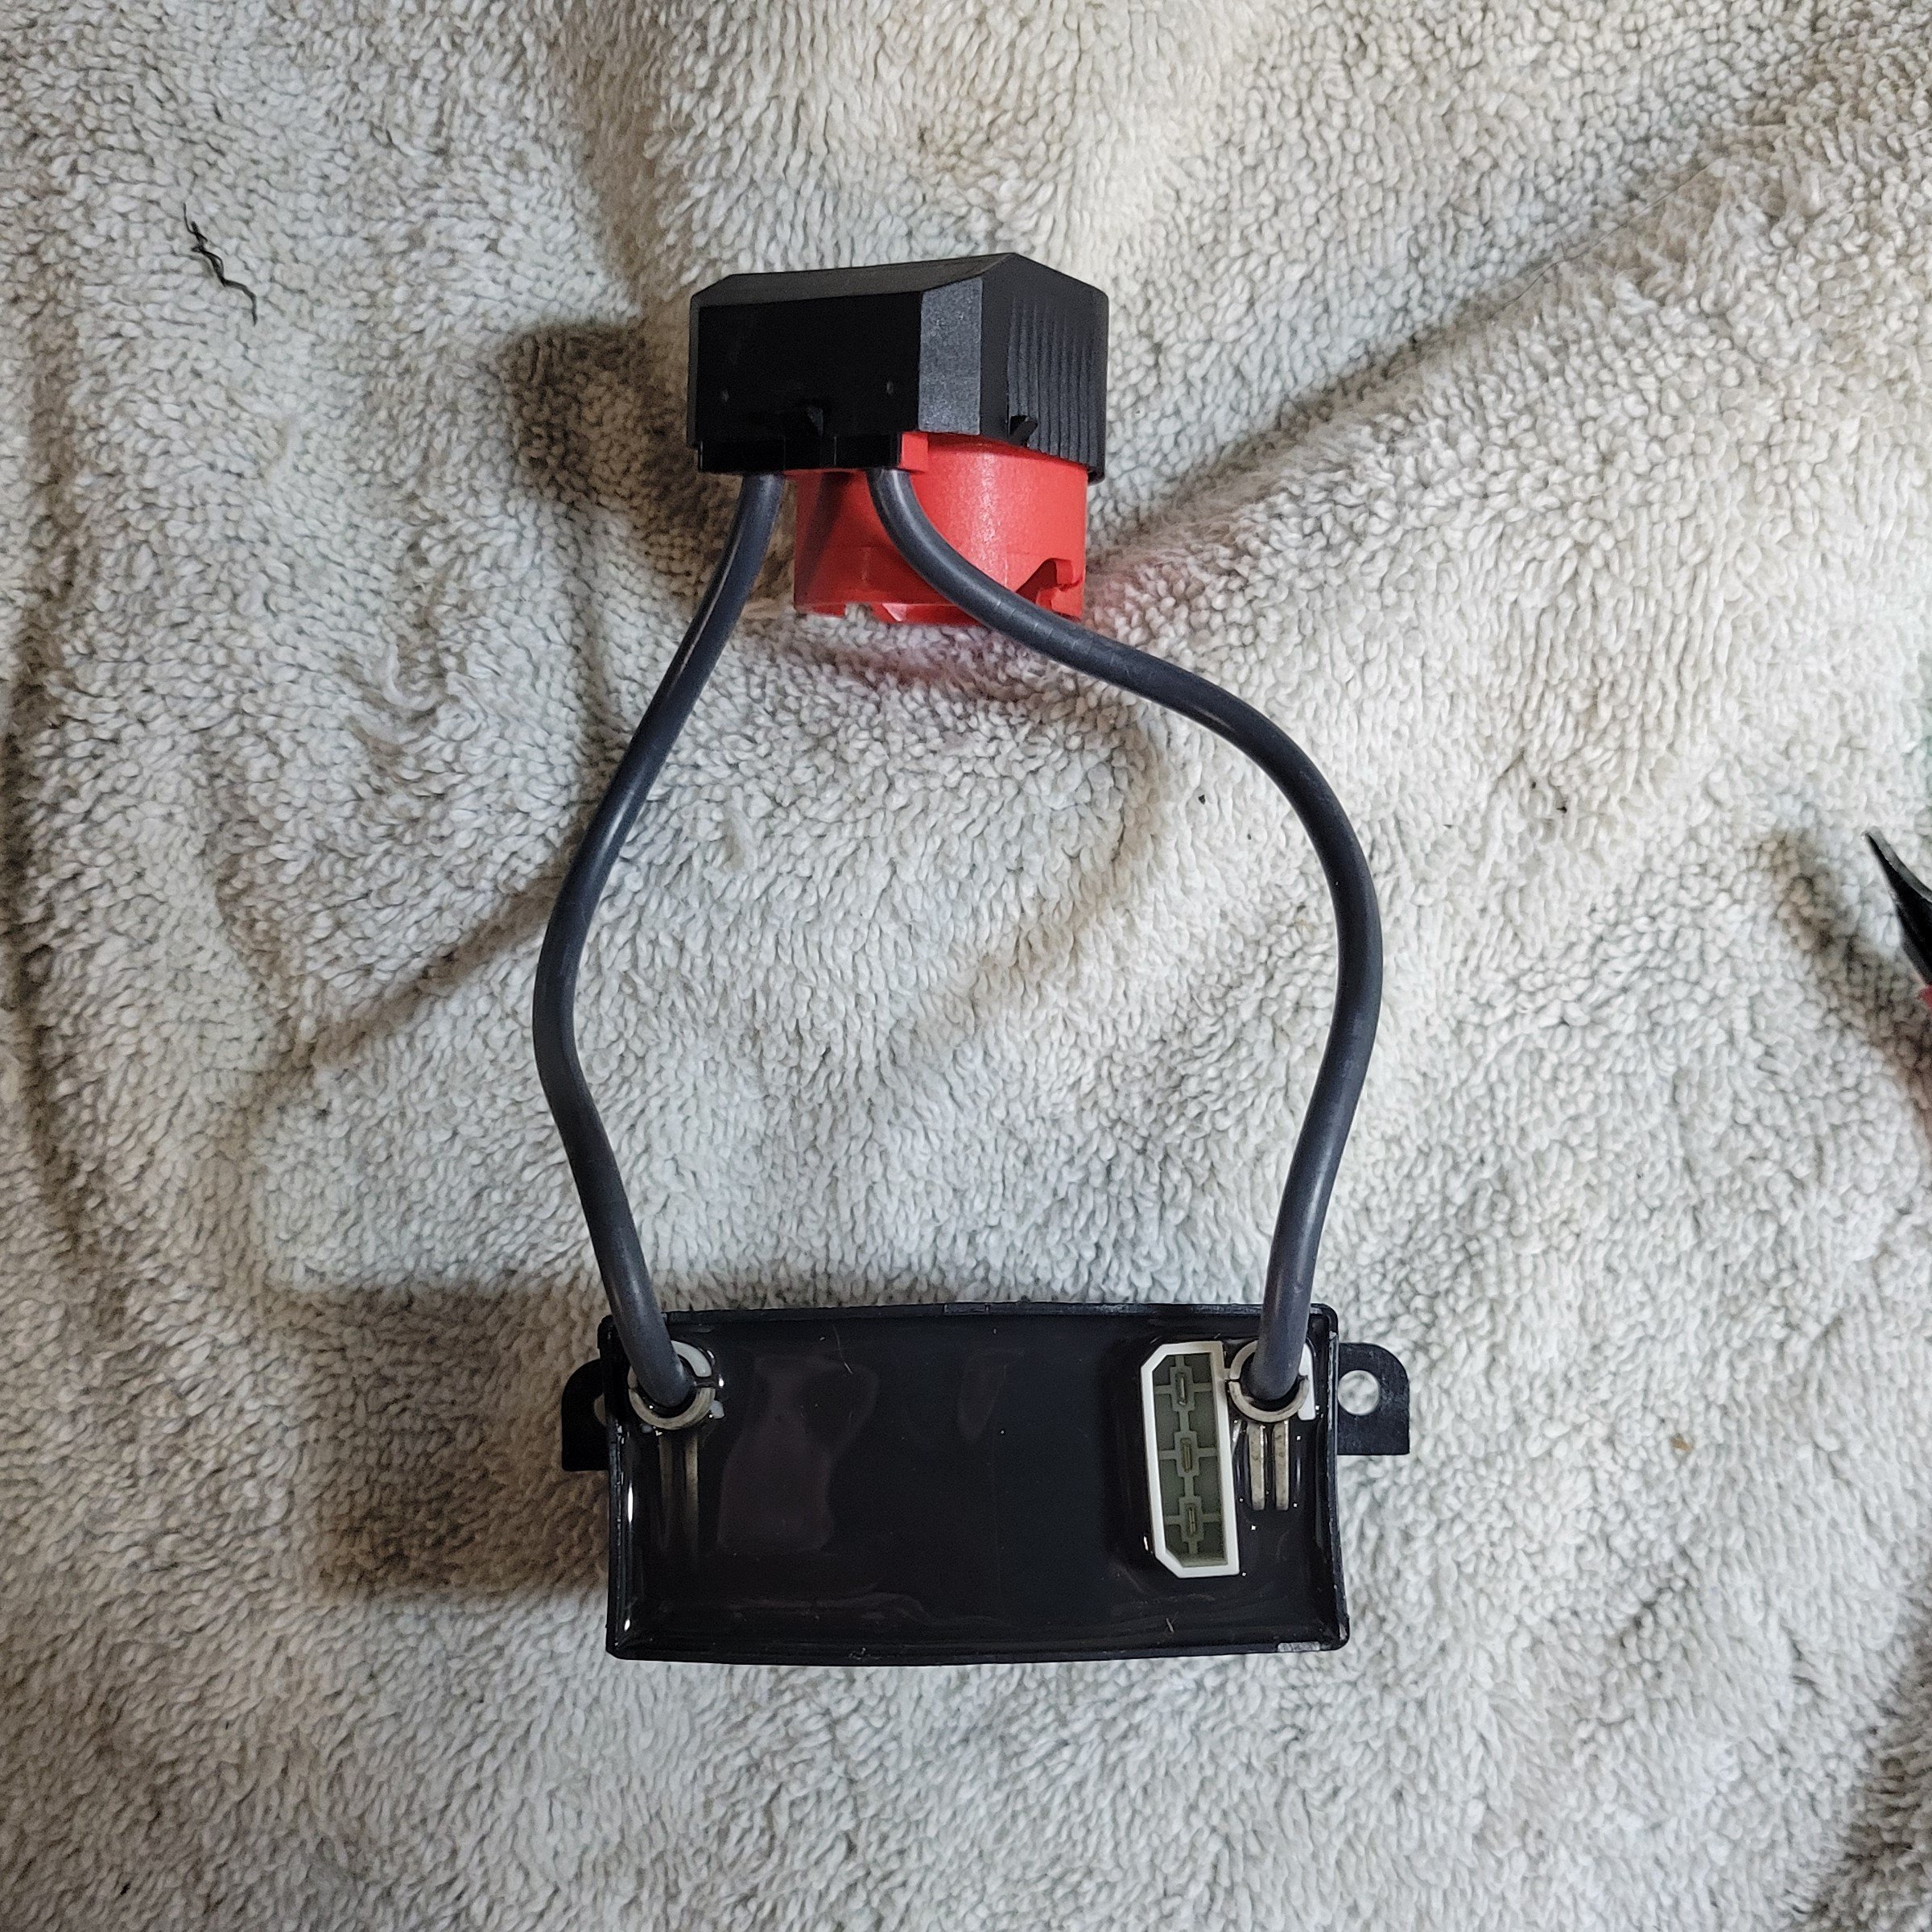
I decided to leave the wiring birds nest alone and start by swapping over the igniter unit, which seems to have turned out to be the fix. The original igniter unit was visibly "swollen" with the top & bottom edges bowed out, I'm assuming from absorbing all the moisture making its way into the headlight housing.
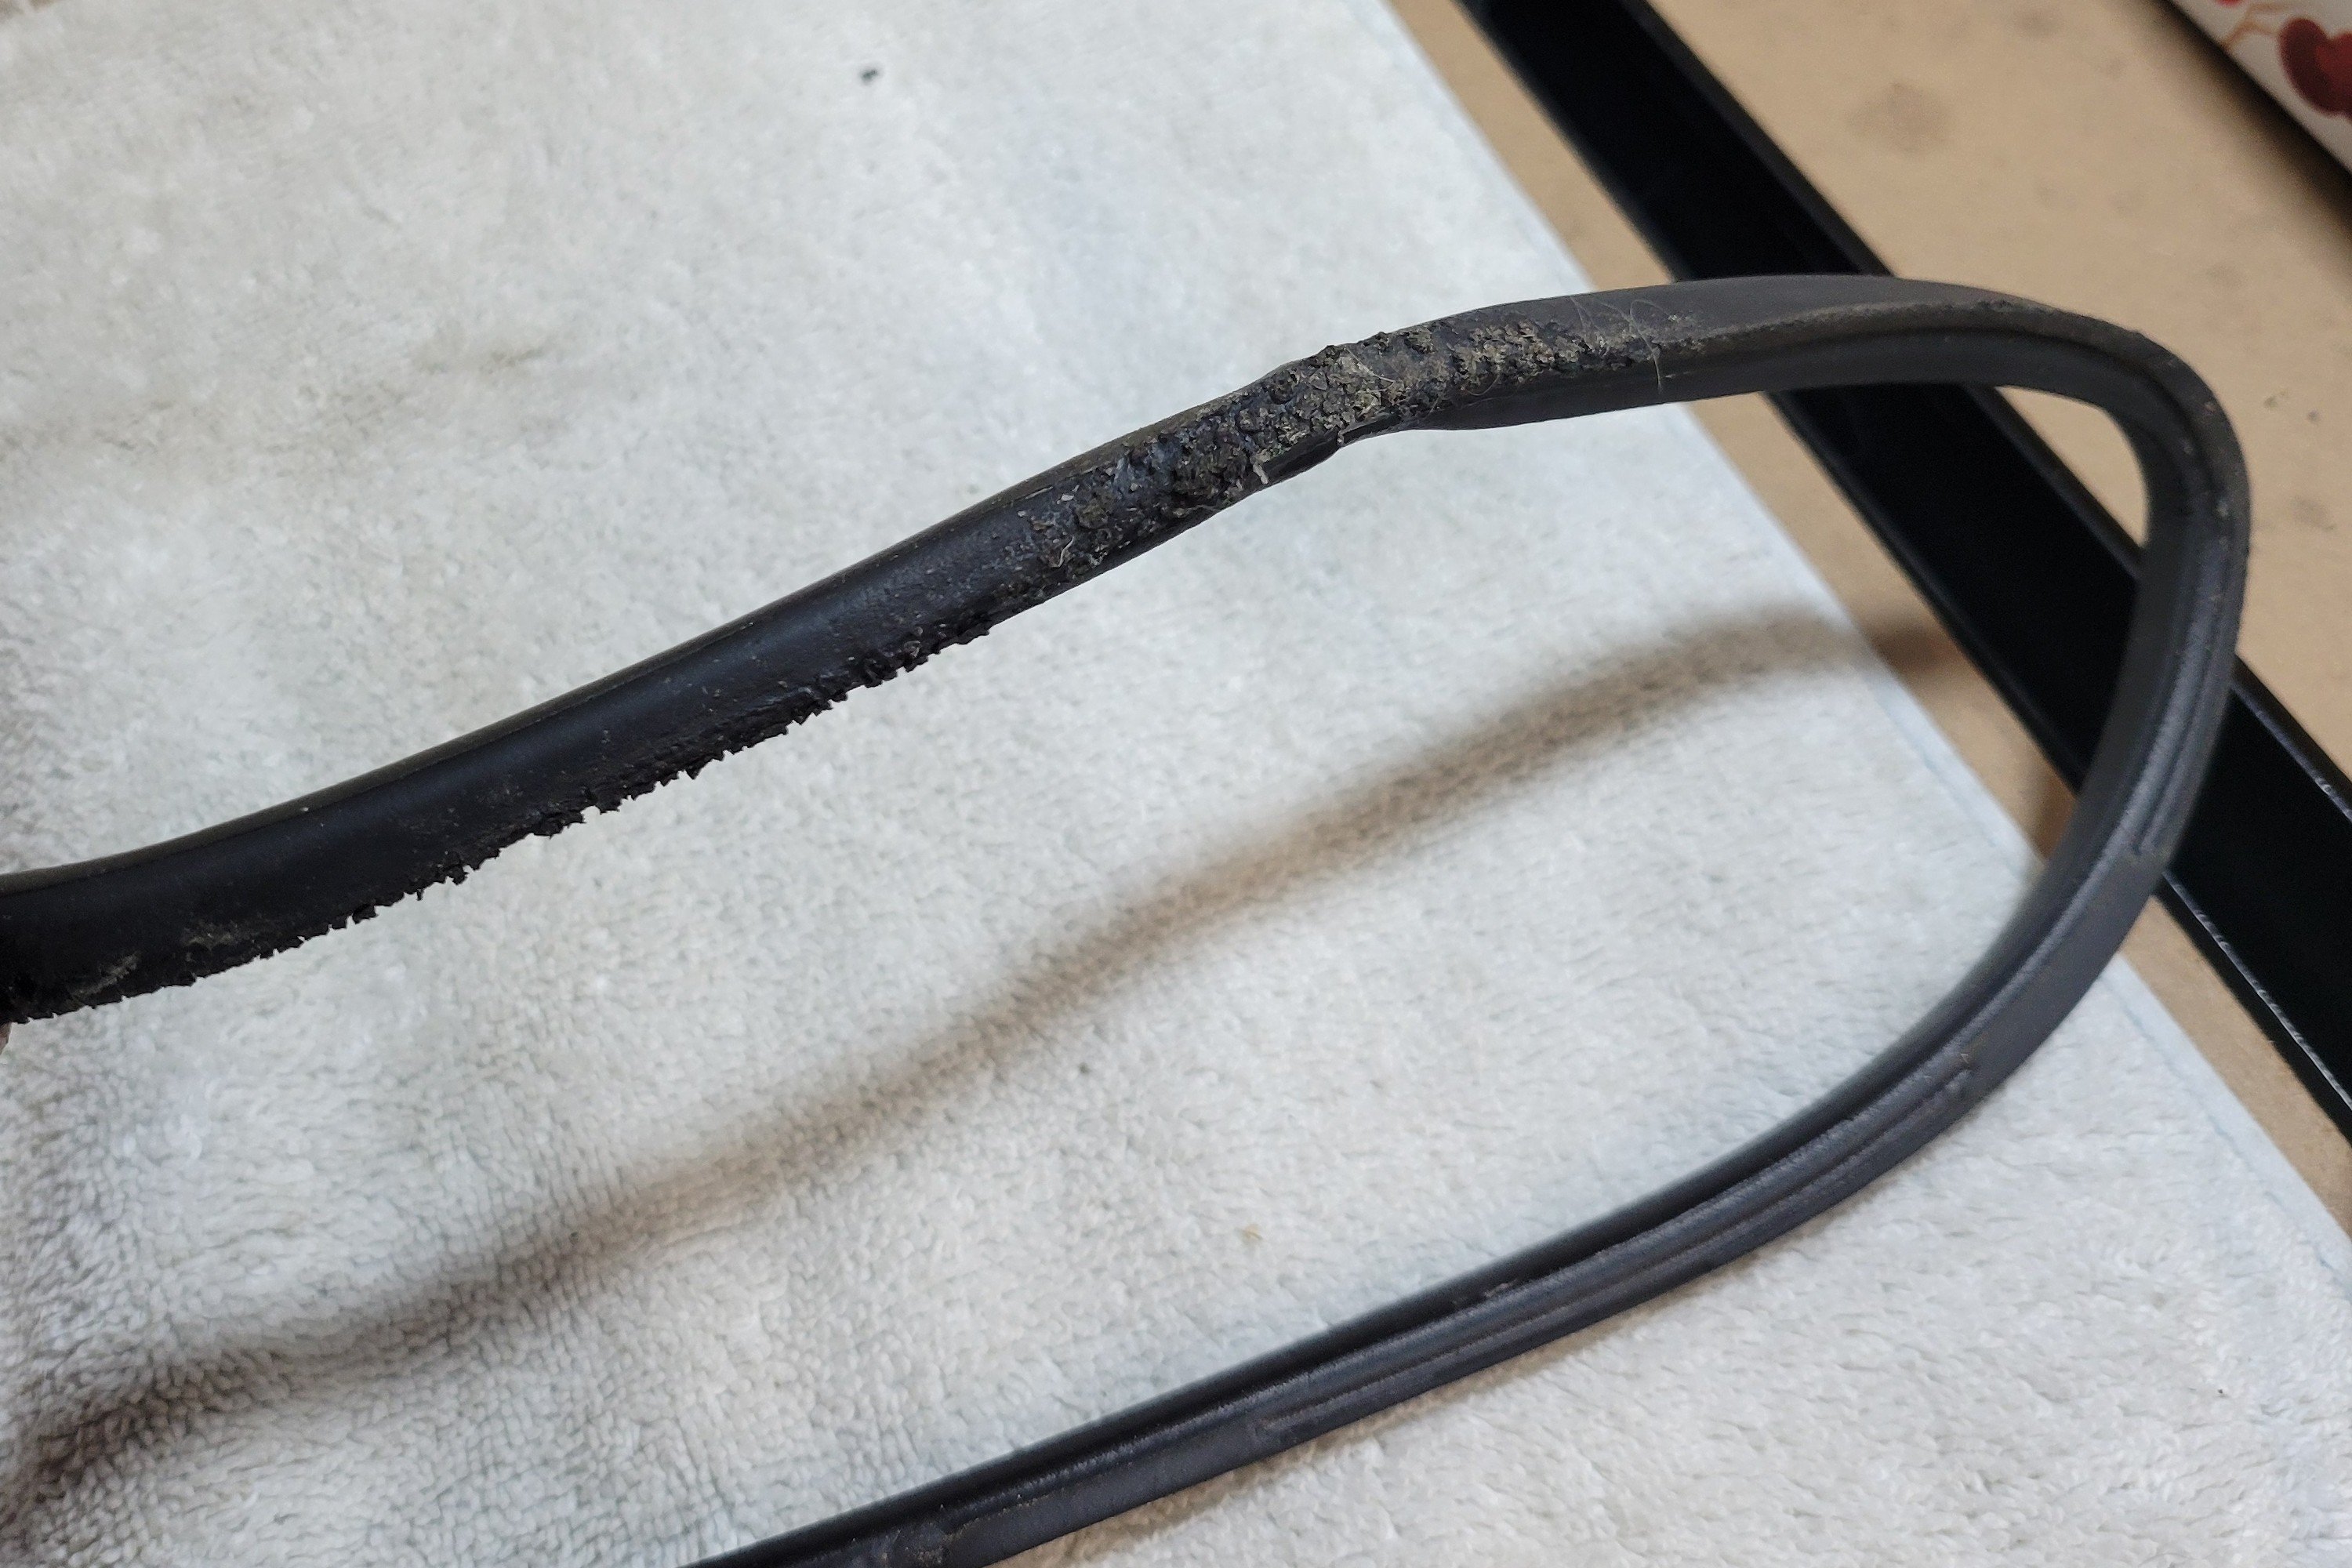
On the moisture front itself, the lens seal had somehow begun to rot and was in an absolute horrid state. Almost impressive how bad it had gotten.

Luckily, the one from the donor was in pretty good nick so I used that for now. Will order a pair of new seals at some point and replace both to future proof it. Unfortunately, it's one of those items that Spareto doesn't stock for some weird reason so will have to be a Schmiedmann order or a trip to the dealership.
All put back together and reinstalled in the car, both headlights now fire up instantly so looks to be a successful fix, although she's yet to venture outside and face the rain. Hopefully it'll hold up just fine tho.
-
2
-
-
That was a massive oversight on our part. Should have checked timing as the first thing but I guess since we managed to get the car running and idling perfectly smoothly a couple of times we just assumed that the timing wouldn't have been the issue. It must only have been marginally out, not beyond what the valvetronic system could compensate for, but not consistently enough for some reason.
How, when and why it skipped timing is a bit of a mystery. The car has 165,331km's on the clock. At 160,736km's it had a timing chain, guide, tensioner etc replacement done at Christchurch BMW so it hadn't even done 5k km's since then. Weird one all around.
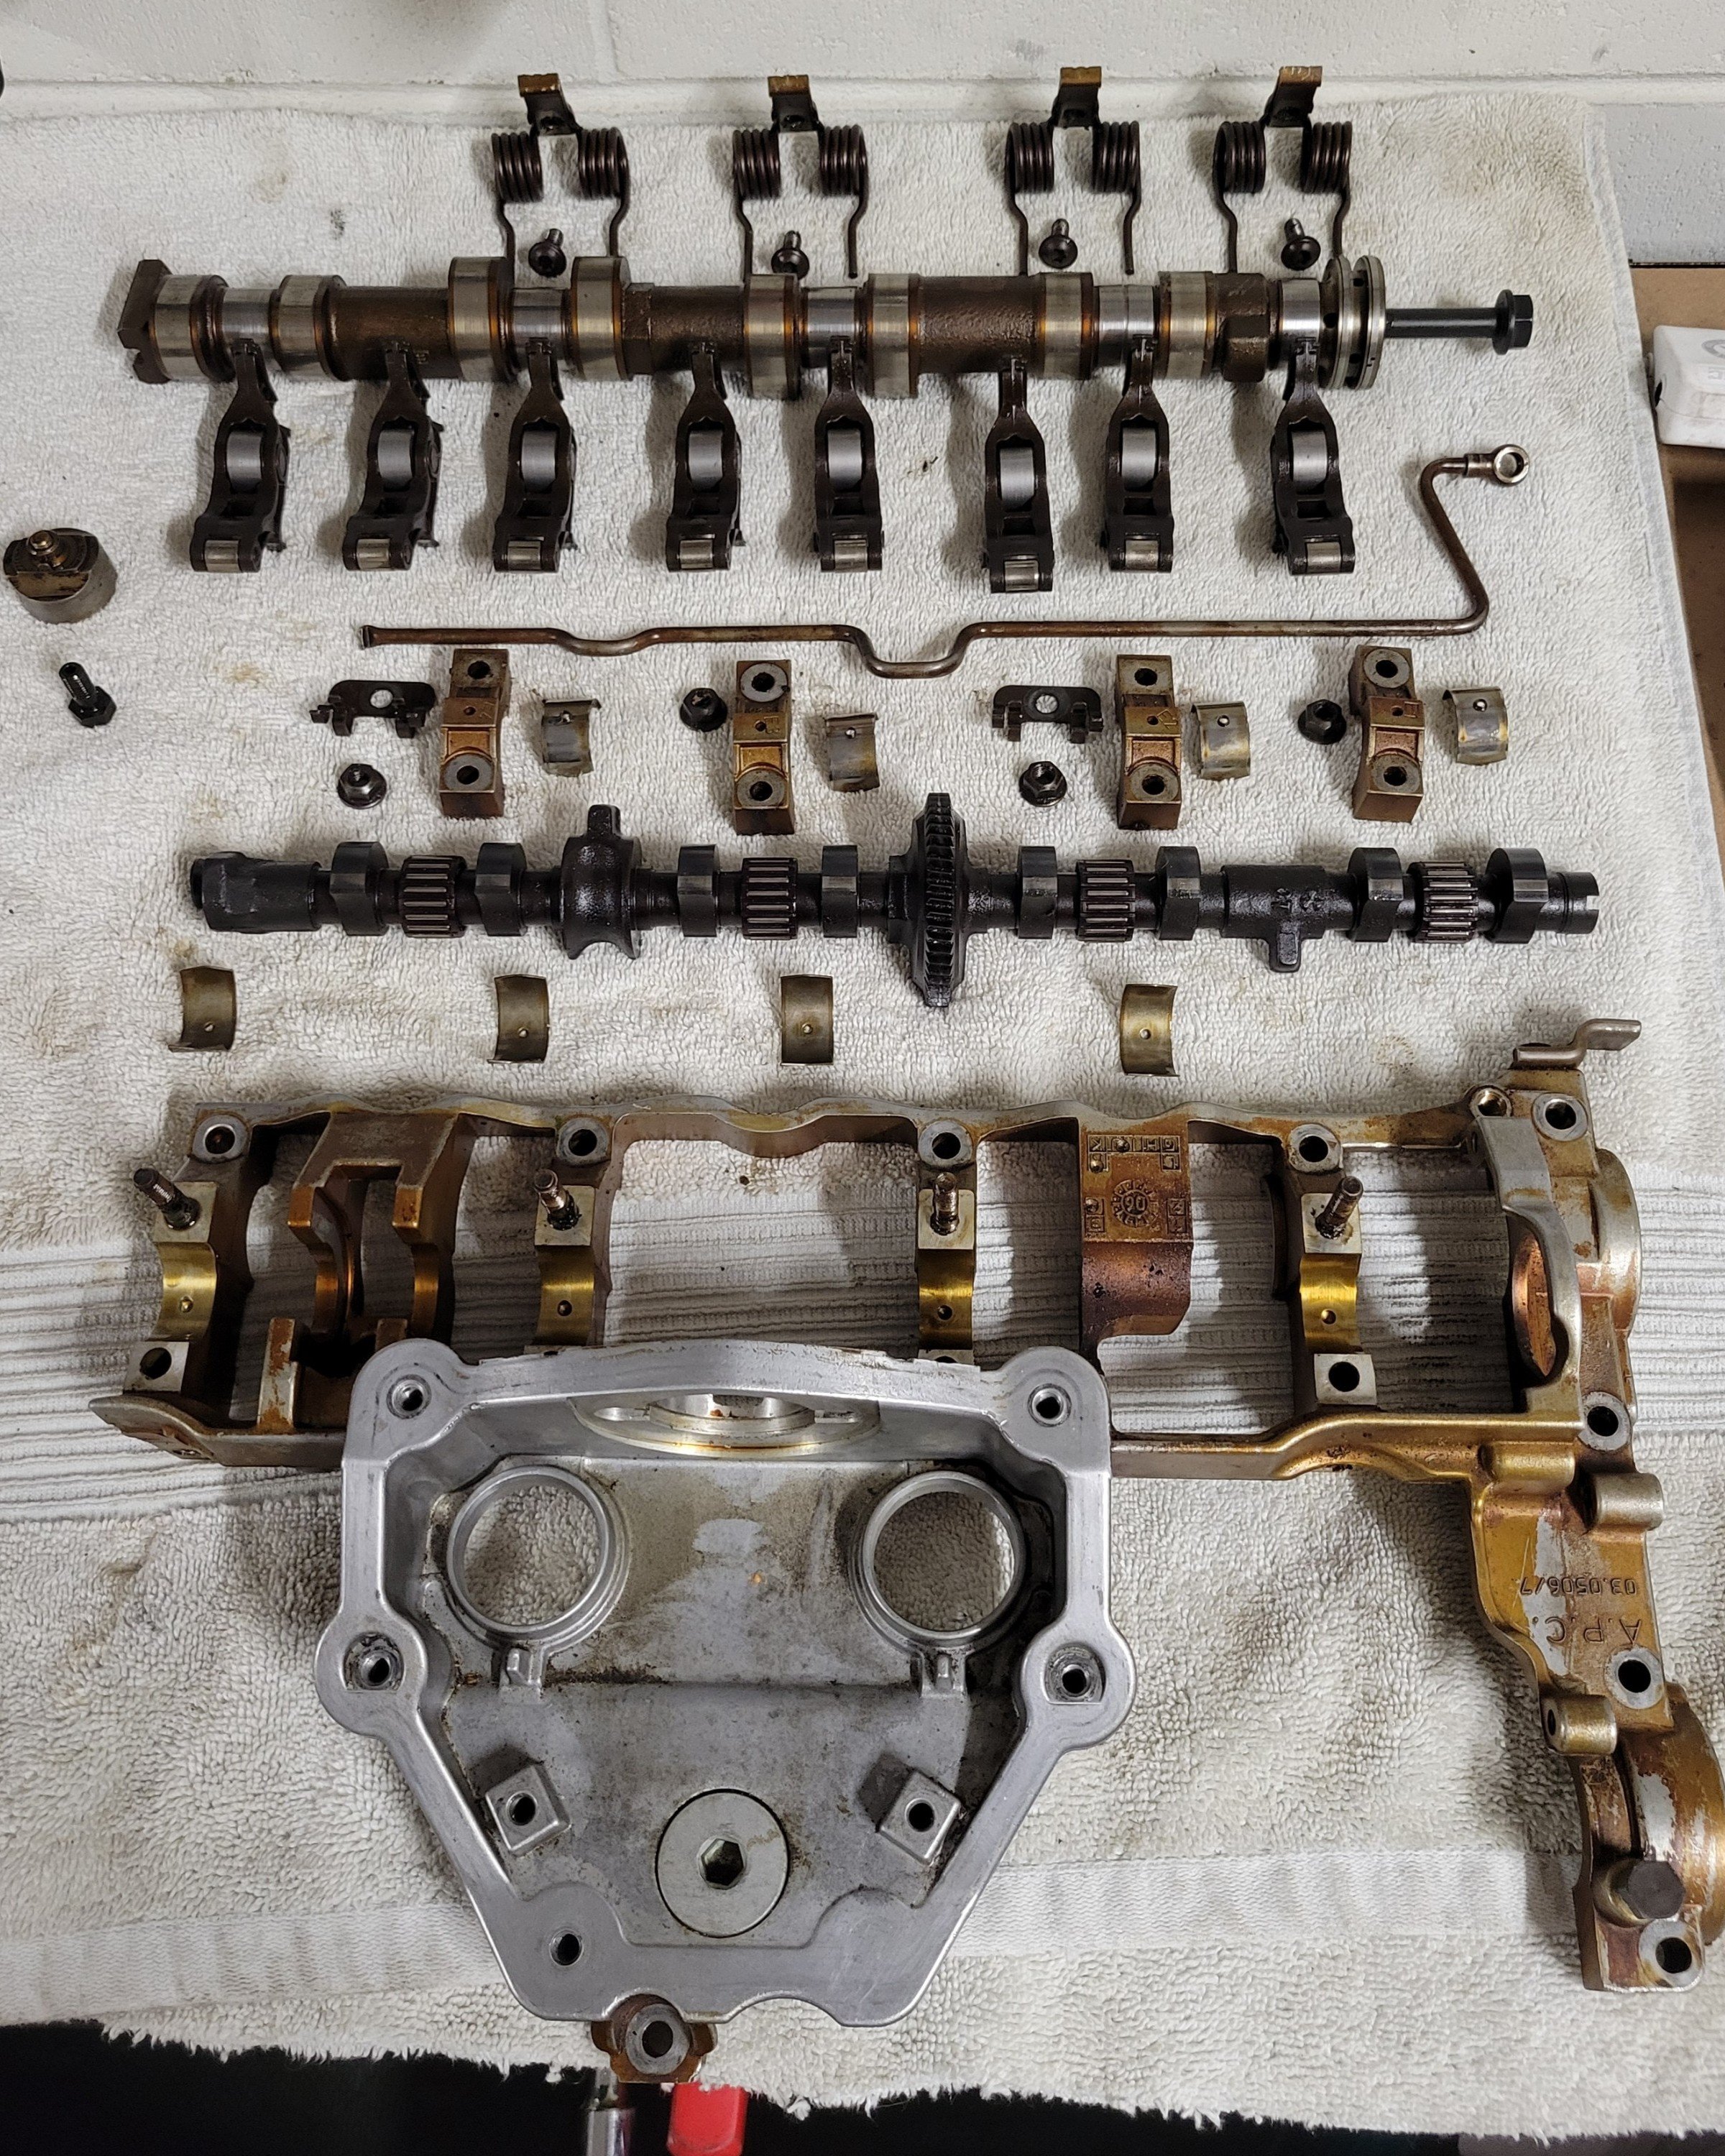
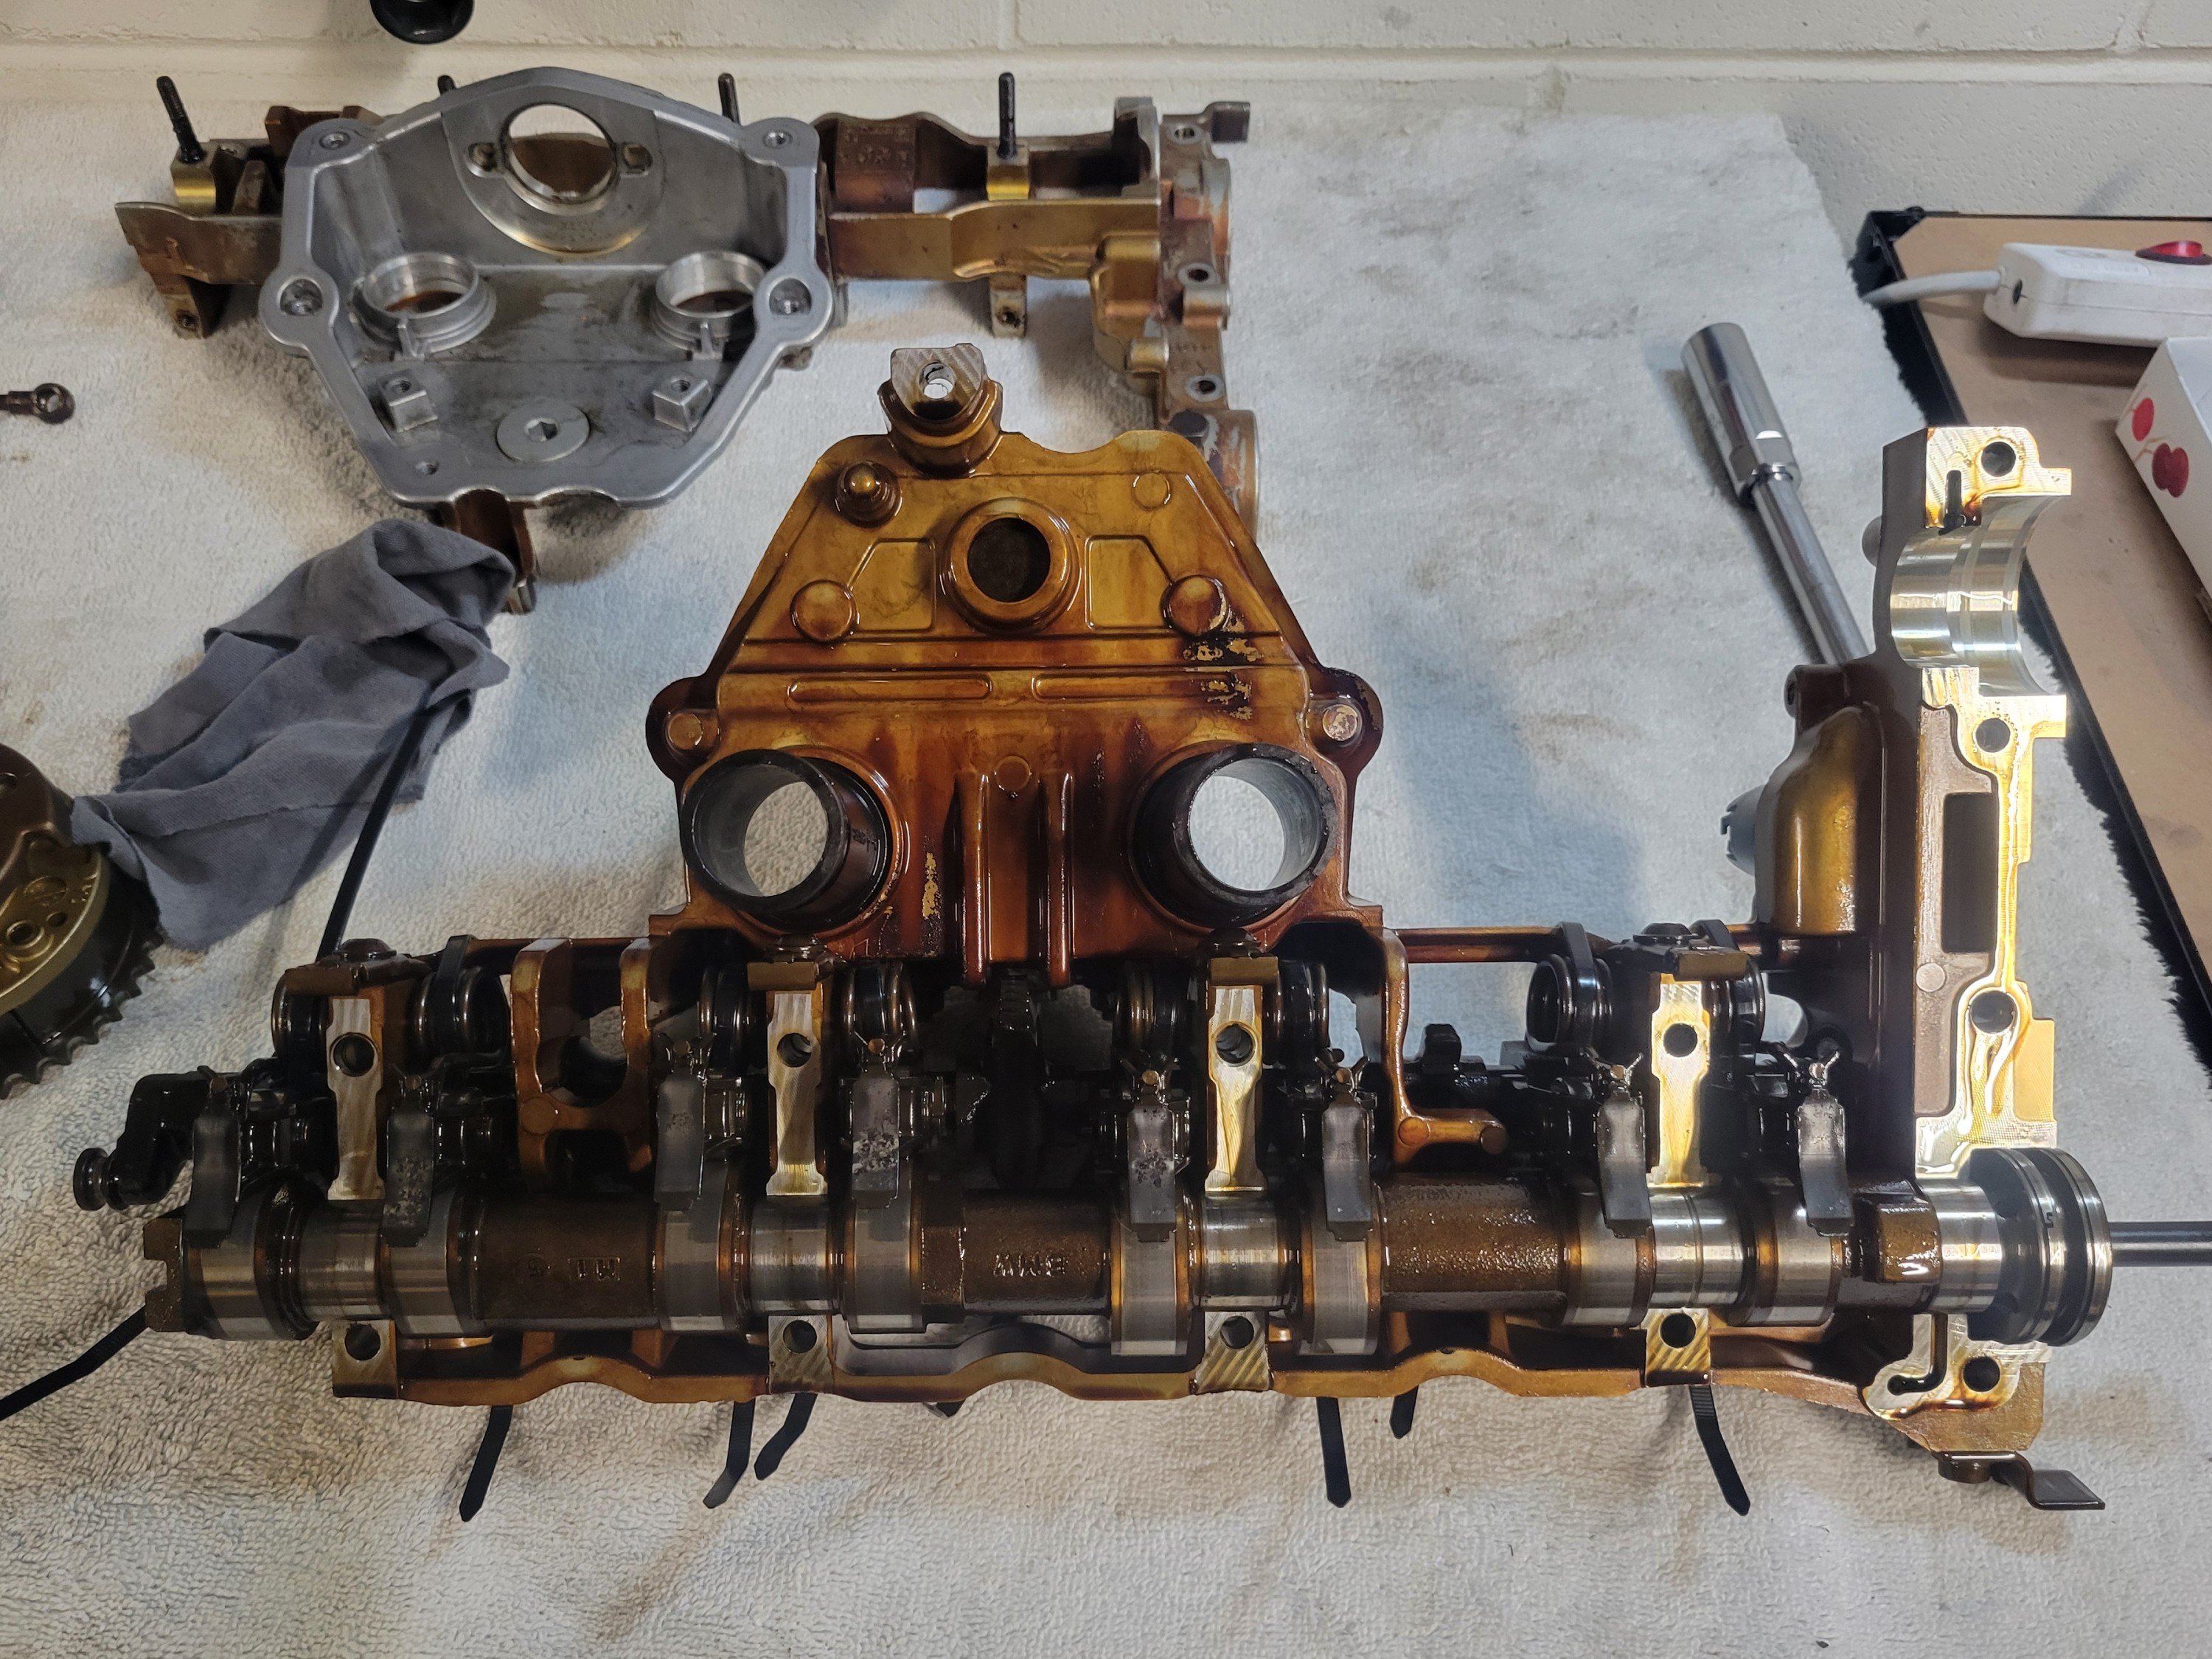
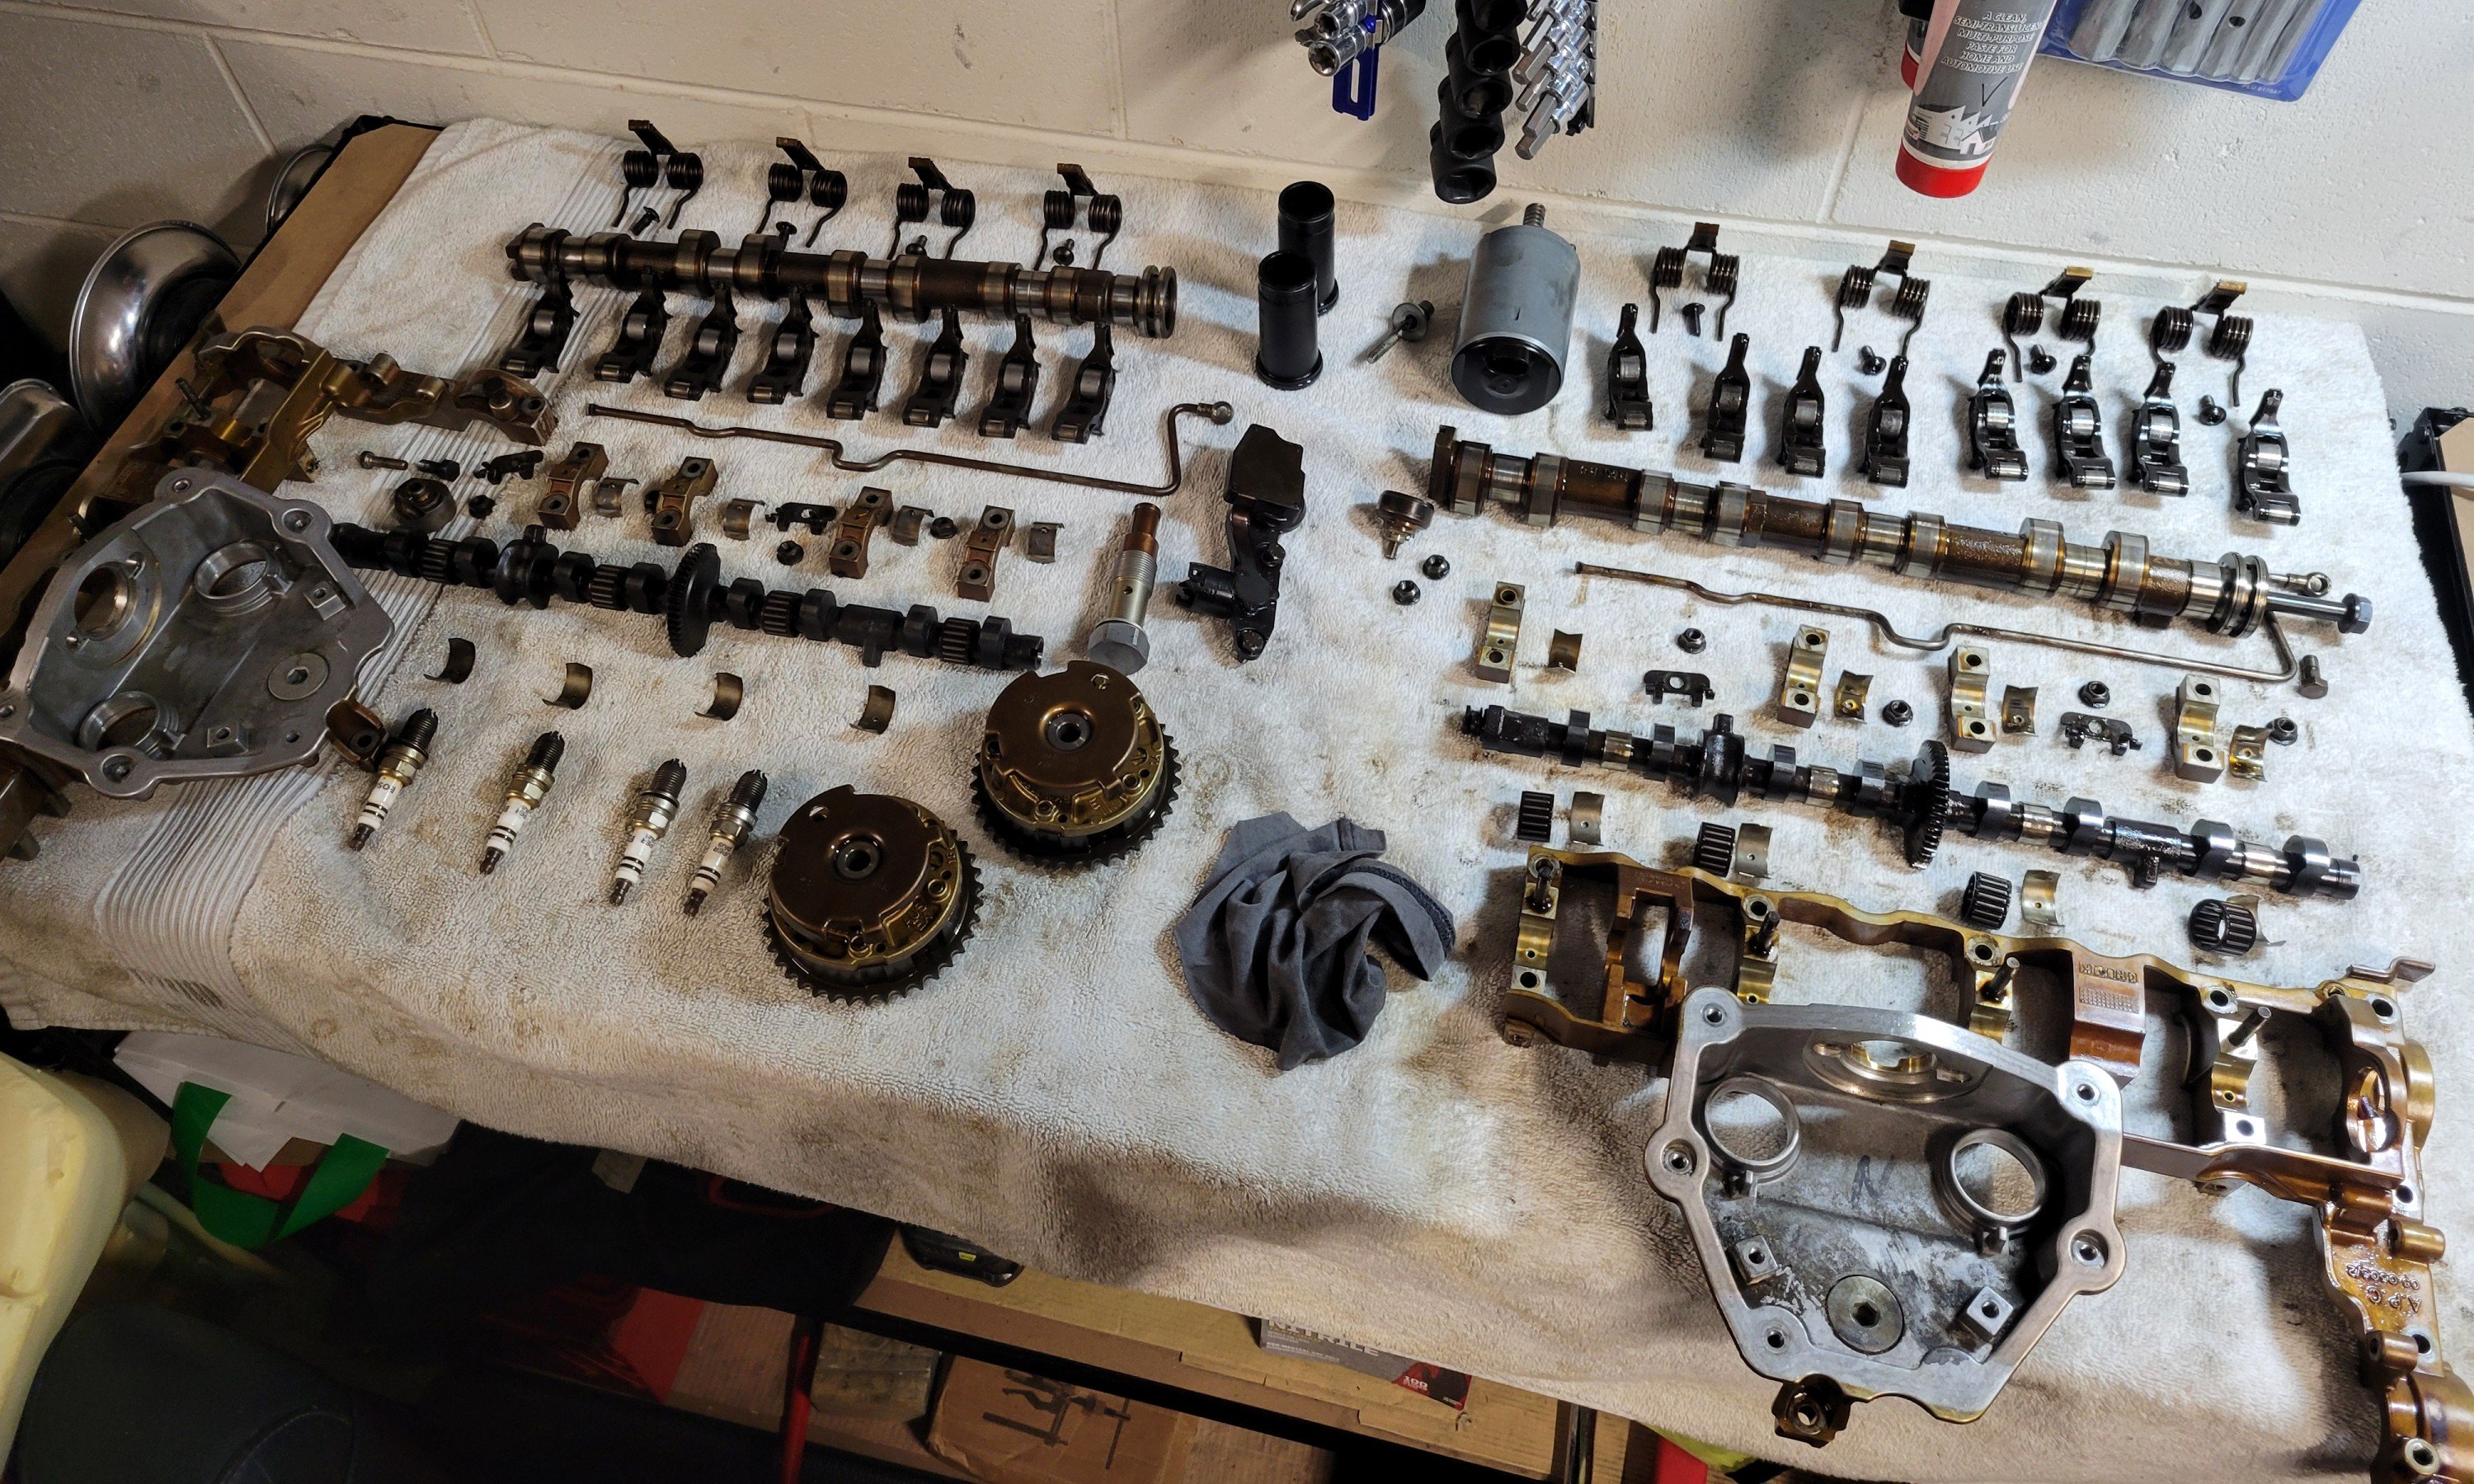
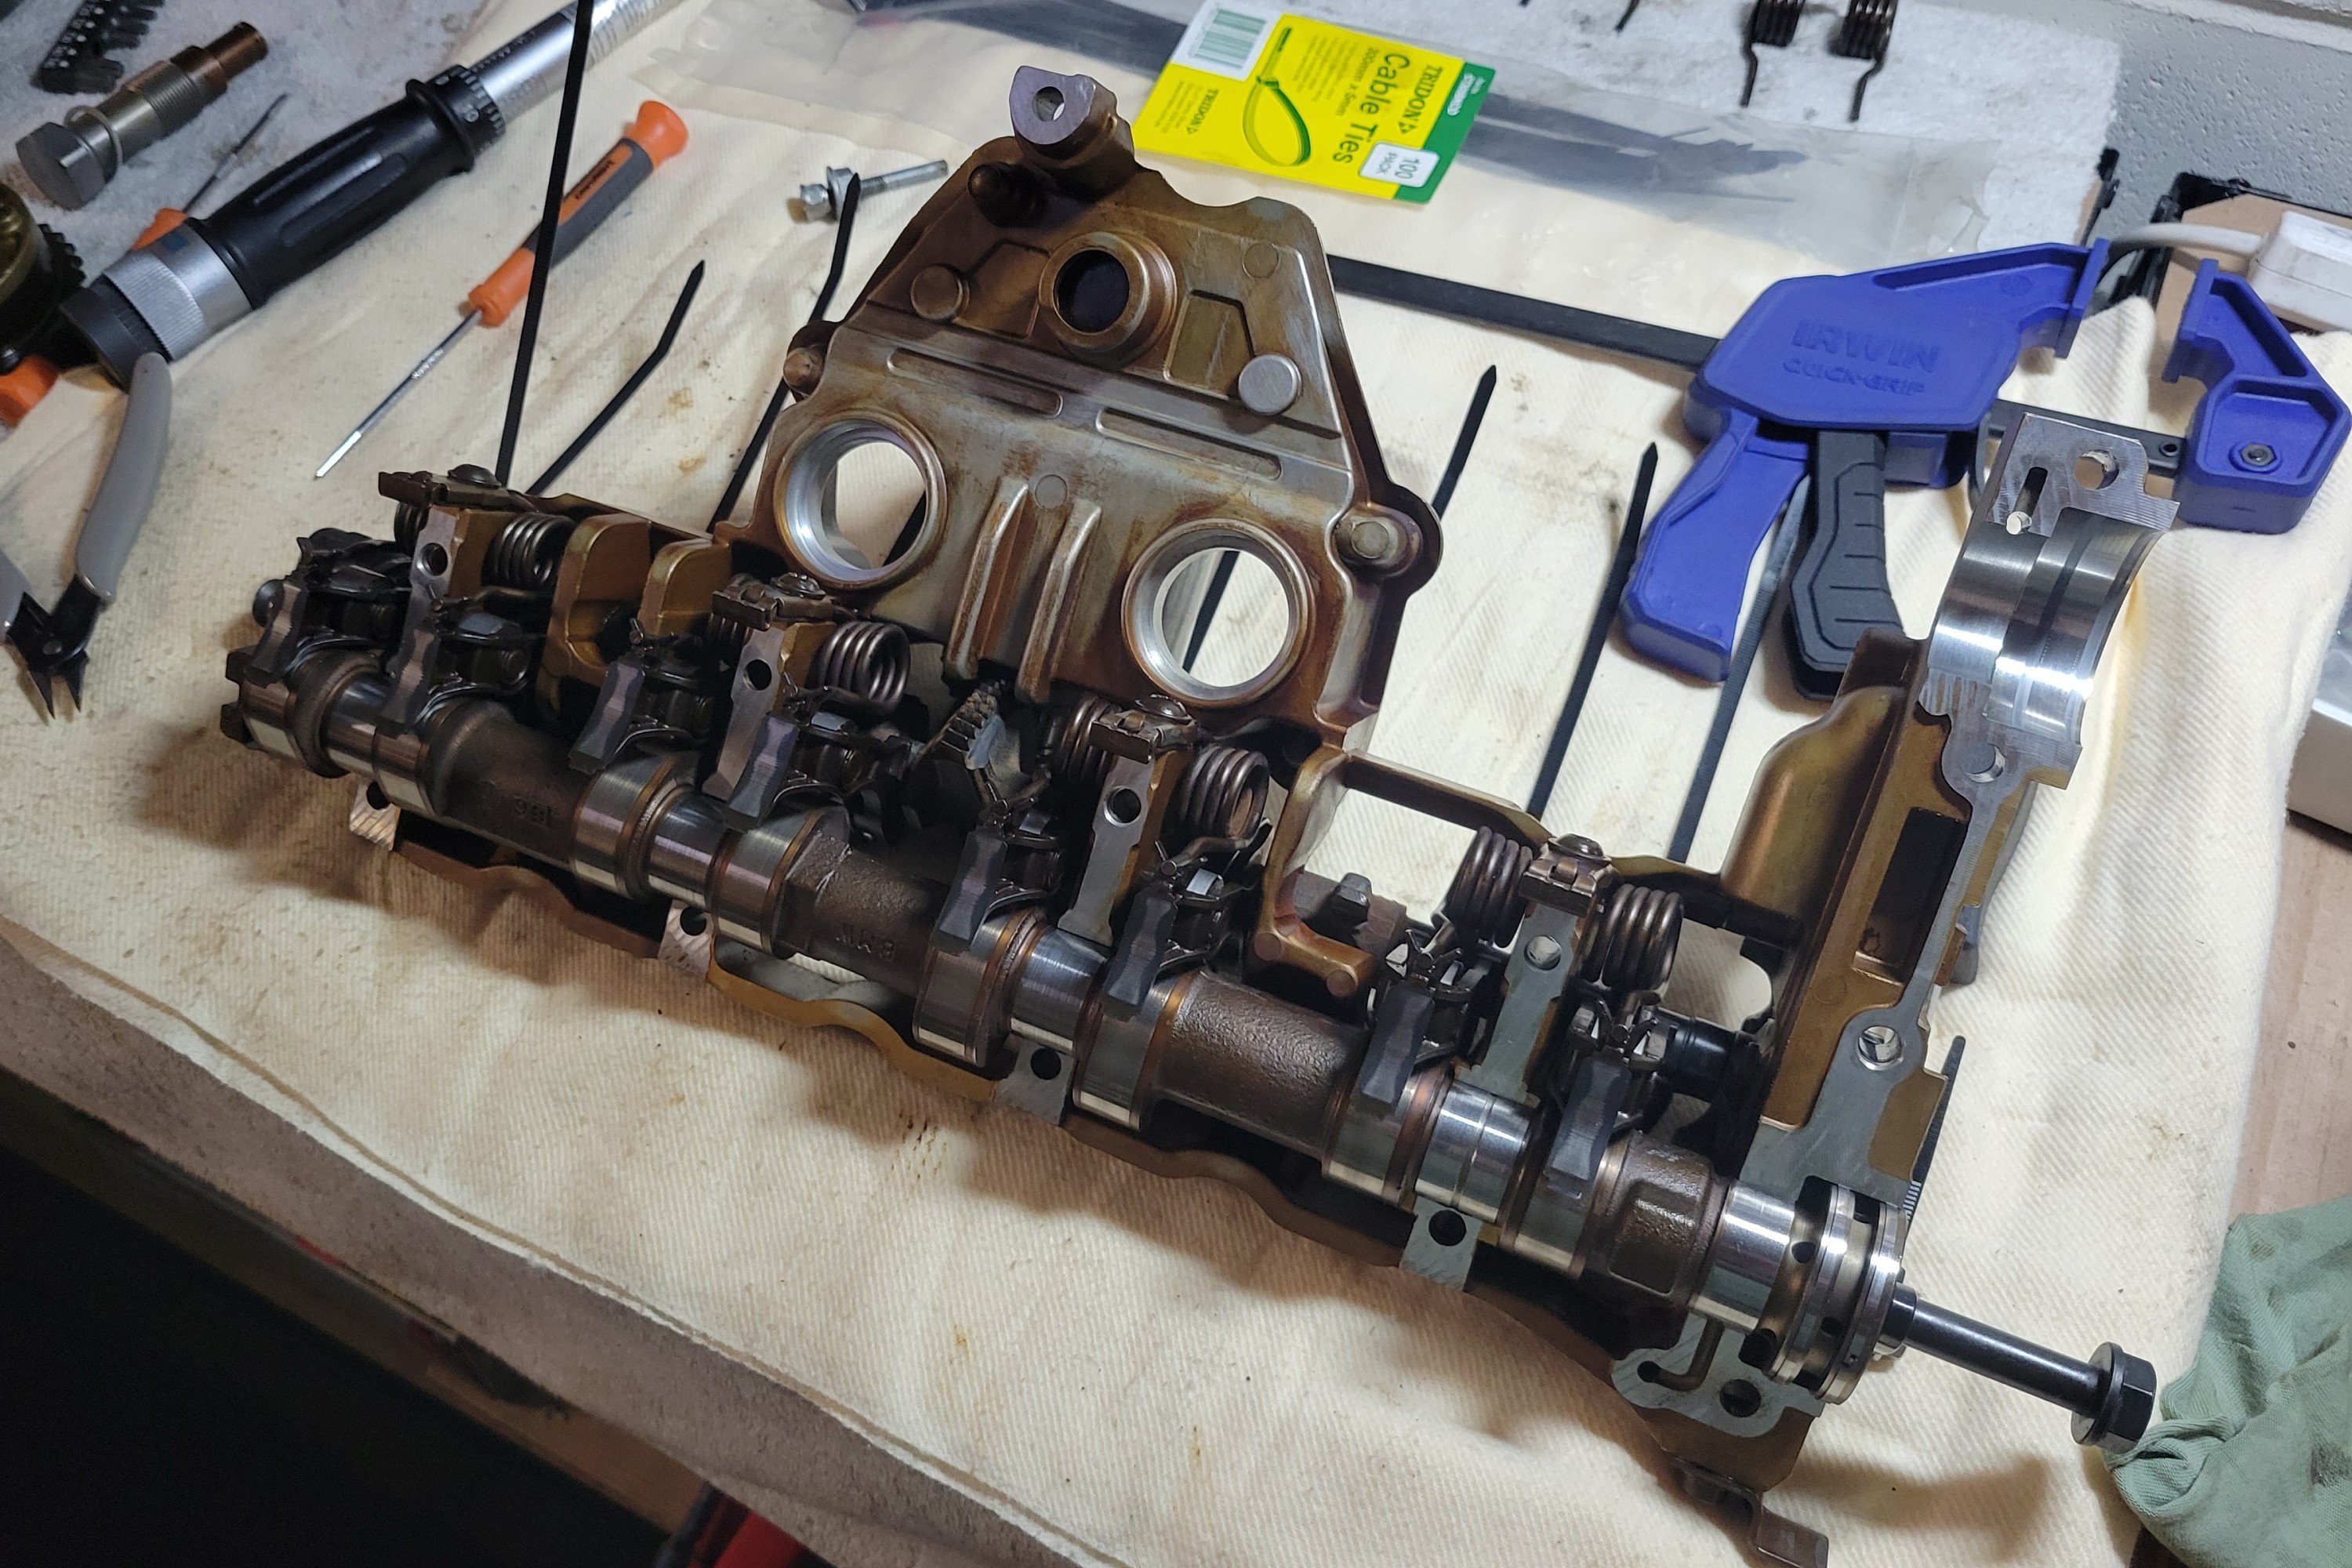
When picking up a spare valvetronic motor a year ago, it came with a whole valvetronic assembly that I parked up on a shelf but now came in quite handy. I figured since I'm disturbing timing anyway, I might as well remove the whole thing, give it a checkover and a clean. I started on the spare unit as a test run before removing the one from the car and tearing that one apart as well. The video series from BimmerZen was super useful throughout the whole process.
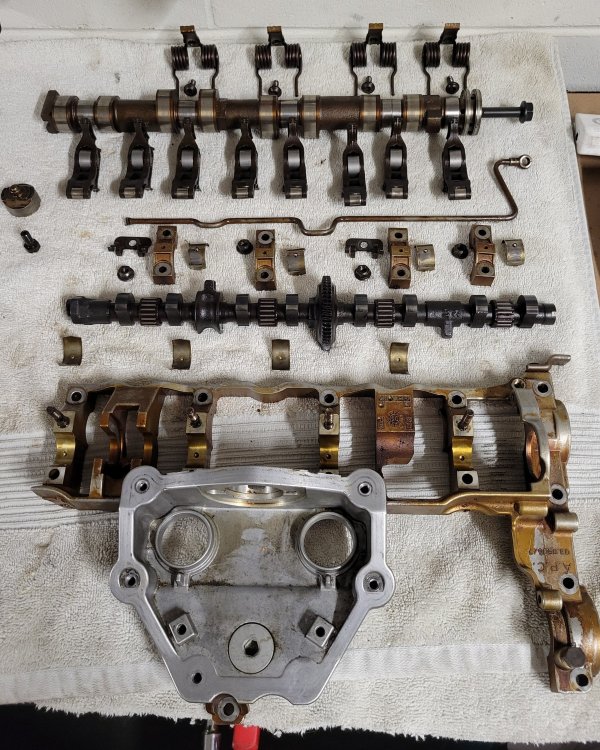
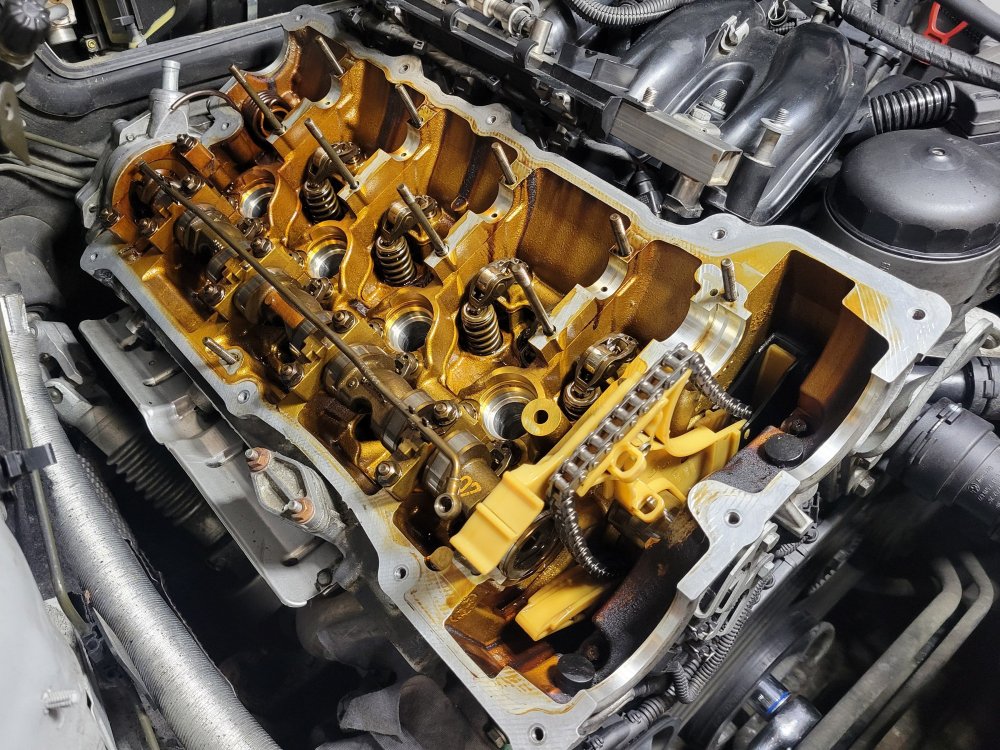
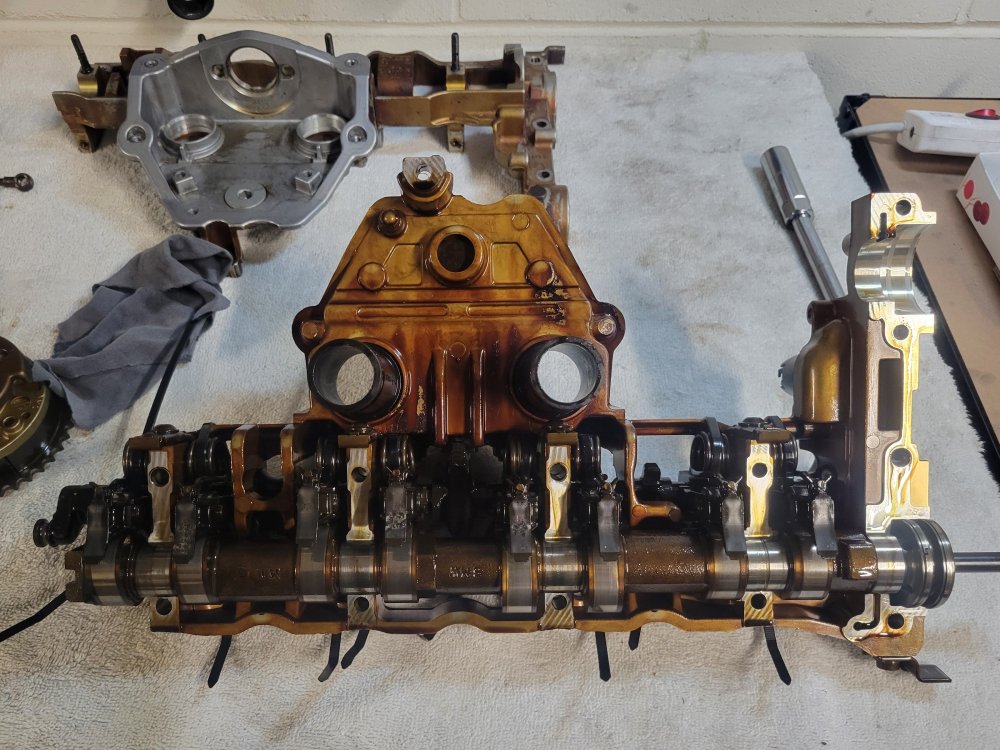
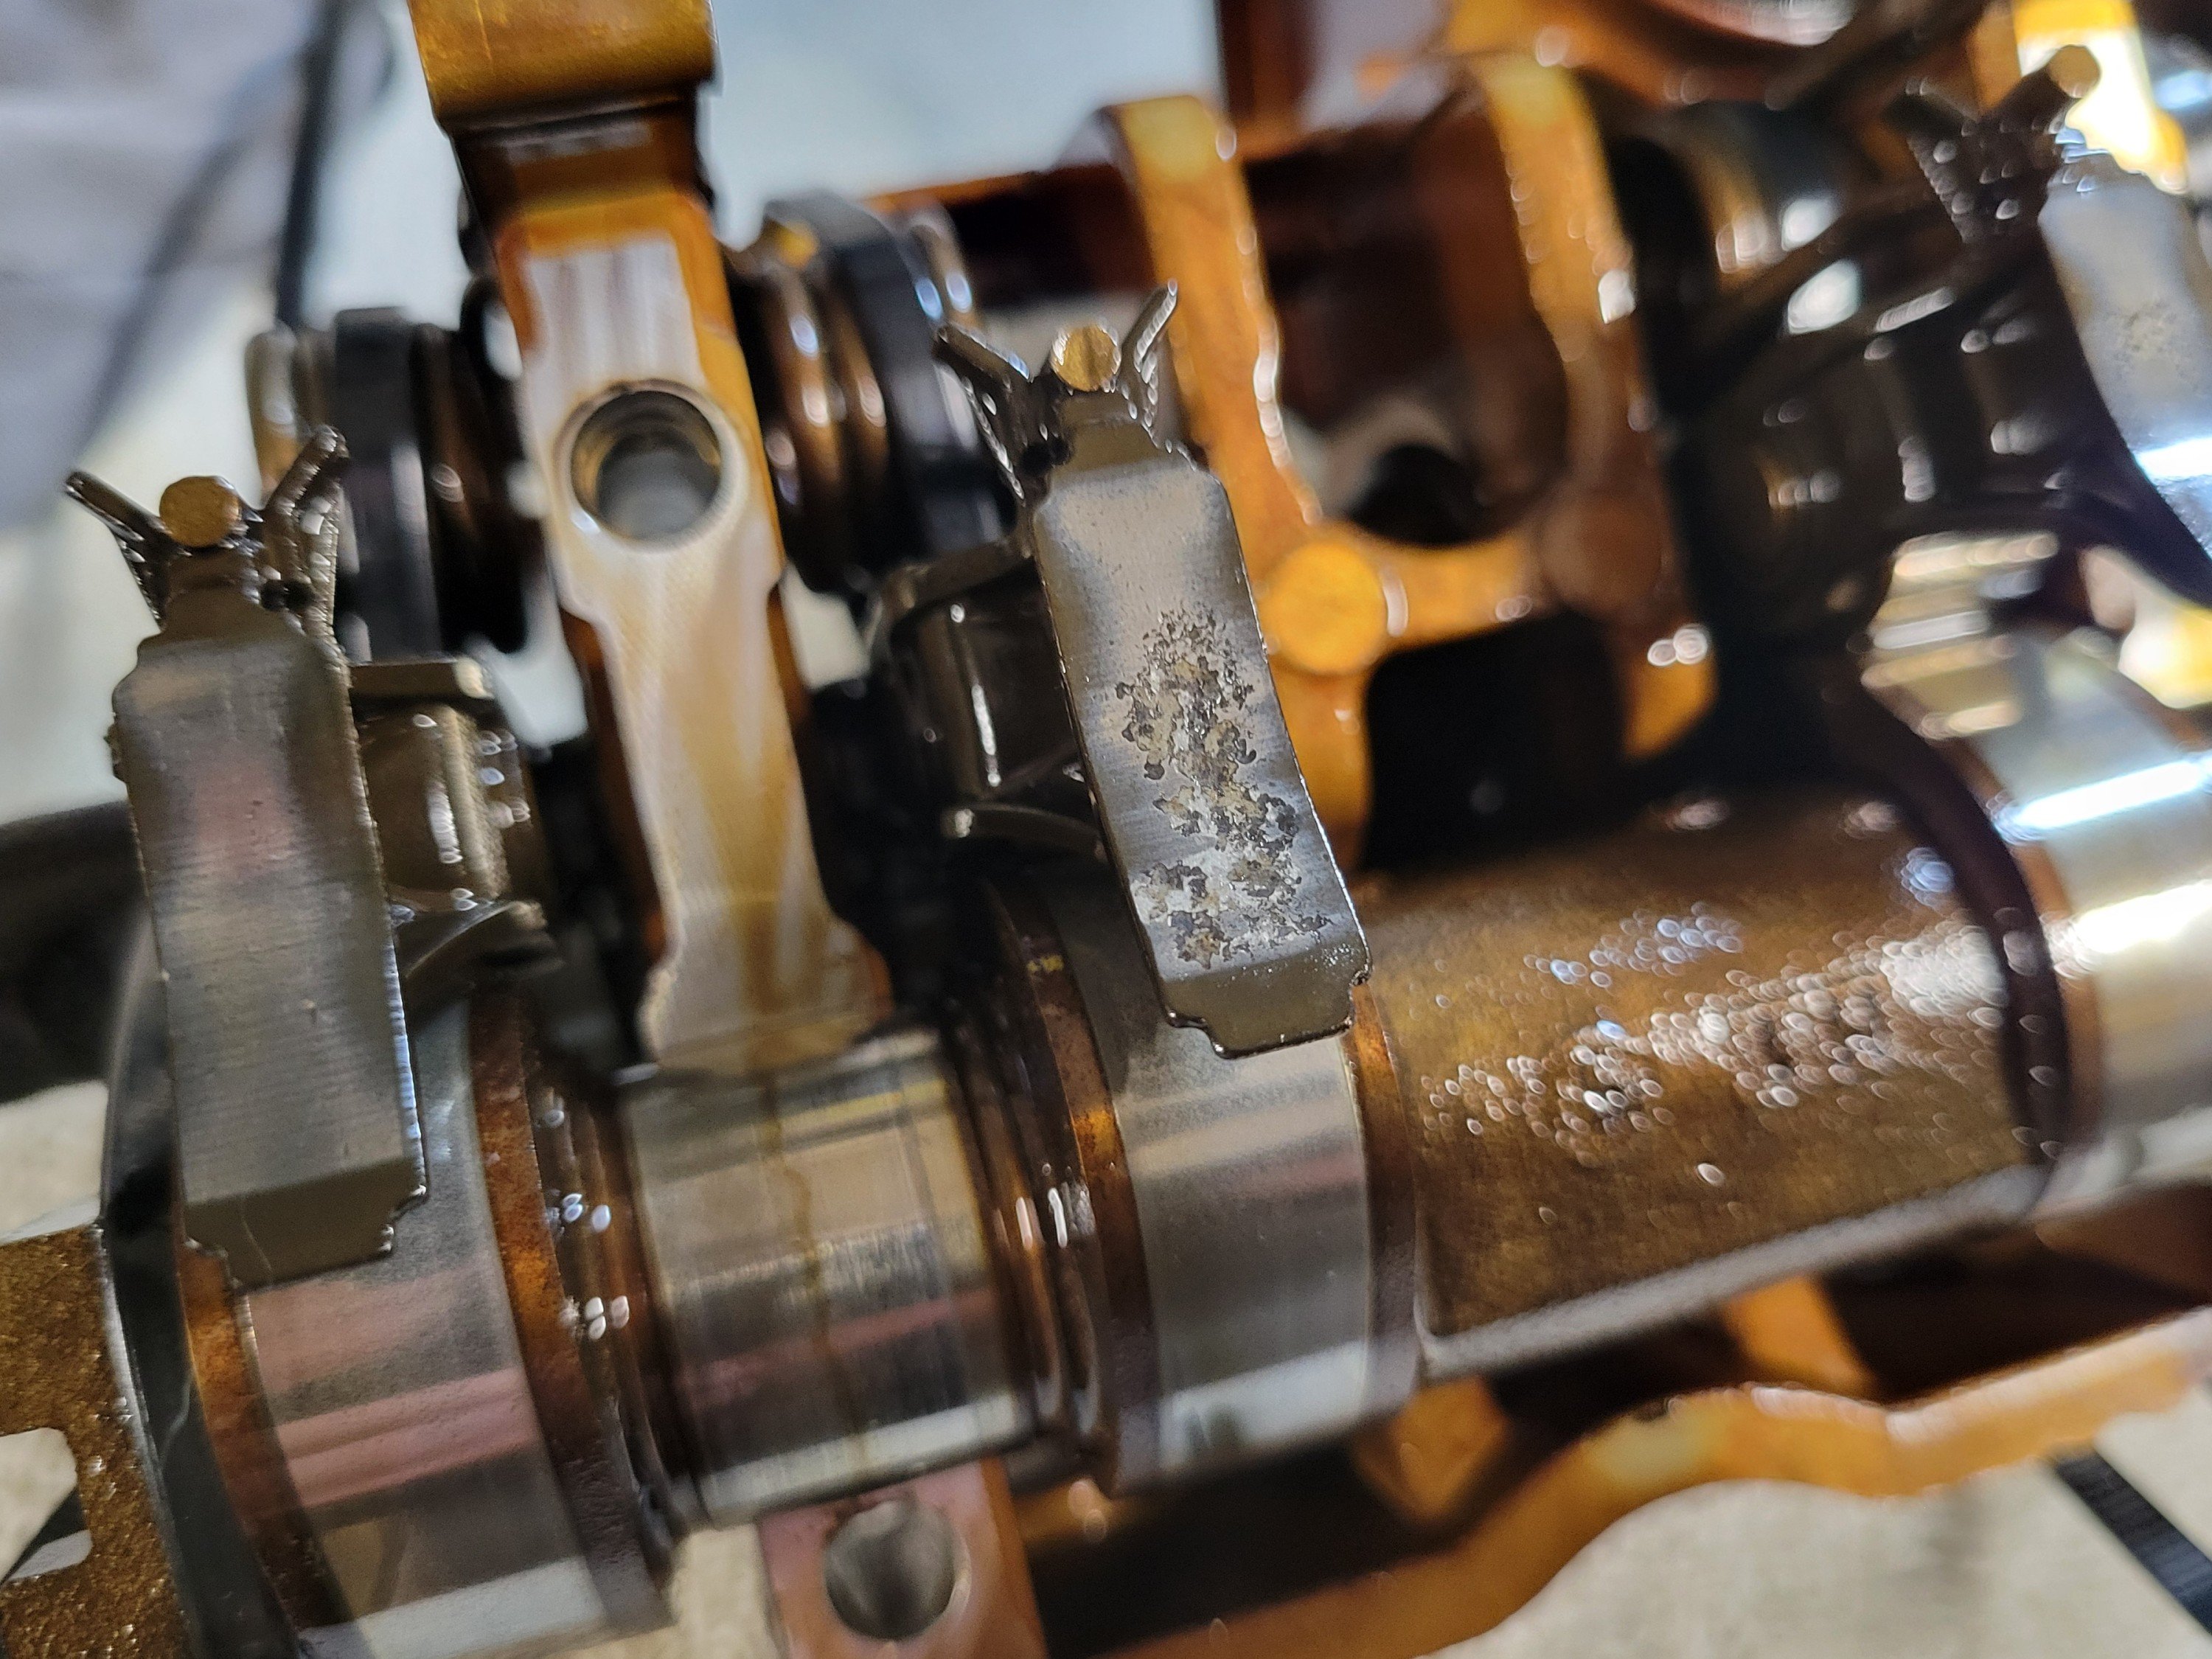
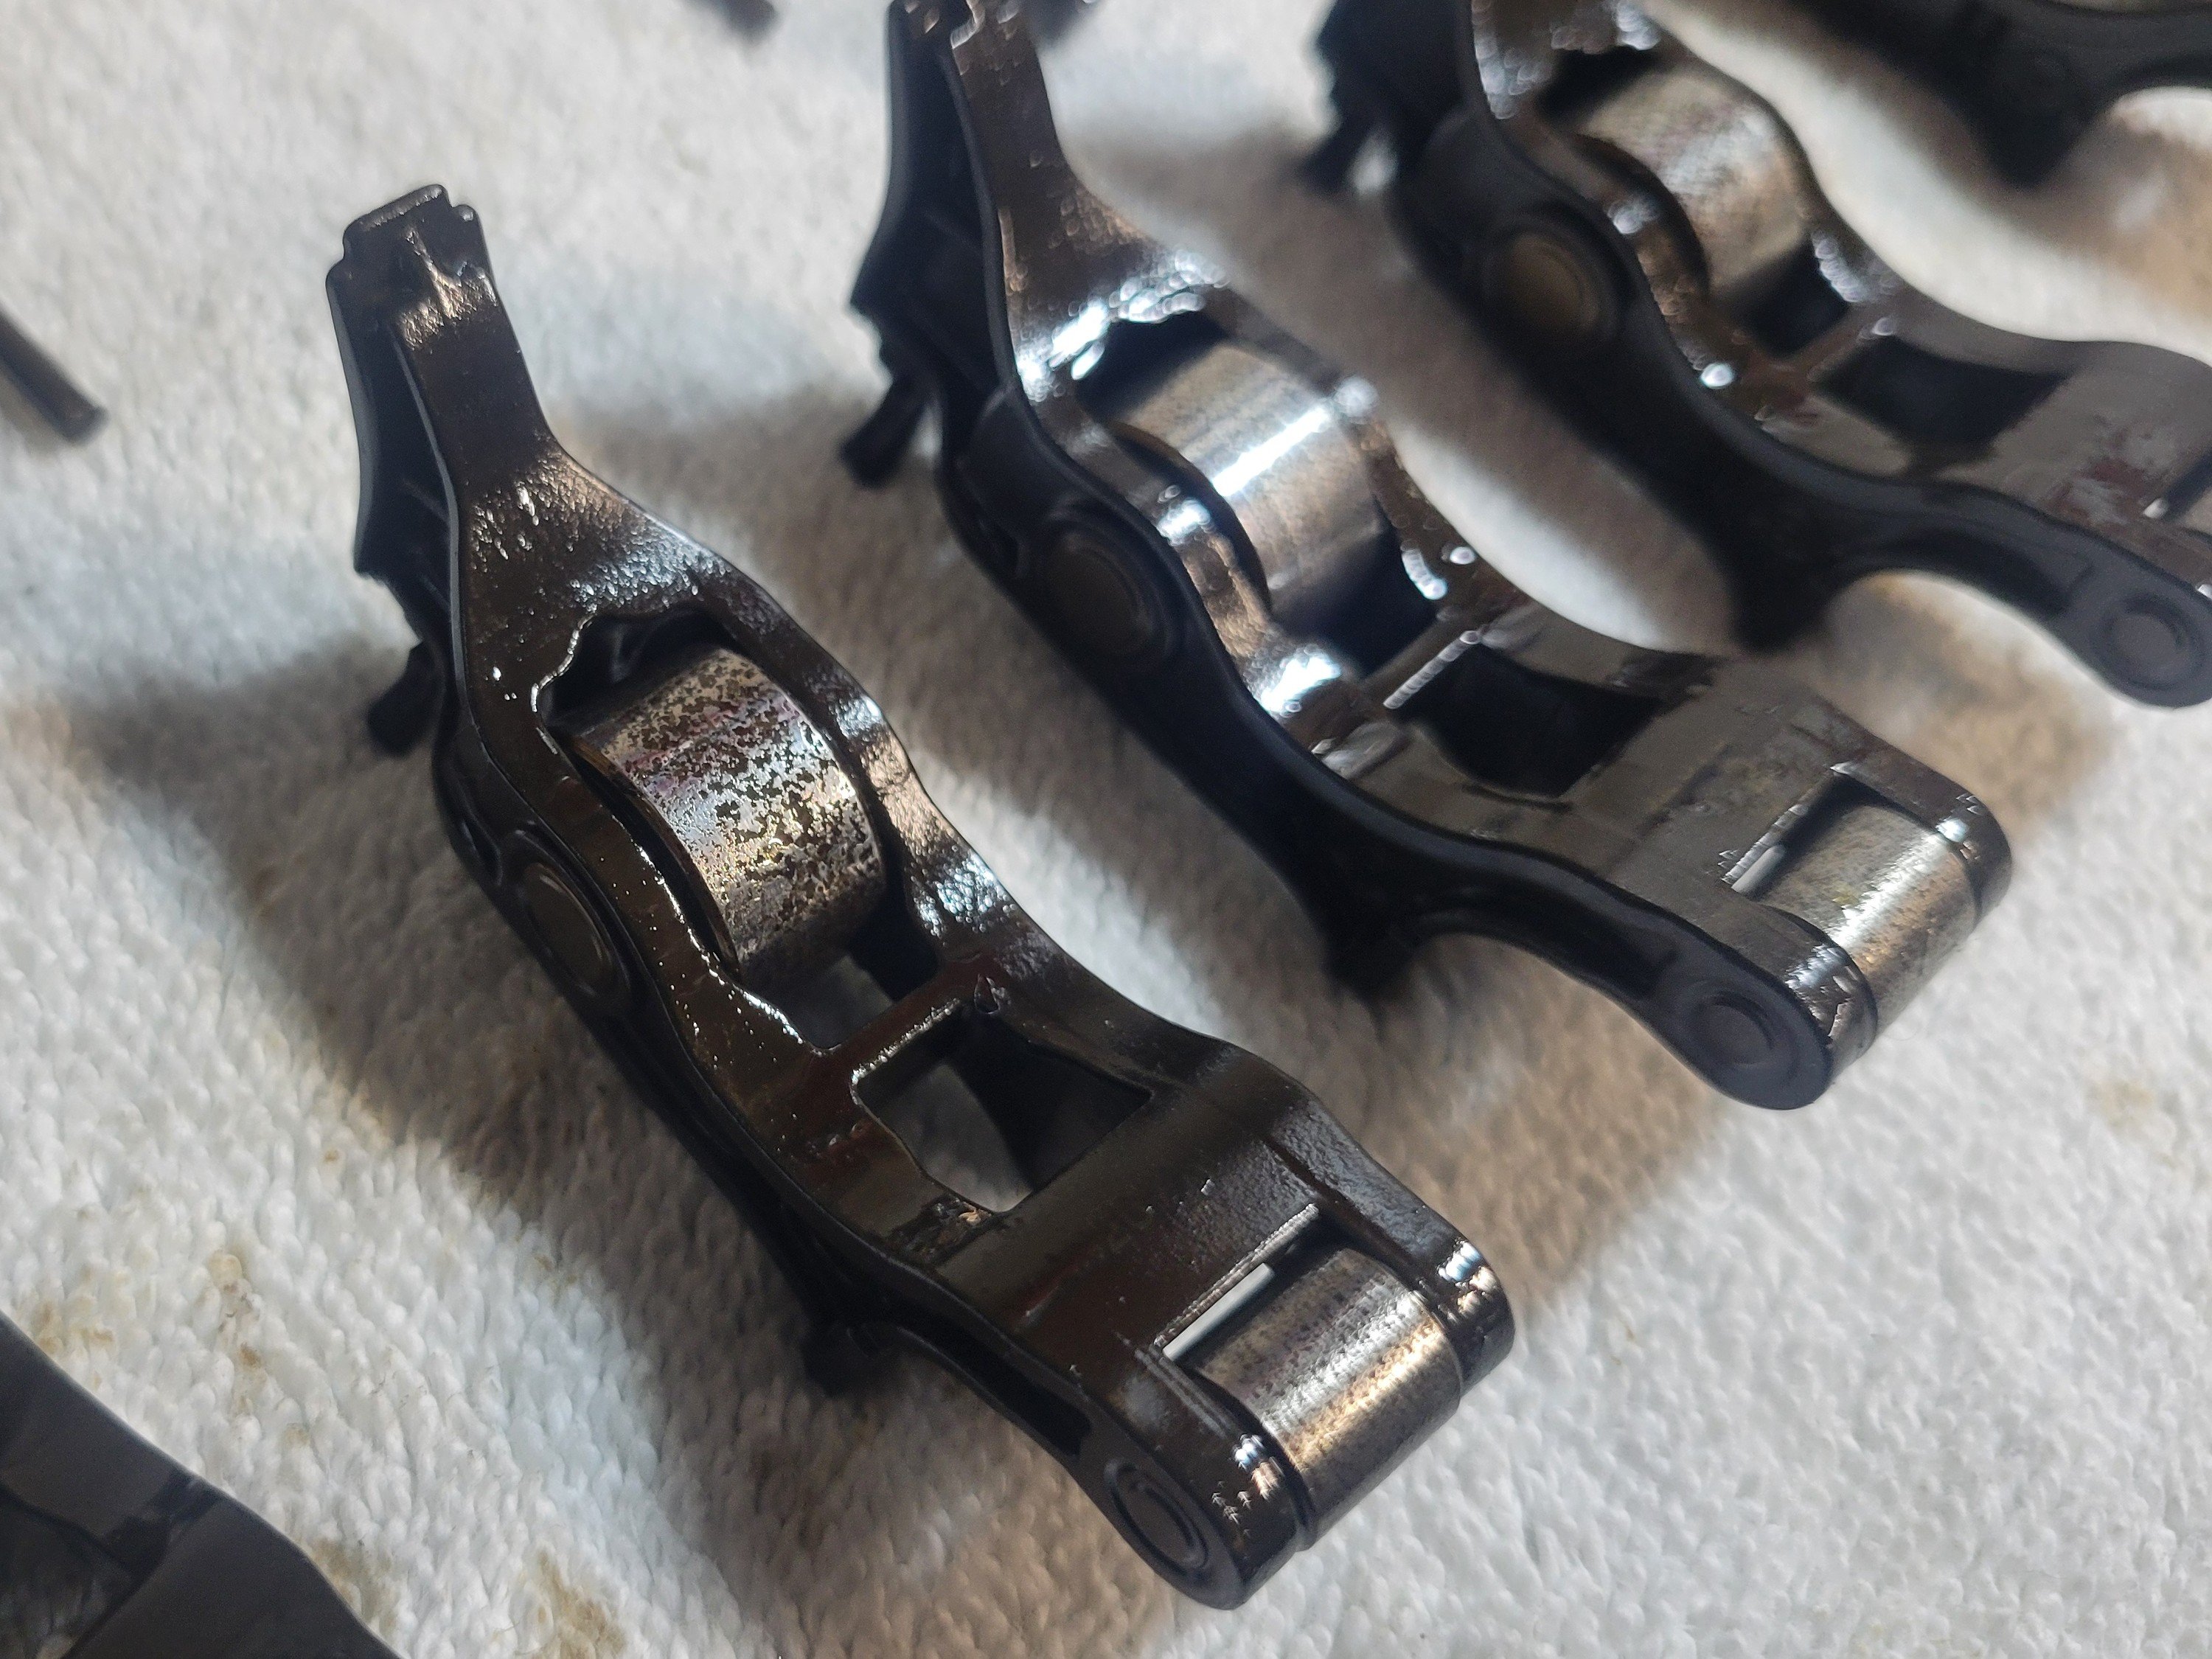
Straight away it became apparent that the unit that came off the car was in real shoddy state. Whether from neglect during its life or purely from sitting for close to 6 years now the surfaces on the tappet arms (or whatever you call them) and eccentric shaft had become quite badly pitted and looked really rough.
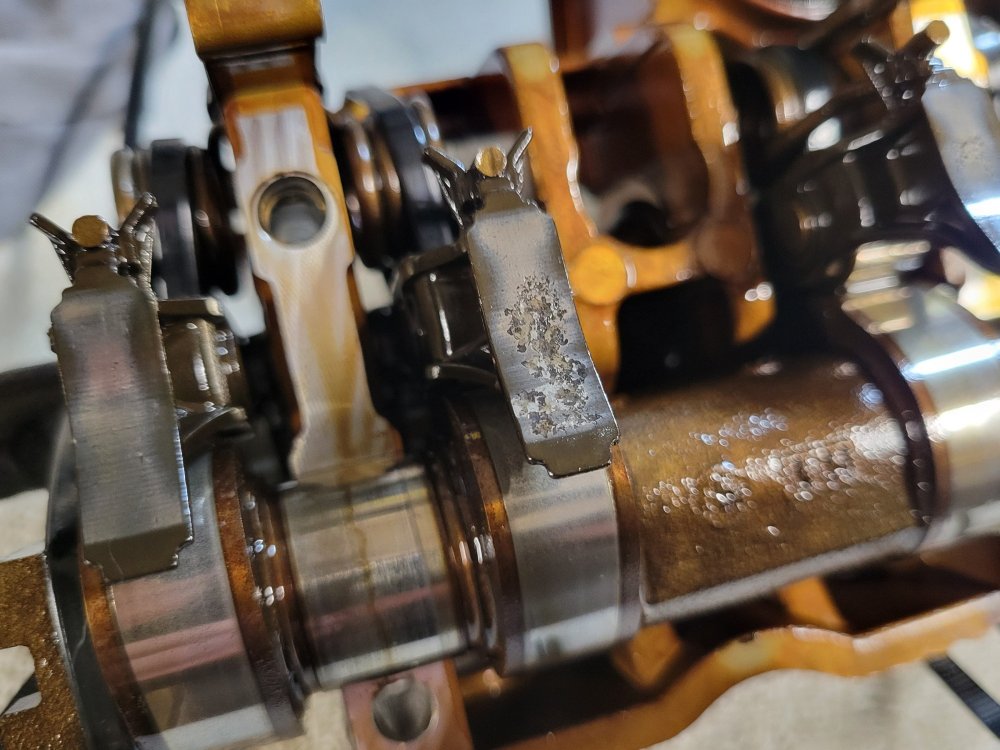
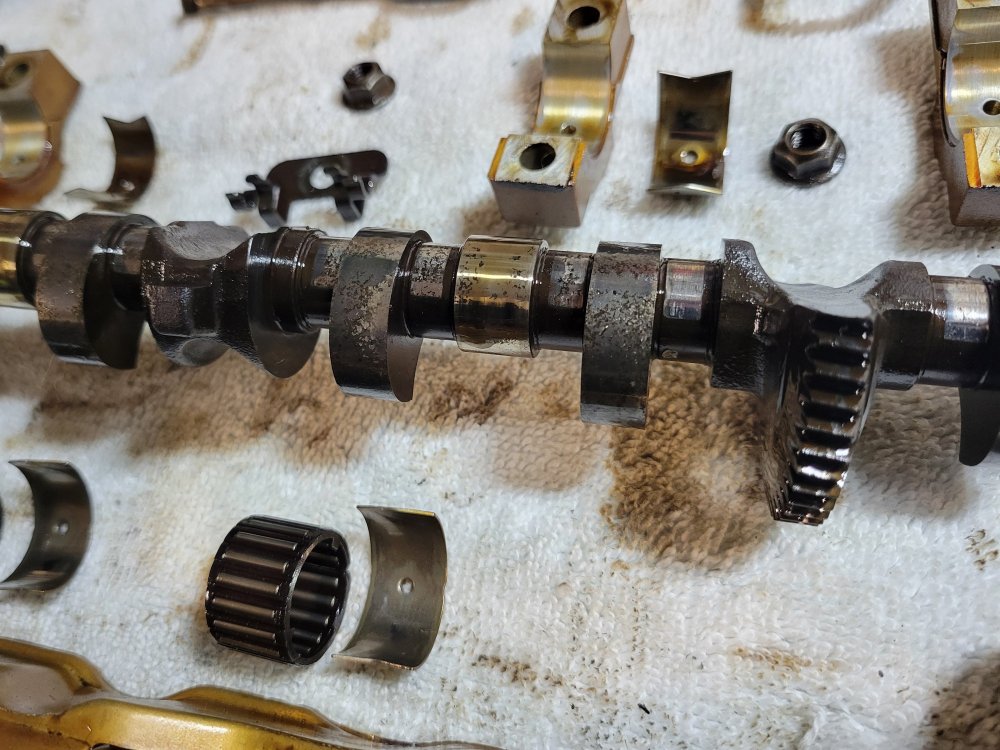
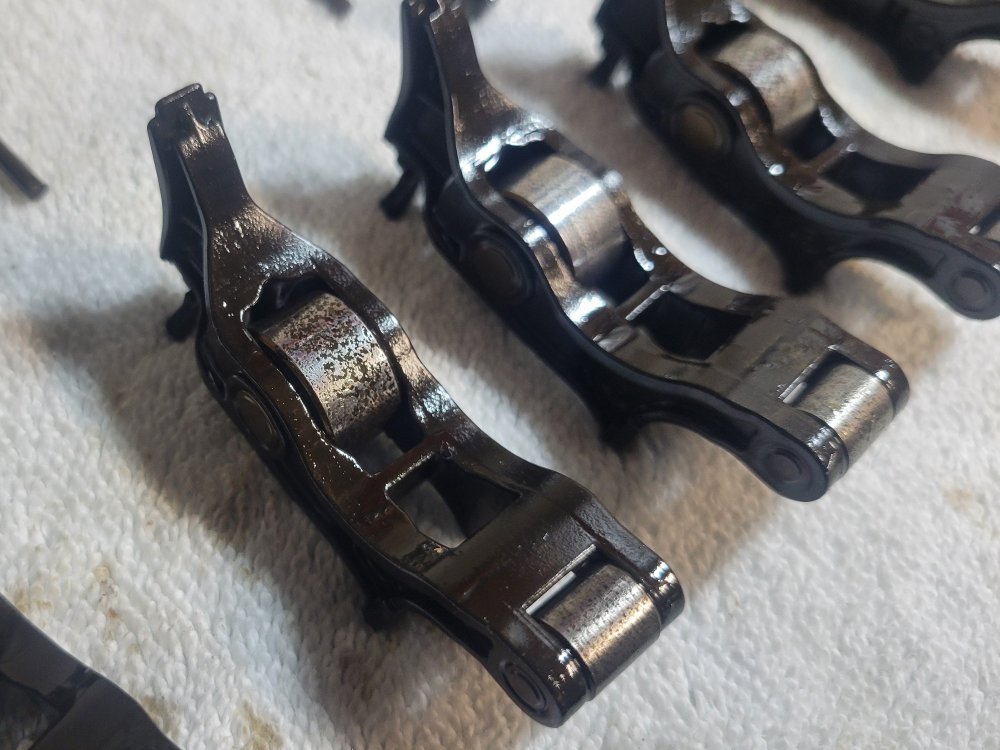
Luckily, I had the second unit on hand and between the two of them made up one decent one.


All put back together, the car would now start every time but would run rough and want to die soon after. A few tries later, assisting with the throttle, it began running a bit more consistently but accompanied with loud pops which sounded like backfiring into the intake manifold. I then looked in the rear view mirror only to see a big while cloud from having smoked up the whole street. I then remembered that the fuel would have been sitting in the tank for near enough a year and probably wasn't in ideal state.
Decided to drain it and replaced it with 10L of fresh BP98, just to give it the best chance at life. After a few more tries, probably helped by the fact of built up oil pressure, it would now run without stalling, but still erratically backfiring into the intake manifold. I was even brave enough to take it for a lap around the block, clocking up a whopping 1.2km whilst sputtering lightly.

That's the state of things for the time being. Showing signs of life but not quite back to full health. The backfiring could be something as simple as a vacuum leak, or a more serious undiagnosed issue that took it off the road in the first place. Either way, needs more effort (and money) thrown at it. Just not sure how far to take it. Would hate to jump in head first and start throwing money at it only to take it for a WoF and find out something fundamentally wrong that would make it wildly uneconomical to remedy. Ideally, I'd figure out a way to get it running smoothly enough for it to make its way to the inspection, get a full list of issues and reassess from there. More tinkering for another weekend.
-
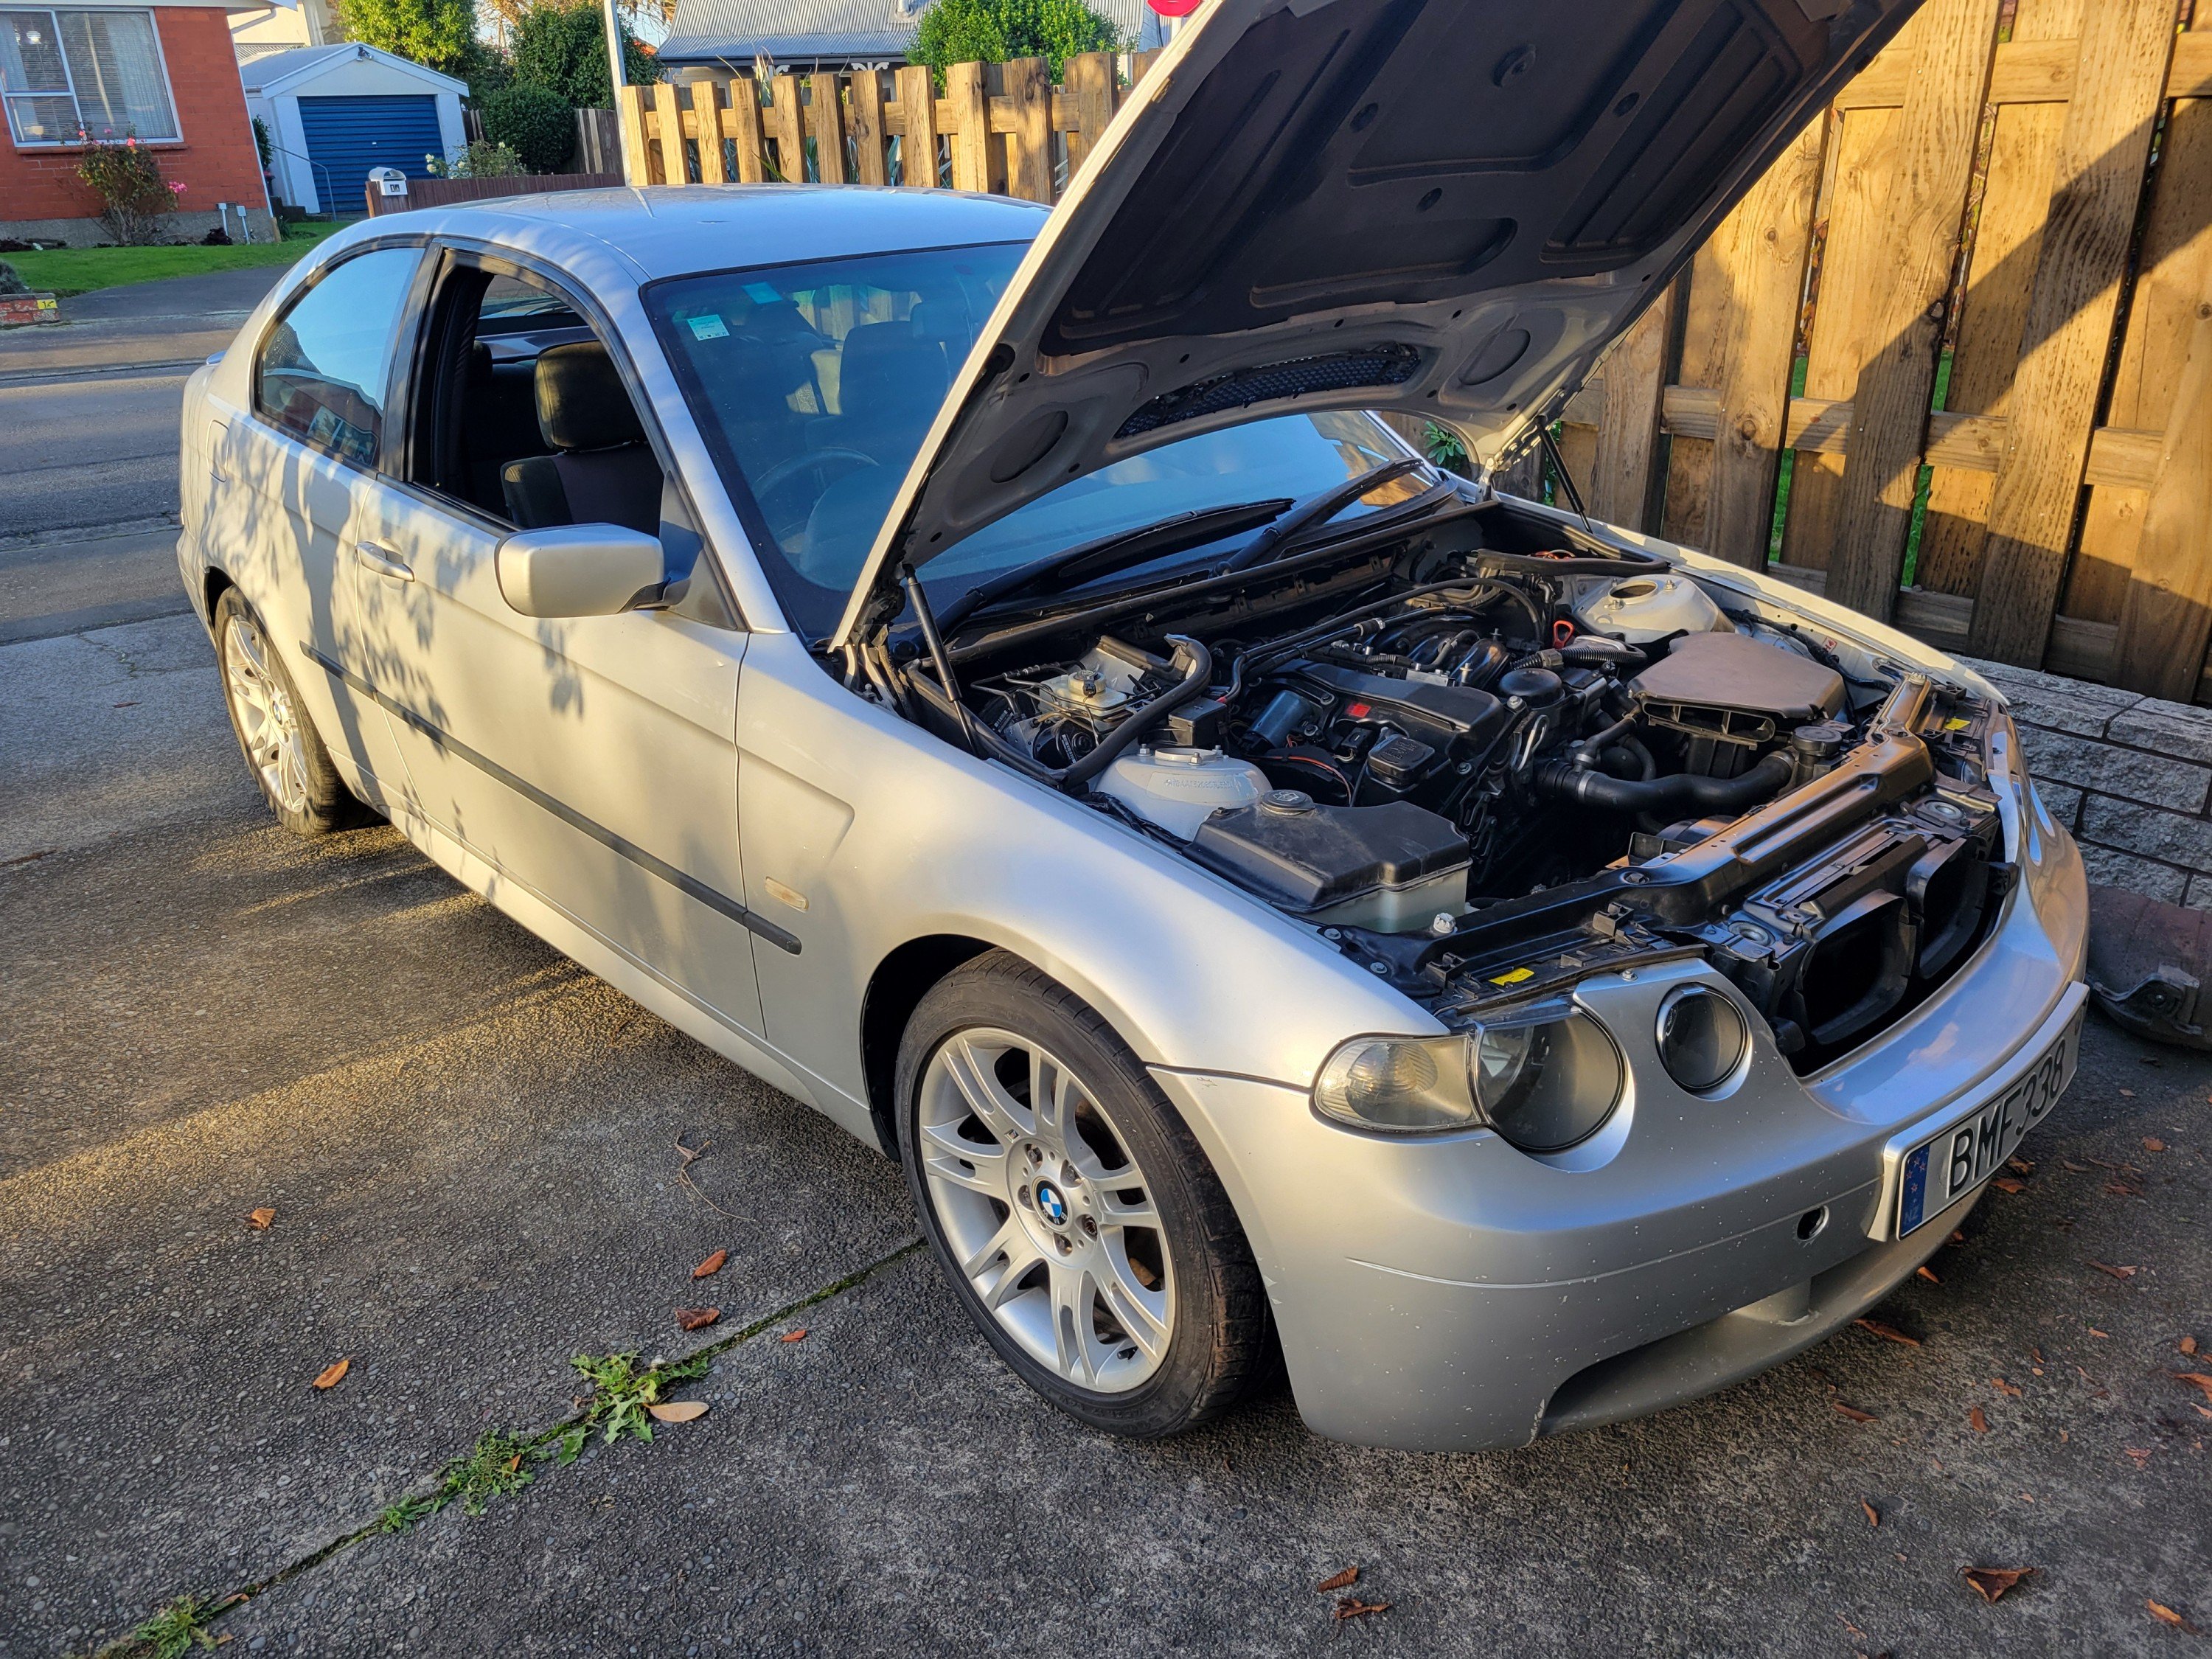
Time for a long overdue update on this little piggy. Here's a summary of all my efforts over the past month or so.
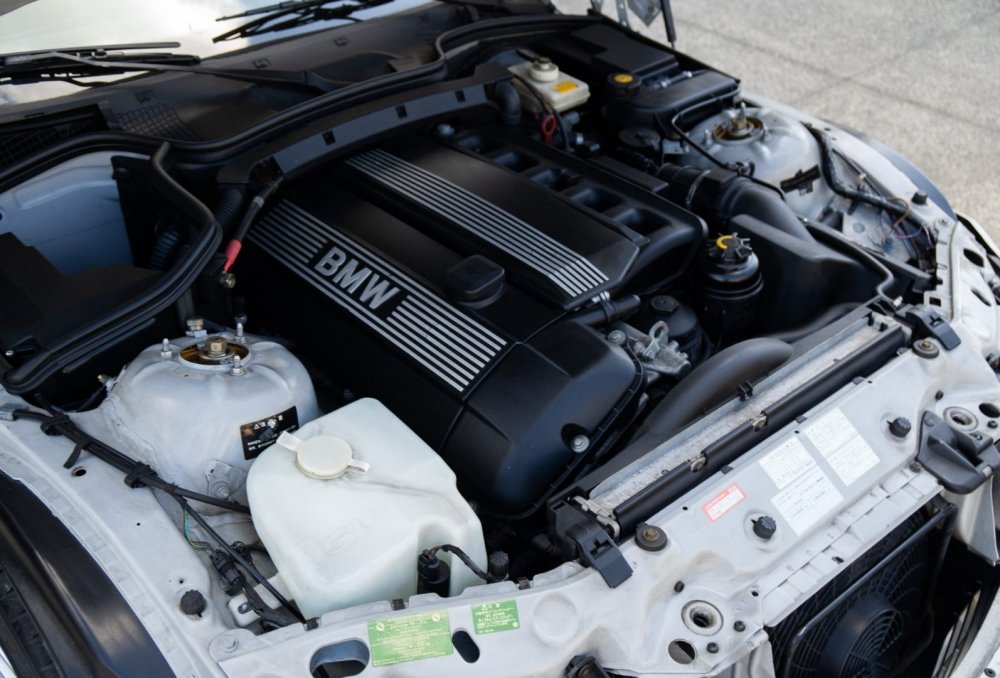
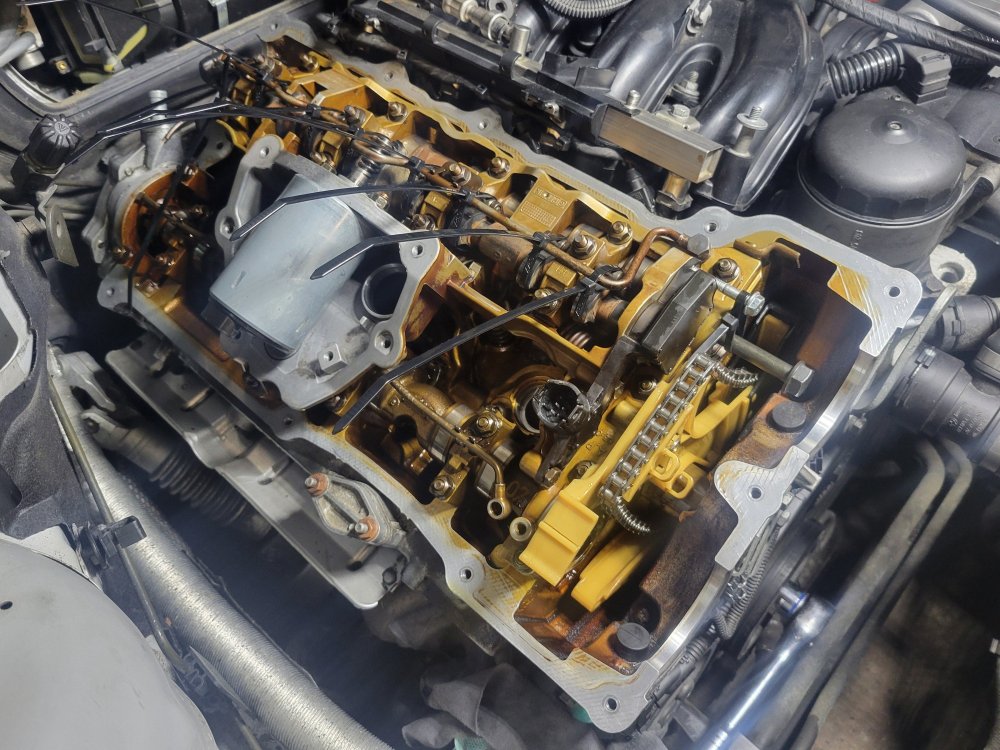
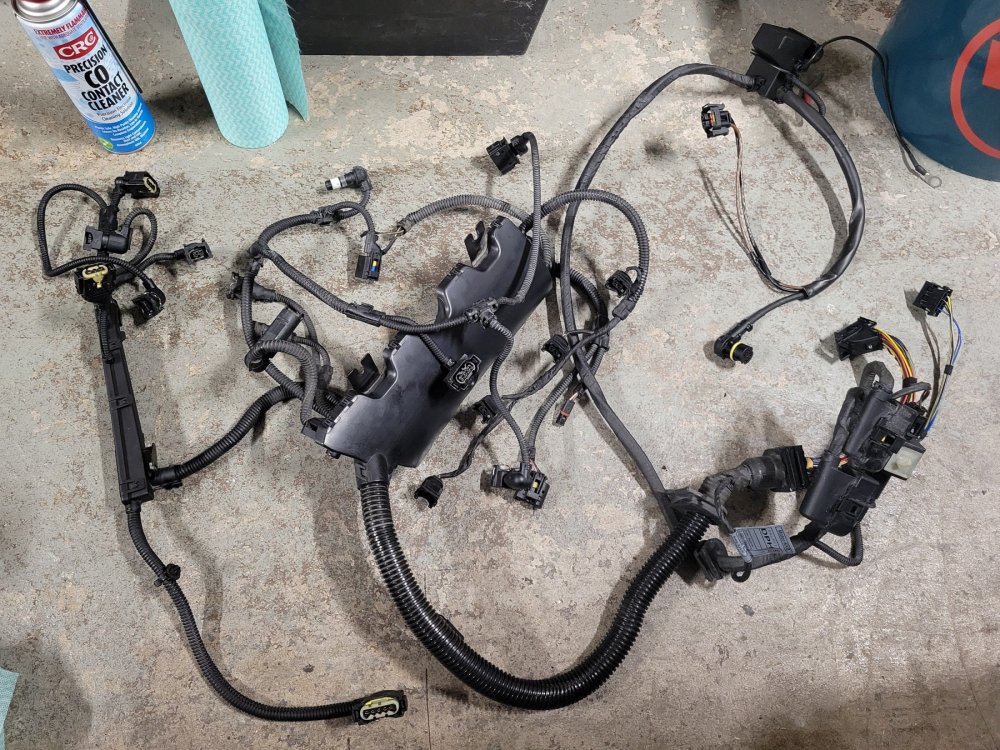
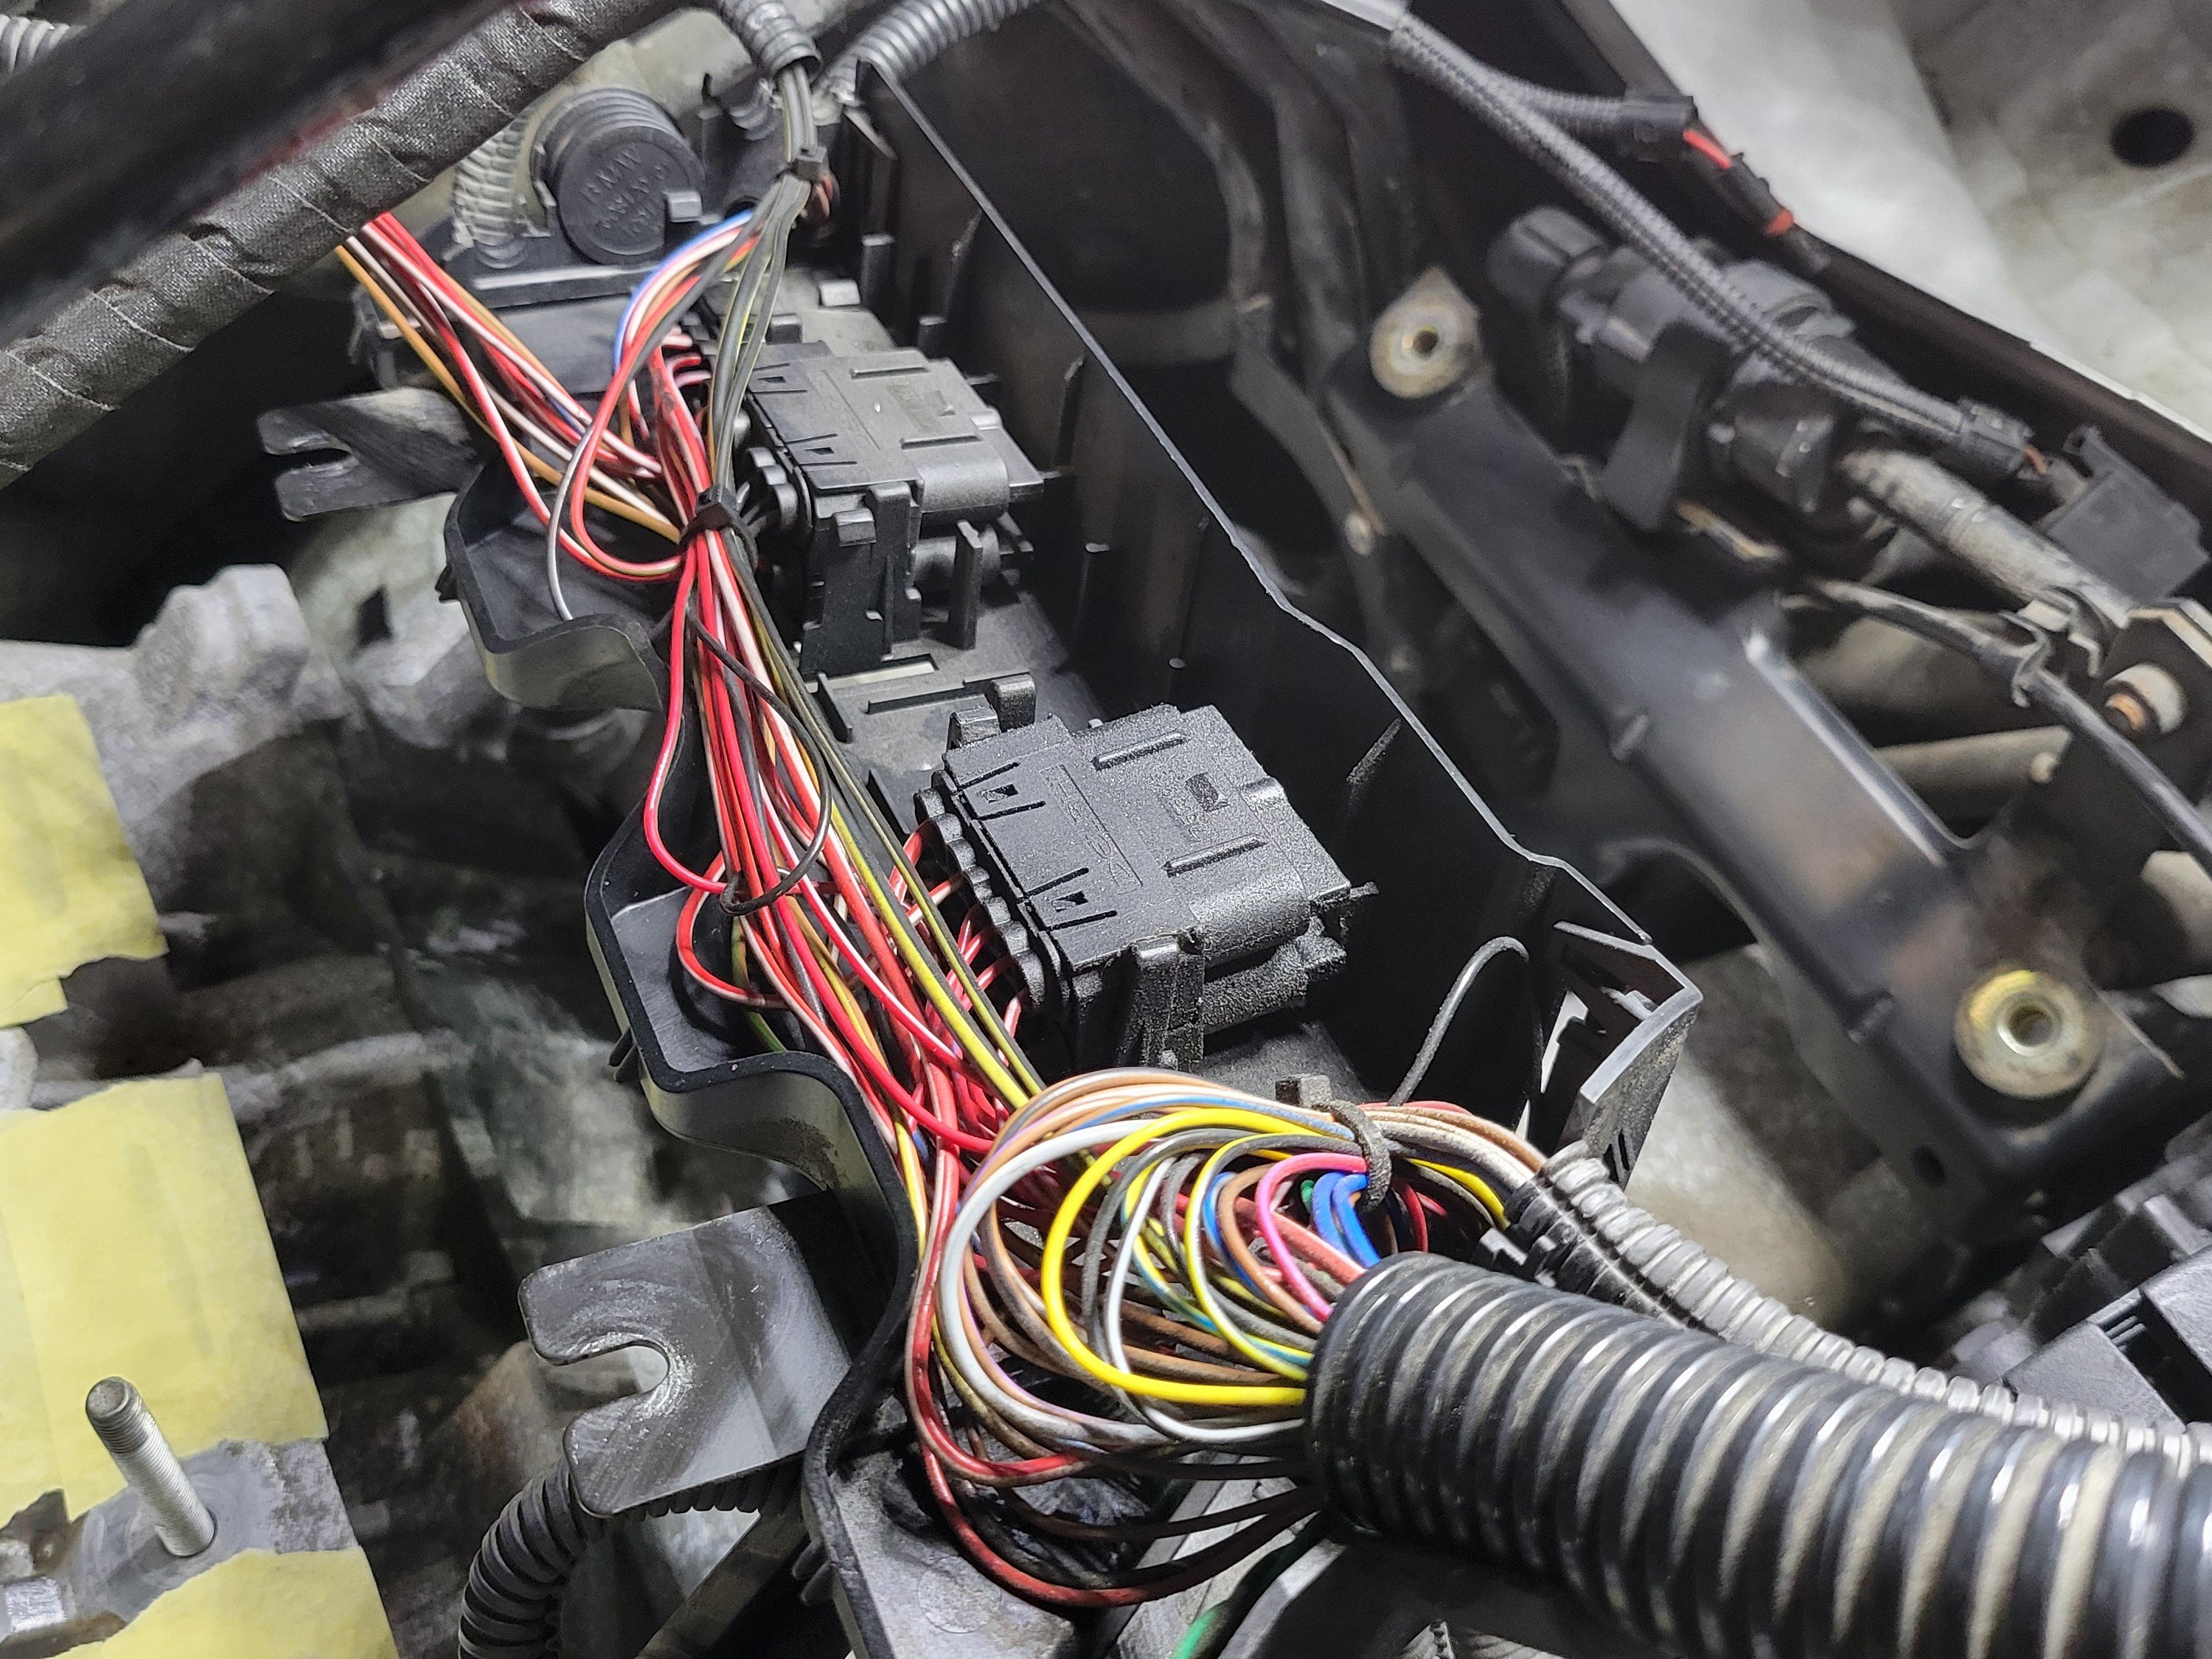
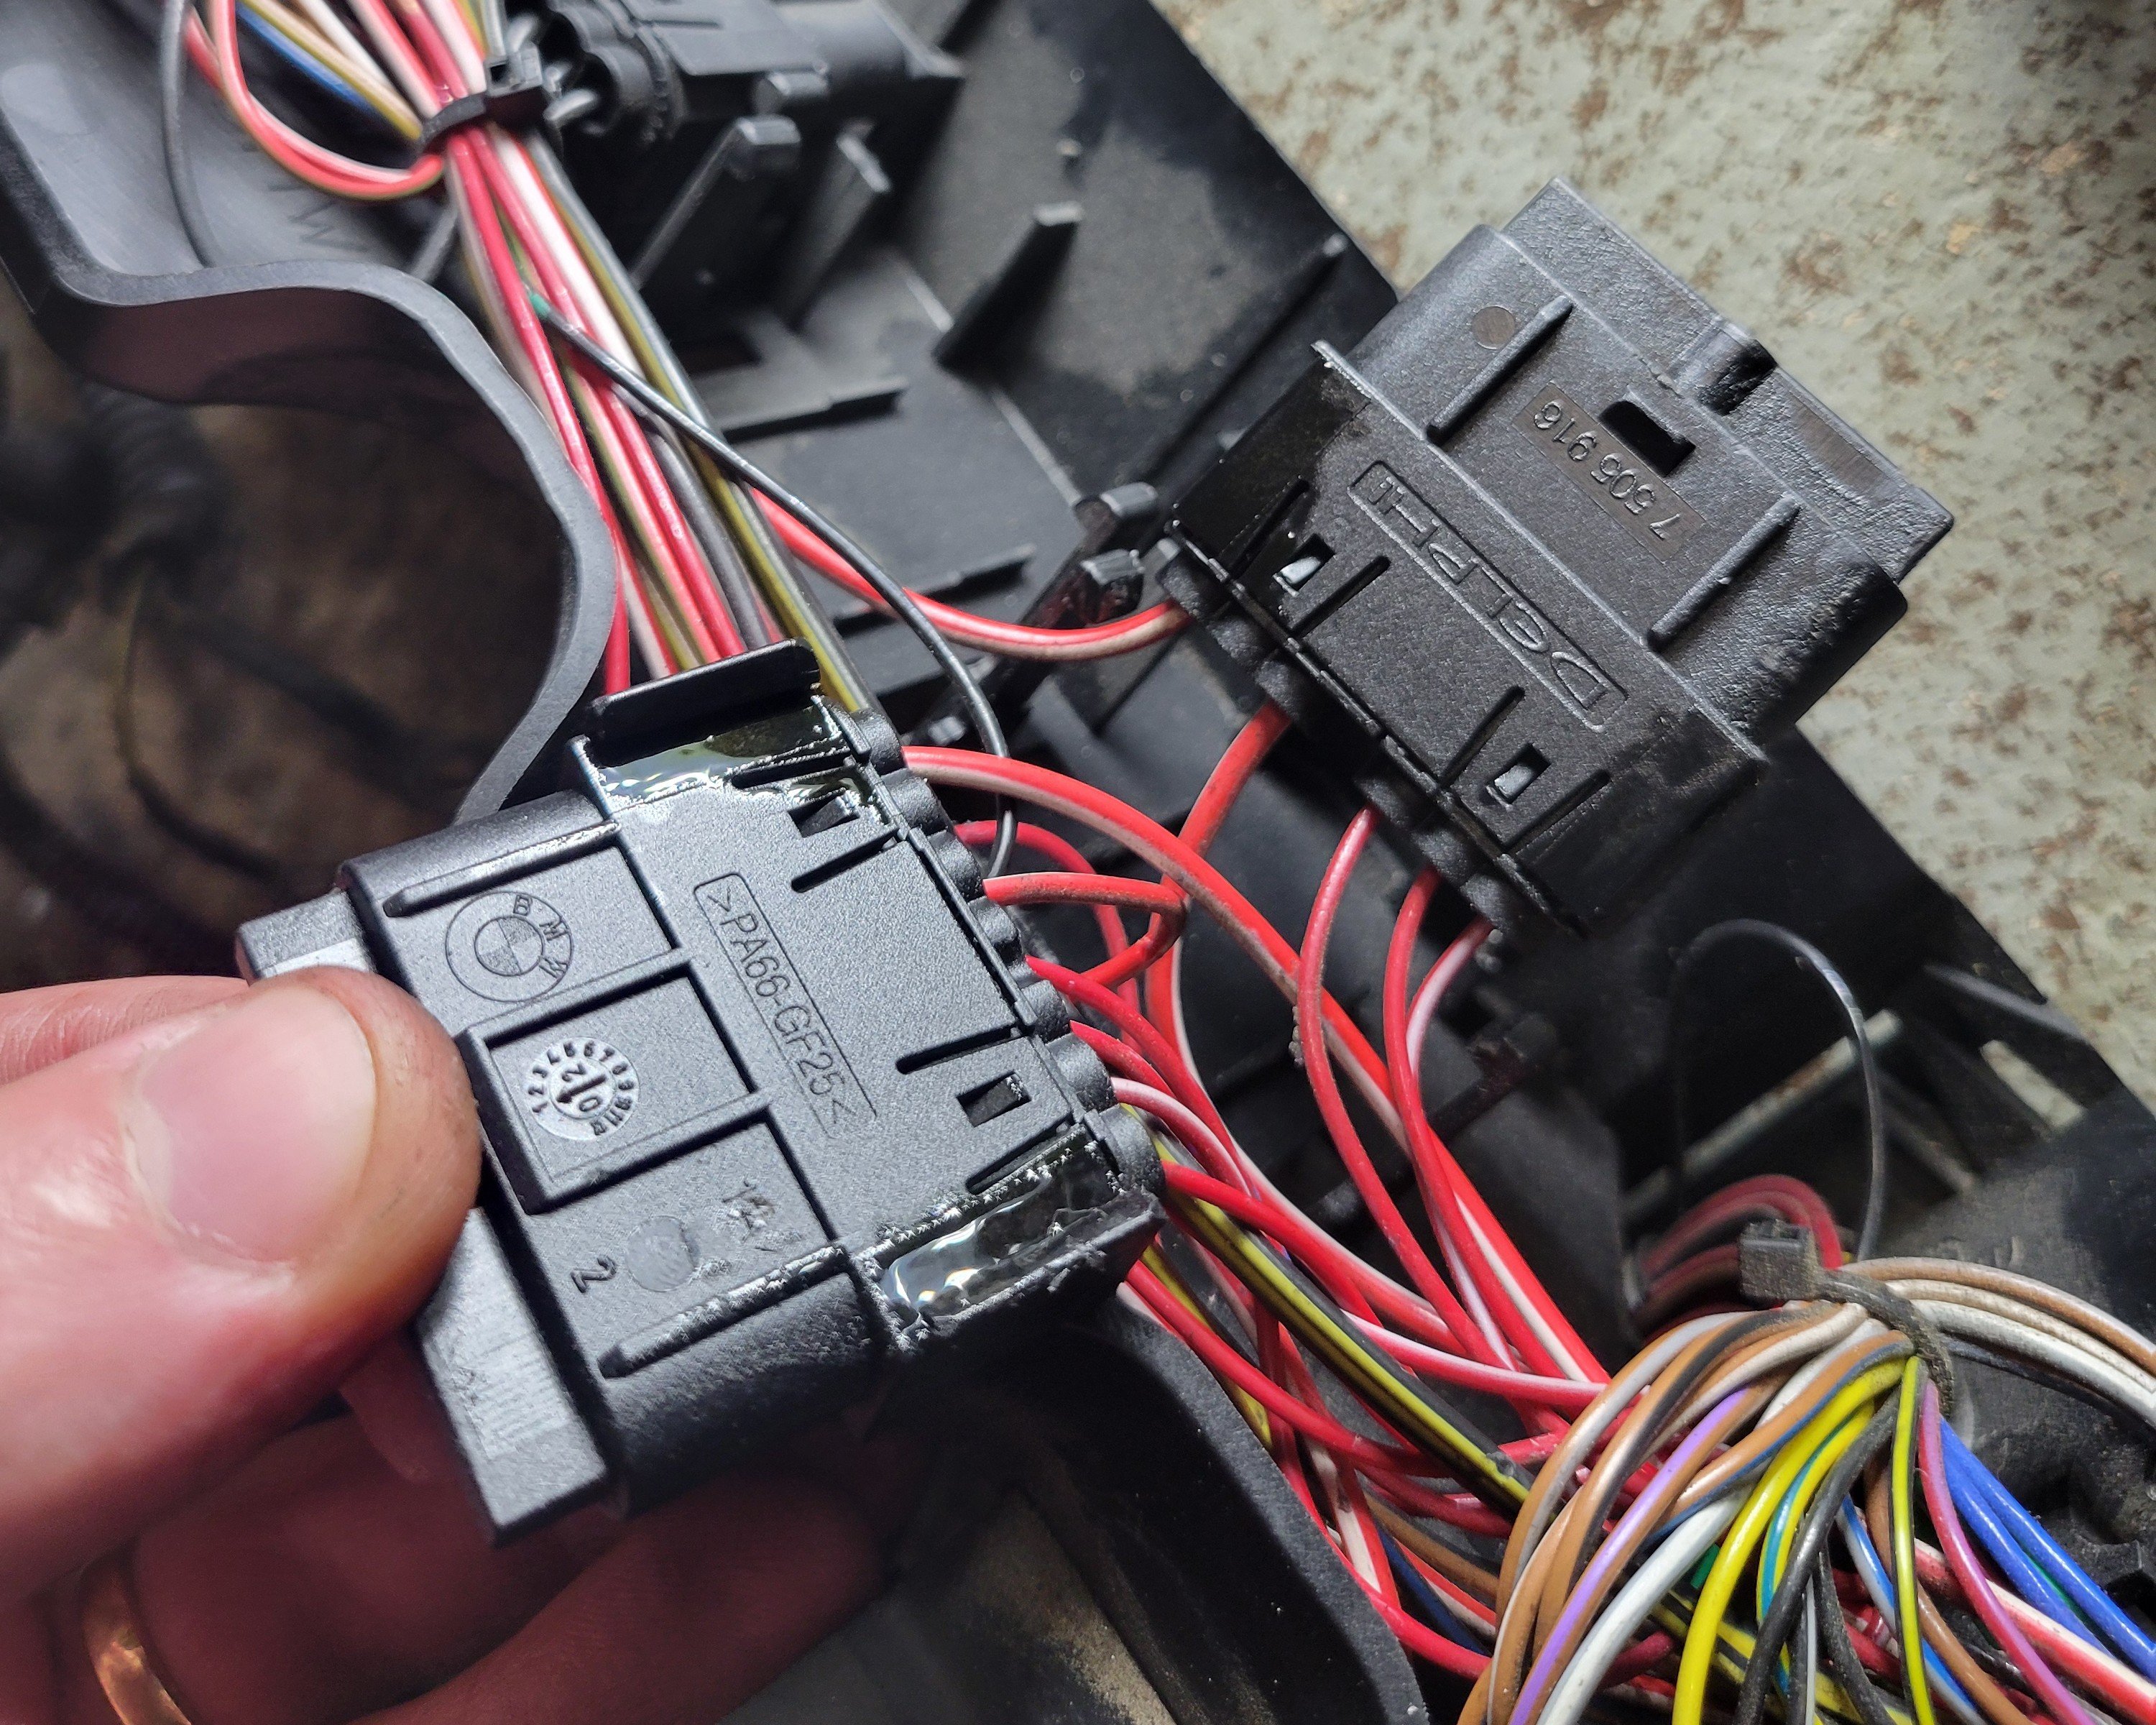
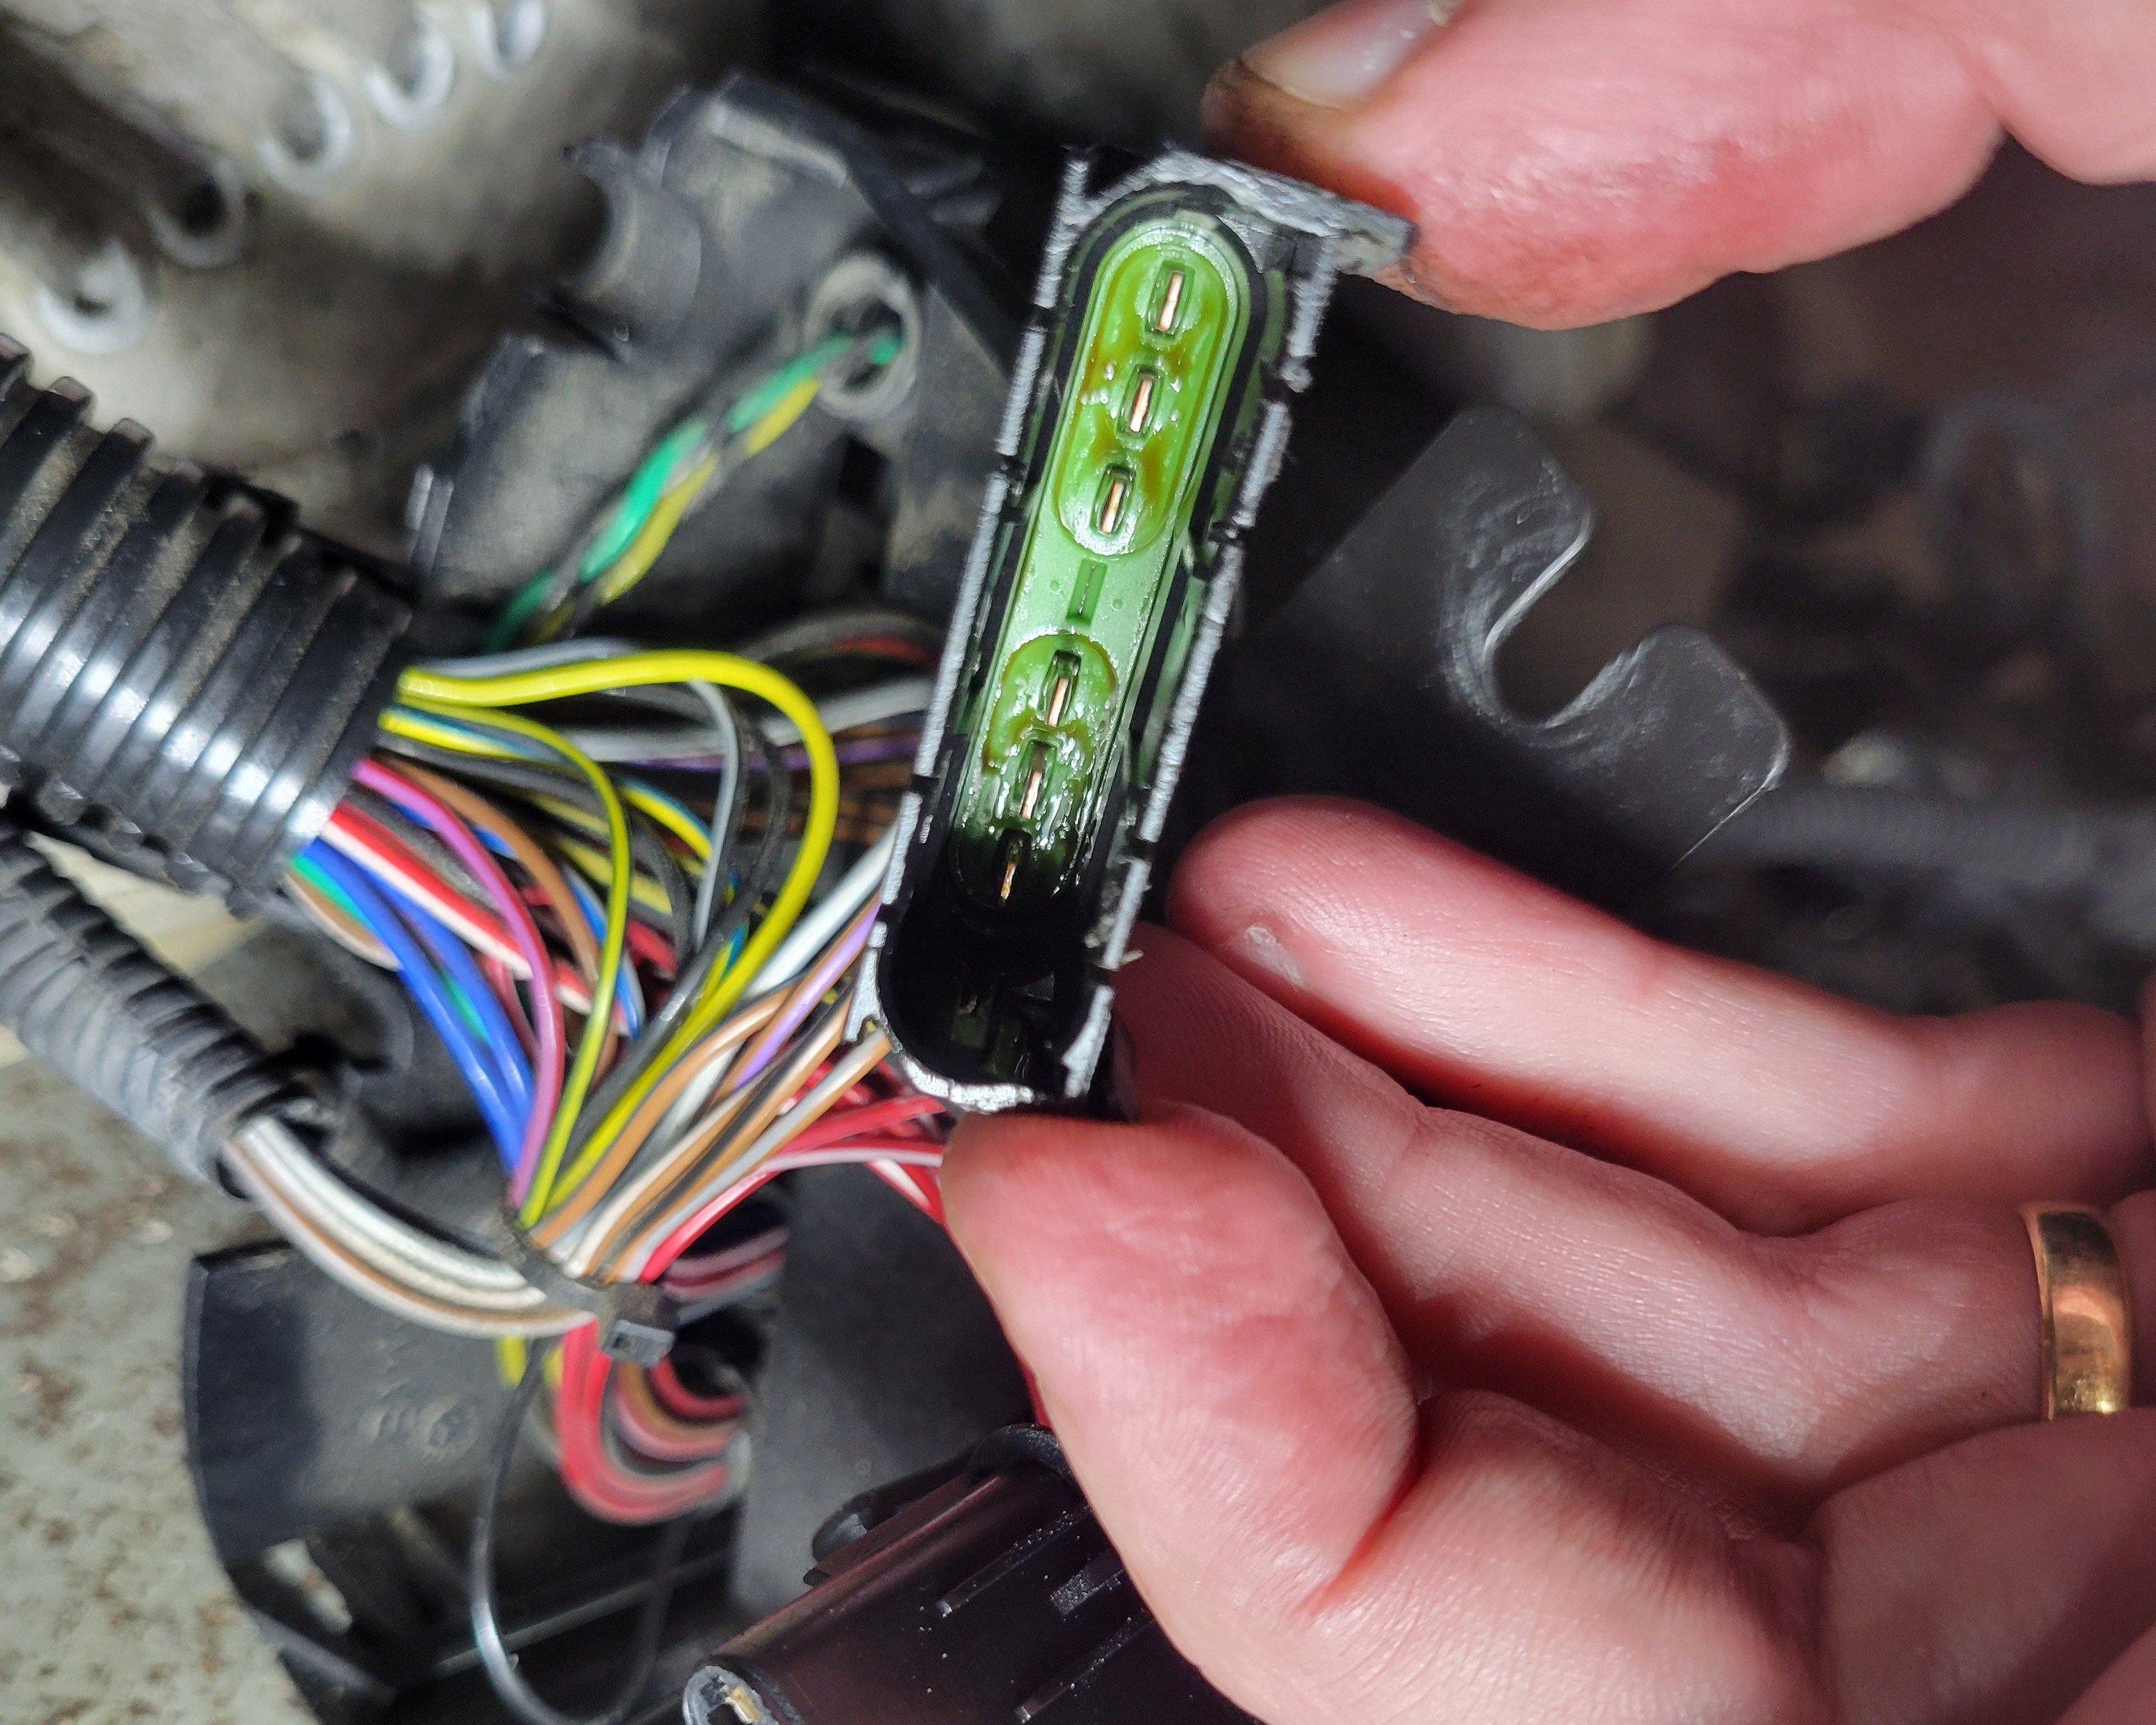
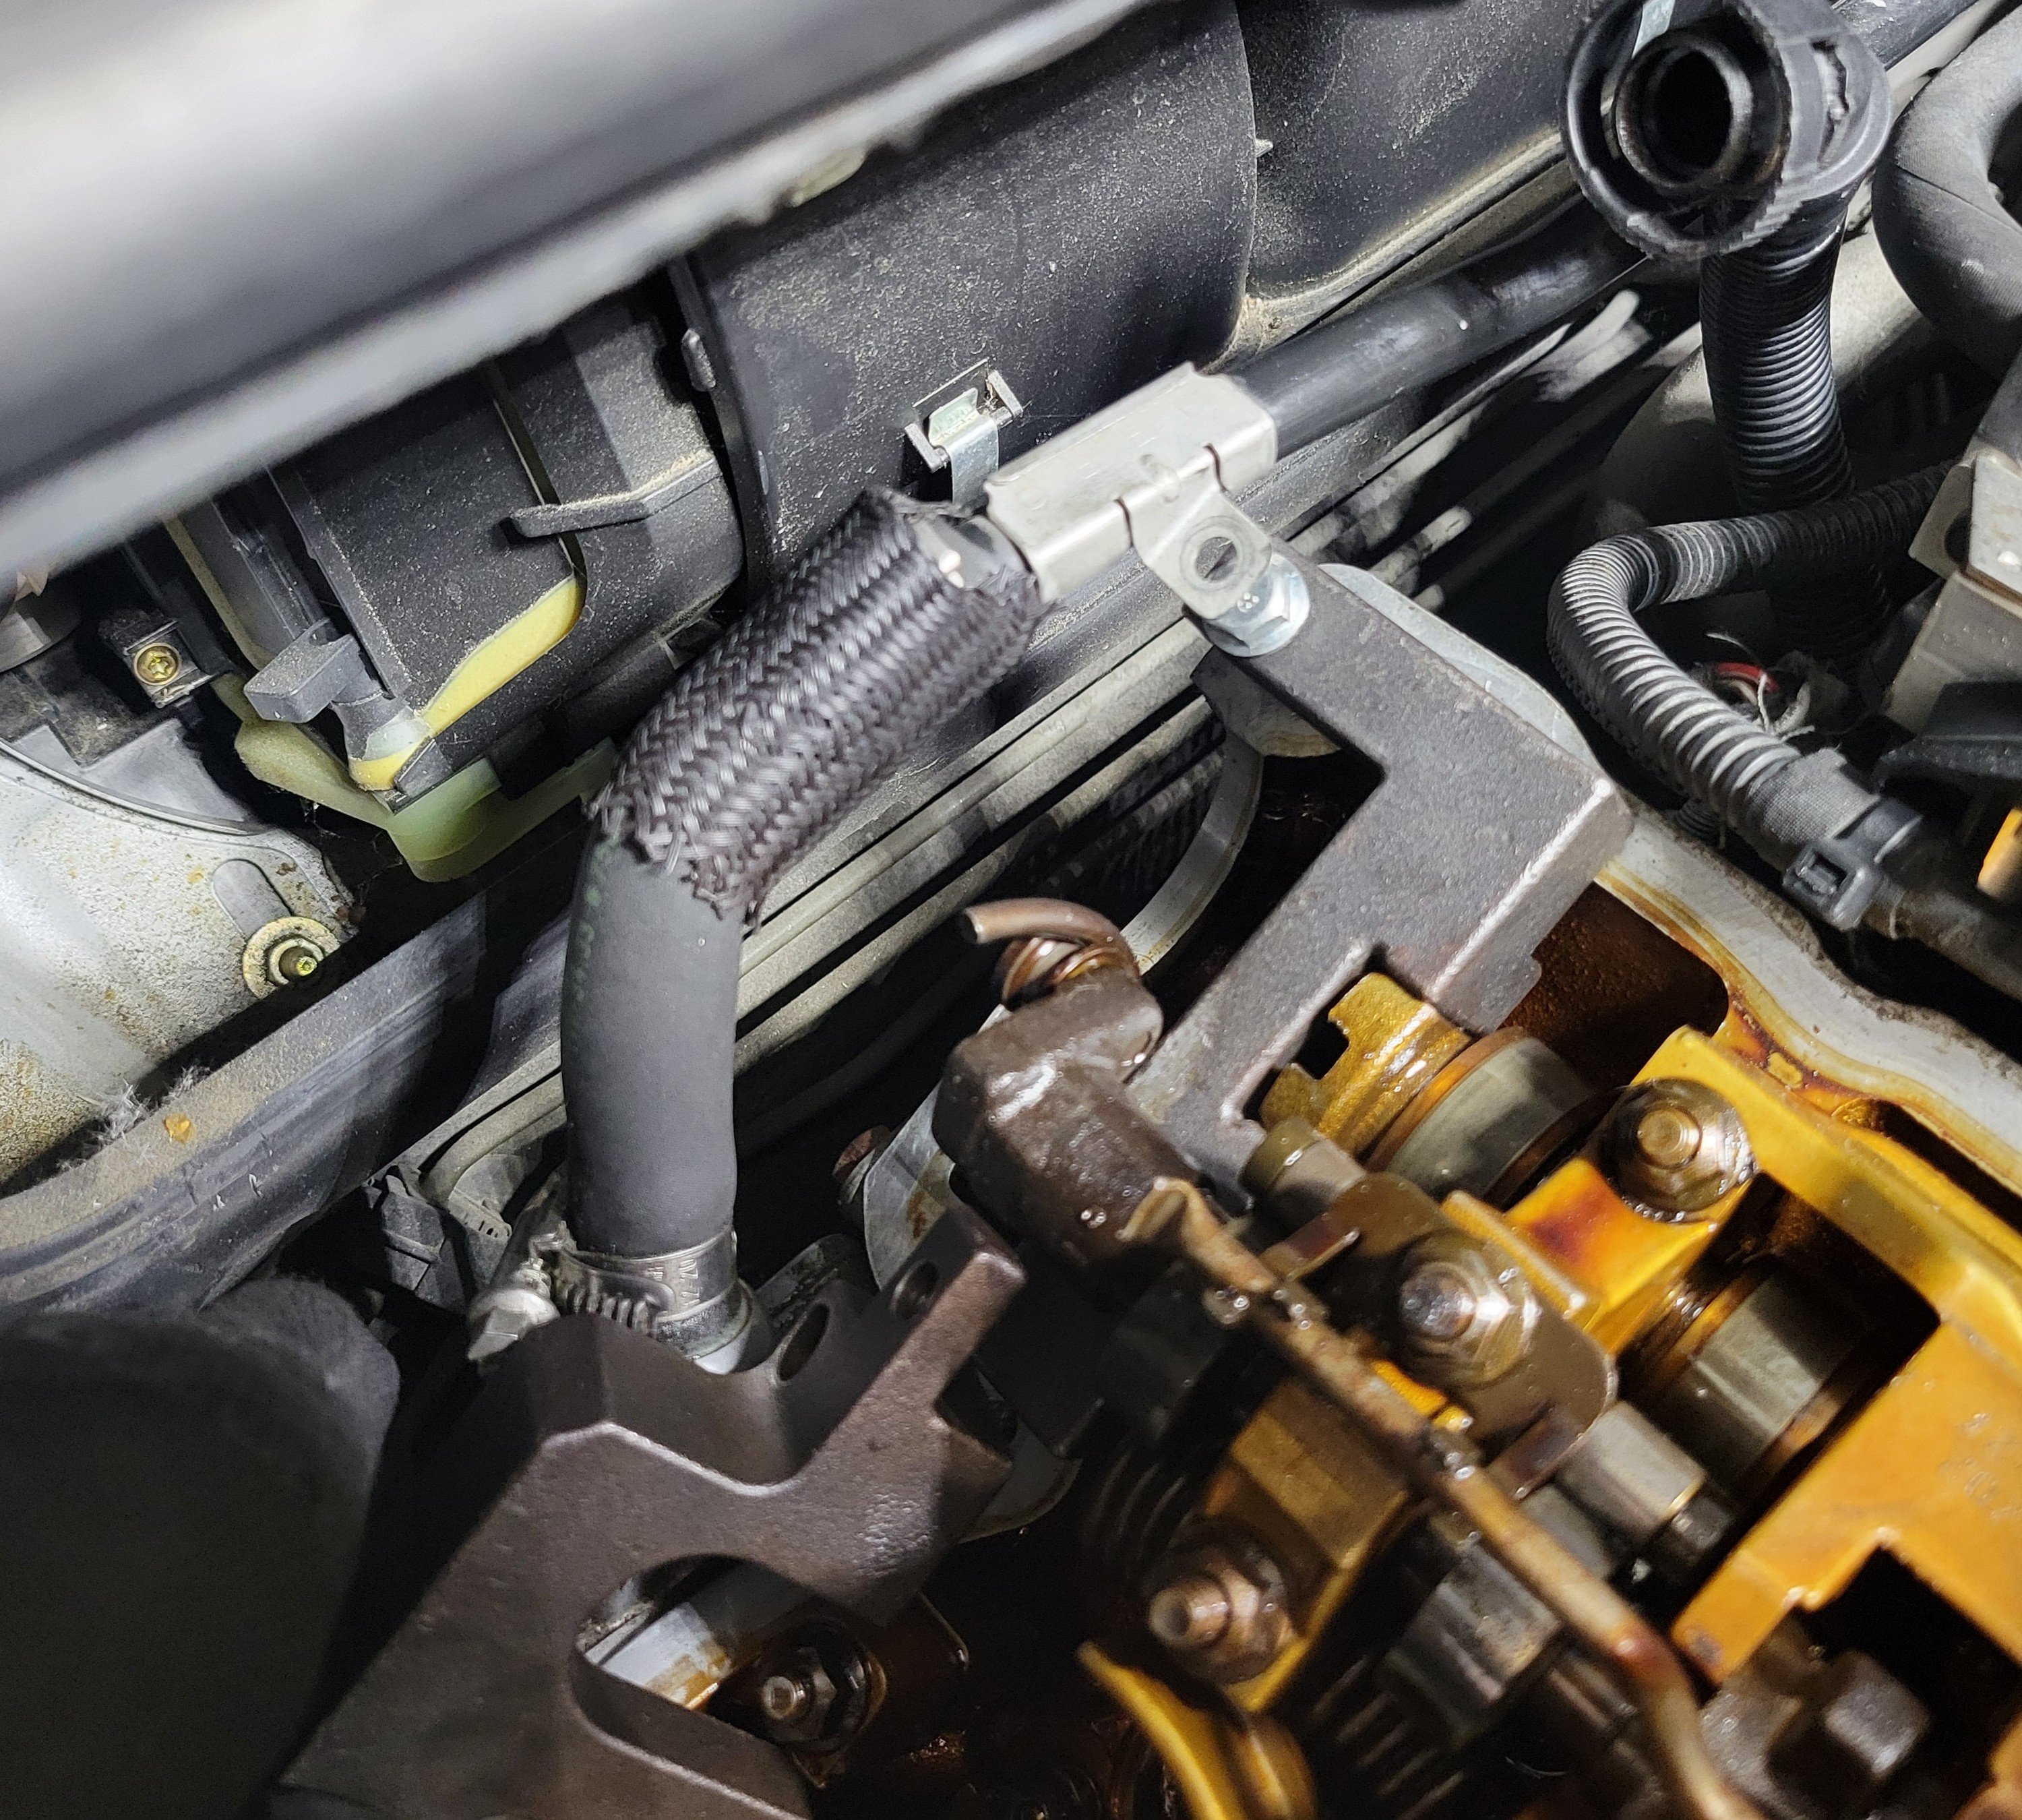
All our previous attempts had led us to believe the issue to be electrical and having found oil on the DME plugs I went further down that rabbit hole. I removed the intake manifold, revealing the junction box for the engine loom. I opened it up to discover a couple of plugs drenched in oil so figured I might as well remove the whole thing and give it a good clean.


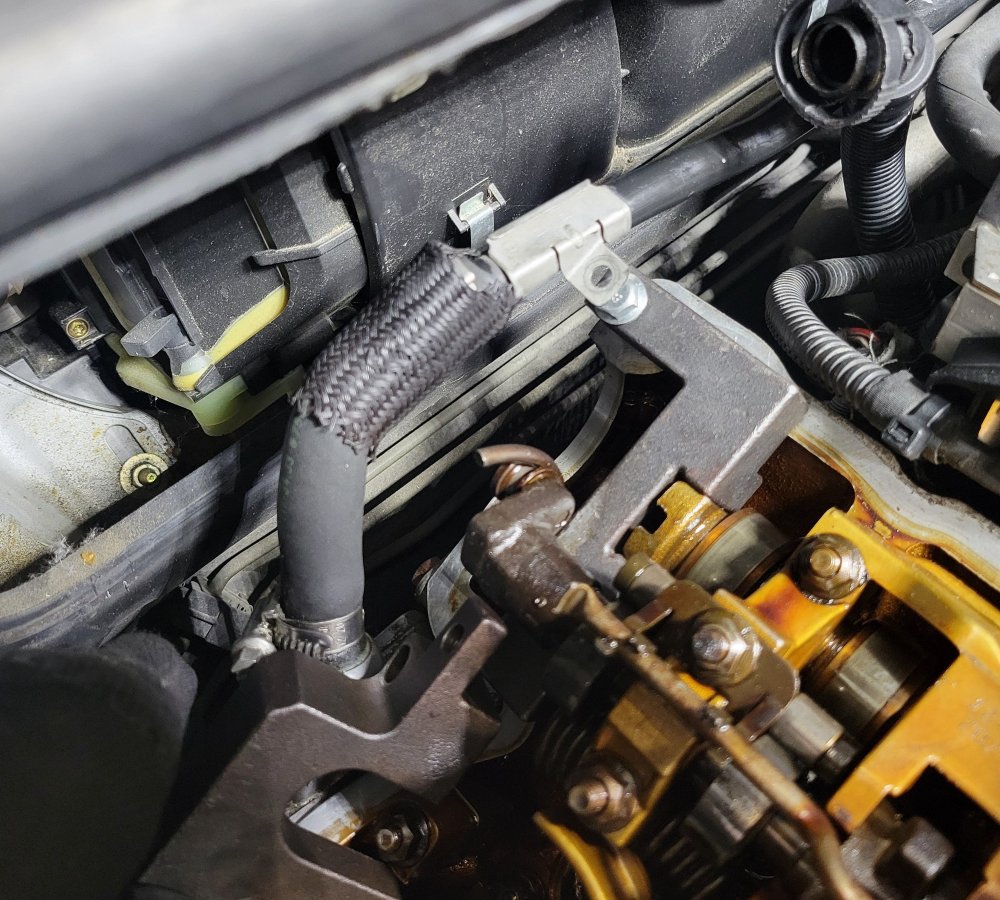
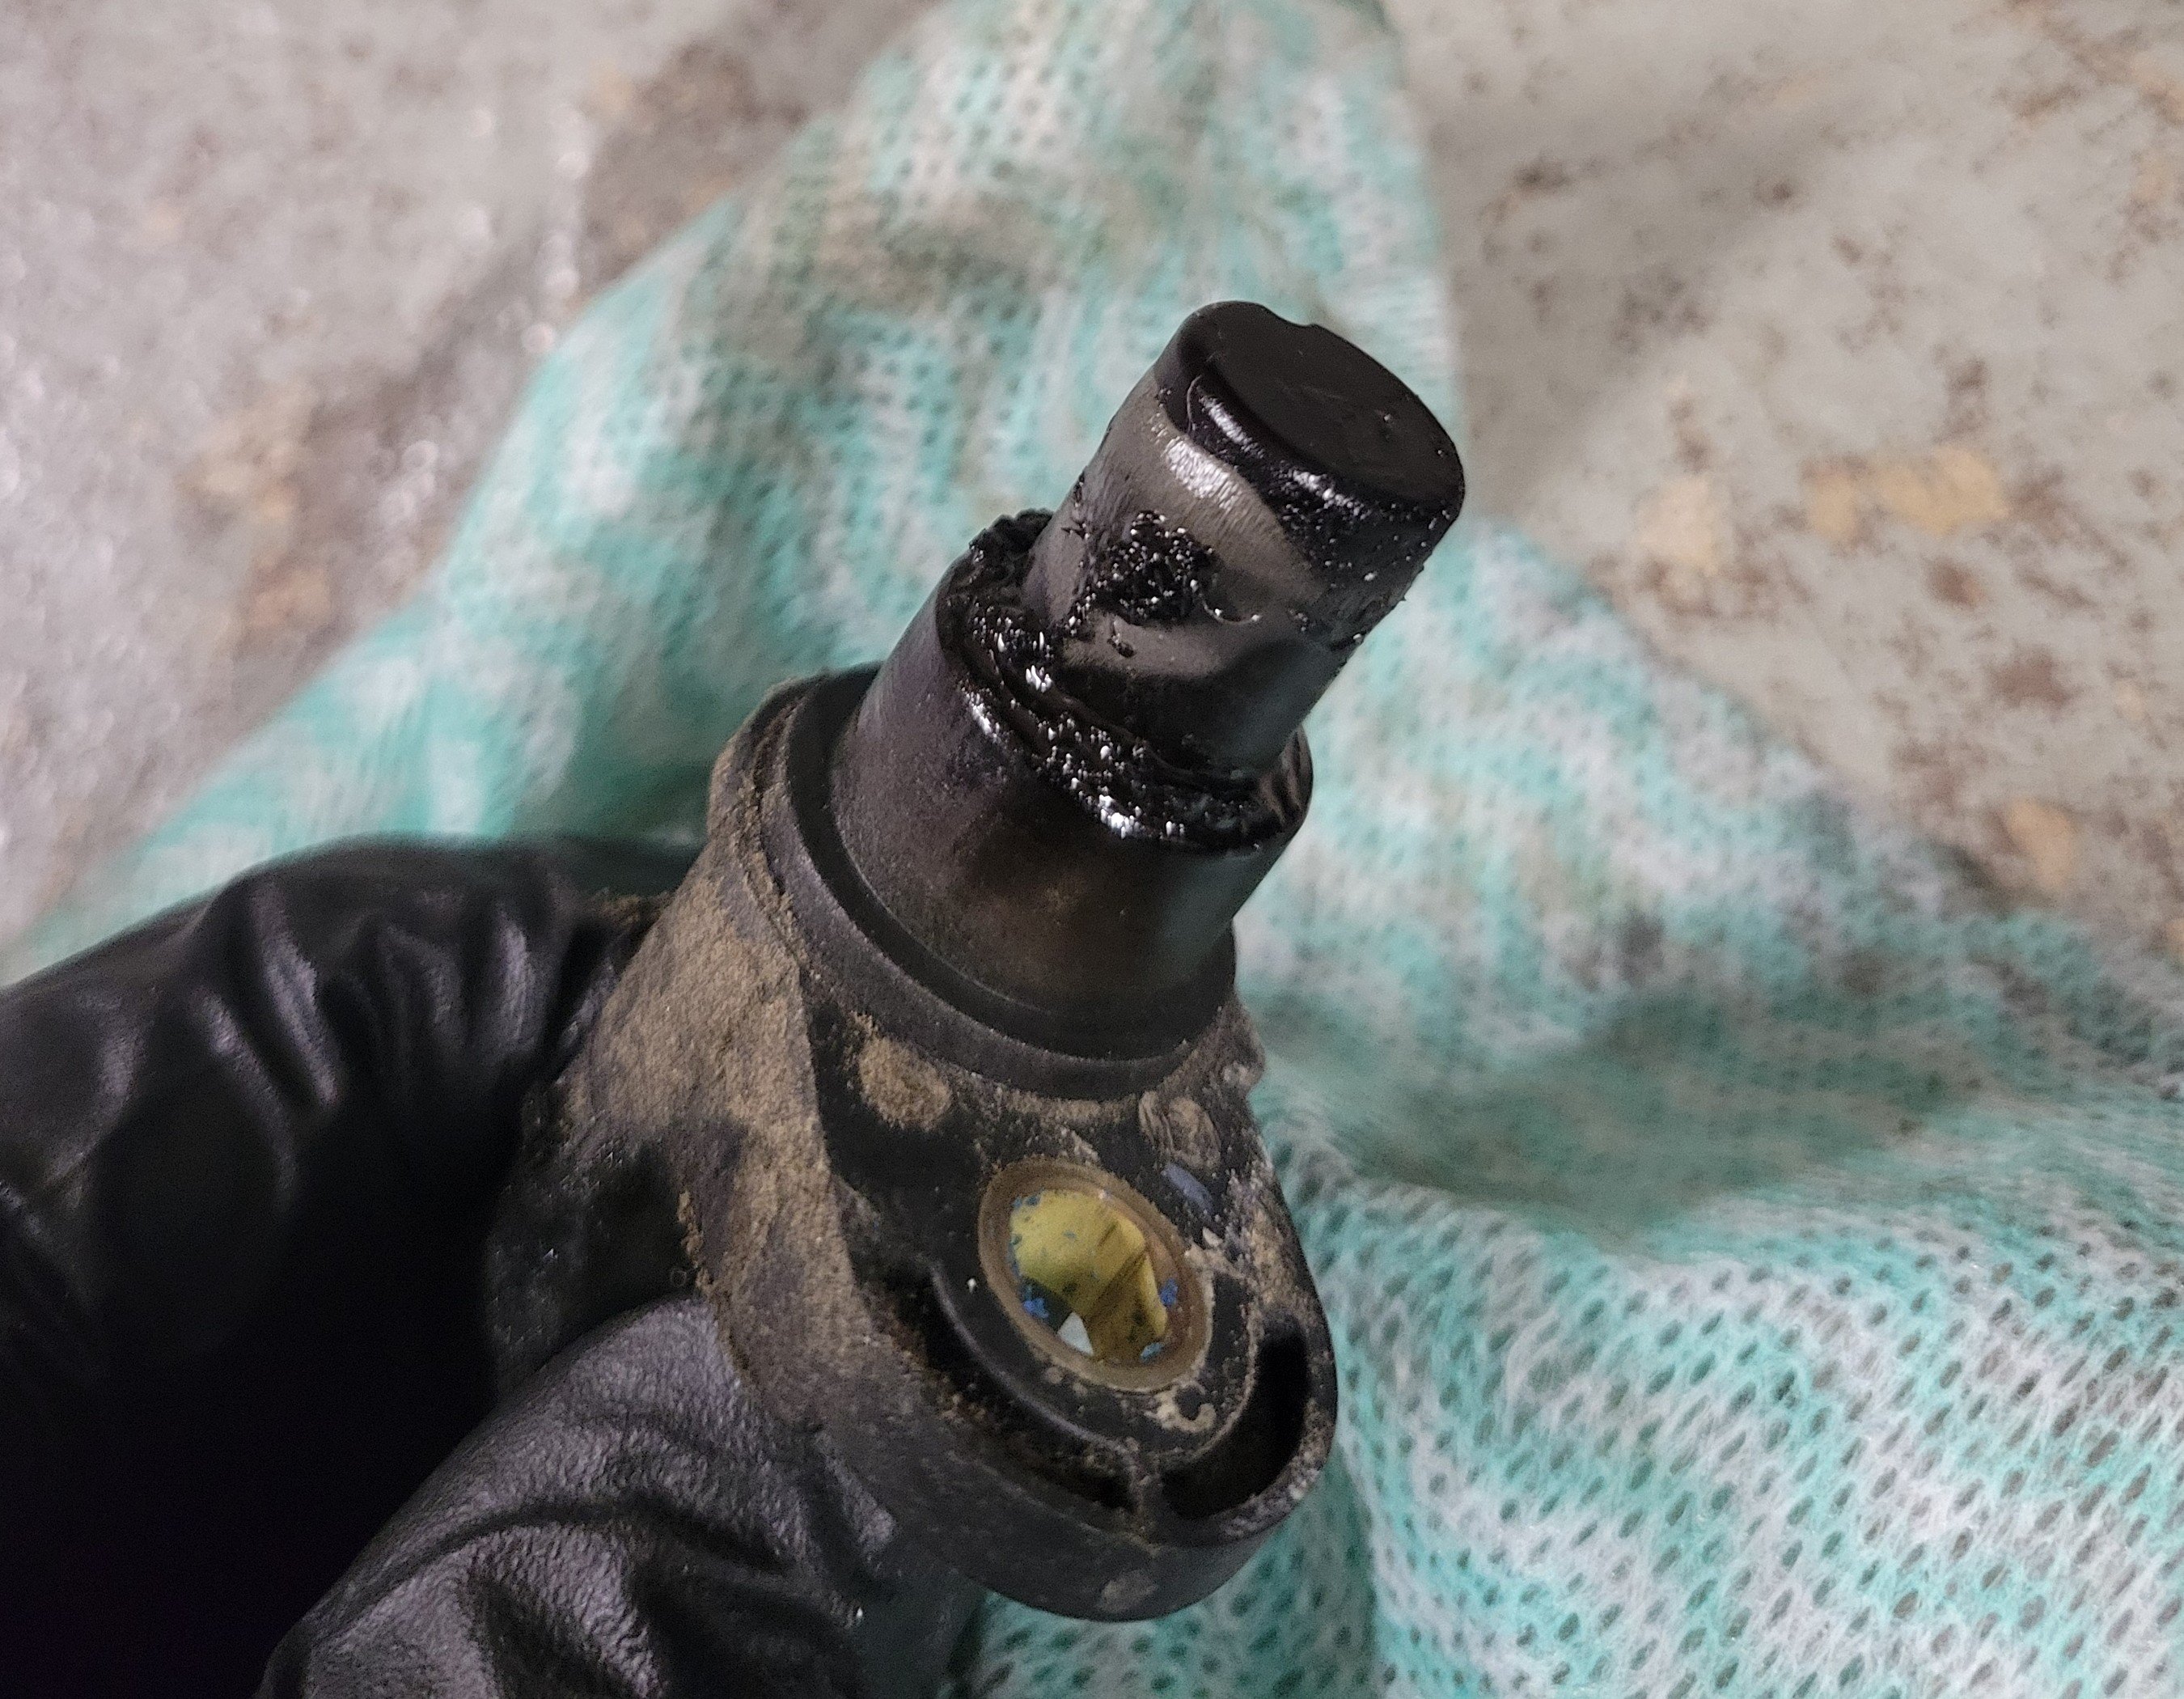
I traced the drenched plugs to the cam sensor wiring at the front of the engine. I also removed the cam sensors themselves to check them out. They were the older design ones with a thinner end bit becoming wider half way along with a rubber seal at the junction. That rubber seal had all but perished on one of the sensors and along with external leaks, seemed to also shooting oil straight through into the plug.

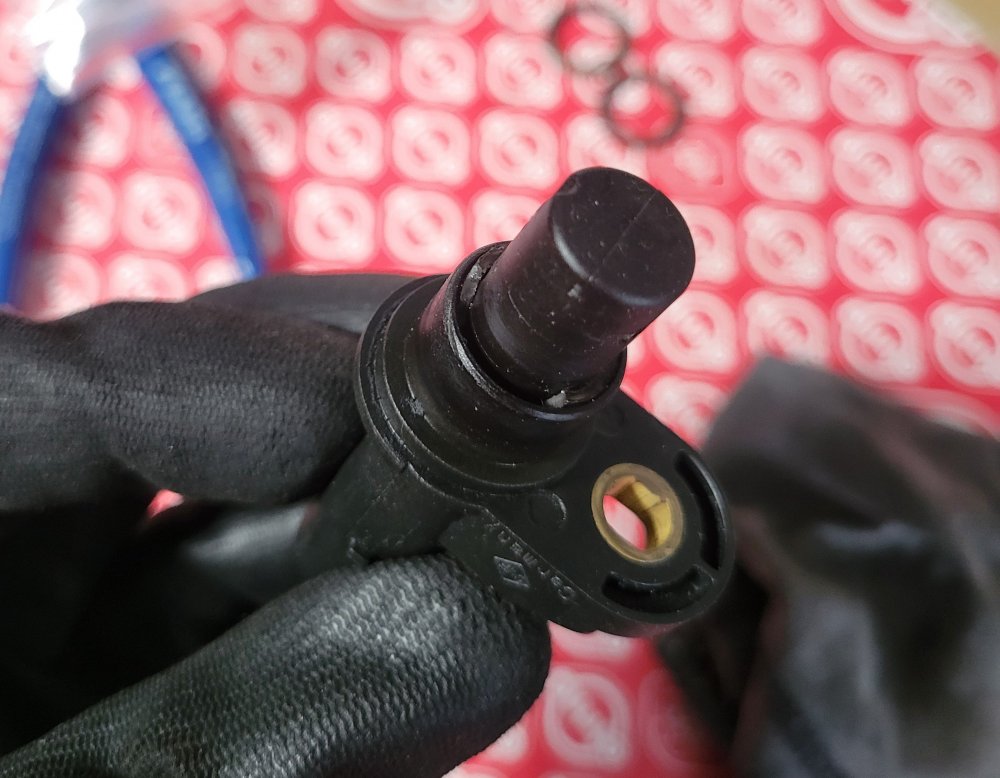
I swapped in some spare, newer design cam sensors I had handy, as well as the crank sensor for good measure. I then went through the whole loom with contact cleaner spray, tidied up the whole thing and reinstalled it.
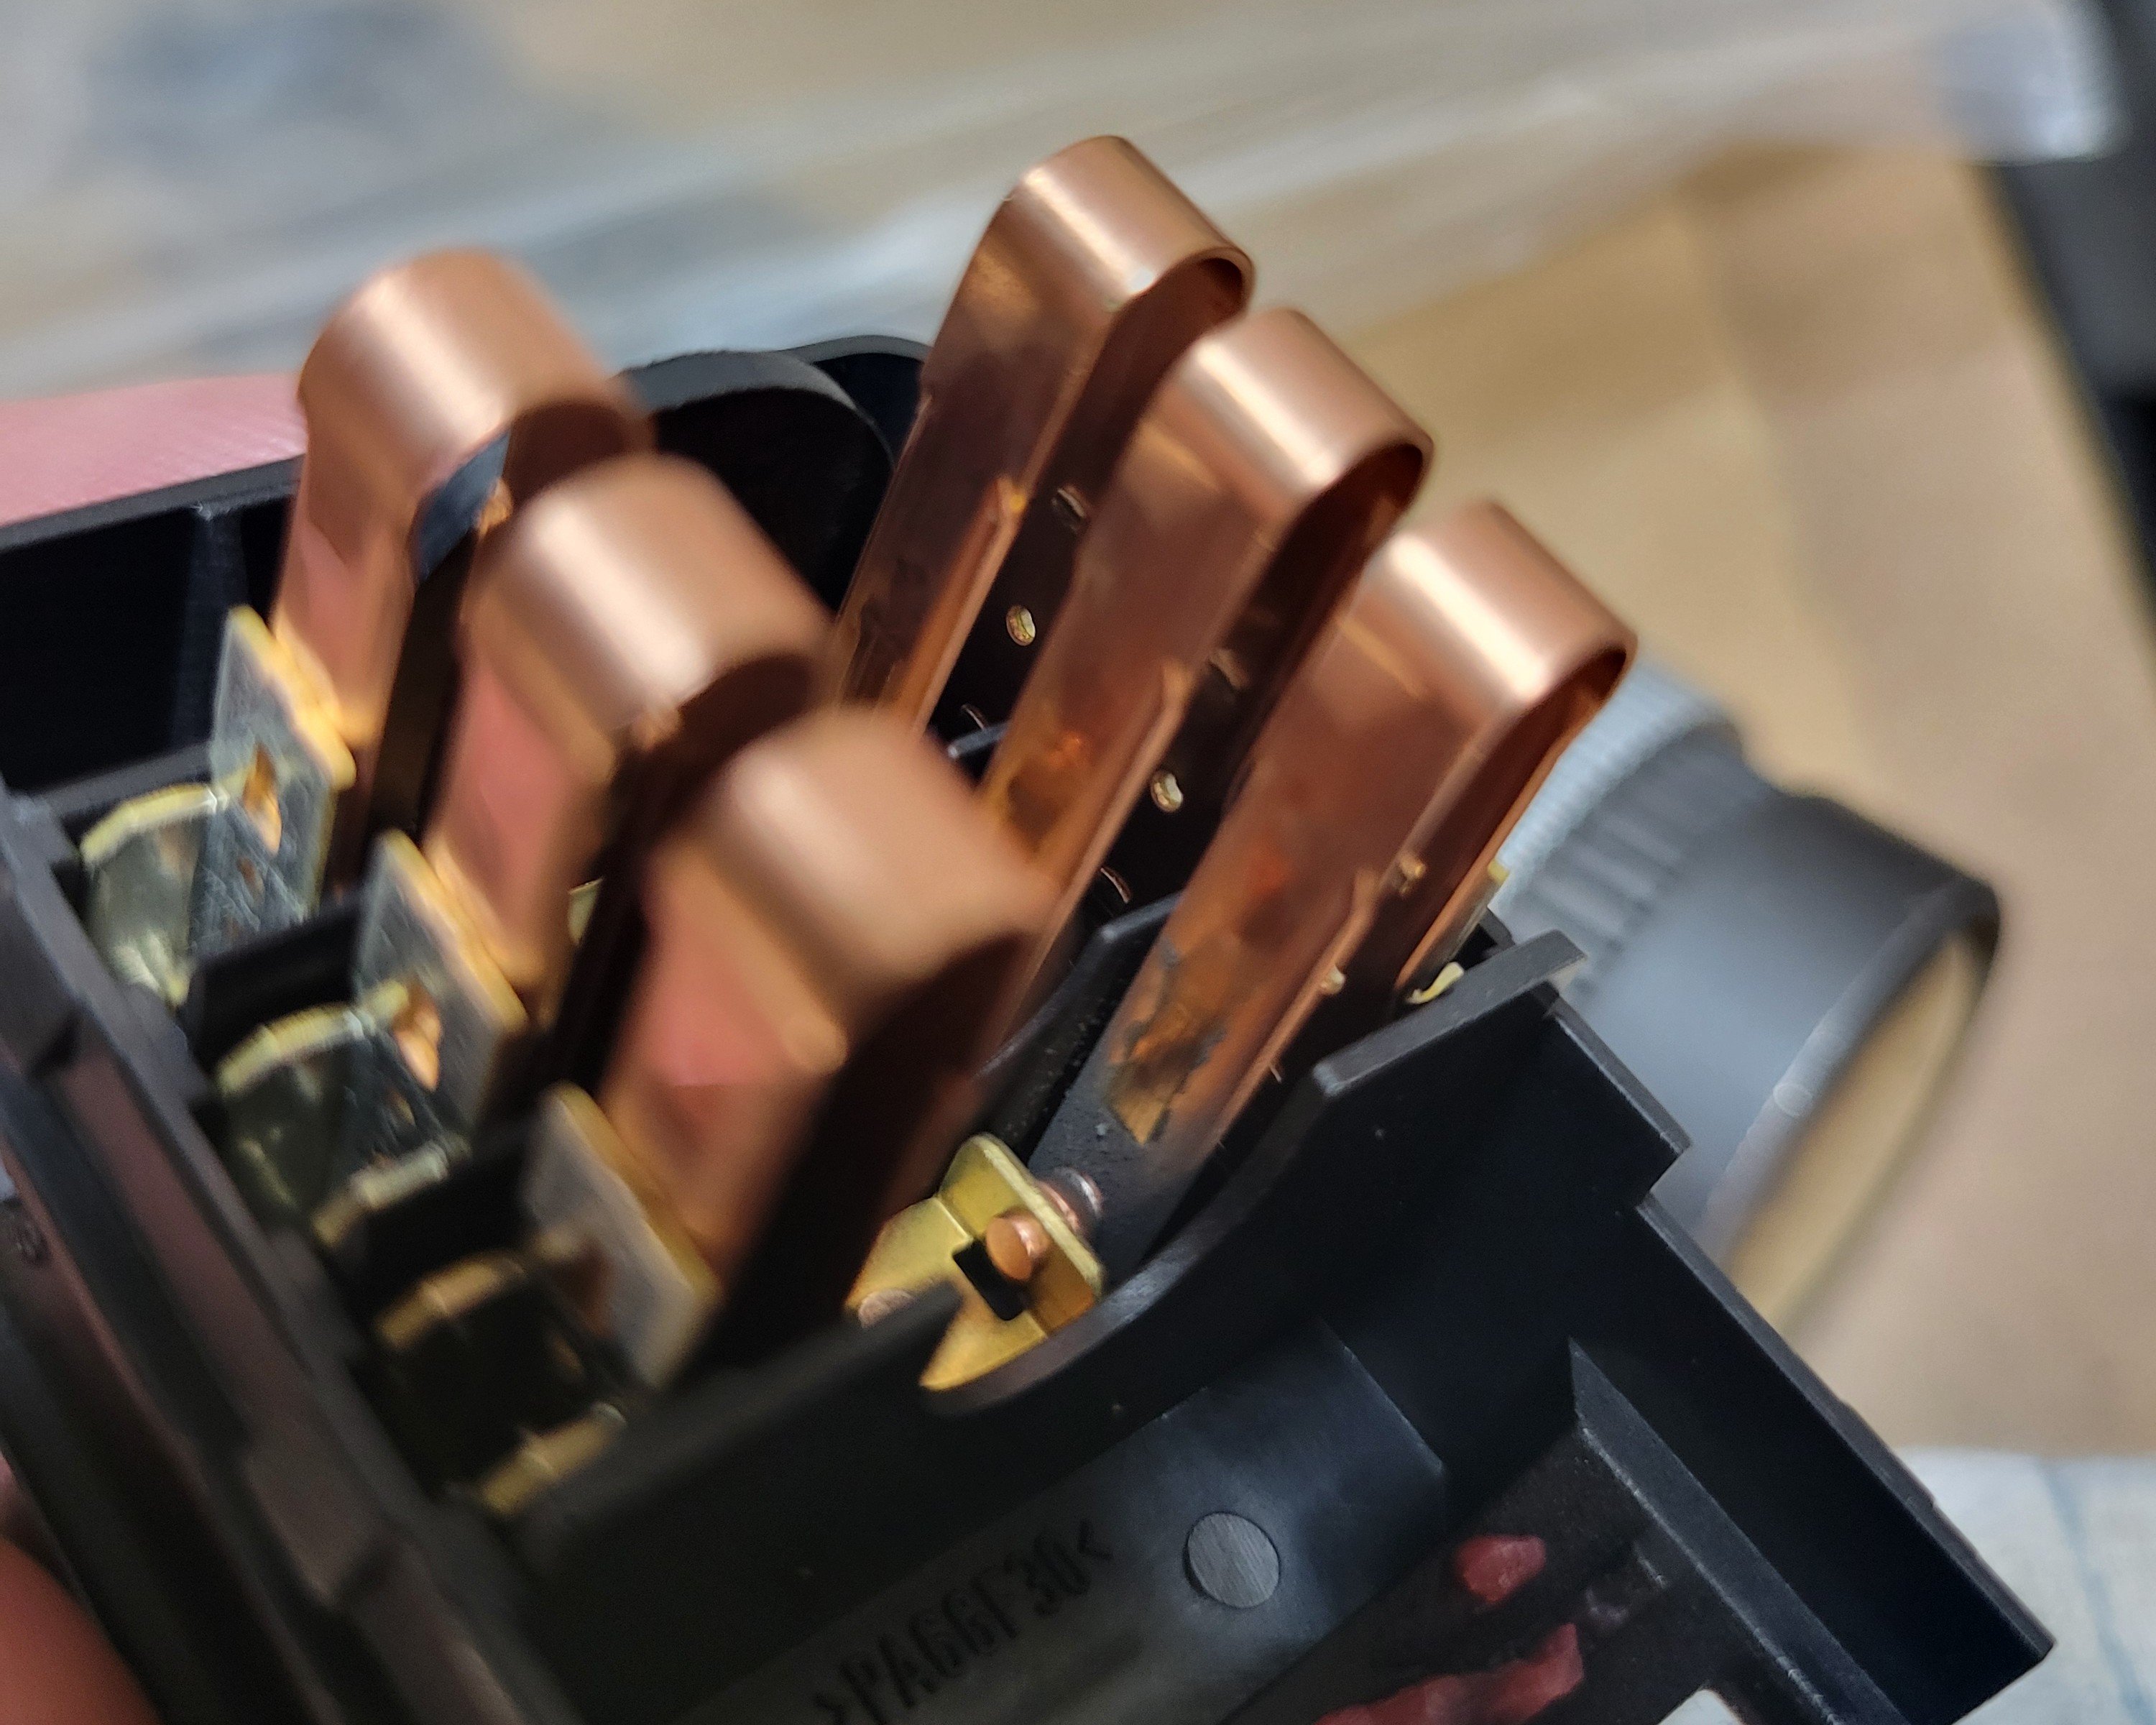
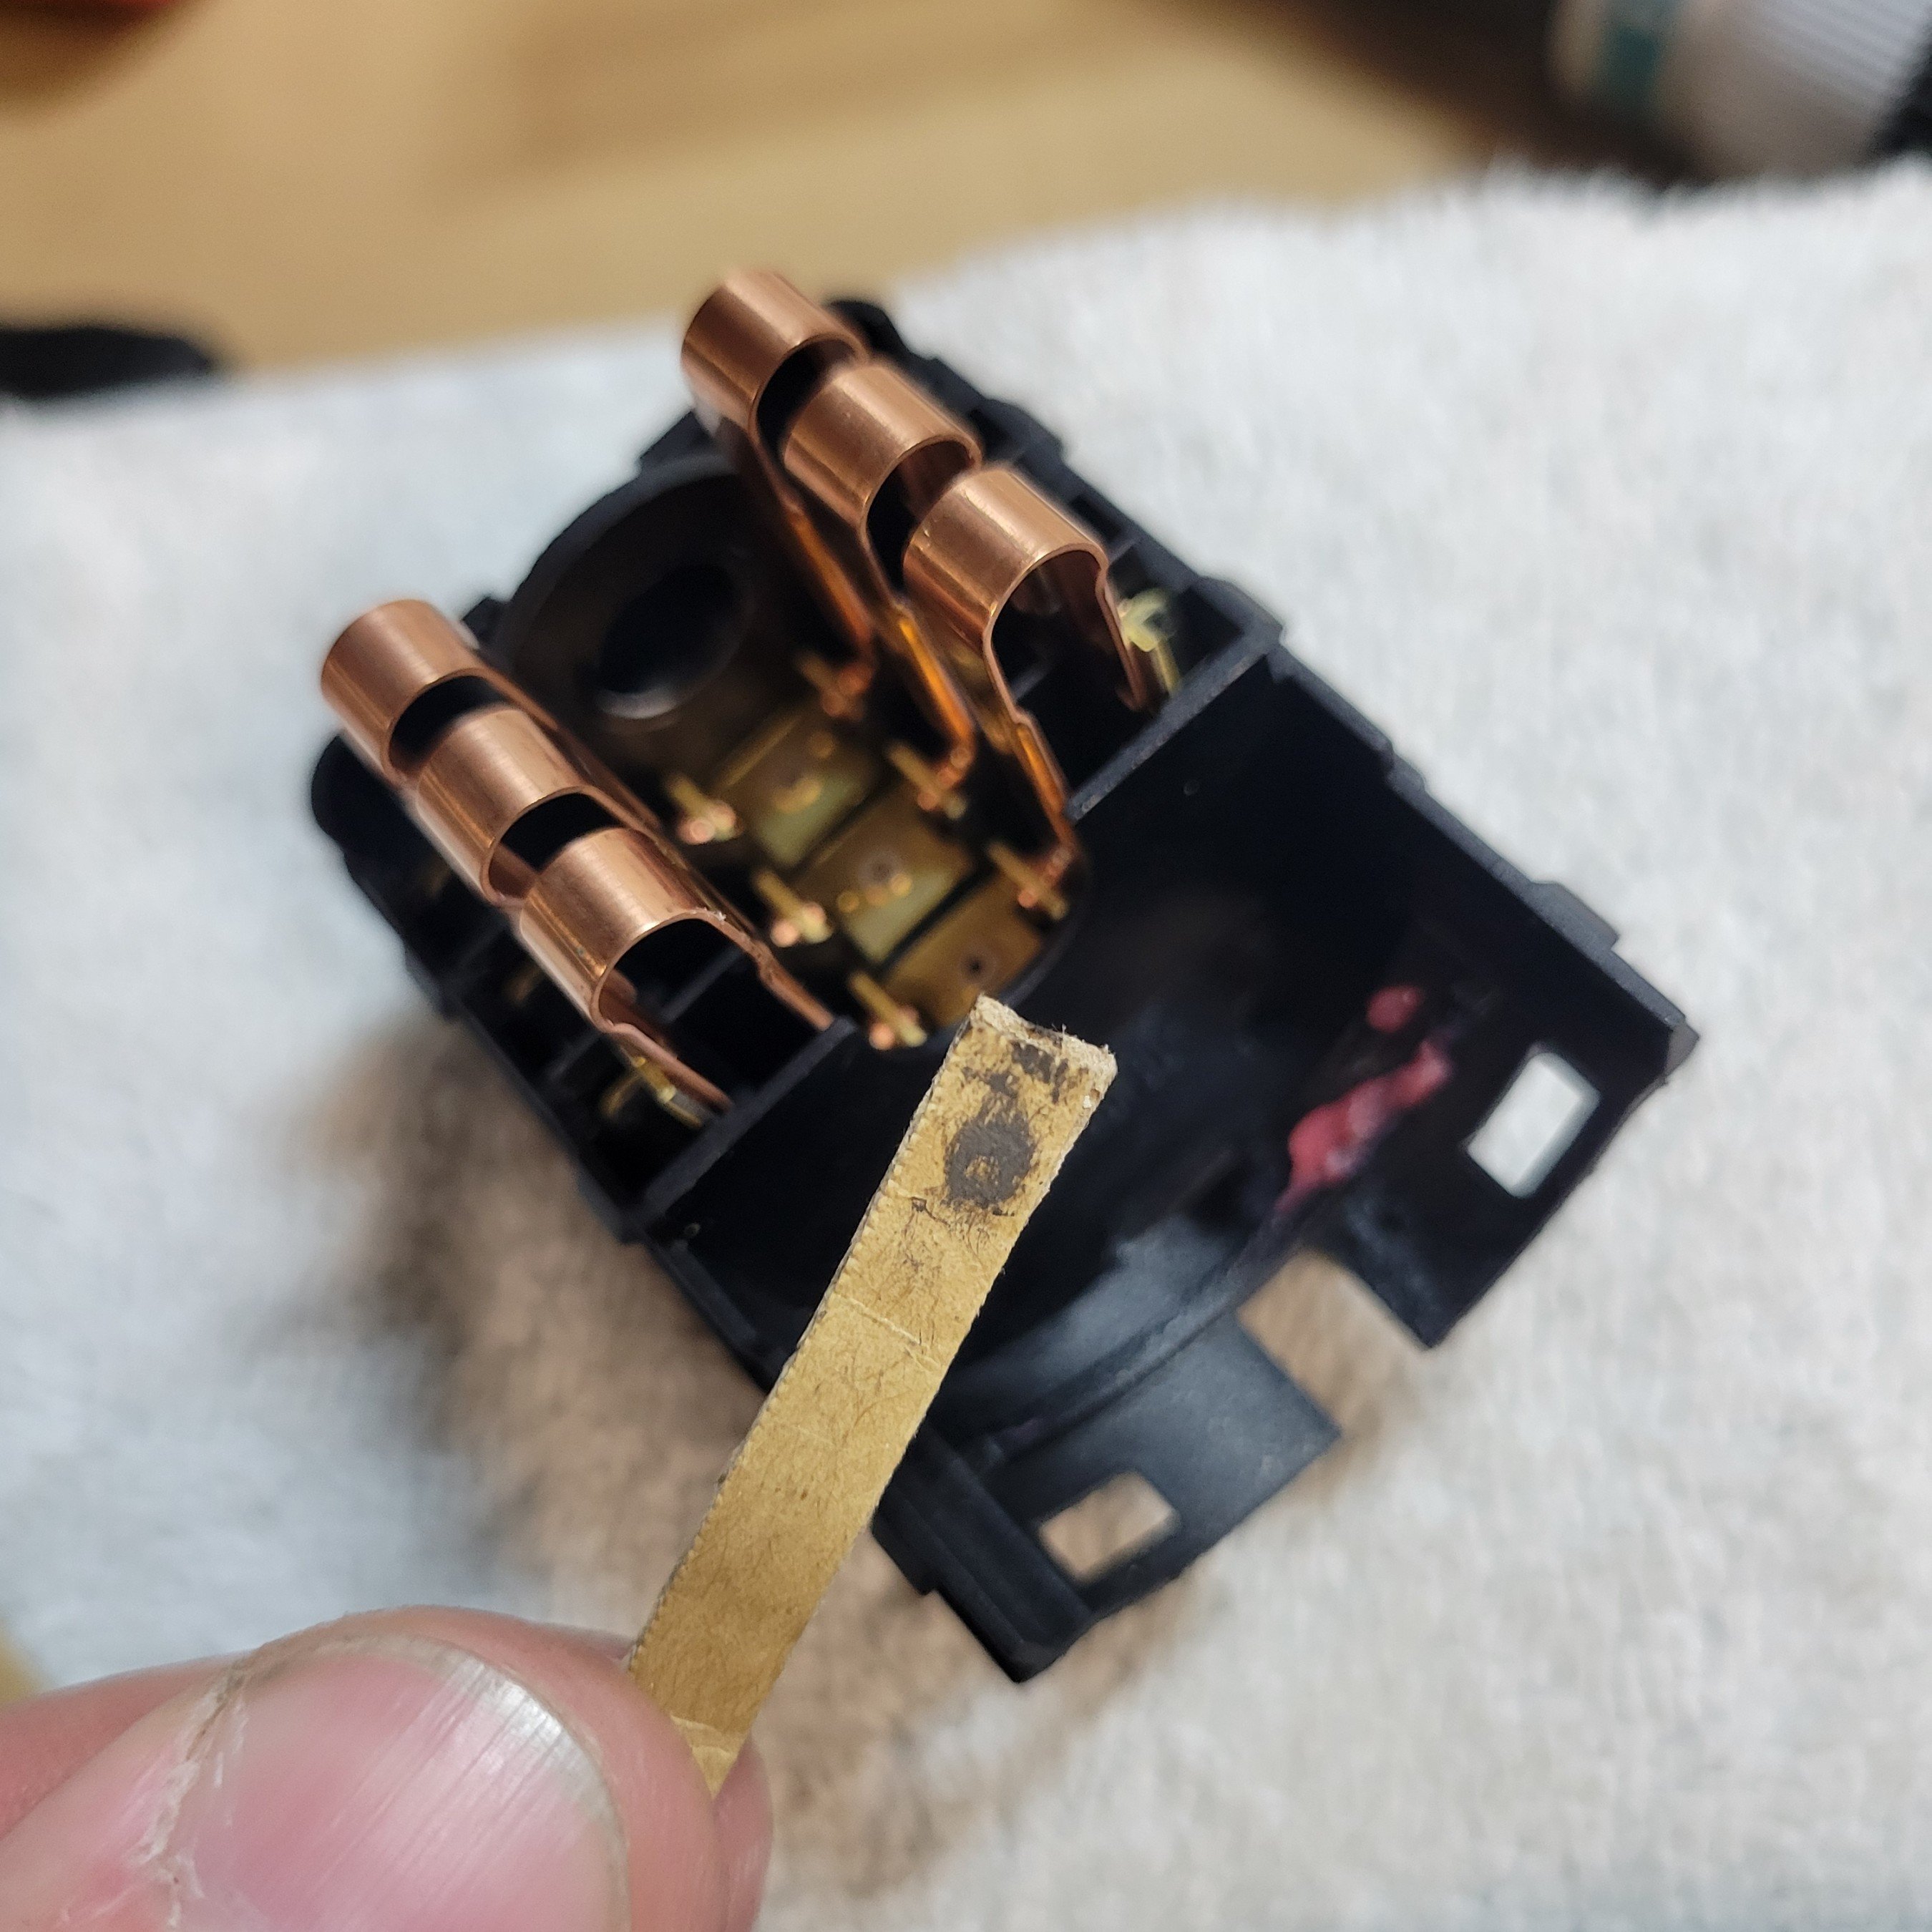
I then moved inside, removed the ignition switch and gave that a good clean. Those are known to cause all sorts of erratic electrical issues and was good to eliminate as a possible culprit. One of the connection spots was really gummed up with carbon dust so could have been beginning to be problematic.


I then checked all the fuses, both in the glovebox and whichever ones I could find in the DME box. All checked out fine. With the battery fully charged, I gave starting it a go.
Crank, no start.
The only DME code showing up was for the ambient temperature sensor, the one on the passenger side fender liner, which had of course gotten ripped out at some point in its life. I always thought that it's only there for the cluster display and the operation of the HVAC system so not sure why it was showing up as a DME code. Nevertheless, I spliced in a spare sensor and plug to get rid of the fault code at the very least. Code now gone, it still made no difference.
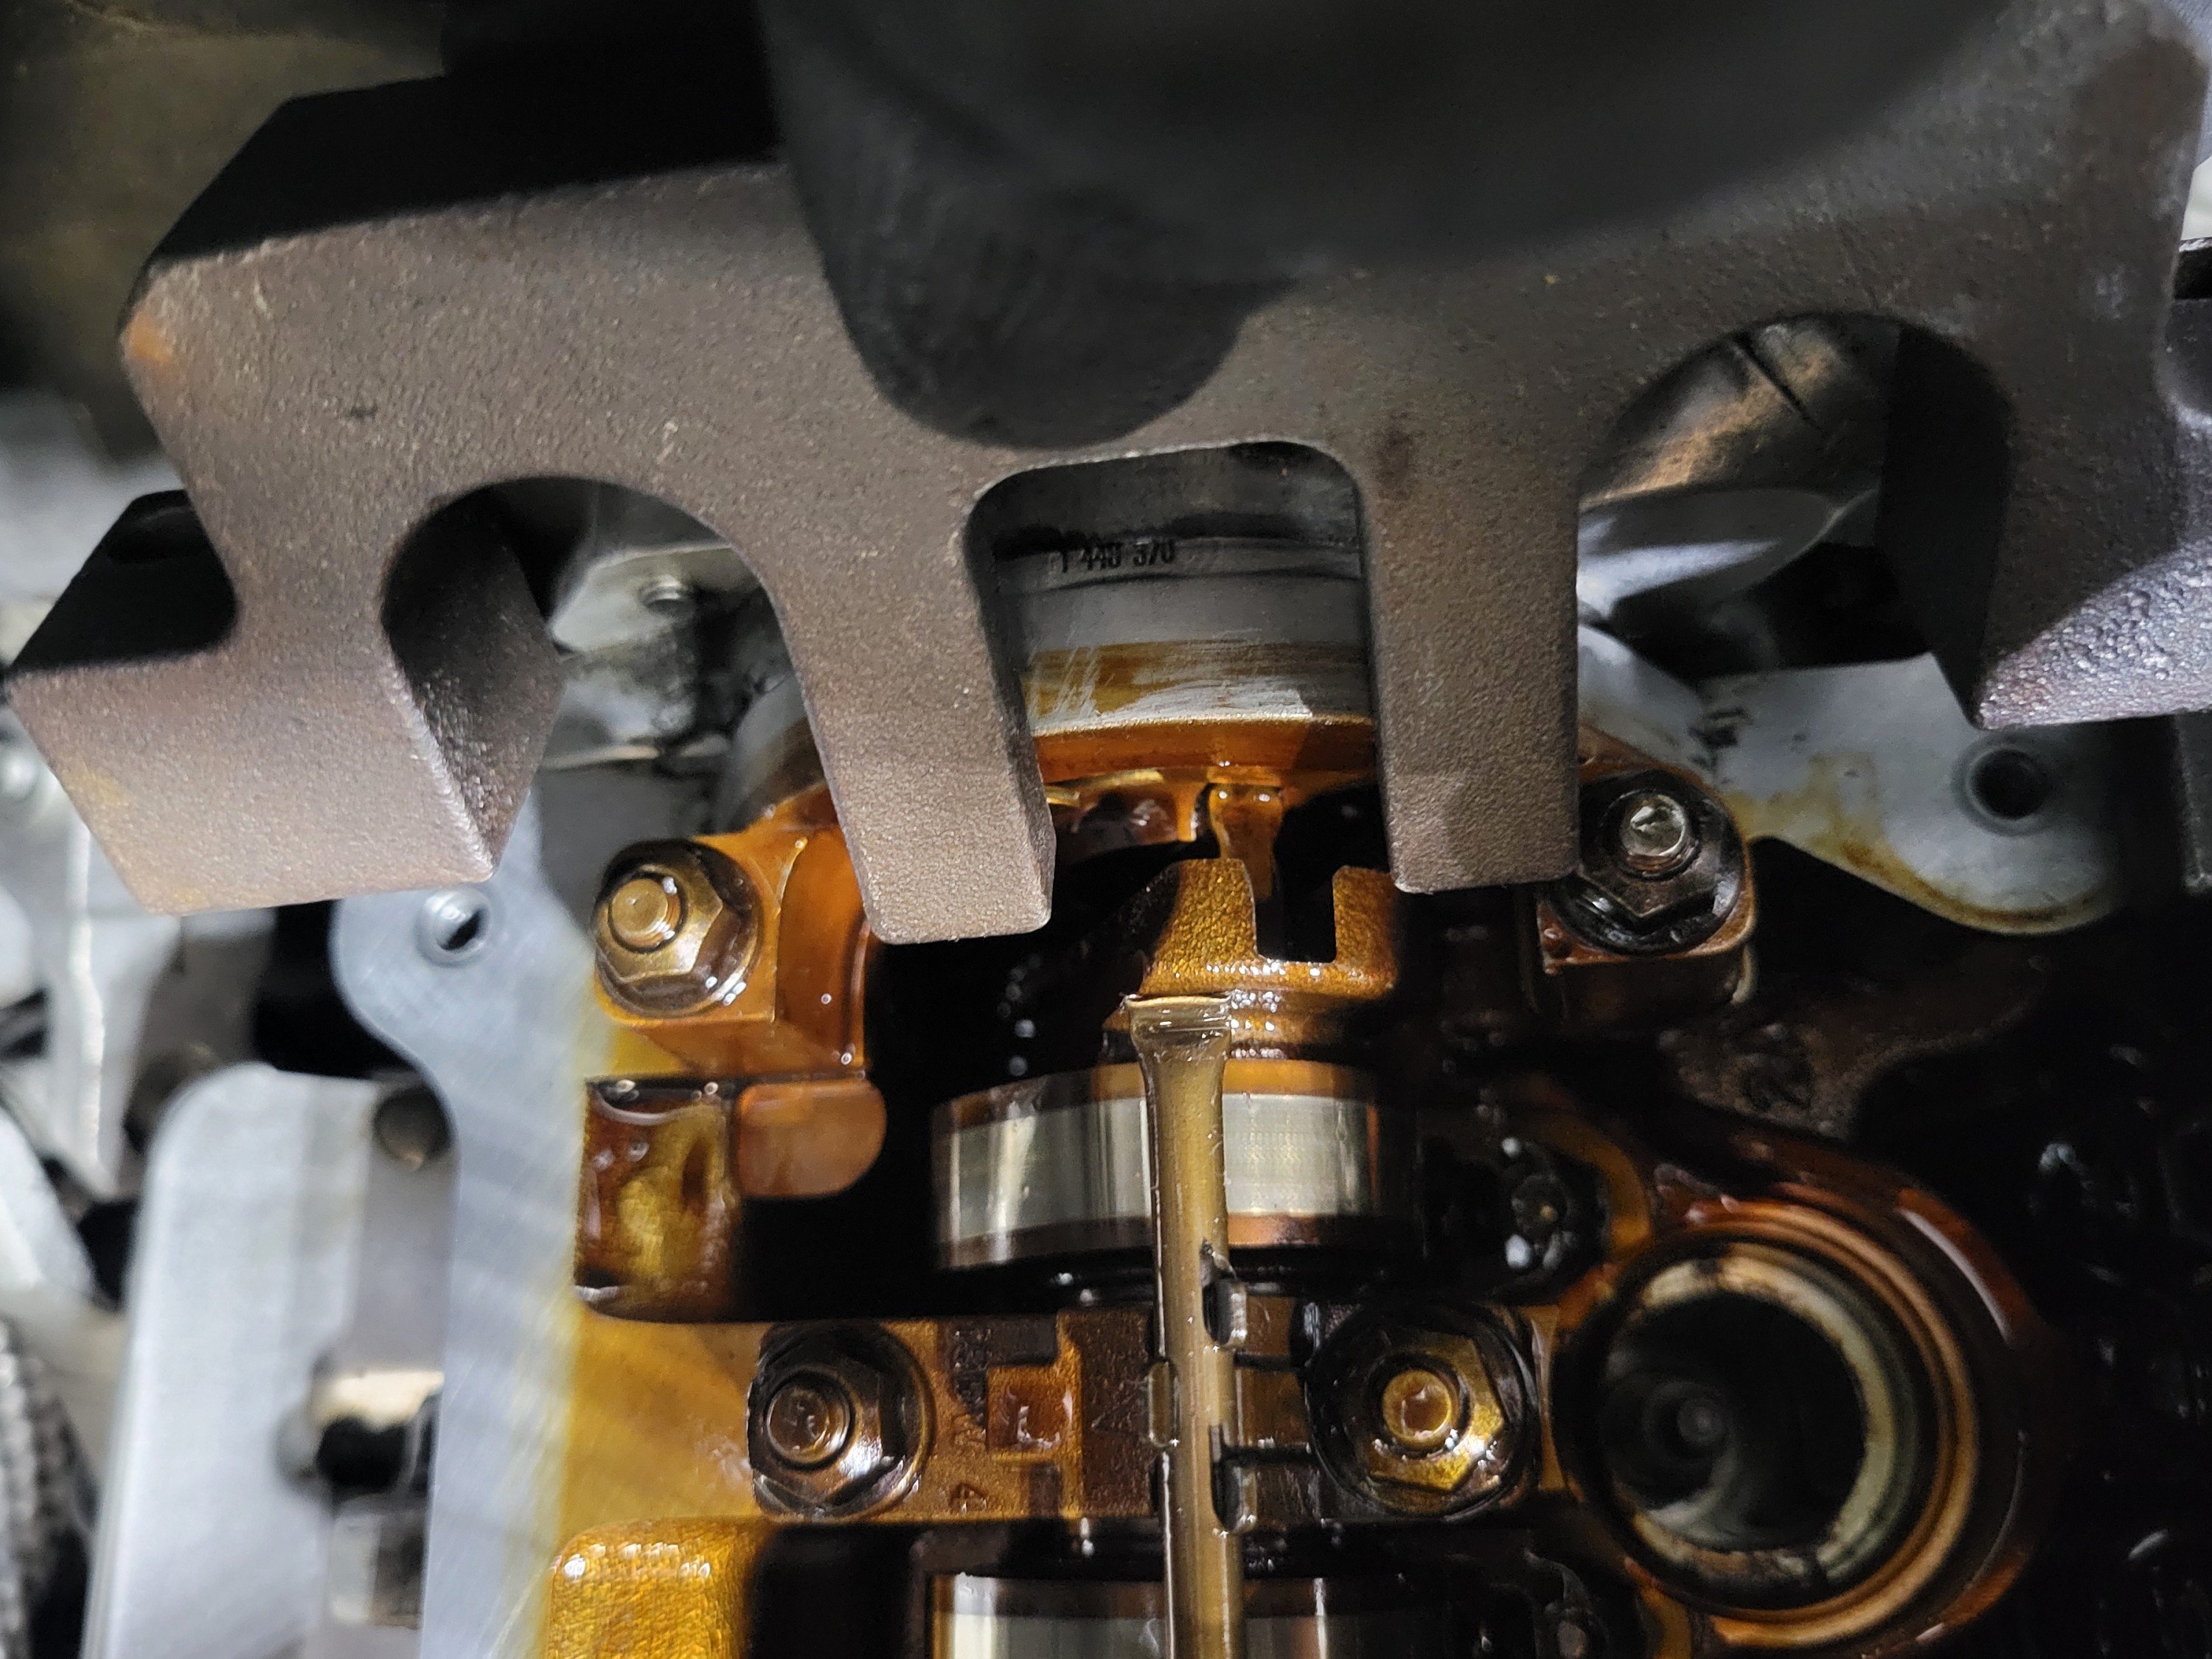
It was only at that point that I decided to do the thing I should have done as the first step. I borrowed a timing tool kit from a fella I'd bought some parts from a while ago, opened up the valve cover and had a fresh peek inside. The intake cam locking tool was a real tight squeeze to install but finally went in, only to then move over to the exhaust side and find it nowhere near fitting.

Bastard.
-

Been following the channel for a good while now and was happy to finally see an E46 featured, a Touring no less. Props to the dudes doing their research, felt like they got the vast majority of the info spot on. Worth a watch.
PS. Spare a thought for the Aussies only ever getting the Touring in 320i form for some weird reason. No idea what that's about.
-
1
-
-
12 minutes ago, Danch said:2003 BMW Z4 3.0ltr V6 for 24.5k!
Was just about to post this 😄 Absolute crackhead pricing. Dude is a car salesman and doesn't even know his V6's from I6's. Needs to be disqualified from owning cars.
-
2
-
1
-
-
49 minutes ago, darren_mk said:Slightly off topic but did you have a punt on the registered X5 at Manheim salvage Chch last week?
Nah I did see it but have enough semi-broken BMW's on my plate to want any additional ones 😄 Did you see what it went for?
-
1
-
-
Good for an occasional punt.

-
1
-
-
So good! Amazing attention to detail.
Where did you get some of that adhesive foam if you don't mind me asking? Any local suppliers or need to look overseas?
-
Yeah that's well sh*t, they sent out a survey a while ago asking for opinions on such a proposed change, I spoke out against it back then too, but obviously to no avail.
The BPC was one of those awesome perks that endeared me to SCA when I first started using them back in the day. Have had a few instances of buying stuff I needed just a day or two before the same stuff becoming discounted. Felt awesome getting credit for it, would have otherwise felt a bit cheated. Shame it's getting scrapped.
Wouldn't mind the Spend & Get thing as much if it weren't for the 28 day expiry period, that's awfully off-putting.
-
It's been a topic of debate around the forums for a good while.
Some see it as an "upgrade", the logic being lower pressure = less strain on the plastic & rubber components in the cooling system = longer life for the cooling system components.
The counter argument is that lower pressure = lower boiling point = higher chance of vapours in the system. Gases don't transfer heat nearly as efficiently as fluids, leading to localised hot spots or hot pockets in the engine, which obviously isn't good.
I'm far from an expert but from what I gather you'll probably be fine running with either option if the car only sees light everyday use. It'd take quite a bit of bashing to get it to the extremes where the difference would start to show so you get two camps of people who claim to have run with their preference for years and have never had issues.
Personally, I like to preventatively replace the main failure prone cooling system components and stick with the cap the car was designed for.
-
 1
1
-
-
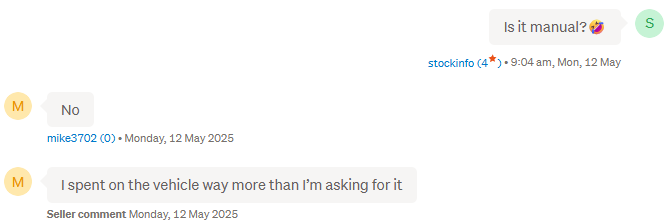
It's been kicking around for a wee while. Pretty sure the KiwiCarLife fella sold it not too long ago for $5k so this fella is being a bit cheeky listing it straight away for $1k on top of it having seemingly done nothing to it.
I actually had a chat to him about it when he had it, it's far from perfect... It's been repainted, the quality of which is questionable. Apparently will need injectors imminently, amongst other things. He was gonna keep it but seemingly saw that it's too much for him so flicked it on soon after. Probably the same story for the new guy too. It's sporting an N53 so is direct injected, with comes with some pros but heaps of cons.
Cheap for a manual BMW, but there's a reason for it.
-
1
-
-
"Mature senior owner" with a goddamn nightclub on wheels, and some rando asking about cruise control
Peak TradeMe
-
1
-
2
-
-
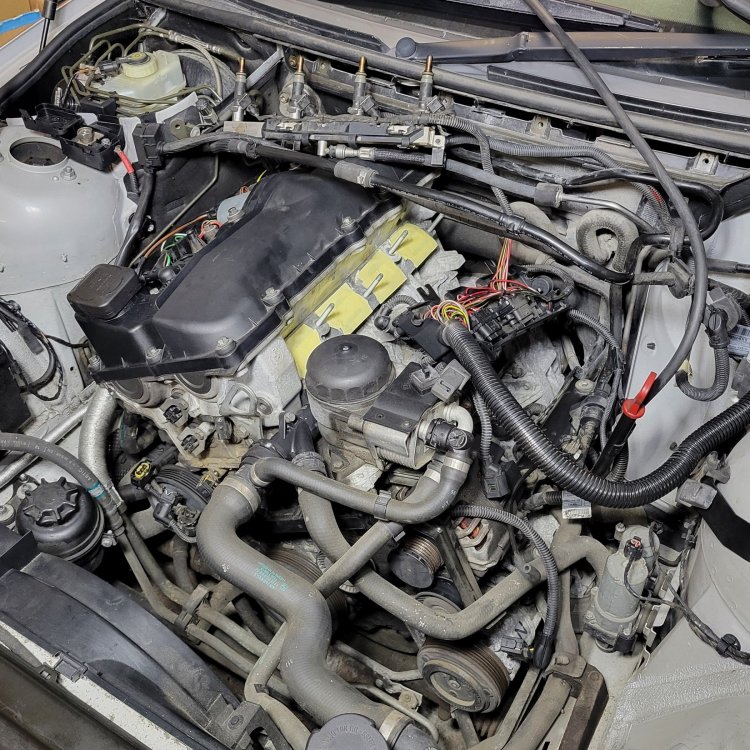
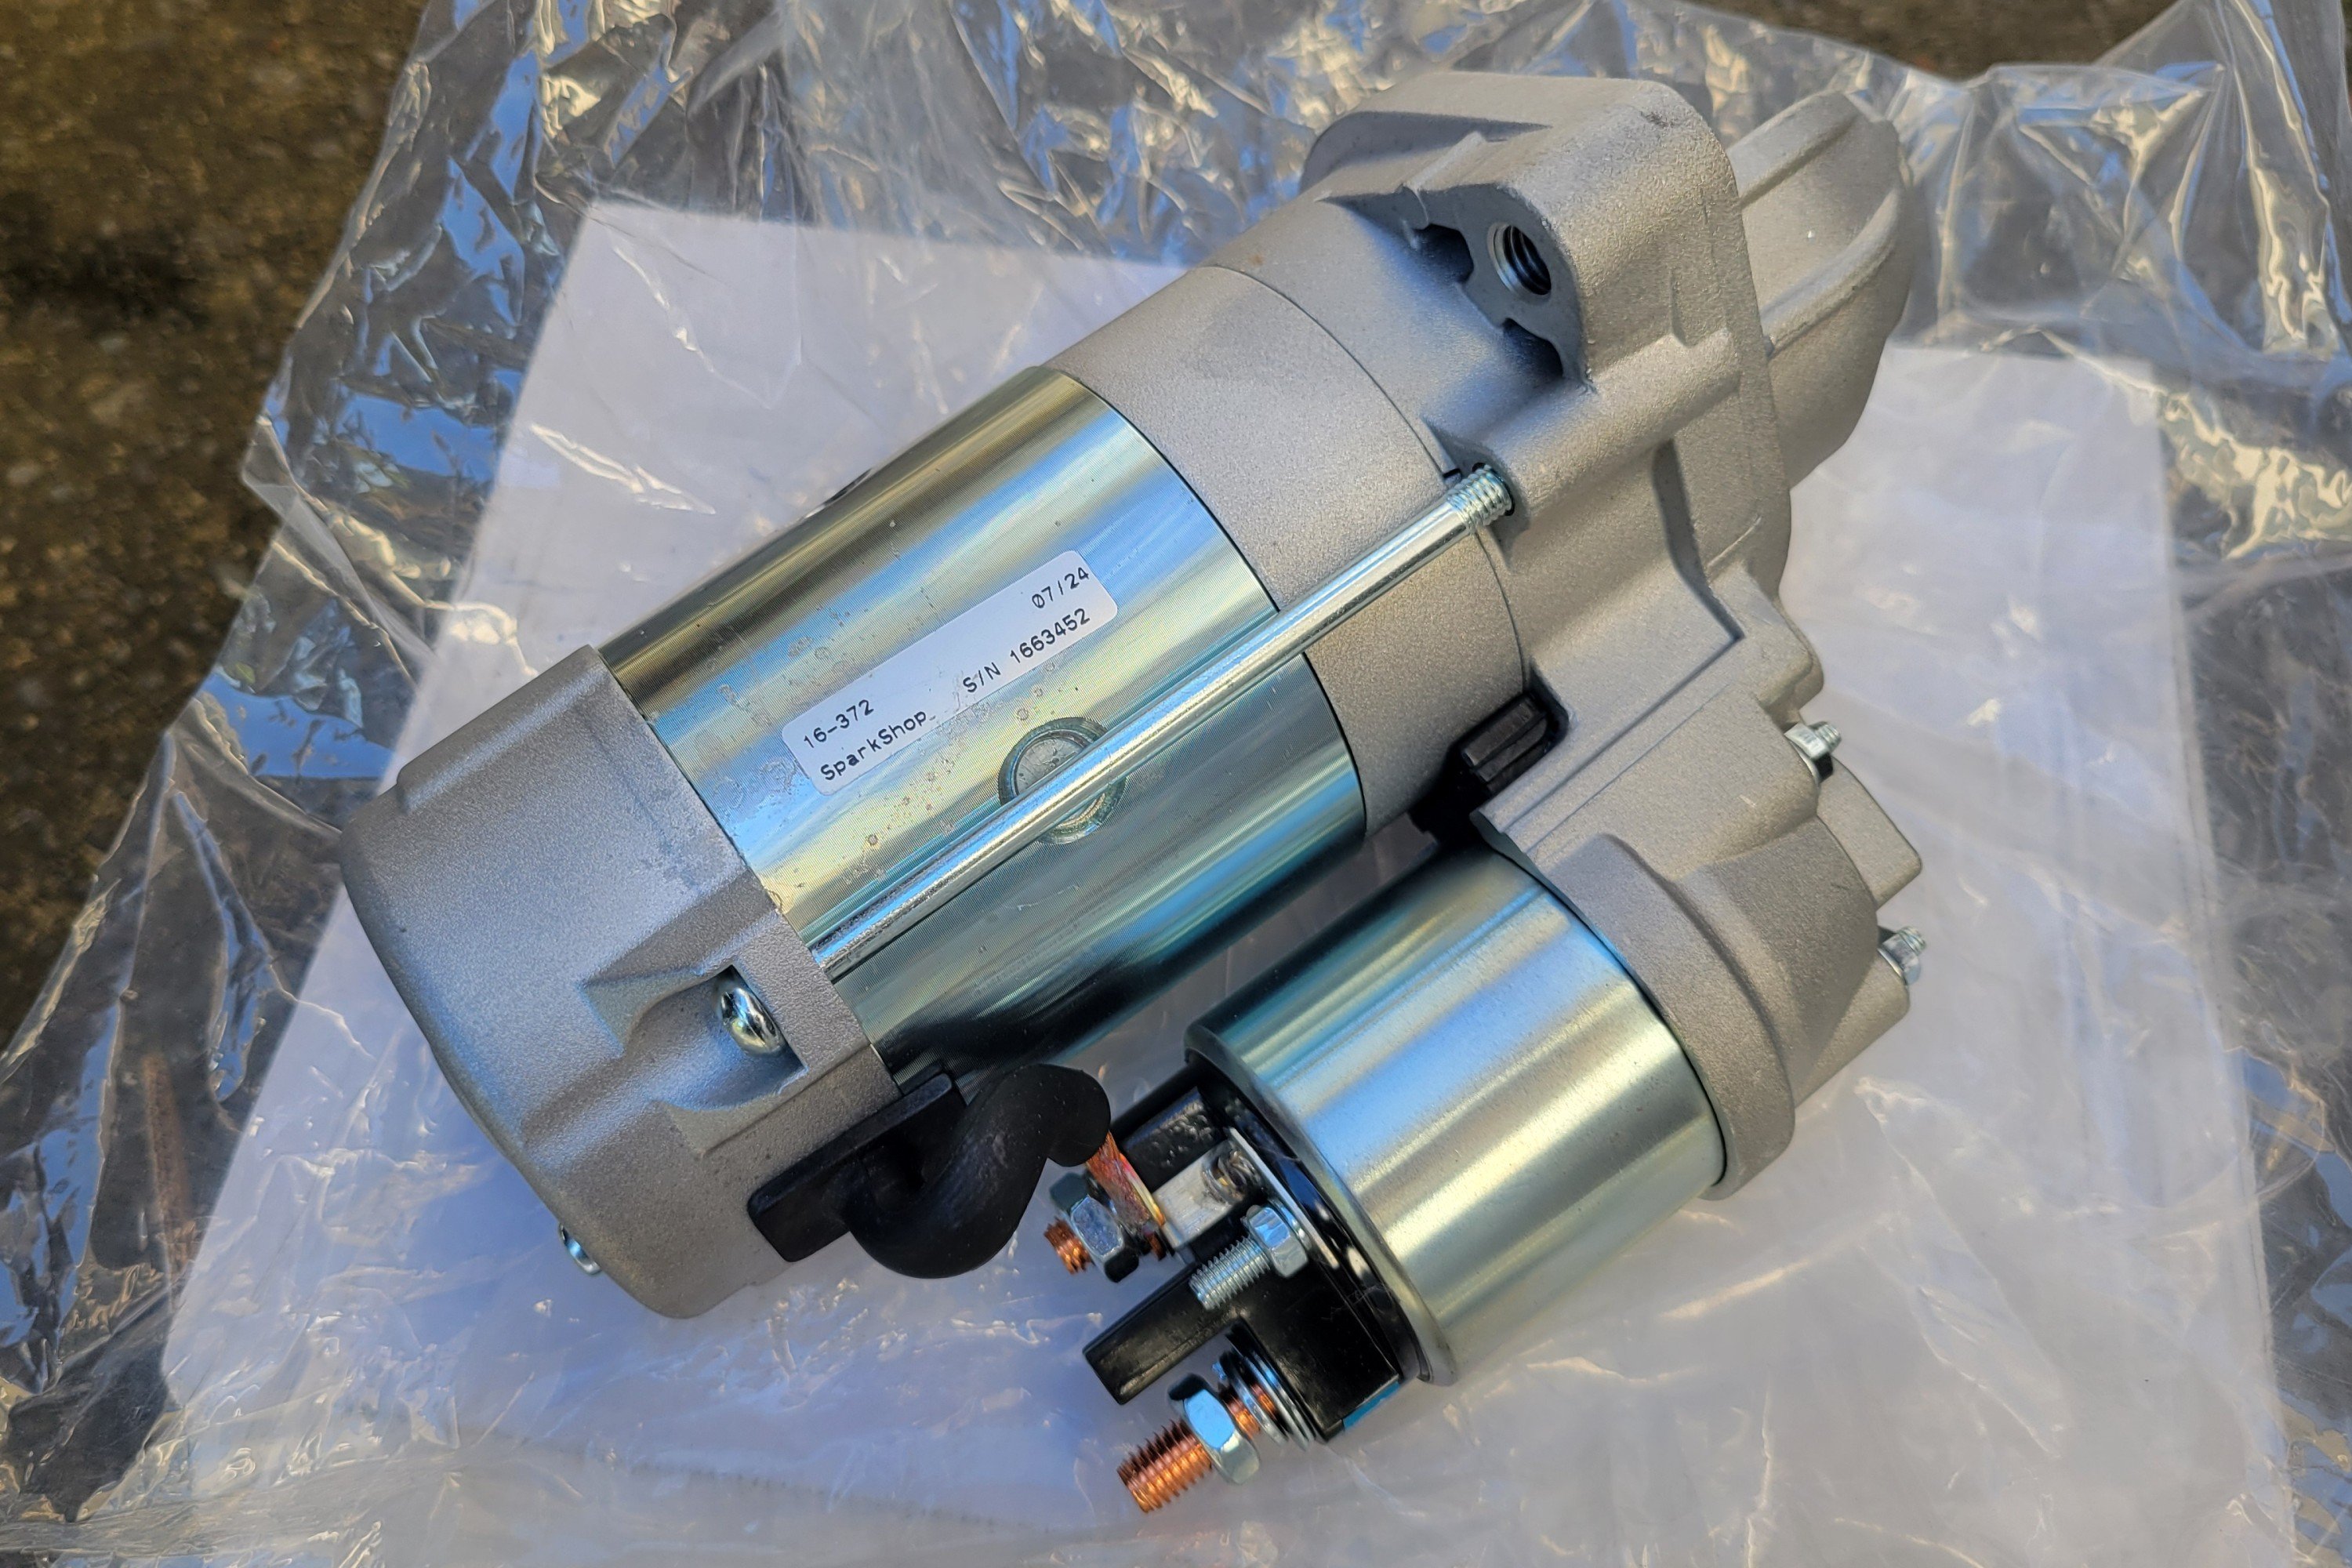
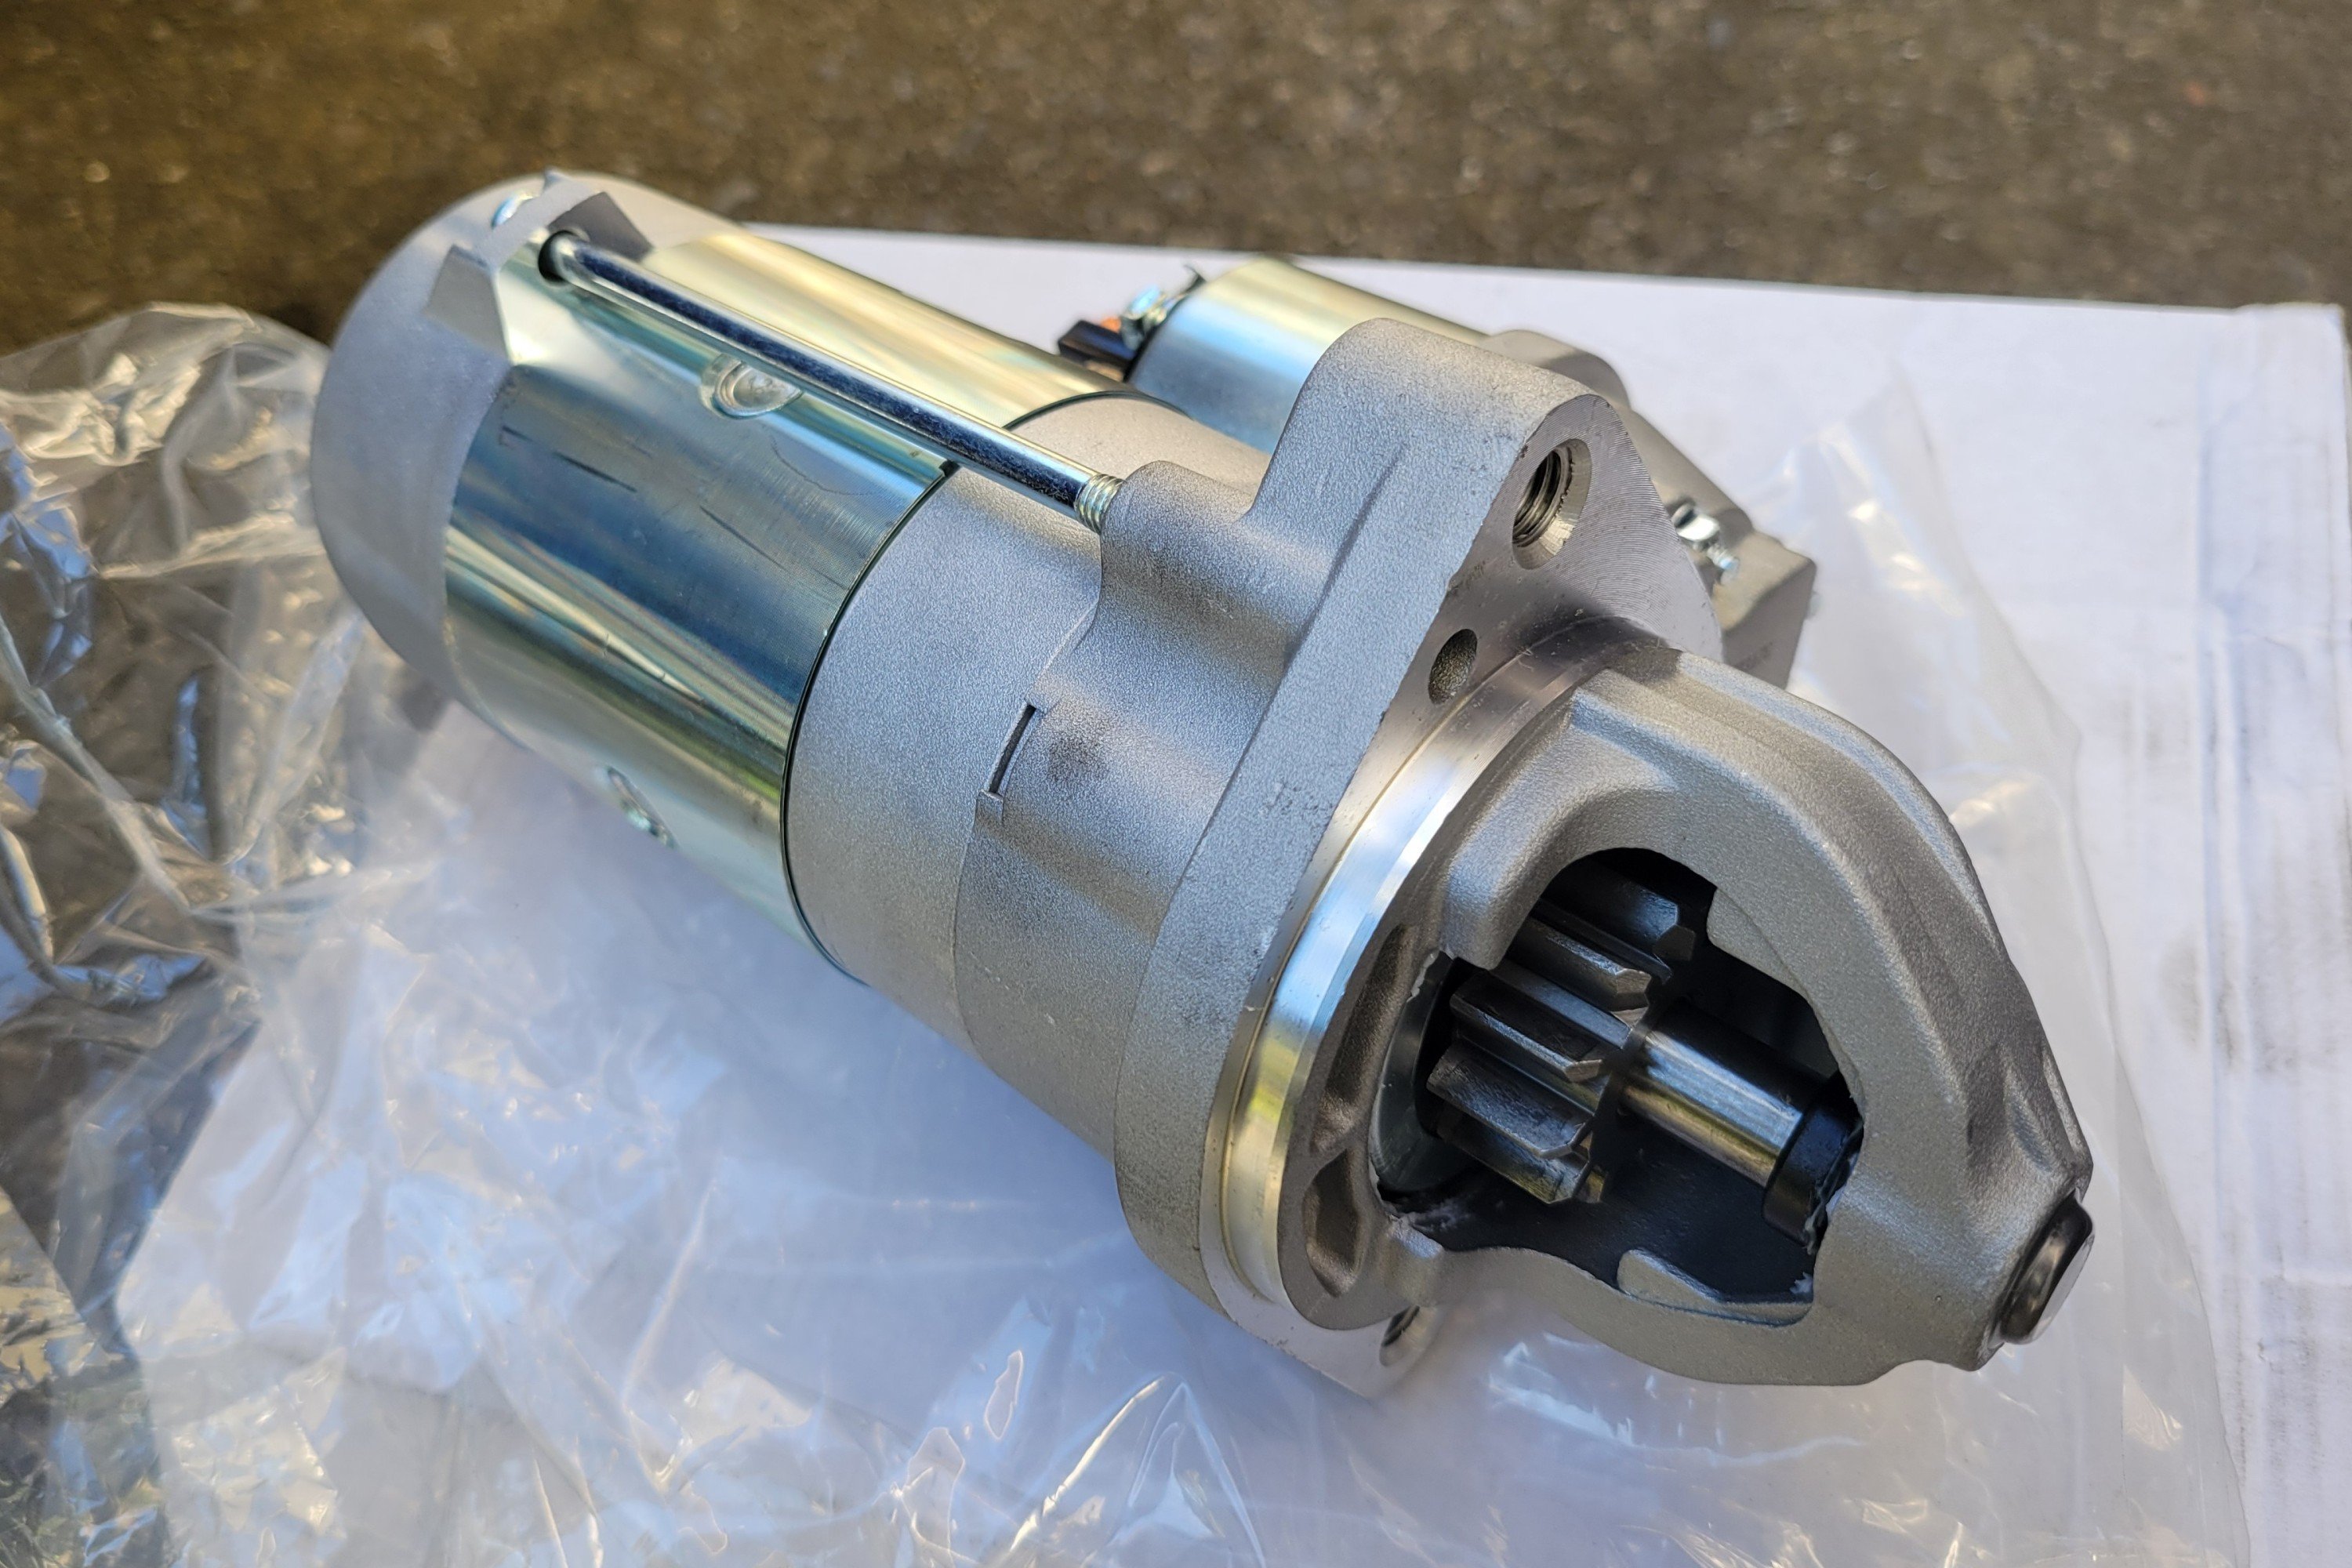
X5 is back up and running but the wallet did take a bit of a hit. Turns out those Denso units are quite uncommon and my mate struggled to find the correct brushes to suit. Had a few options but some weren't tall enough and others were too loose in the casing. Could have continued with the trial and error but was keen to get the thing back up and running ASAP so opted for a new unit instead. Denso units look to be discontinued, I was tossing up a Bosch one off Spareto which would have worked out to $480 shipped and an extra week of waiting but the same mate got me a trade price on a SparkShop unit which worked out slightly cheaper and I got my hands on it the same day. Bit of an unknown of a brand but looks decent quality, comes with a local warranty and a test sheet, plus it's 2.2kW compared to the 2.0kW of the original. Winning. Turns out the car is also sporting a SparkShop alternator, courtesy of the previous owner, and that's working well enough.


Everything went back together quickly and without issues. Loving how easy the intake manifold is to remove and reinstall on these. Started up effortlessly on the first go. Job's a good 'un.
-
2
-
-
9 hours ago, turboray82 said:Don't mint the fact that the grilles are black, it's the wannabe F-series slotted design that's utter cringe.
Ohh I feel you buddy. Doesn't do much to increase its value these days tho.
-
1
-
-
Loving the content James is making since leaving Donut - quirky, weirdly informative, a tad cringe at times but always funny and entertaining. Find myself craving an X3M40i all of a sudden.
-
3
-


Any N42/N46 Experts Out There?
in Projects
Posted · Report reply
Got back to tinkering on this little nugget this past weekend. Since it was still misfiring, I decided to do a compression test to make sure the issue isn't with any of the valves getting jammed. Shockingly, the result was 225-230 PSI on all cylinders.
I was a bit taken aback by such high numbers. I then noticed that I had disconnected the valvetronic motor and the eccentric shaft sensor plugs when removing the coils. Wasn't sure if it'd influence the results I reconnected them and redid the test, this time around getting 175-185 PSI on all cylinders.
That ruled out compression being the issue. I then moved onto the smoke tester to check for vacuum leaks. Having removed the airbox and throttle body to insert the smoke tester adapter, I discovered a major f**kup, which turned out to be the cause of the backfiring - a vacuum hose from the EVAP valve was left dangling loose, unconnected from the intake manifold. It took a fair bit of force for it to clip in properly, not sure if I had missed it completely or hadn't seated it properly when reinstalling the intake. The throttle body and airbox obscure it pretty well so would have been easy to overlook but silly mistake on my part none the less.
I went ahead and did a smoke test anyway, which didn't reveal anything obvious. I then took off the valve cover and rechecked the timing - all perfectly in time still.
Got everything reassembled last night and did a quick test start this morning before running off for work - she now idles buttery smooth. Then took her for a quick test run after work - far from a pleasant driving experience as things stand, but at least she's back up and running!
The tyres are barely holding air, the brakes are garbage, the steering is vague, the shifter sloppy and the AC compressor will likely grenade itself as soon as I press the button but felt a nice sense of achievement clocking up some 10km along some backroads for the first time in years. Will need a fair bit of love to be put back on the road but hopefully this means she's not destined for the scrapyard just yet. Happy days.
It'll definitely need new tyres, and probably the rotors machined at the very least to pass but will book her in for a WoF to see what all she needs to be made roadworthy before throwing any money at it. Hopefully it's nothing major. I'm growing quite fond of this quirky little thing.