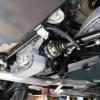
central3 31 Report post Posted August 20, 2011 (edited) Finally brought an M3 and prior to selling the 330i the plan is spend a few months detailing. After stripping all of the underside covers and panels off I was very pleased to find the engine and gearbox looked very good with no signs of any leaks etc. The diff though was covered with oil encrusted dirt. The side seals are definitely weeping but I am not sure if the oil around the input shaft is from the pinion seal or grease from the inpur shaft CV. Anyway I want this thing spot on so I have stripped it out along with all of the front and rear suspension. Apart from the diff seals I plan to replace any bushes etc (although after an initail inspection everything looks good) - paint all components and have all of the bolts/nuts re-galvanised. Toying with replacing the shocks but the car has just turned over 100K km's and feels good so may not. Apart from this all I will do is have the drivers seat base re-upholstered, wrap the interior trim pieces in a graphite CF (if I can find some) and give the car a thorough clay bar, localised cut, buffing compound and polish. Will respray the underside of the front bumper and sills to cover a couple of scrapes and gravel rash. One rim needs some curbing removed so this will be done too. Plan is to keep the car 100% stock at least for the next couple of years. A few photos attached re progress so far (photos of the exhaust are pre clean, post clean up with pickling paste (magic stuff) and polishing). Edited August 20, 2011 by central3 Quote Share this post Link to post Share on other sites
Michael. 2312 Report post Posted August 20, 2011 I commend this sort of maintenance. Especially polishing up the factory exhaust! Fantastic! Quote Share this post Link to post Share on other sites
CamB 48 Report post Posted August 20, 2011 Its worth checking the shocks - at 110k km my front ones were knackered (on bump). You could feel it on turn in - the front would slightly bob and take two goes at the corner. Quote Share this post Link to post Share on other sites
Greg111 13 Report post Posted August 20, 2011 Exhaust came up great! Diff doesn't look too bad? May as well take the back off it and check it's inids. Quote Share this post Link to post Share on other sites
central3 31 Report post Posted August 21, 2011 Exhaust came up great! Diff doesn't look too bad? May as well take the back off it and check it's inids. A close up photo shows the diff issue better - the output shafts have quite a bit of radial play in them - I have read that this is how they are but makes me wonder how any oil seal would cope Cleaned up and checked for the dreaded sub frame mounting cracks today - no problems Quote Share this post Link to post Share on other sites
thorburn 120 Report post Posted August 21, 2011 That's really tidy under there. Are you going to be reinforcing the subframe while your in there? the turners ones seem easy to replicate Keep up the great work Quote Share this post Link to post Share on other sites
central3 31 Report post Posted August 22, 2011 That's really tidy under there. Are you going to be reinforcing the subframe while your in there? the turners ones seem easy to replicate Keep up the great work No I won't be doing any reinforcing. After reading up on it I understand the majority of the vehicles at fault (a small percentage of the 45,000+ cars built) generally had SMG (and drivers who liked the lauch control) and/or modified suspension and/or some competion use. Mine looks mint and probably doesn't match most of this criteria. Quote Share this post Link to post Share on other sites
deshanv 0 Report post Posted August 31, 2011 No I won't be doing any reinforcing. After reading up on it I understand the majority of the vehicles at fault (a small percentage of the 45,000+ cars built) generally had SMG (and drivers who liked the lauch control) and/or modified suspension and/or some competion use. Mine looks mint and probably doesn't match most of this criteria. Hi mate. Great car. Just purchased my e46 m3 last week as well. Stunning car. I am going to keep it stock as well. I wanted to ask you a question on how I can get rid of all the swirl marks and minor fine scratches on the car please. Cheers Quote Share this post Link to post Share on other sites
central3 31 Report post Posted August 31, 2011 Hi mate. Great car. Just purchased my e46 m3 last week as well. Stunning car. I am going to keep it stock as well. I wanted to ask you a question on how I can get rid of all the swirl marks and minor fine scratches on the car please. Cheers There is lots of stuf on the net about this but in short wash the car, wipe down with turps to get rid of any road tar, wash again, clay bar the car to get rid of any ingrained grit in the paint, use a fine cutting cream on any scratchs (I use a 75mm pad on a pistol drill - slowish speed) but don't over do it, machine glaze the whole car (proffesional polishing machine, black pad and 3M (or similar) glaze needed) and polish. Mask off all rubbers and mouldings as the glaze gets every where. quite a lot of work but something you will only do every 3 or so years Quote Share this post Link to post Share on other sites
deshanv 0 Report post Posted August 31, 2011 There is lots of stuf on the net about this but in short wash the car, wipe down with turps to get rid of any road tar, wash again, clay bar the car to get rid of any ingrained grit in the paint, use a fine cutting cream on any scratchs (I use a 75mm pad on a pistol drill - slowish speed) but don't over do it, machine glaze the whole car (proffesional polishing machine, black pad and 3M (or similar) glaze needed) and polish. Mask off all rubbers and mouldings as the glaze gets every where. quite a lot of work but something you will only do every 3 or so years Thanks for this, enjoy your car mate. Quote Share this post Link to post Share on other sites
hybrid 1039 Report post Posted August 31, 2011 good stuff nice to see youre going all out on this thing. You should enter it in concorse haha Quote Share this post Link to post Share on other sites
swordfish 30 Report post Posted September 1, 2011 Great work!!! Here is the thread that you have just reminded me off. But this one goes way beyond than anyone can ever imagine... http://www.bmwfaq.com/f157/restauracion-m3...acabado-442043/ I know it is not in English, but looking through all the photos you can easily get and idea Quote Share this post Link to post Share on other sites
M3_Power 636 Report post Posted September 1, 2011 (edited) No I won't be doing any reinforcing. After reading up on it I understand the majority of the vehicles at fault (a small percentage of the 45,000+ cars built) generally had SMG (and drivers who liked the lauch control) and/or modified suspension and/or some competion use. Mine looks mint and probably doesn't match most of this criteria. Not entirely true - the pre 2003 cars also have a slightly weaker floor design - BMW changed the floor design during 2003. The cracks are mostly due to abusive use and a lot of them to do with SMG not calibrated regularly (or run on s5 24/7) but also a lot of it down to lack of maintenance with the rear bushings. I don't recommend the Turners reinforcement plate personally, but I do recommend the official BMW fix - with the structural foam. I've seen the Turner plates fail and future rust issues that have caused the whole floor to come apart from the unibody - it is very ugly when it does. Epoxying the plates is also pointless. I recently had the structural foam injected into the CSL as a future preventative measure as I don't have any fractures in my car either (but that's keeping on top of maintenance and bushings). When the floor does fail and BMW weld in a new floor (it's a huge job, I've seen it personally), the structural foam is also used to further reinforce the floor. After seeing a couple of cars with this issue and seeing the foam procedure I'd highly recommend that you have this done regardless of whether you have a cracked floor. The product is made by Henkel and was used on formula atlantic single seater suspension mounting repairs and a couple of other 'race car' applications. The foam actually has a dampening characteristics as the epoxy isn't actually a rock hard material but with a very slight give (it also doesn't expand contrary to popular belief). What it does is it fills the void within the rear subframe floor (between the bottom and top layer) unifying the rear structure to provide reinforced torsional rigidity in what is otherwise a very poorly designed rear floor mounting support. The foam kit isn't expensive either and you only have to reinforce the rear left - or if you like both the left and right like I have. It only requires drilling of one 10mm hole in the rear top floor for the expansion foam part (there are two foam parts to this repair) - and this is subsequently blocked off with a factory plug returning the car back to a factory look - the foam is then injected into the primary layer of the bottom floor through a pre-existing hole already in the unibody. The first crack always appears in the rear left, then front right (looking from the rear) - consistent with torque load towards the rear - so SMG or not it will happen to all cars, eventually (if you've seen the floor in person like I have you'll understand straight away why they fail in such drastic fashion) If you want to know more, feel free to PM or email me. p.s. great work by the way!!! Loving the tidy up you are doing to this car!! p.s.s Also I don't agree with the modified suspension contributes to the floor cracking myth - FYI the harder the setup the less likely the floor will come apart - just look at the number of CSLs vs the number of stock M3s that have cracked floors - there have been very few CSLs with cracked floors (and they are all SMG) and any that have had cracks had either heavy race use (with solid subframe bushes) or have been seriously abused and used for drifting with little to no maintenance (I know of one race CSL with a weld in cage which did not tie into the rear subframe mounts without any cracked mounting and this car was used for two full season of racing running stock standard rear subframe mounts but very heavily sprung and solid rear trailing arm bushings). It's a torque induced failure, so theoretically speaking the less twisting action you've got back there the less likely it will happen - in fact there's actually a high percentage of failures on completely stock standard cars vs modified ones. Edited September 1, 2011 by M3_Power Quote Share this post Link to post Share on other sites
central3 31 Report post Posted September 1, 2011 Great work!!! Here is the thread that you have just reminded me off. But this one goes way beyond than anyone can ever imagine... http://www.bmwfaq.com/f157/restauracion-m3...acabado-442043/ I know it is not in English, but looking through all the photos you can easily get and idea Crikey - and I thought I had caught the obsessive compulsive disease - thanks for this - can use it on my (non understanding) wife Quote Share this post Link to post Share on other sites
Braeden320 0 Report post Posted September 1, 2011 Great work!!! Here is the thread that you have just reminded me off. But this one goes way beyond than anyone can ever imagine... http://www.bmwfaq.com/f157/restauracion-m3...acabado-442043/ I know it is not in English, but looking through all the photos you can easily get and idea Use Google Chrome, It will translate the whole page for you in seconds Quote Share this post Link to post Share on other sites
Sam@TMBMW 0 Report post Posted September 1, 2011 There is lots of stuf on the net about this but in short wash the car, wipe down with turps to get rid of any road tar, wash again, clay bar the car to get rid of any ingrained grit in the paint, use a fine cutting cream on any scratchs (I use a 75mm pad on a pistol drill - slowish speed) but don't over do it, machine glaze the whole car (proffesional polishing machine, black pad and 3M (or similar) glaze needed) and polish. Mask off all rubbers and mouldings as the glaze gets every where. quite a lot of work but something you will only do every 3 or so years Just to add to this, makes sure it's at least a 1000 glaze! Quote Share this post Link to post Share on other sites
central3 31 Report post Posted September 4, 2011 (edited) Progress - rear control arm bushes were US so removed - painted all suspension parts in black enamal - polished front control arms - painted underbody plastic - painted underside of front bumperand sills - painted brake calipers in body colour- wrapped some interior trim in silver CF vinyl (thought I was getting a gray colour - not sure about the silver) Edited September 4, 2011 by central3 Quote Share this post Link to post Share on other sites
Guest Ari Gold Report post Posted September 4, 2011 Wow I'm pretty impressed with the wrapped parts! Did you wrap them yourself? Quote Share this post Link to post Share on other sites
rjac001 0 Report post Posted September 4, 2011 Legend! can you do my car too.... Quote Share this post Link to post Share on other sites
central3 31 Report post Posted September 4, 2011 Wow I'm pretty impressed with the wrapped parts! Did you wrap them yourself? Yes - cocked the first couple of pieces up with either too much or not enough heat - knowing my luck I reckon I will have it perfected on the last part Quote Share this post Link to post Share on other sites
Michael. 2312 Report post Posted September 4, 2011 Fantastic!! Quote Share this post Link to post Share on other sites
hybrid 1039 Report post Posted September 6, 2011 DIYP badge for you! Quote Share this post Link to post Share on other sites
central3 31 Report post Posted September 18, 2011 Progress - under body hardware back from electroplater ($90 for the galvanising + brake calliper clip chroming + strut brace polishing). Interior finished apart from the drivers seat which is still at the upholsterer getting the base recovered - only interior mod is the silver carbon fibre wrapped trim. Under bonnet finished - only mod is the polished strut brace. Still waiting for a diff seal so buffed and polished the bodywork - came up well. Front suspension mostly assembled - not a very good photo but under guard area has been based and clear coated in body colour. Quote Share this post Link to post Share on other sites
central3 31 Report post Posted September 25, 2011 Slow progress. Seat back from being reupholstered , it ended up being expensive but the work is spot on. Front end assembled . Diff back from having the seals replaced and after painting. Quote Share this post Link to post Share on other sites
Smac01 12 Report post Posted September 25, 2011 Those seats look amazing! Can I ask who did the work? (feel free to PM the answer) Quote Share this post Link to post Share on other sites