
Vass
-
Content Count
837 -
Joined
-
Last visited
-
Days Won
75
Posts posted by Vass
-
-
I've found vin decoders unreliable when it comes to gearbox type, often see factory manuals claiming to be autos. Looking at the few photos, I dare say it is a factory manual. Usually, a dead giveaway is the lower right part of the cluster where the auto gear monitor usually resides, on this one it's blocked out as it is on manuals. On most conversions this is a minor detail that gets overlooked as it's purely cosmetic. Another quick giveaway would be any dodgy looking wiring going to the fuse/ECU box under the hood, or remnants of any blue plugs in the box from the EGS/transmission module.
-
1 hour ago, Eagle said:Going to be using your spare exhaust system for mods ? Not sure secondary cats would be worth that much unless prices have gone a lot in recent times?. I scrapped a set of primary M54B30 in late 2020 for around $170-180 iirc.
Those power claims do seem very bold. Personally don't think its worth spending that kind of money on a tune unless you have done other mods. They don't dyno either, so id want to do a before and after which would add more cost.
Not sure, might just sell the second one and mod the main one? Got offered $350 for the full set of cats - manifold + secondary so yeah sorry, got my wires tangled up, your numbers are closer to the truth for just the secondaries.

Hmm...
-
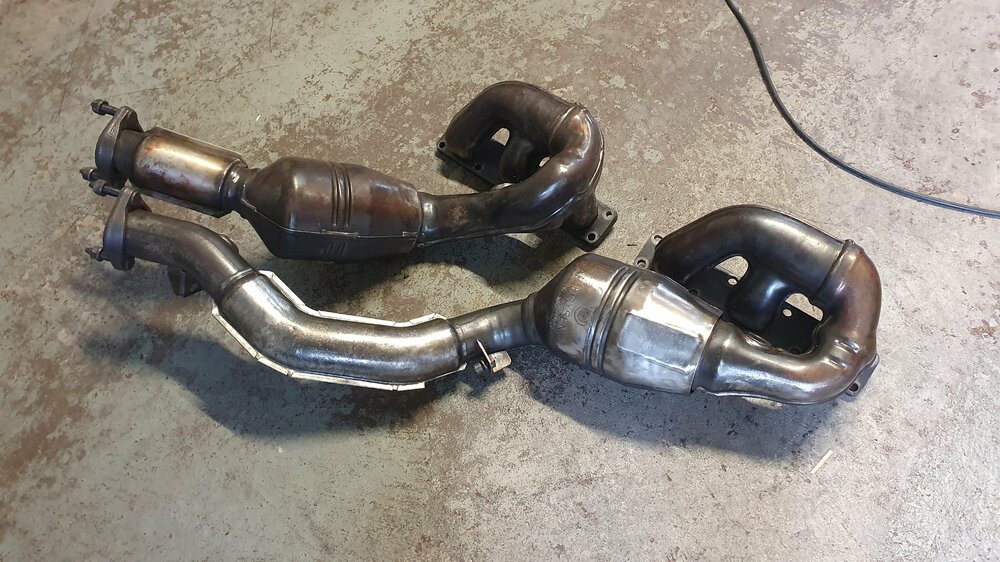
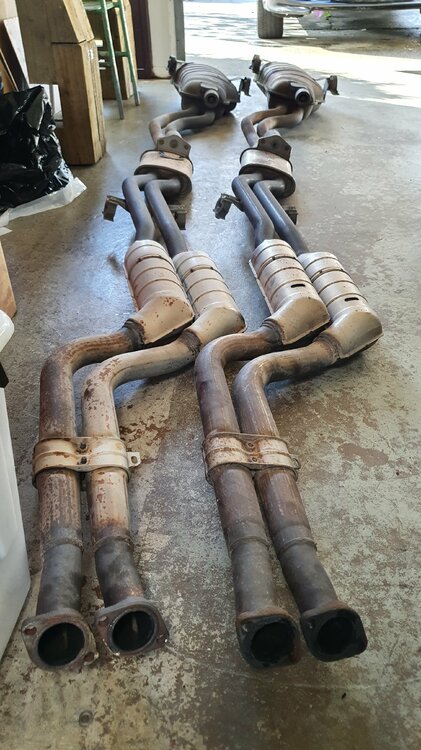
Popped by Uniweld to ask for advice on what I could do with the exhaust system and to gauge what sort of money to budget for. Replacing the secondary cats with resonators as recommended by @wrs would run $400 a side so $800 all up. Could then sell the cats and recoup maybe $200-300 which isn't too bad. Something to look into later on.
He also put me onto Autopassion to see if they offer any ready made exhaust options for the E46. They don't but whilst I was at it, asked them about the chip tuning service they offer and claimed they have a tune for the 330i that increases power from 231hp to 262hp and torque from 300Nm to 345Nm at a cost of $895. Does that seem legit? Haven't really looked into chip tuning before so not sure if there are any downsides to it?
-
On 1/4/2023 at 11:02 AM, Eagle said:Id be very surprised if this isn't the best mechanically sound non M E46 in the country (once fully completed)
Honestly I just hope it fires up, getting increasingly more nervous the closer it gets to the time to turn the key
")
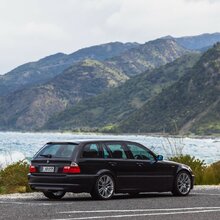
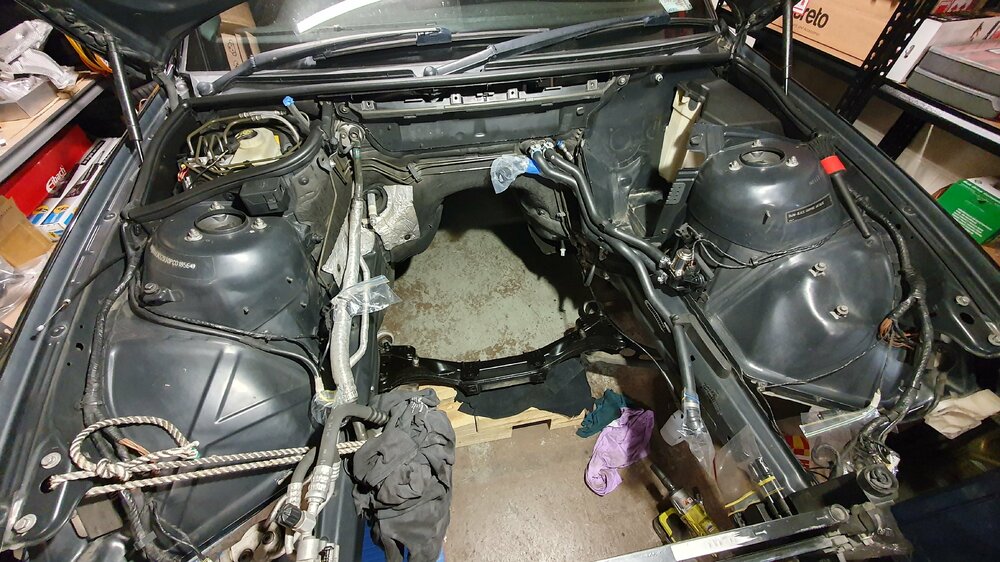
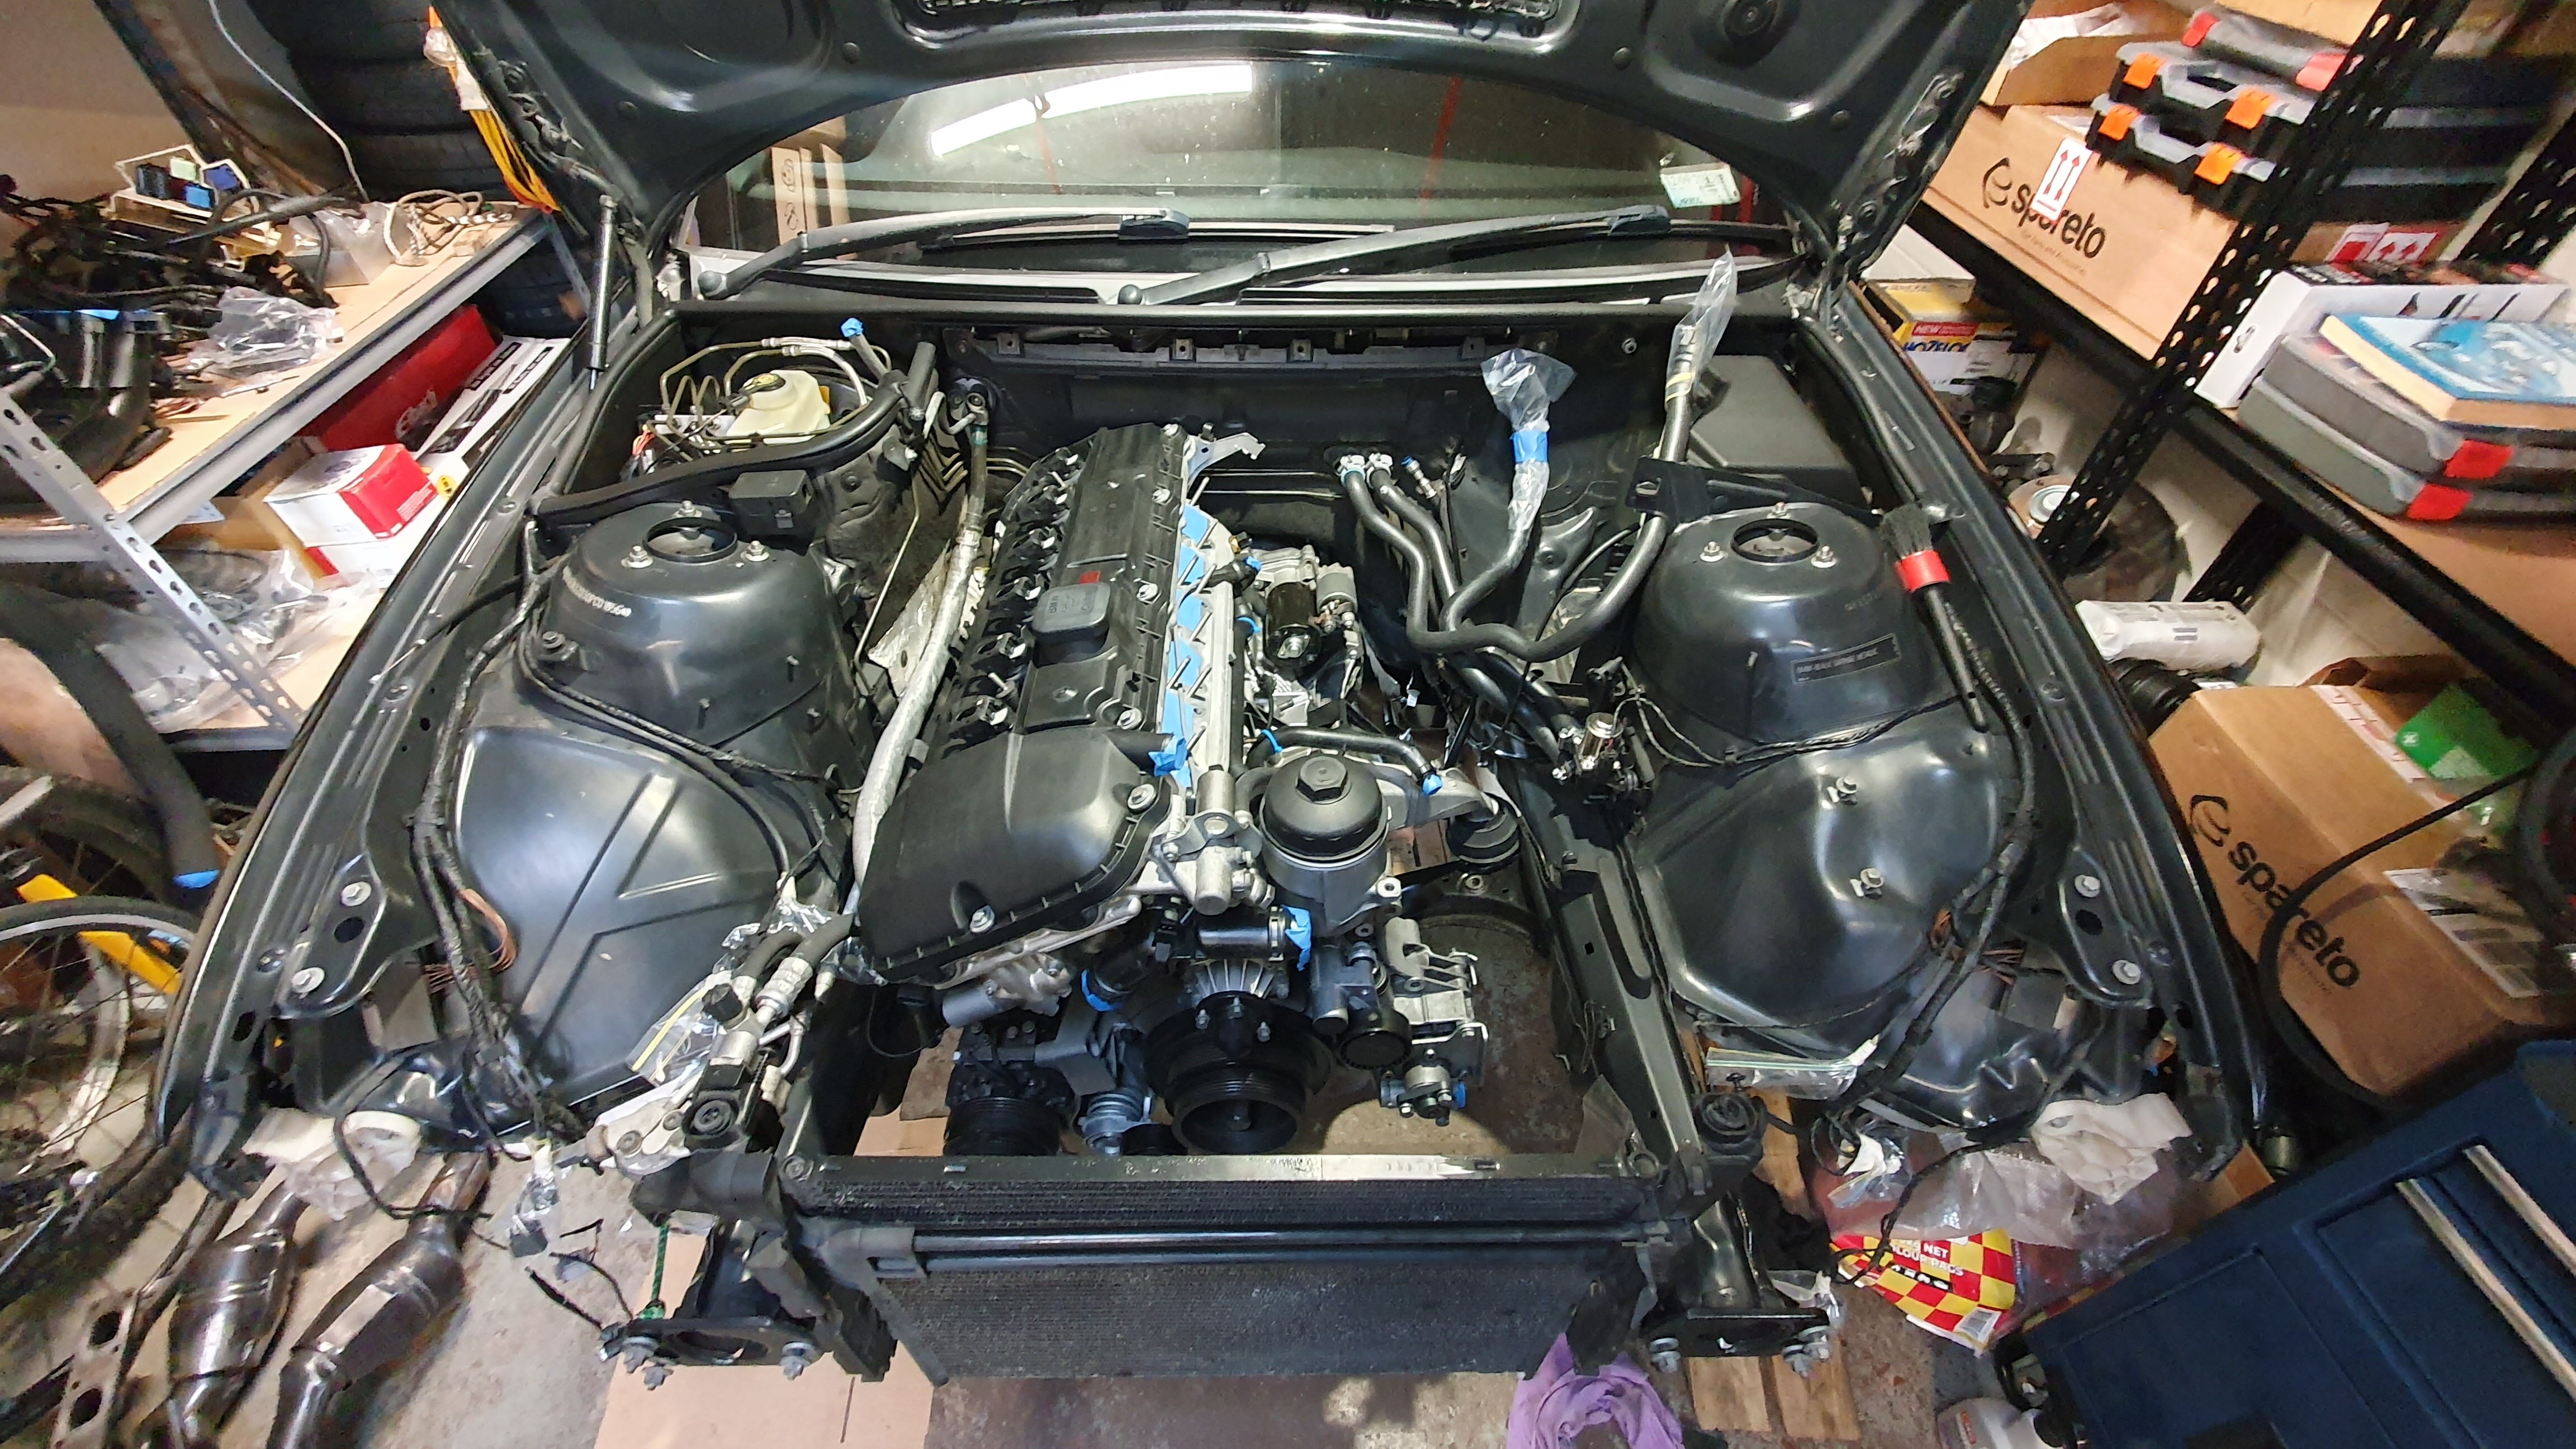
Got the front end back together, great to have it back looking like an actual car again.

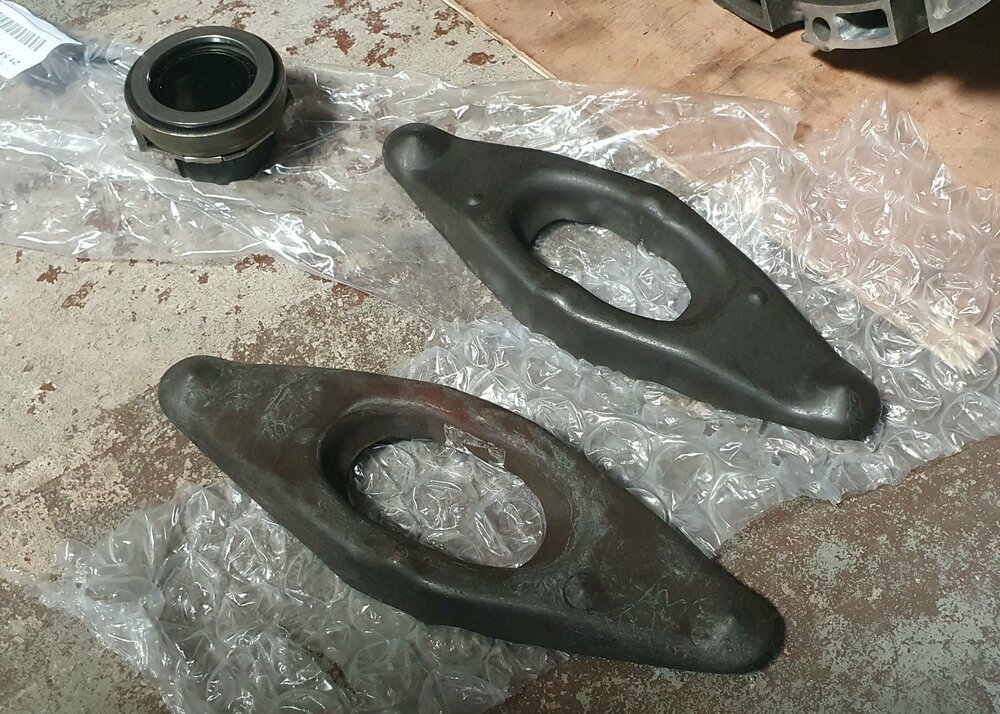
Reattached the sway bar with new bushings and slipped in the strut tower reinforcement plates, will leave the rest of the suspension untouched for now.
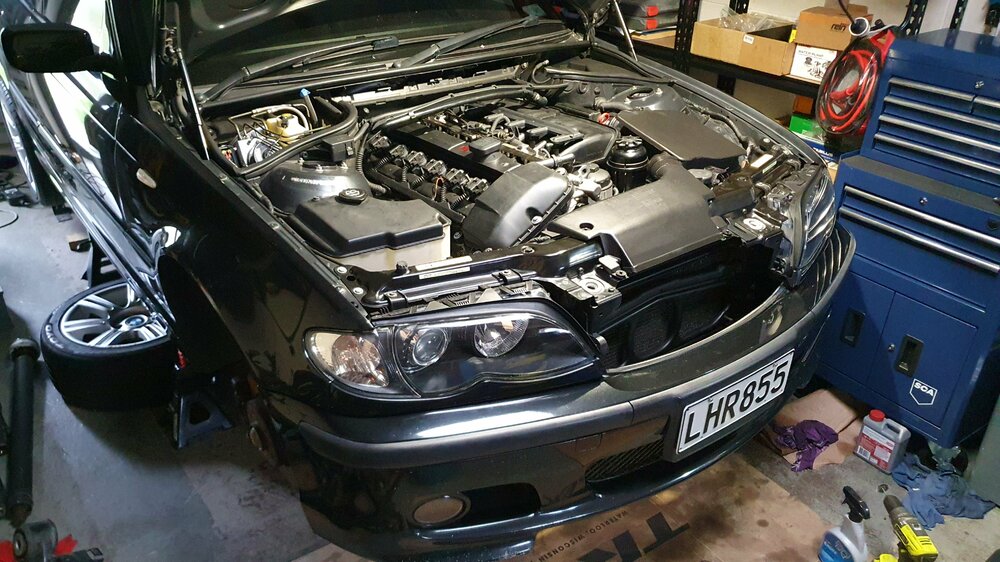
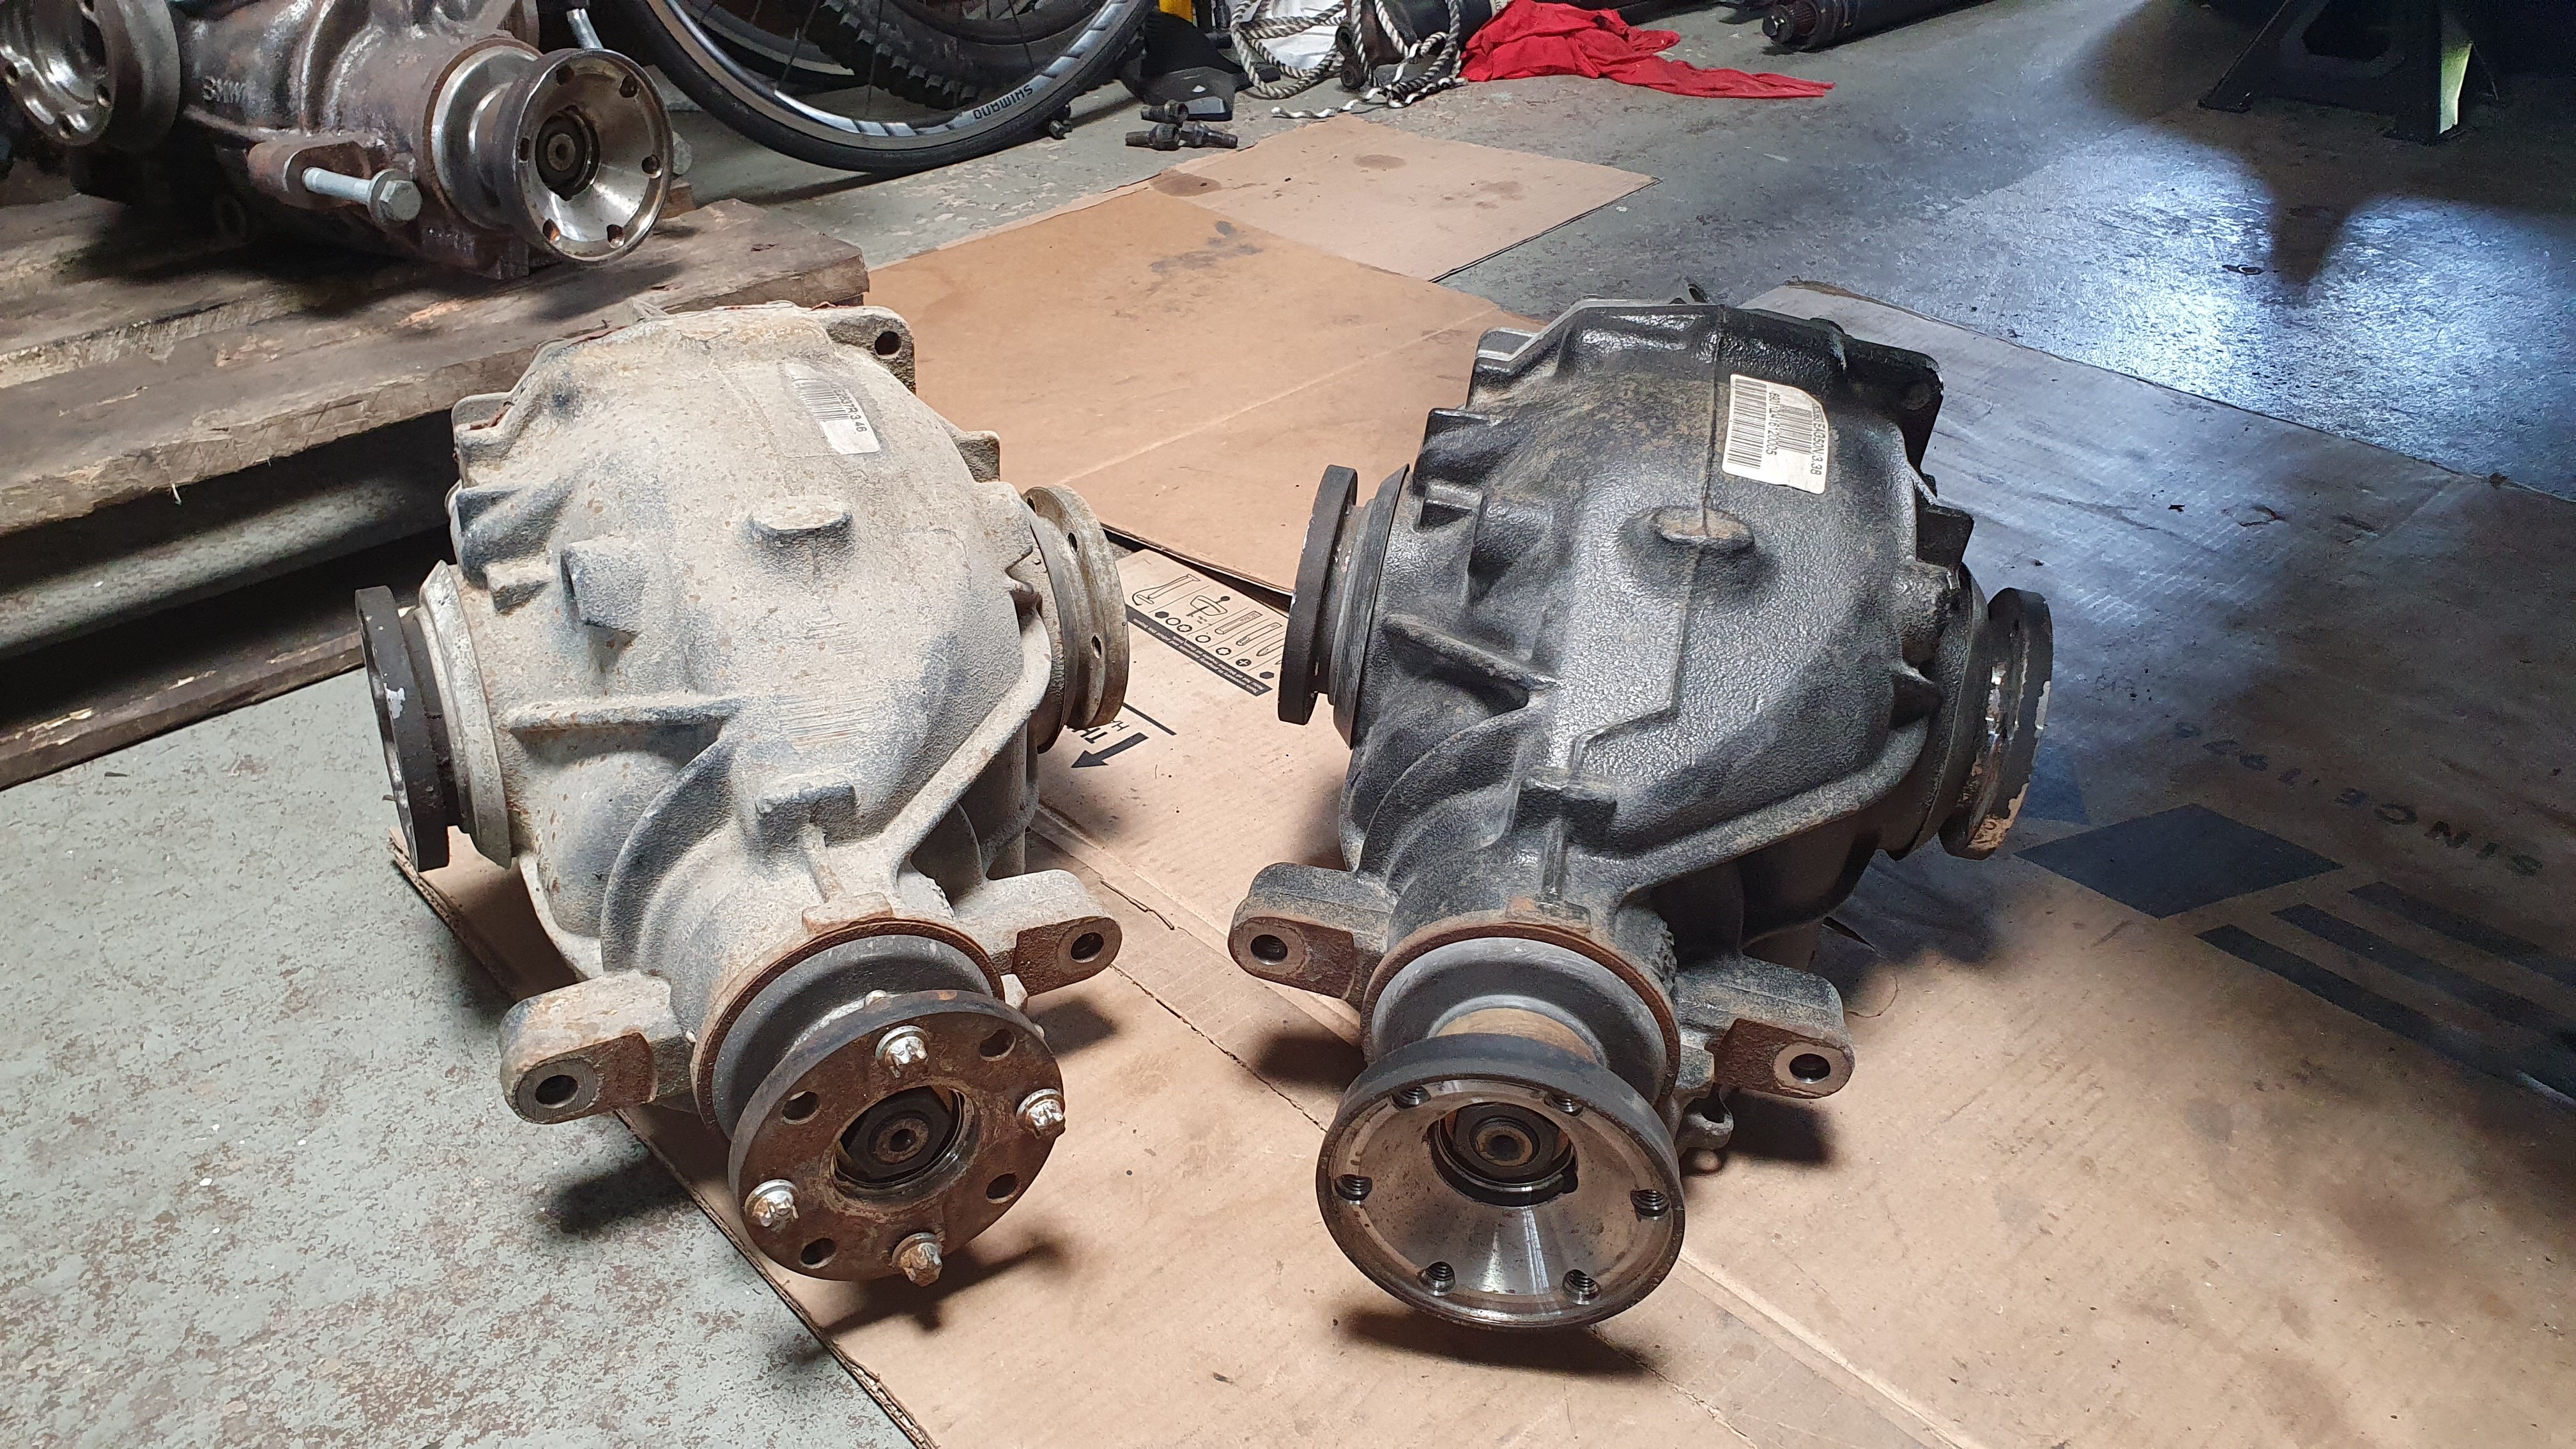
Got onto swapping out the diff. Decided to put in the auto 330 diff (3.38) from the donor car for now rather than messing about swapping over the input flanges on the 325 auto diff (3.46). Want to give the manual 2.93 diff a fresh lick of paint and new fluids before putting it in for good with the rest of the refurbished subframe later down the track so left it out for now. Good chance to try out the different ratios as well. Was a bit of a mission wrestling it in and out but got there in the end.

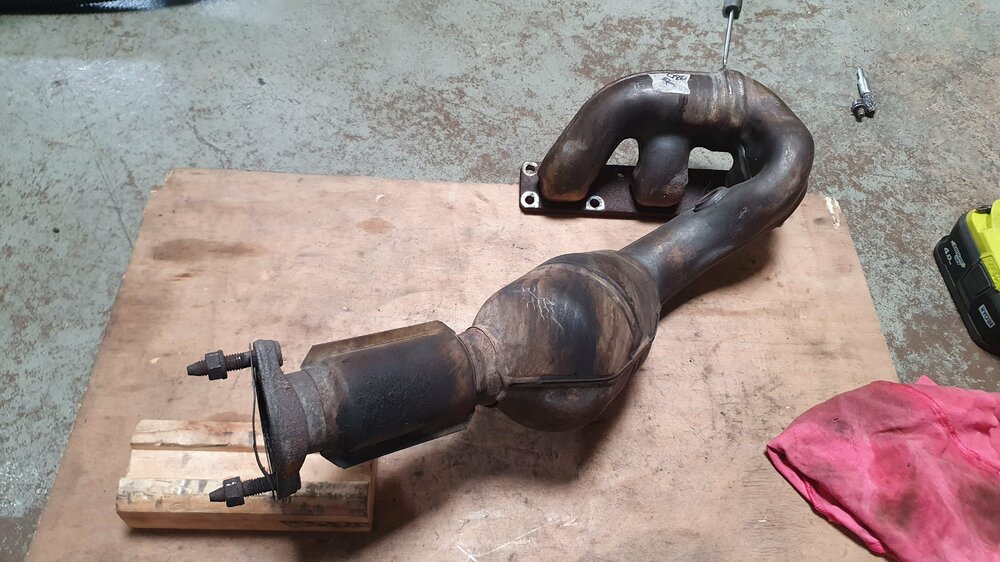
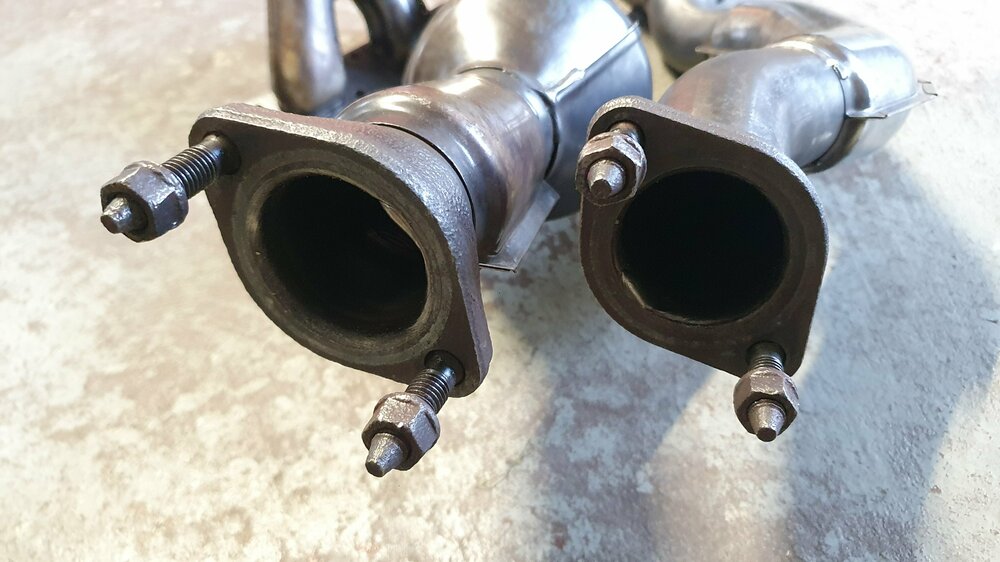
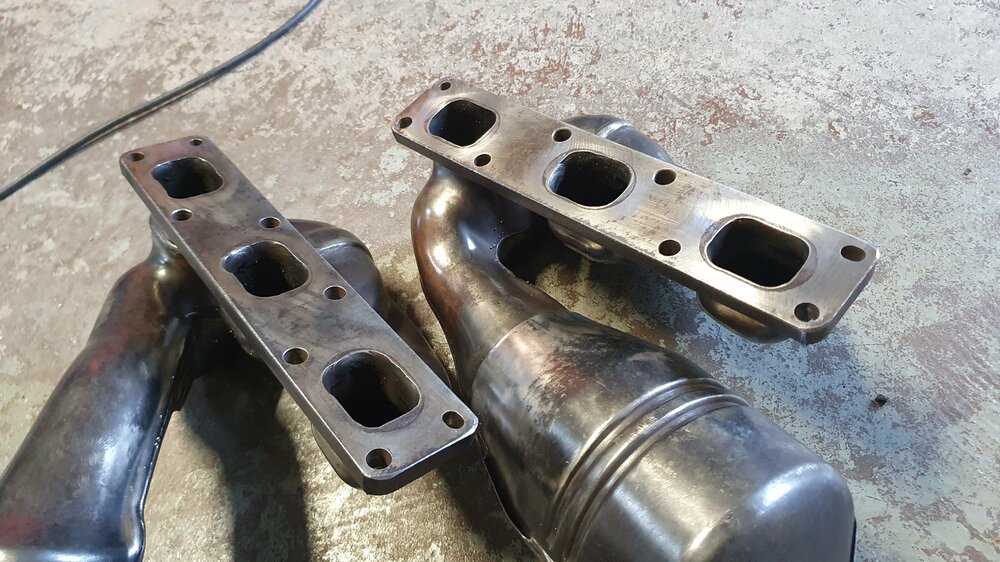
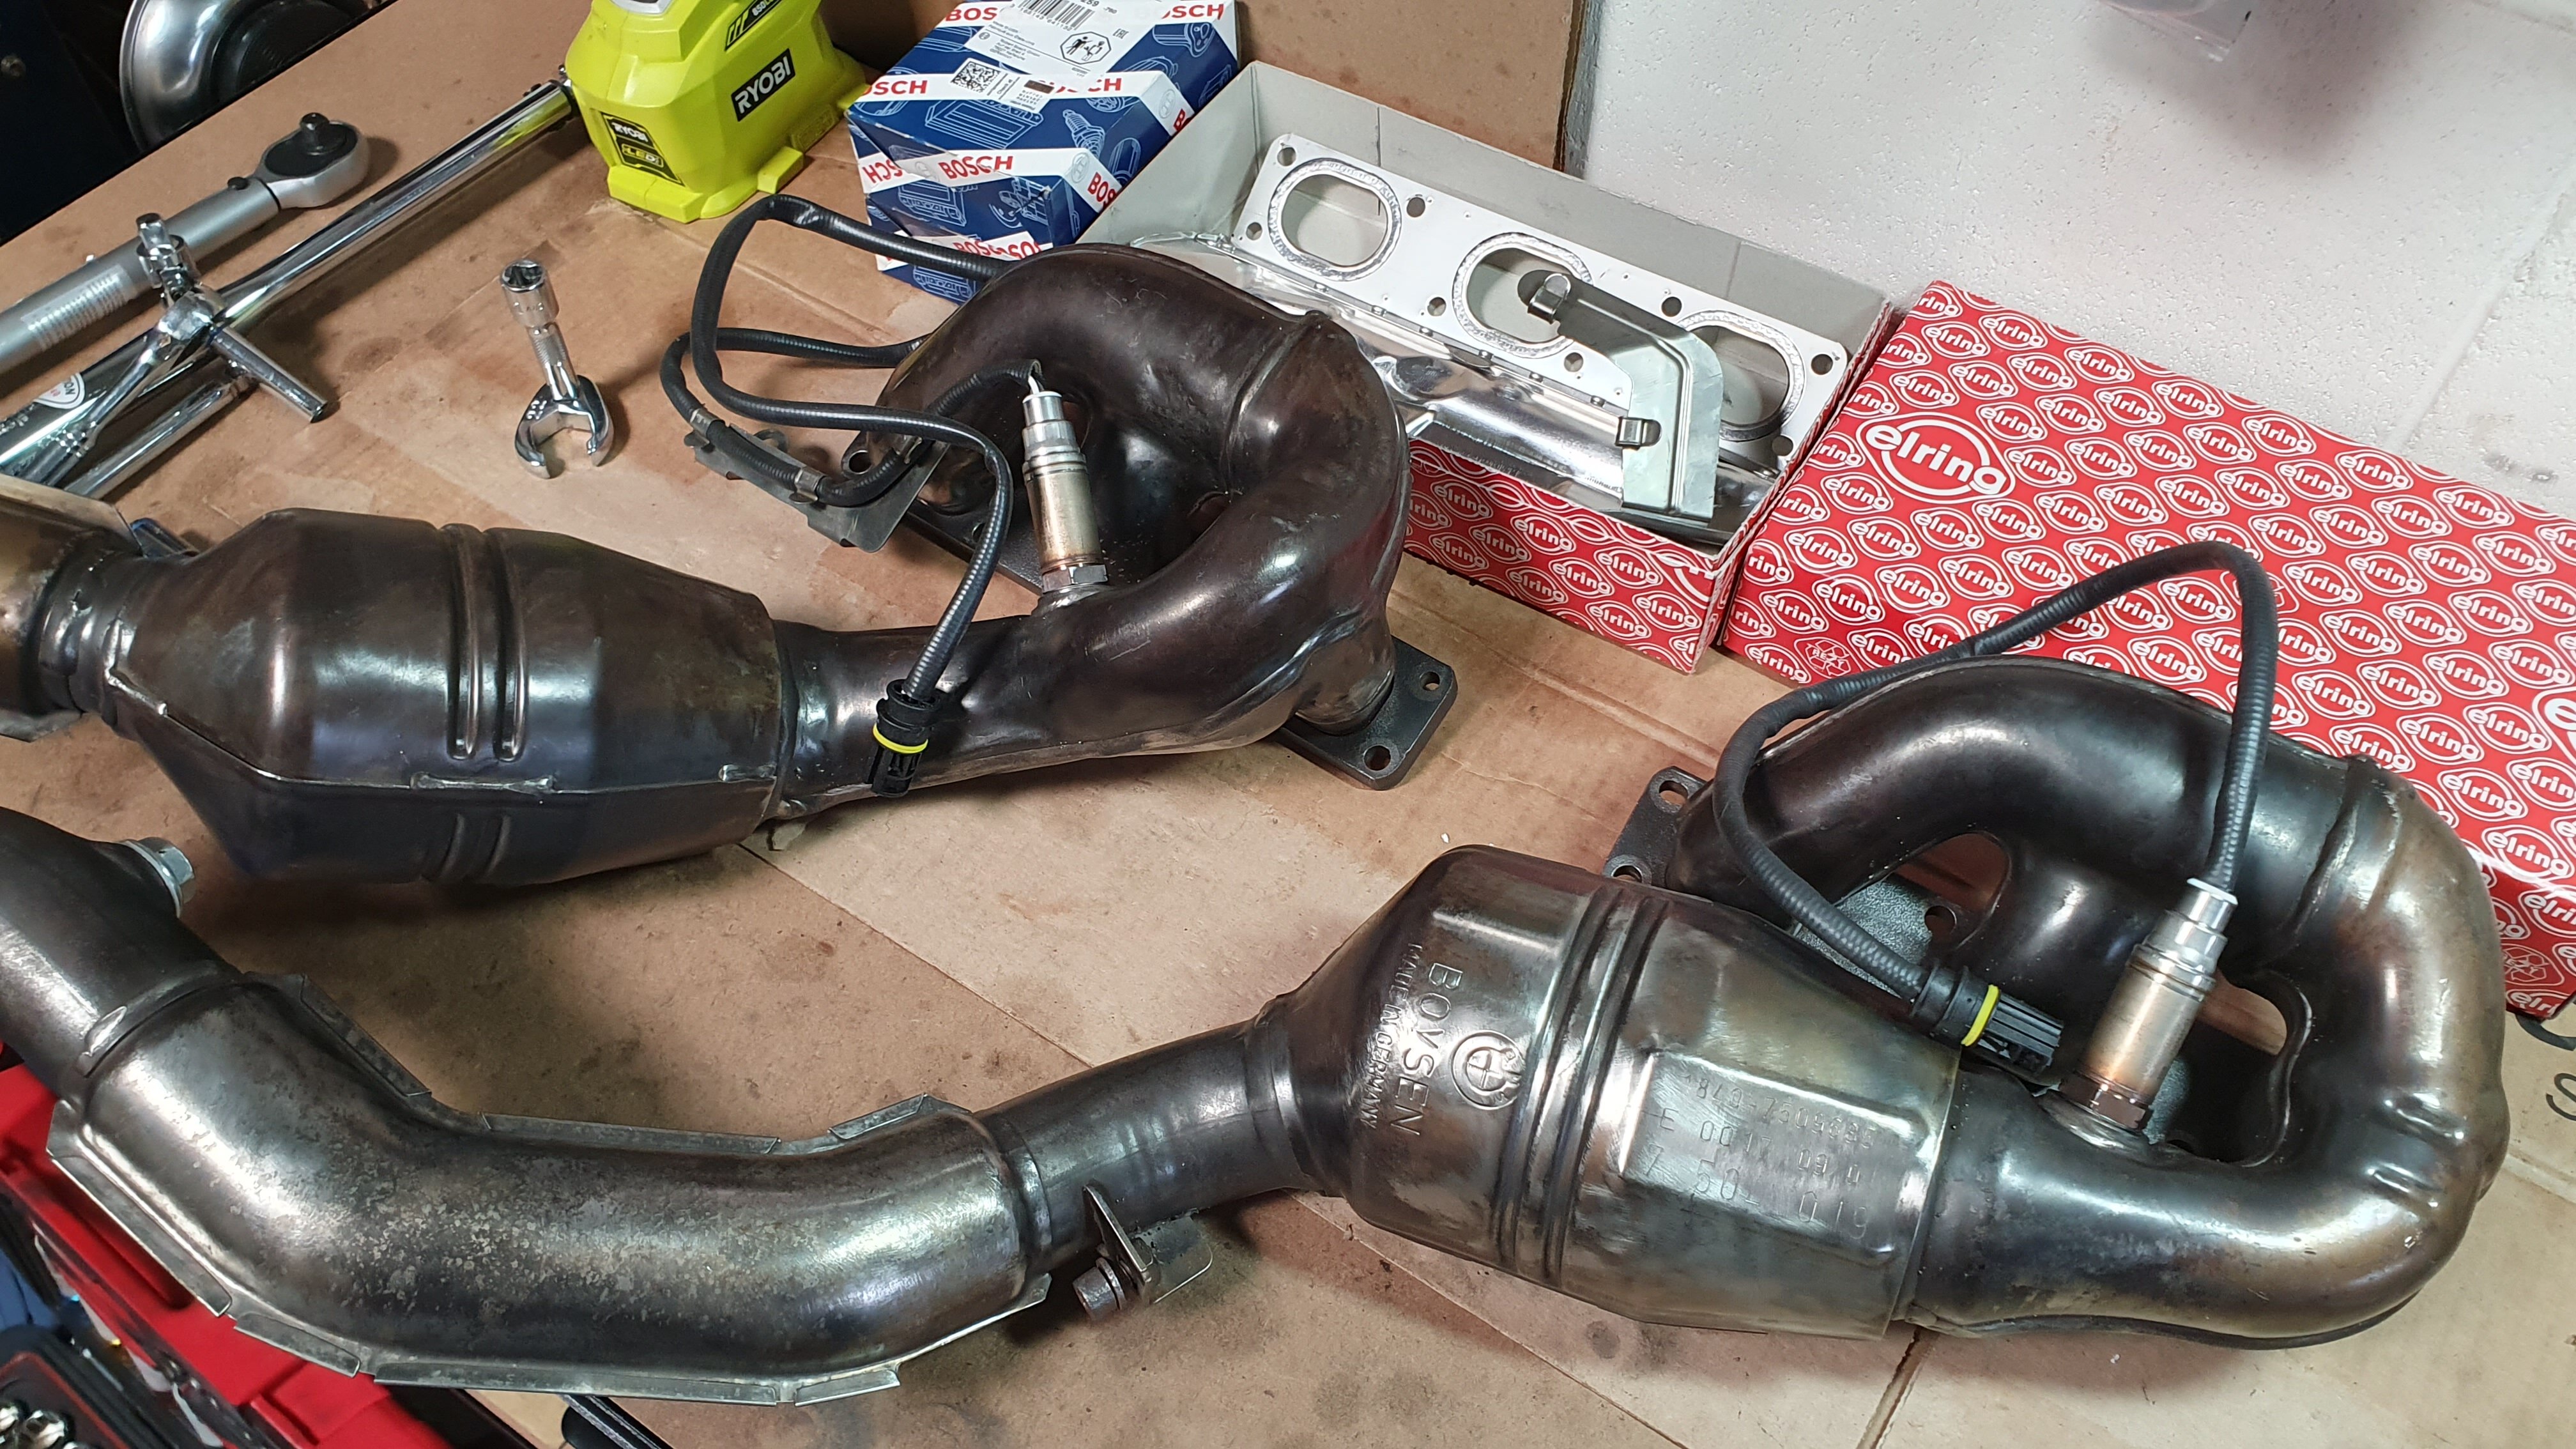
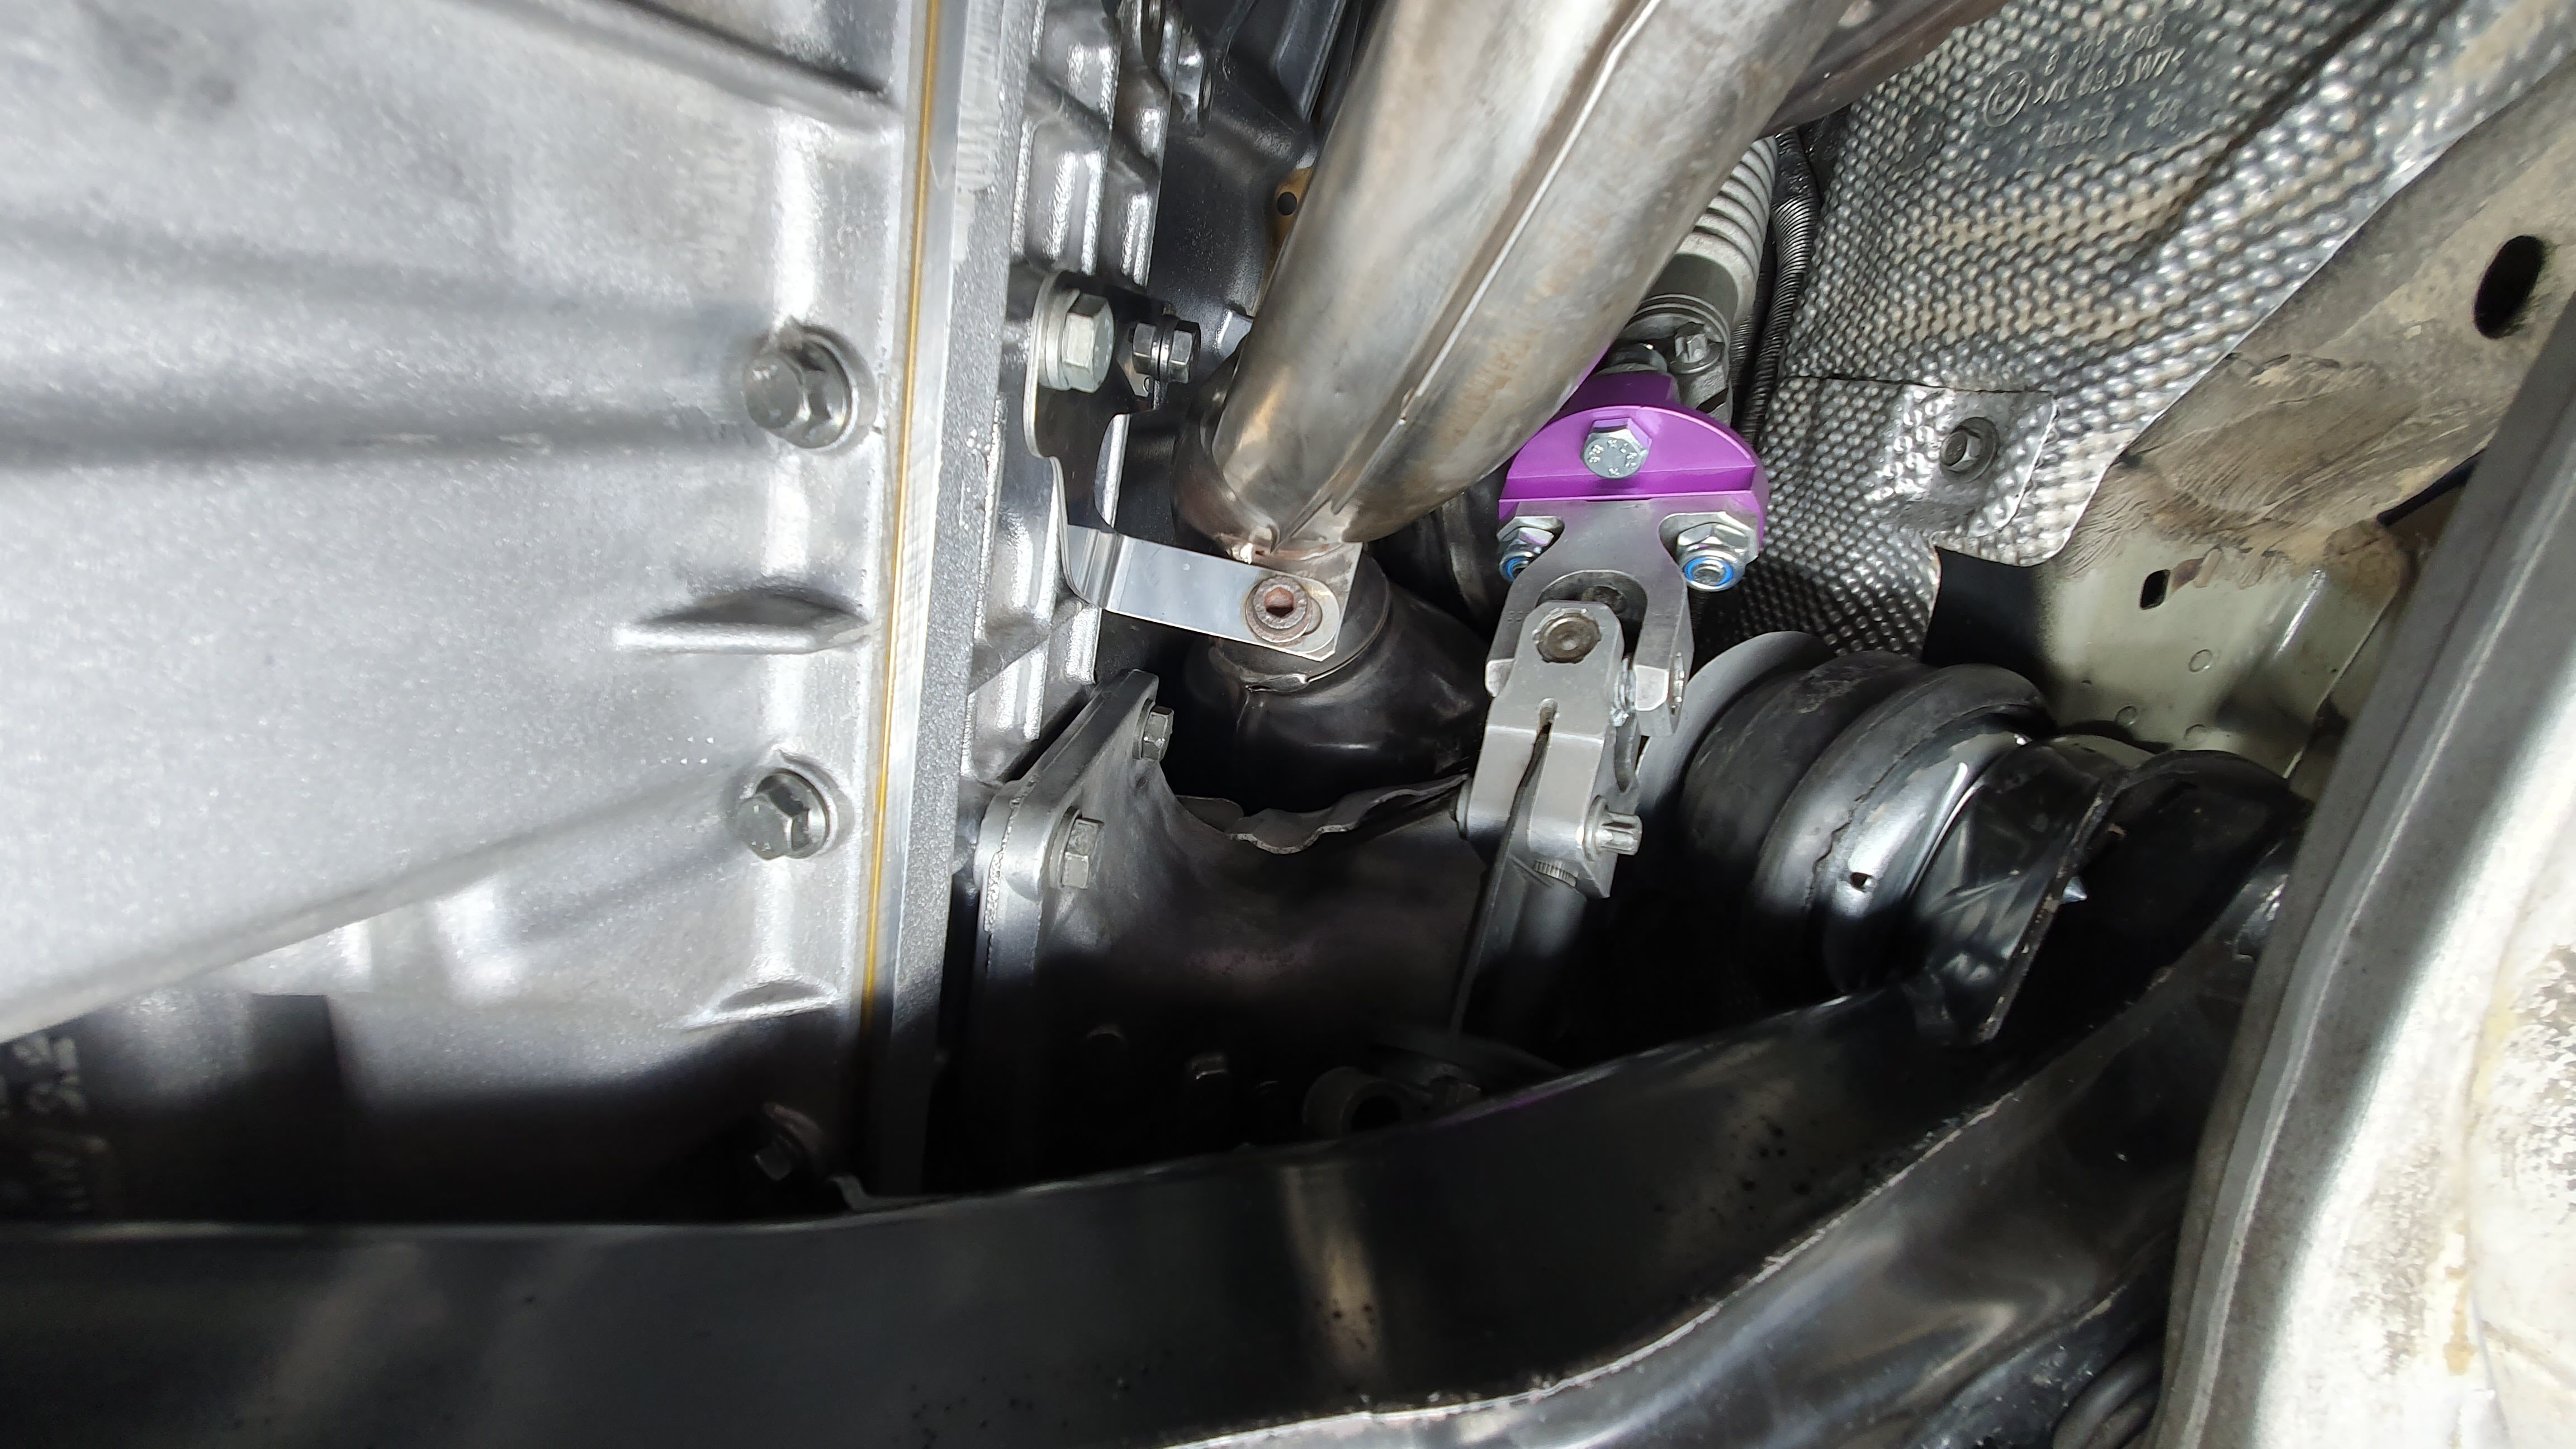
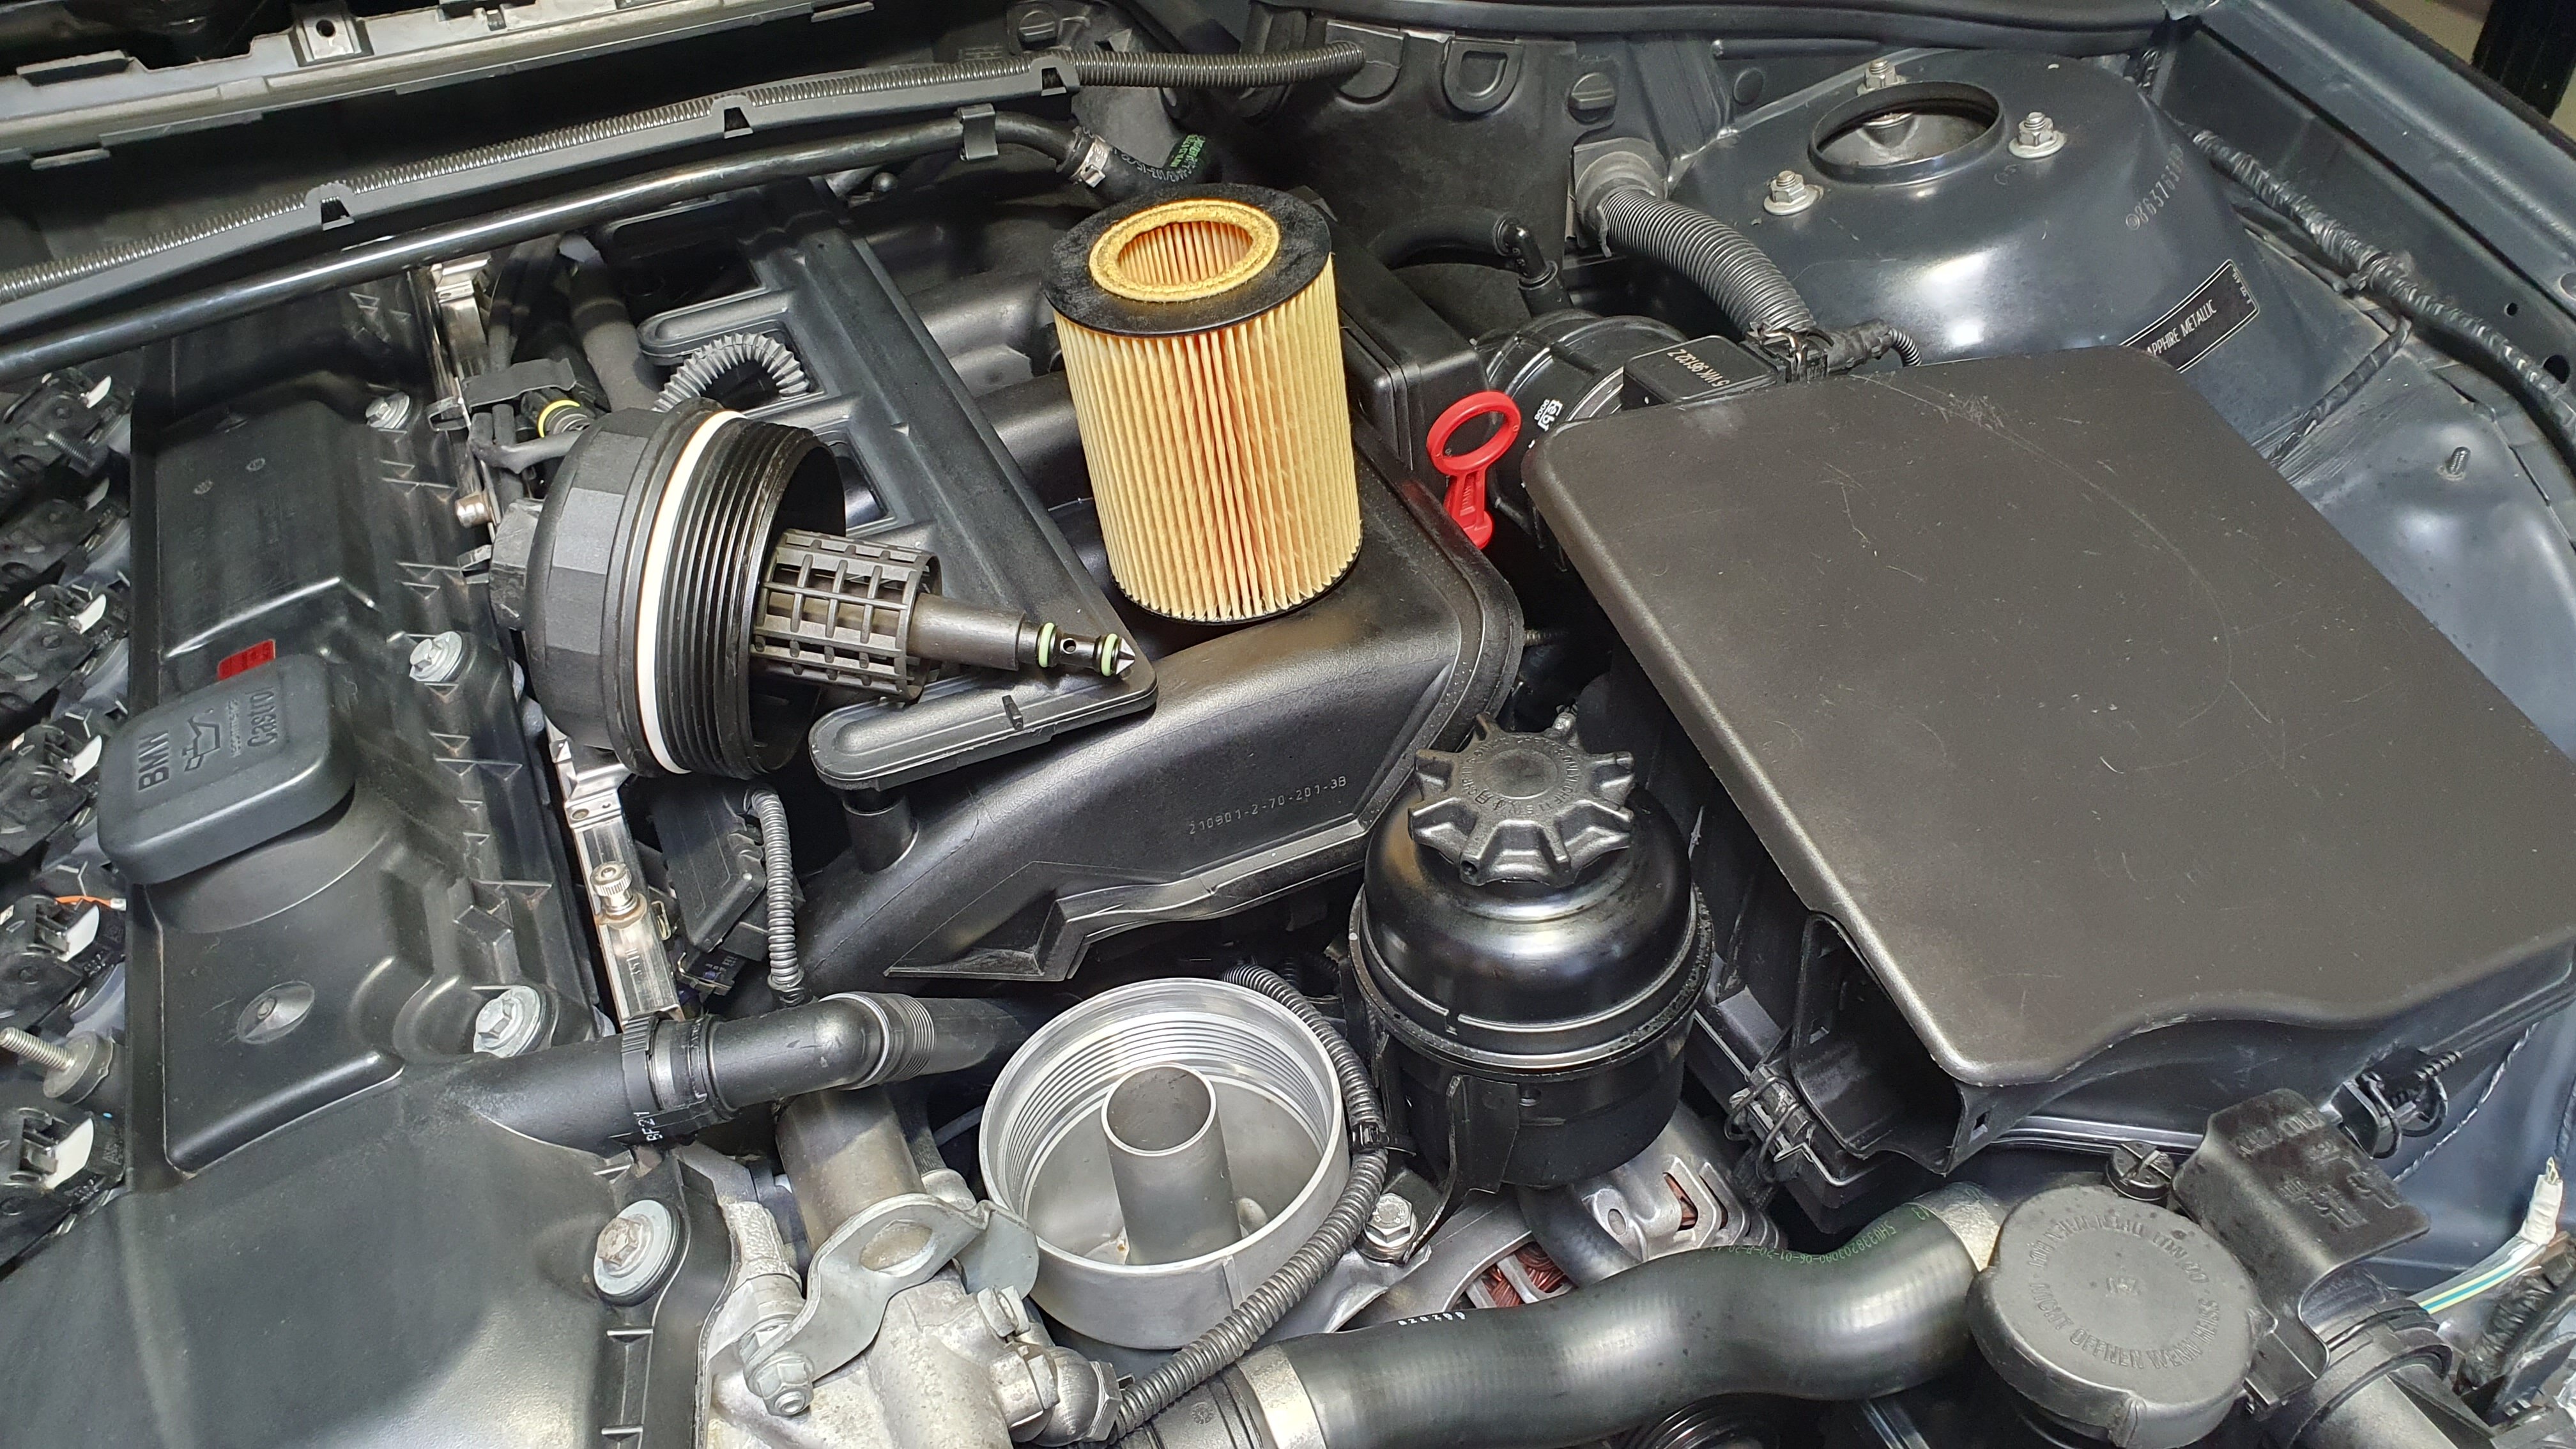
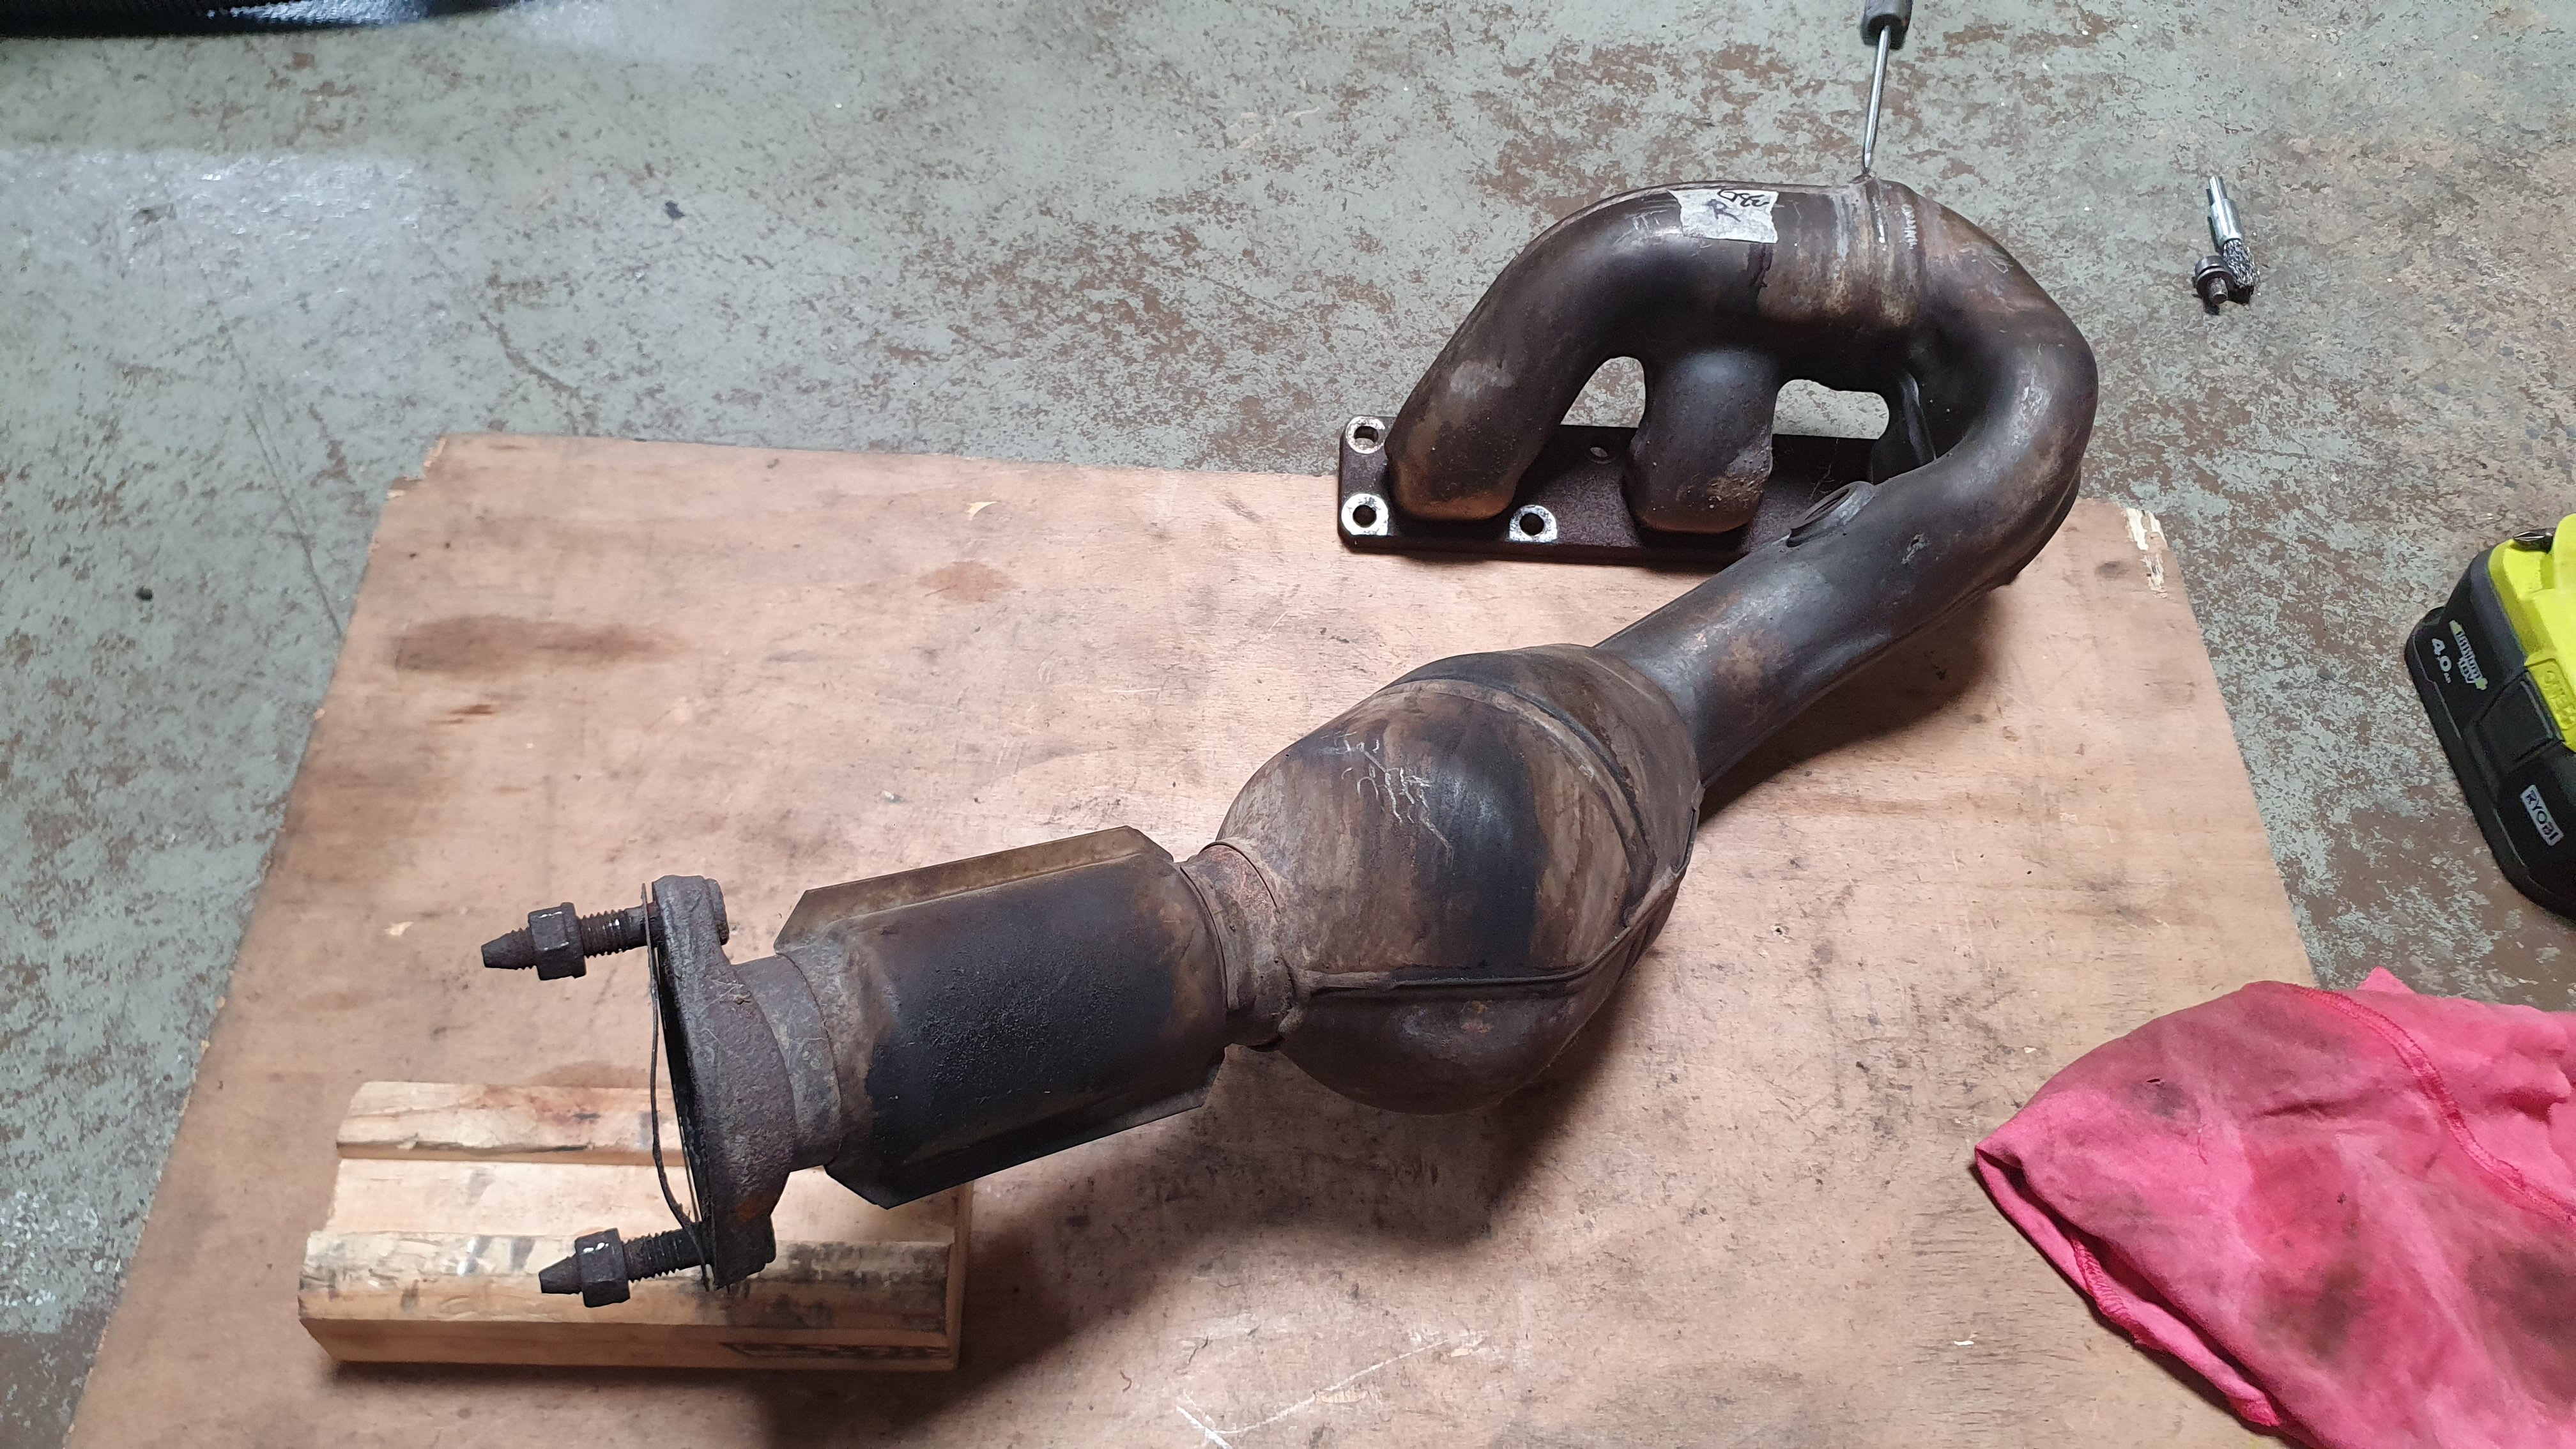
The exhaust gaskets arrived yesterday so got onto attaching the manifolds. Absolute PITA of a job, started early afternoon and finished around 1am.
Fitted new pre-car O2 sensors and blocked out the post's with nuts from Redline delivered overnight.

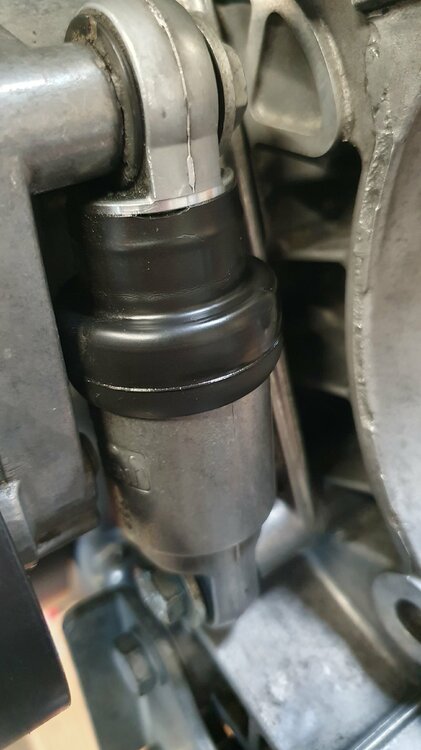
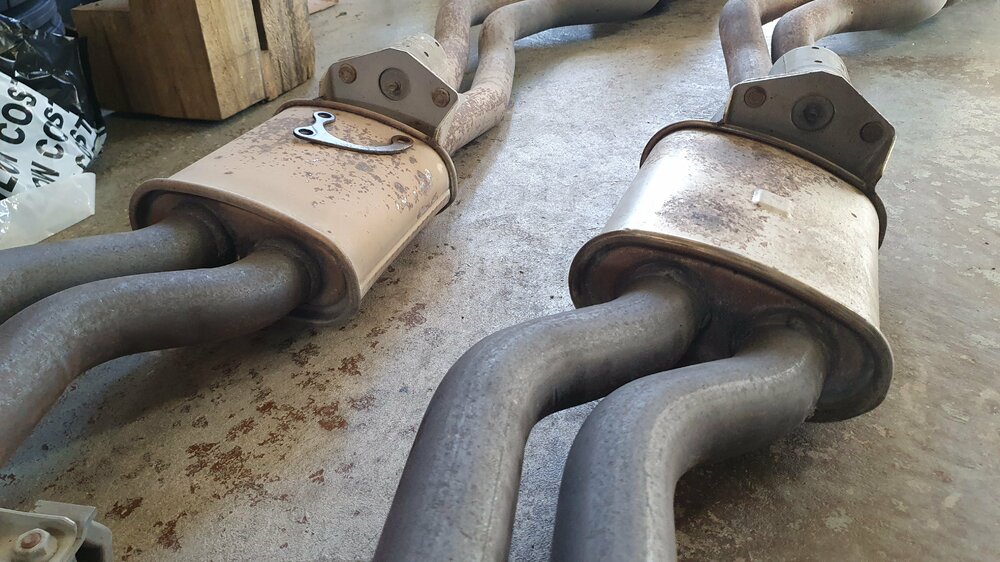
Then got onto the fun part... Honestly, not sure if it's even possible to fit them in without removing the exhaust side engine mount arm. Gave it a quick half-arsed effort but quickly resorted to slightly jacking the front of the engine up (having removed the engine mount nuts on both sides prior) and took the arm out. That opened up enough room to wrestle both the cats past the subframe but was still a balancing act holding them both in there and trying to thread on a few bolts, at the same time trying not to knock the gaskets off the studs. Got there in the end but then made a bit of a misstep. Got the Bank 2 manifold bolted and properly torqued up and jumped onto Bank 1. The right thing to do would have been to at least roughly throw the engine mount arm back in place and reattach the small bracket to the block that holds onto the Bank 1 manifold right after the cat. I only realised my mistake after fully torquing up both manifolds. Of course the engine mount would not fit back through with the manifolds in the way. No way I was going to remove them again so instead I unbolted the power steering hoses (luckily I hadn't filled the system up with fluids yet) and LCA bushing that allowed me to swing the control arm out of the way enough to manoeuver the arm into place. Then I discovered there's not enough room between the block and the manifold to fit in the top bolt for the little bracket (seen in the photo below). Not sure if it serves much of a purpose but wanted to attach it regardless so I ended up cutting the top bolt about 8mm short that gave just enough room to thread it on. So far I think that's the first (and hopefully only) shortcut that I've had to resort to so won't be losing any sleep over it.
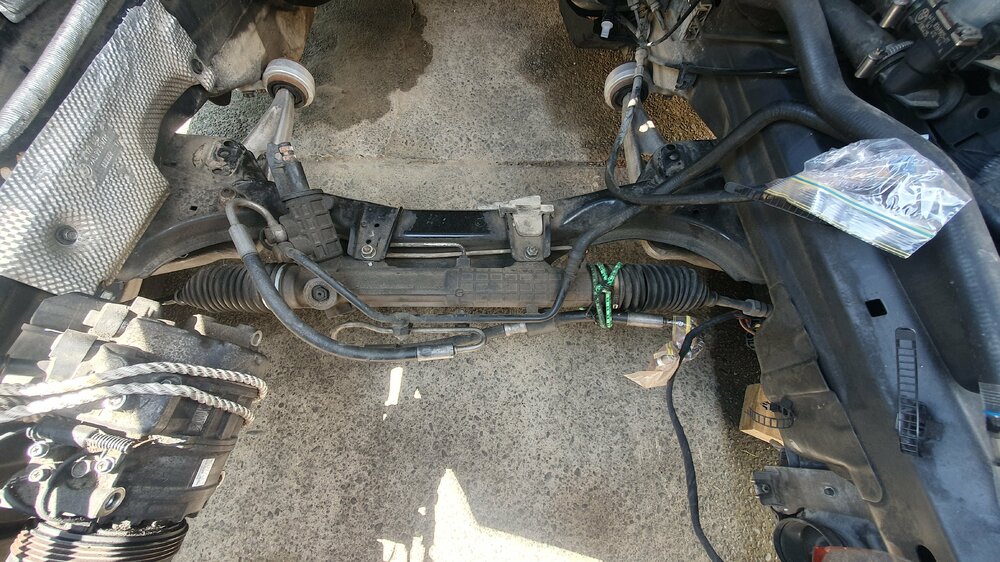
Reattached the steering linkage and that should be that in the engine bay, short of fitting the beauty covers and cabin filter housing. Had to rotate the plastic guiding tab thingy on the steering rack input shaft so that the steering wheel and the wheels themselves are pointing (seemingly) straight.

Prior to that also replaced the top section of the steering linkage with one I stumbled upon at Pick-A-Part. Wouldn't have bothered with the effort but someone had done all the work of removing the thing so it was just laying there looking pretty in the engine bay of one of the cars so I couldn't walk past. I knew the old one had been subjected to some serious abuse in its past life so just another small thing to tidy up.

Things to do still:
- Sort out the driveshaft
- Fit exhaust
- Fluids - bleed brakes & clutch, cooling system, power steering
- Coding - have never done it before but with some awesome guides out there, hoping it won't be too messy an affair.
Not sure if the order matters but will first update the DME to the latest EU2 330i software following this guide. That should code out the post-cat O2's so two birds with one stone. Then, code out the EGS module following this one and that should be that. Hopefully. Famous last words.
If I was a bite-my-nails type of person, I probably wouldn't have any left at this point. Exciting times.
-
 5
5
-
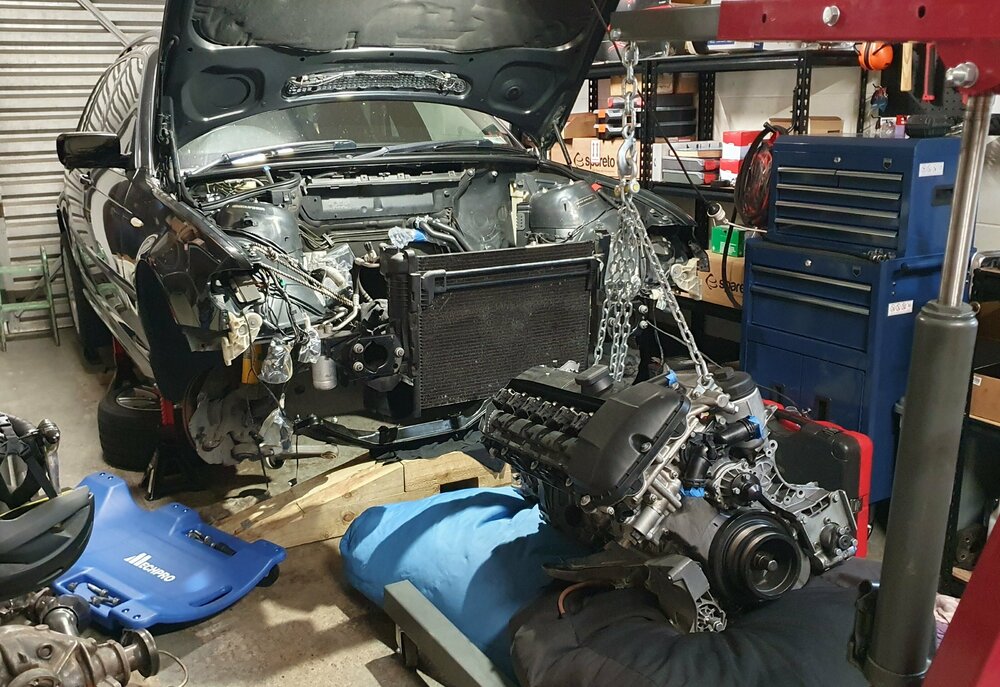
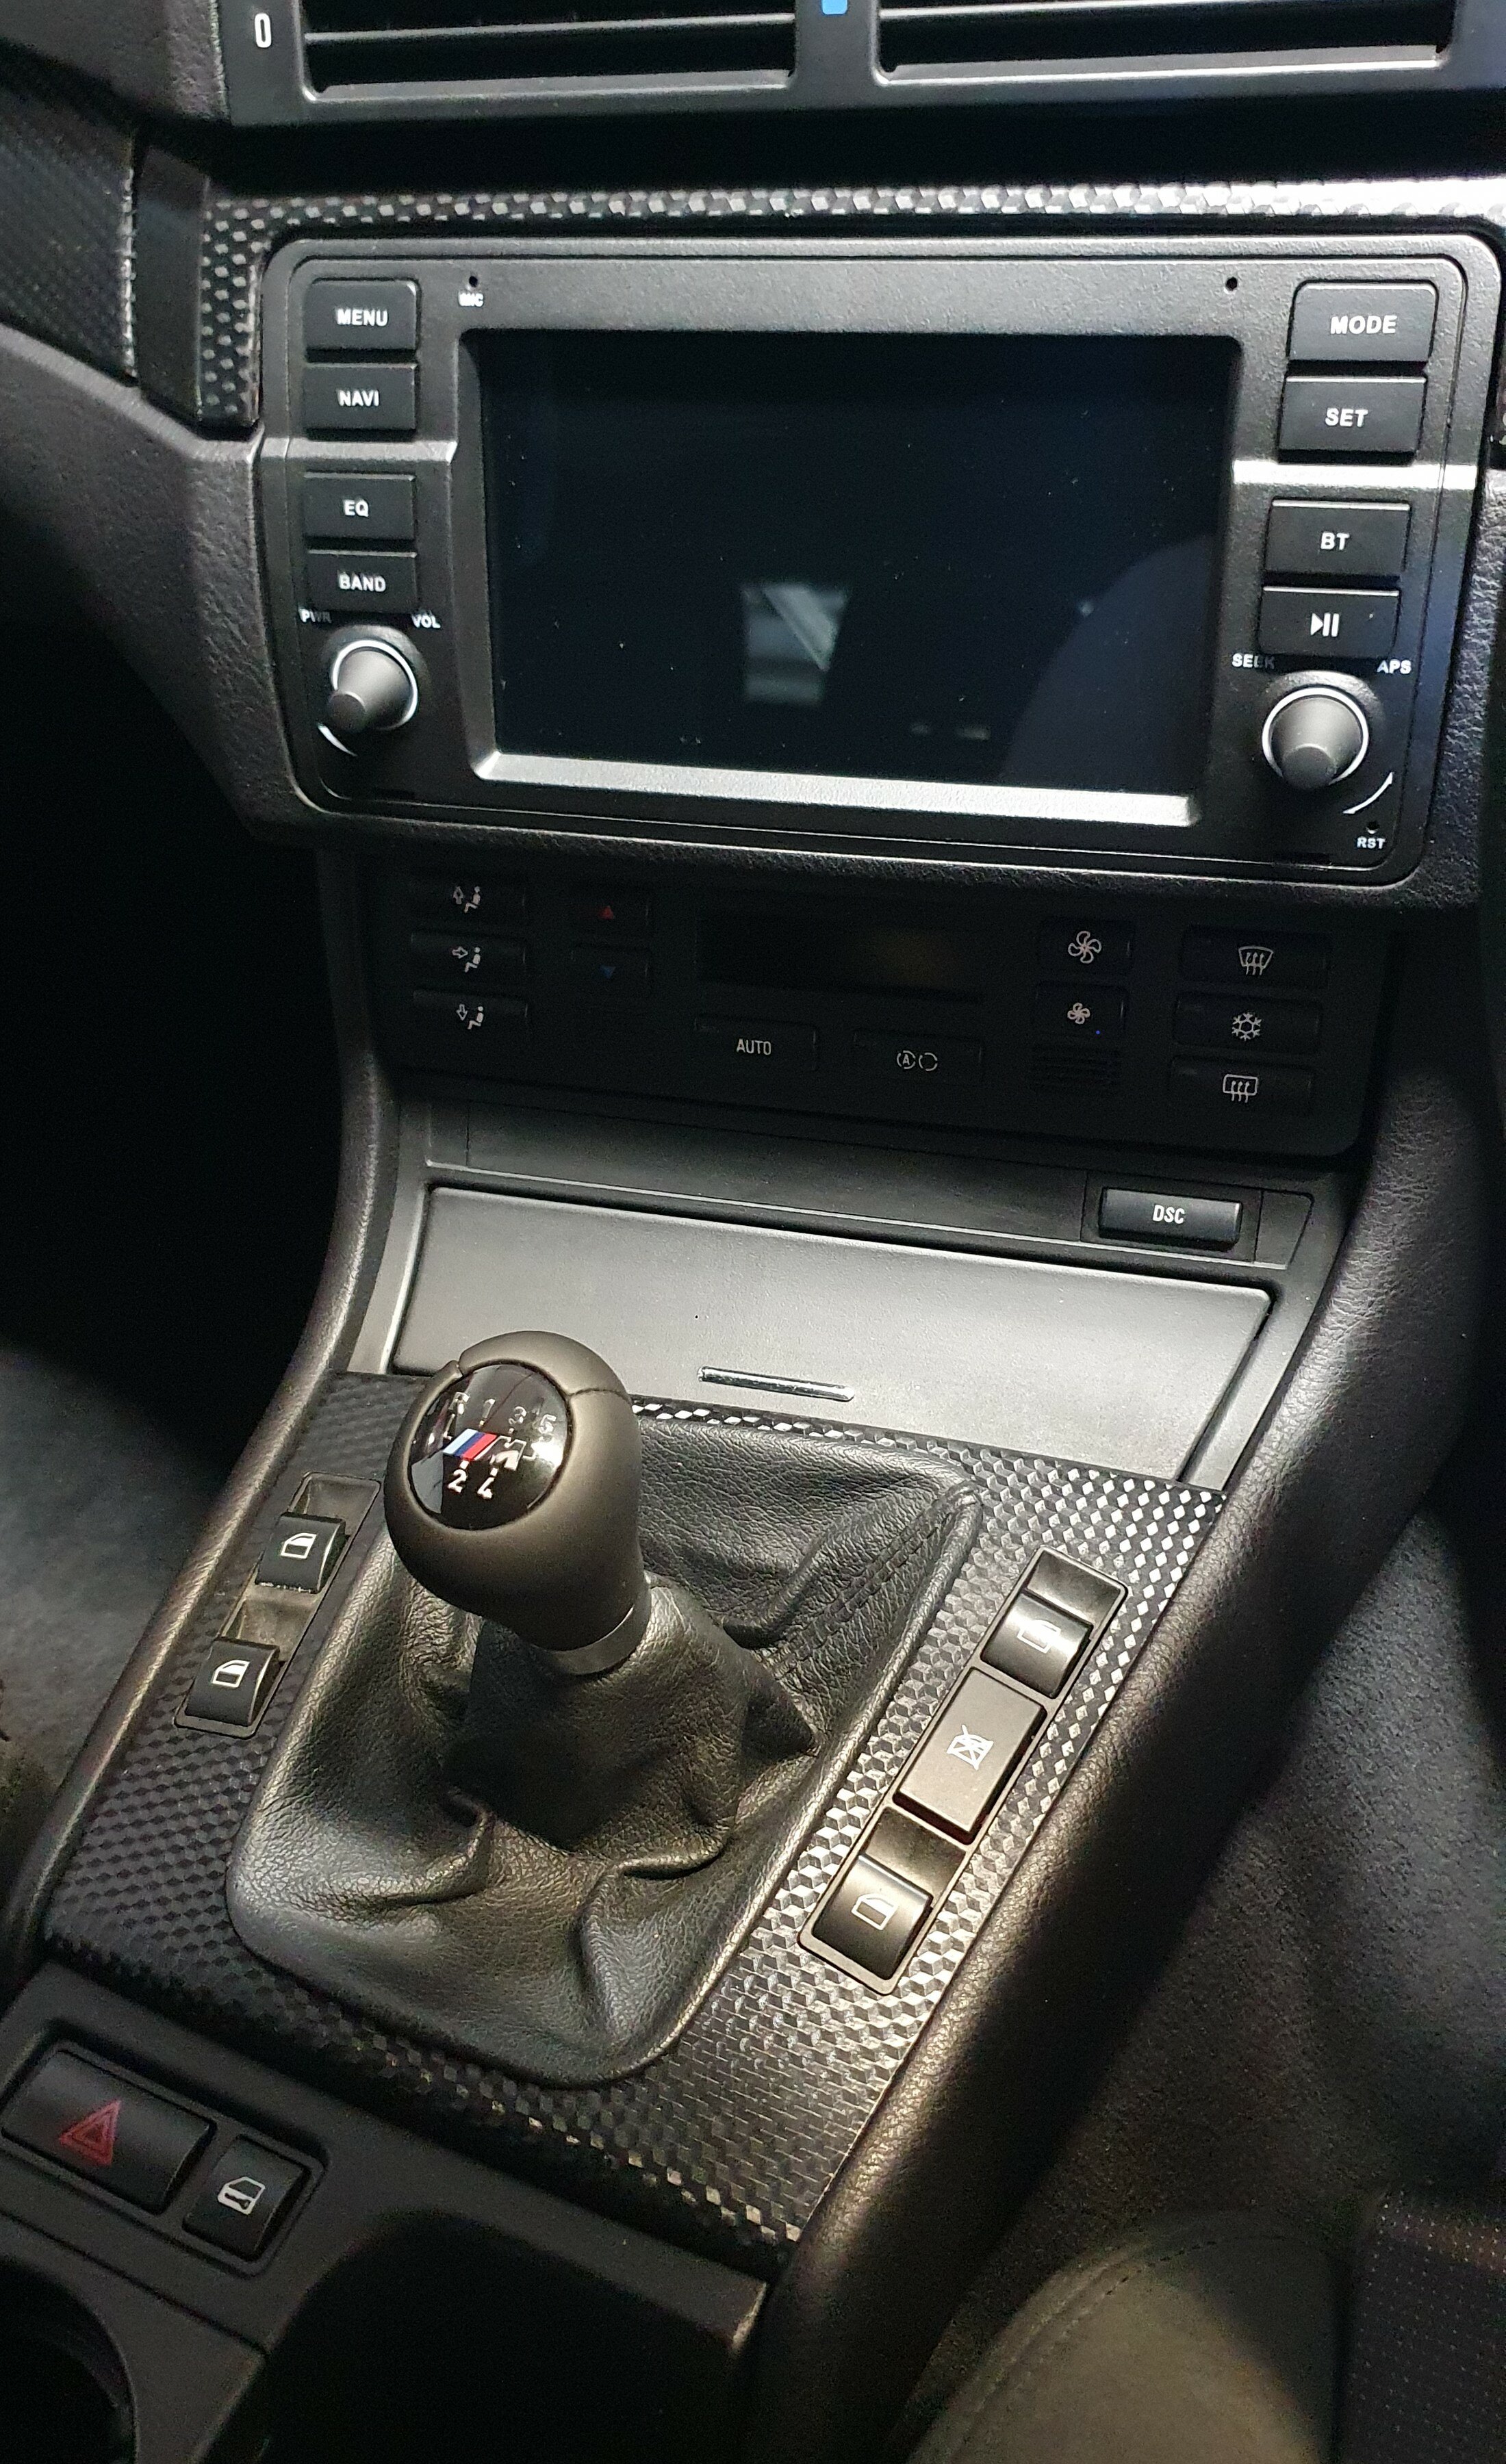
Engine went in without issues and have been busy assembling everything around it. First thing I did, of course, was attach the shifter linkage and have a jolly good time shifting gears whilst making racing noises. Really happy with the E60 shift lever and ZHP knob combo as per @Eagle's recommendation. Well worth the investment.

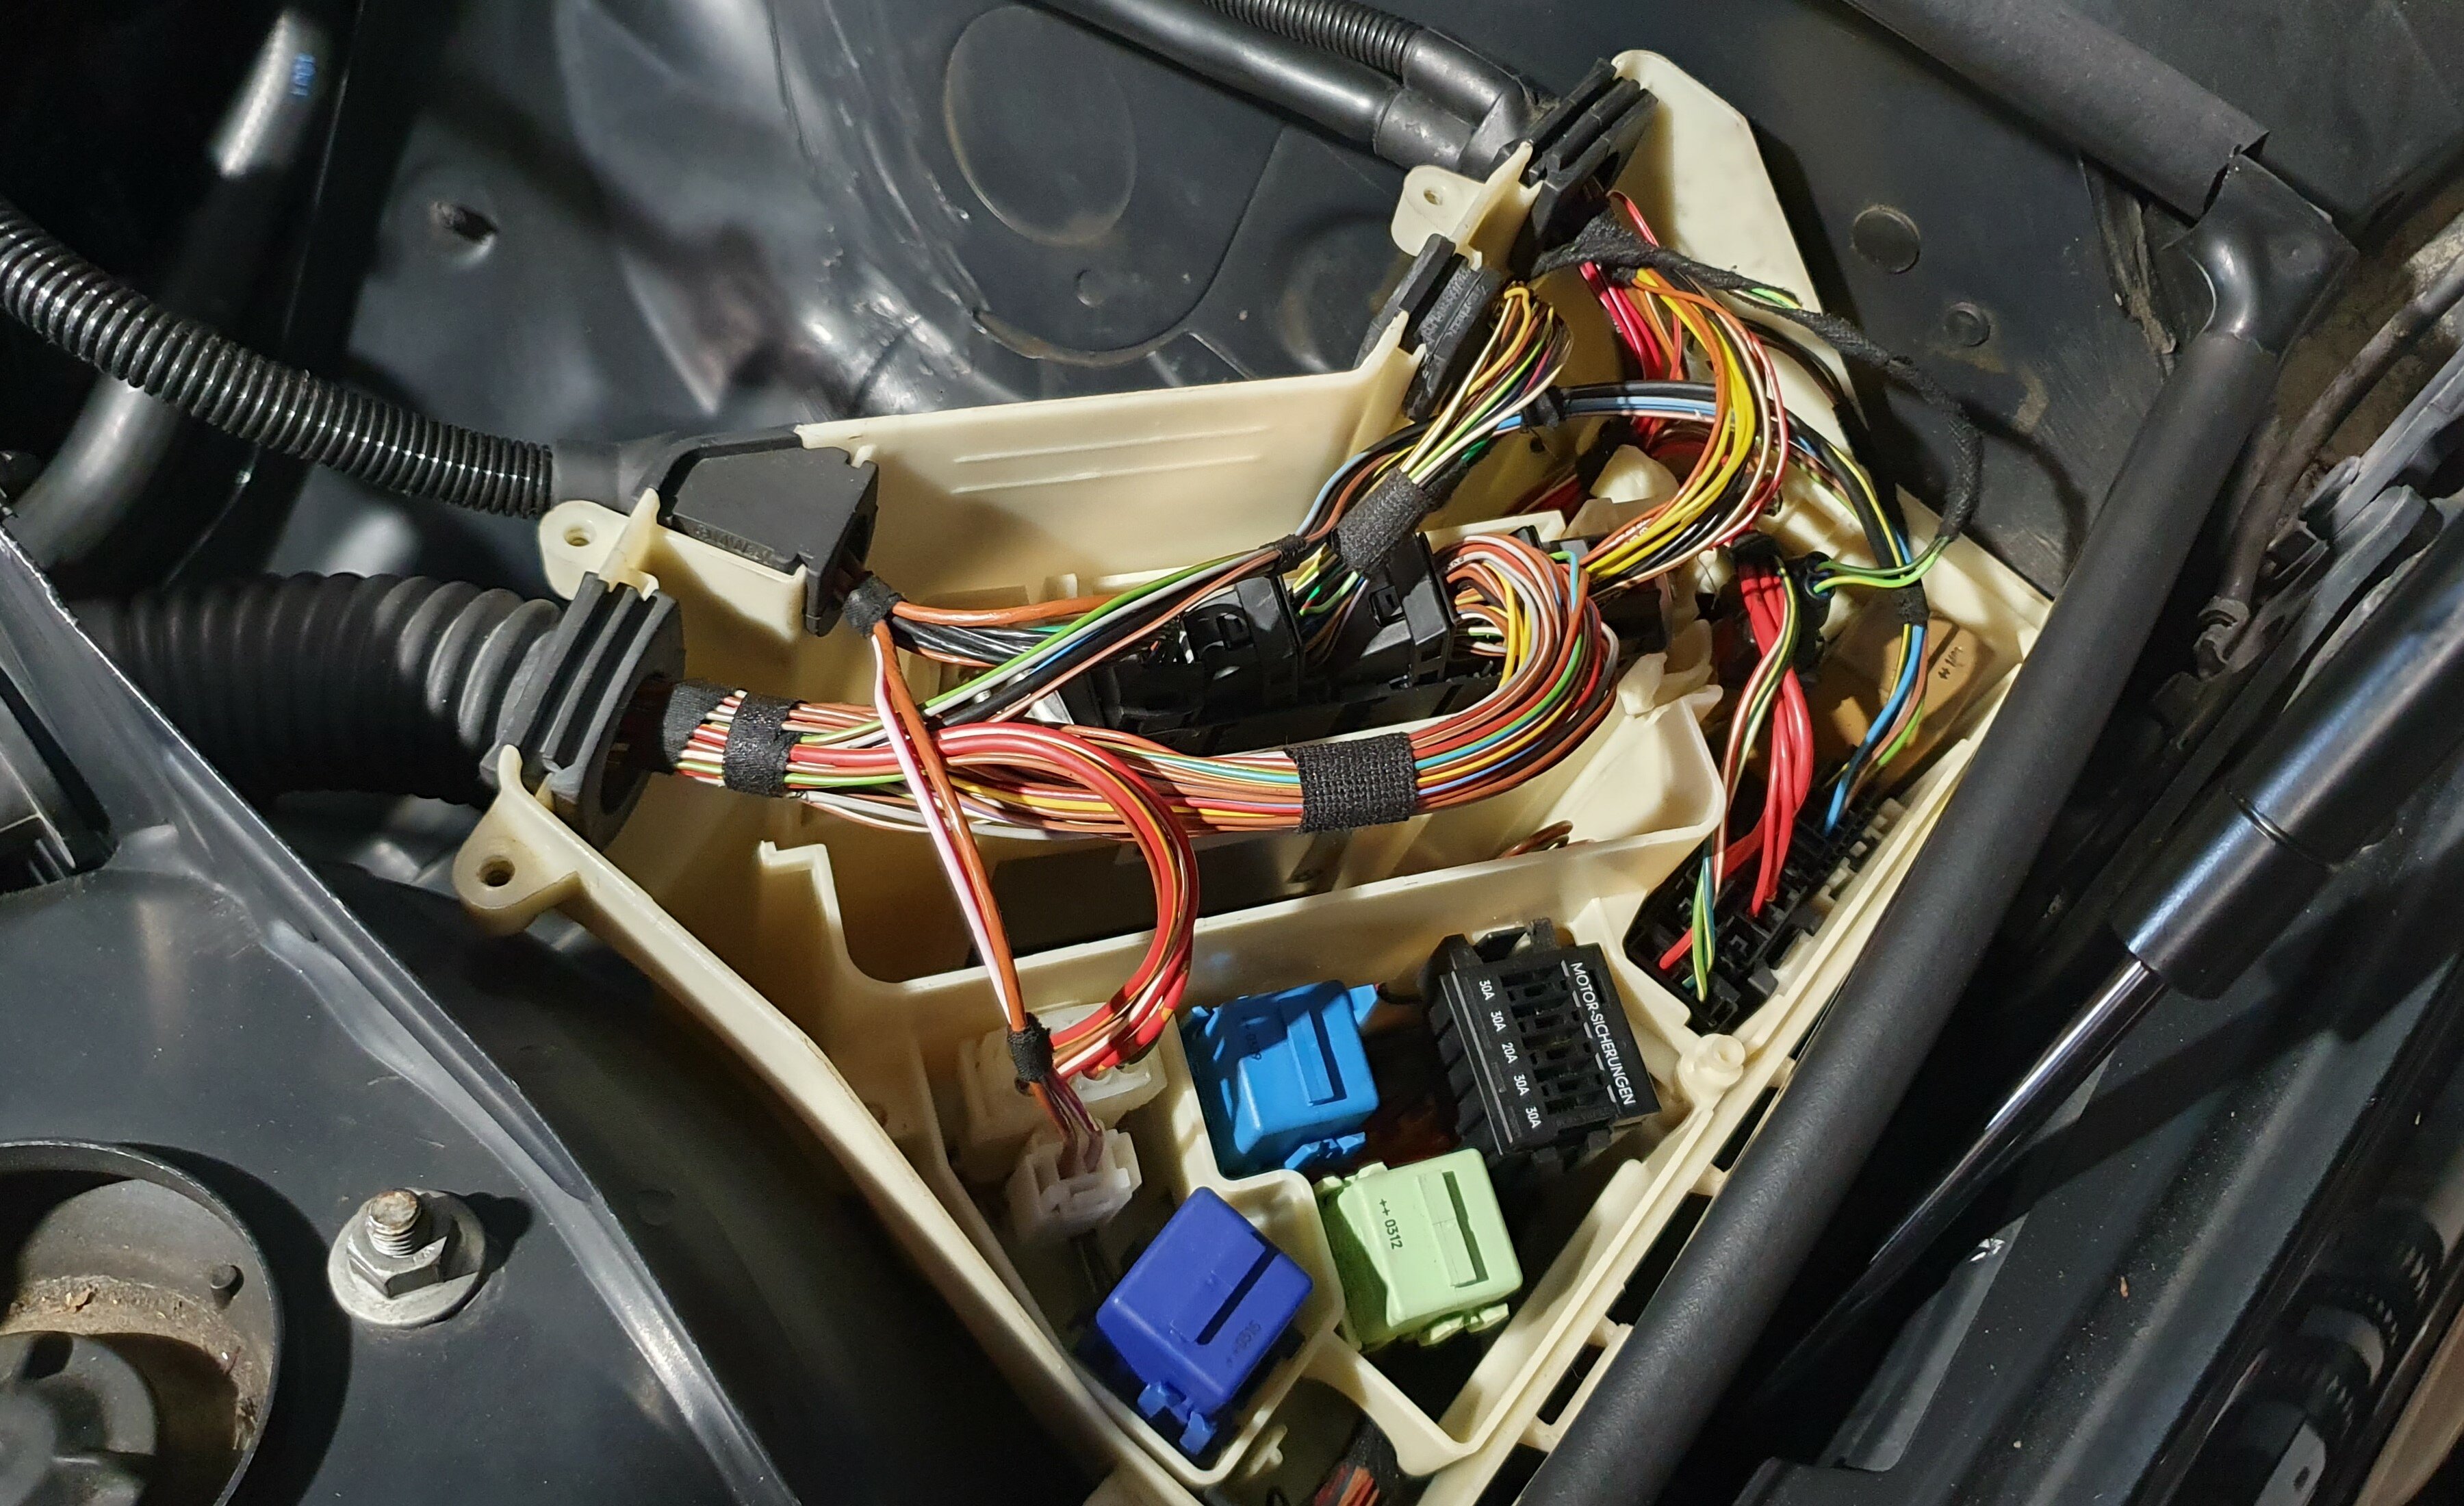
Engine bay is beginning to look pretty much complete now. Just waiting on the exhaust manifold gaskets to arrive and can finish the last bits off. Fuse / ECU box is also looking nice and tidy now. Tied in the reverse light wires quite well so that they're barely noticeable and the one remaining auto transmission plug is also tucked out of the way.

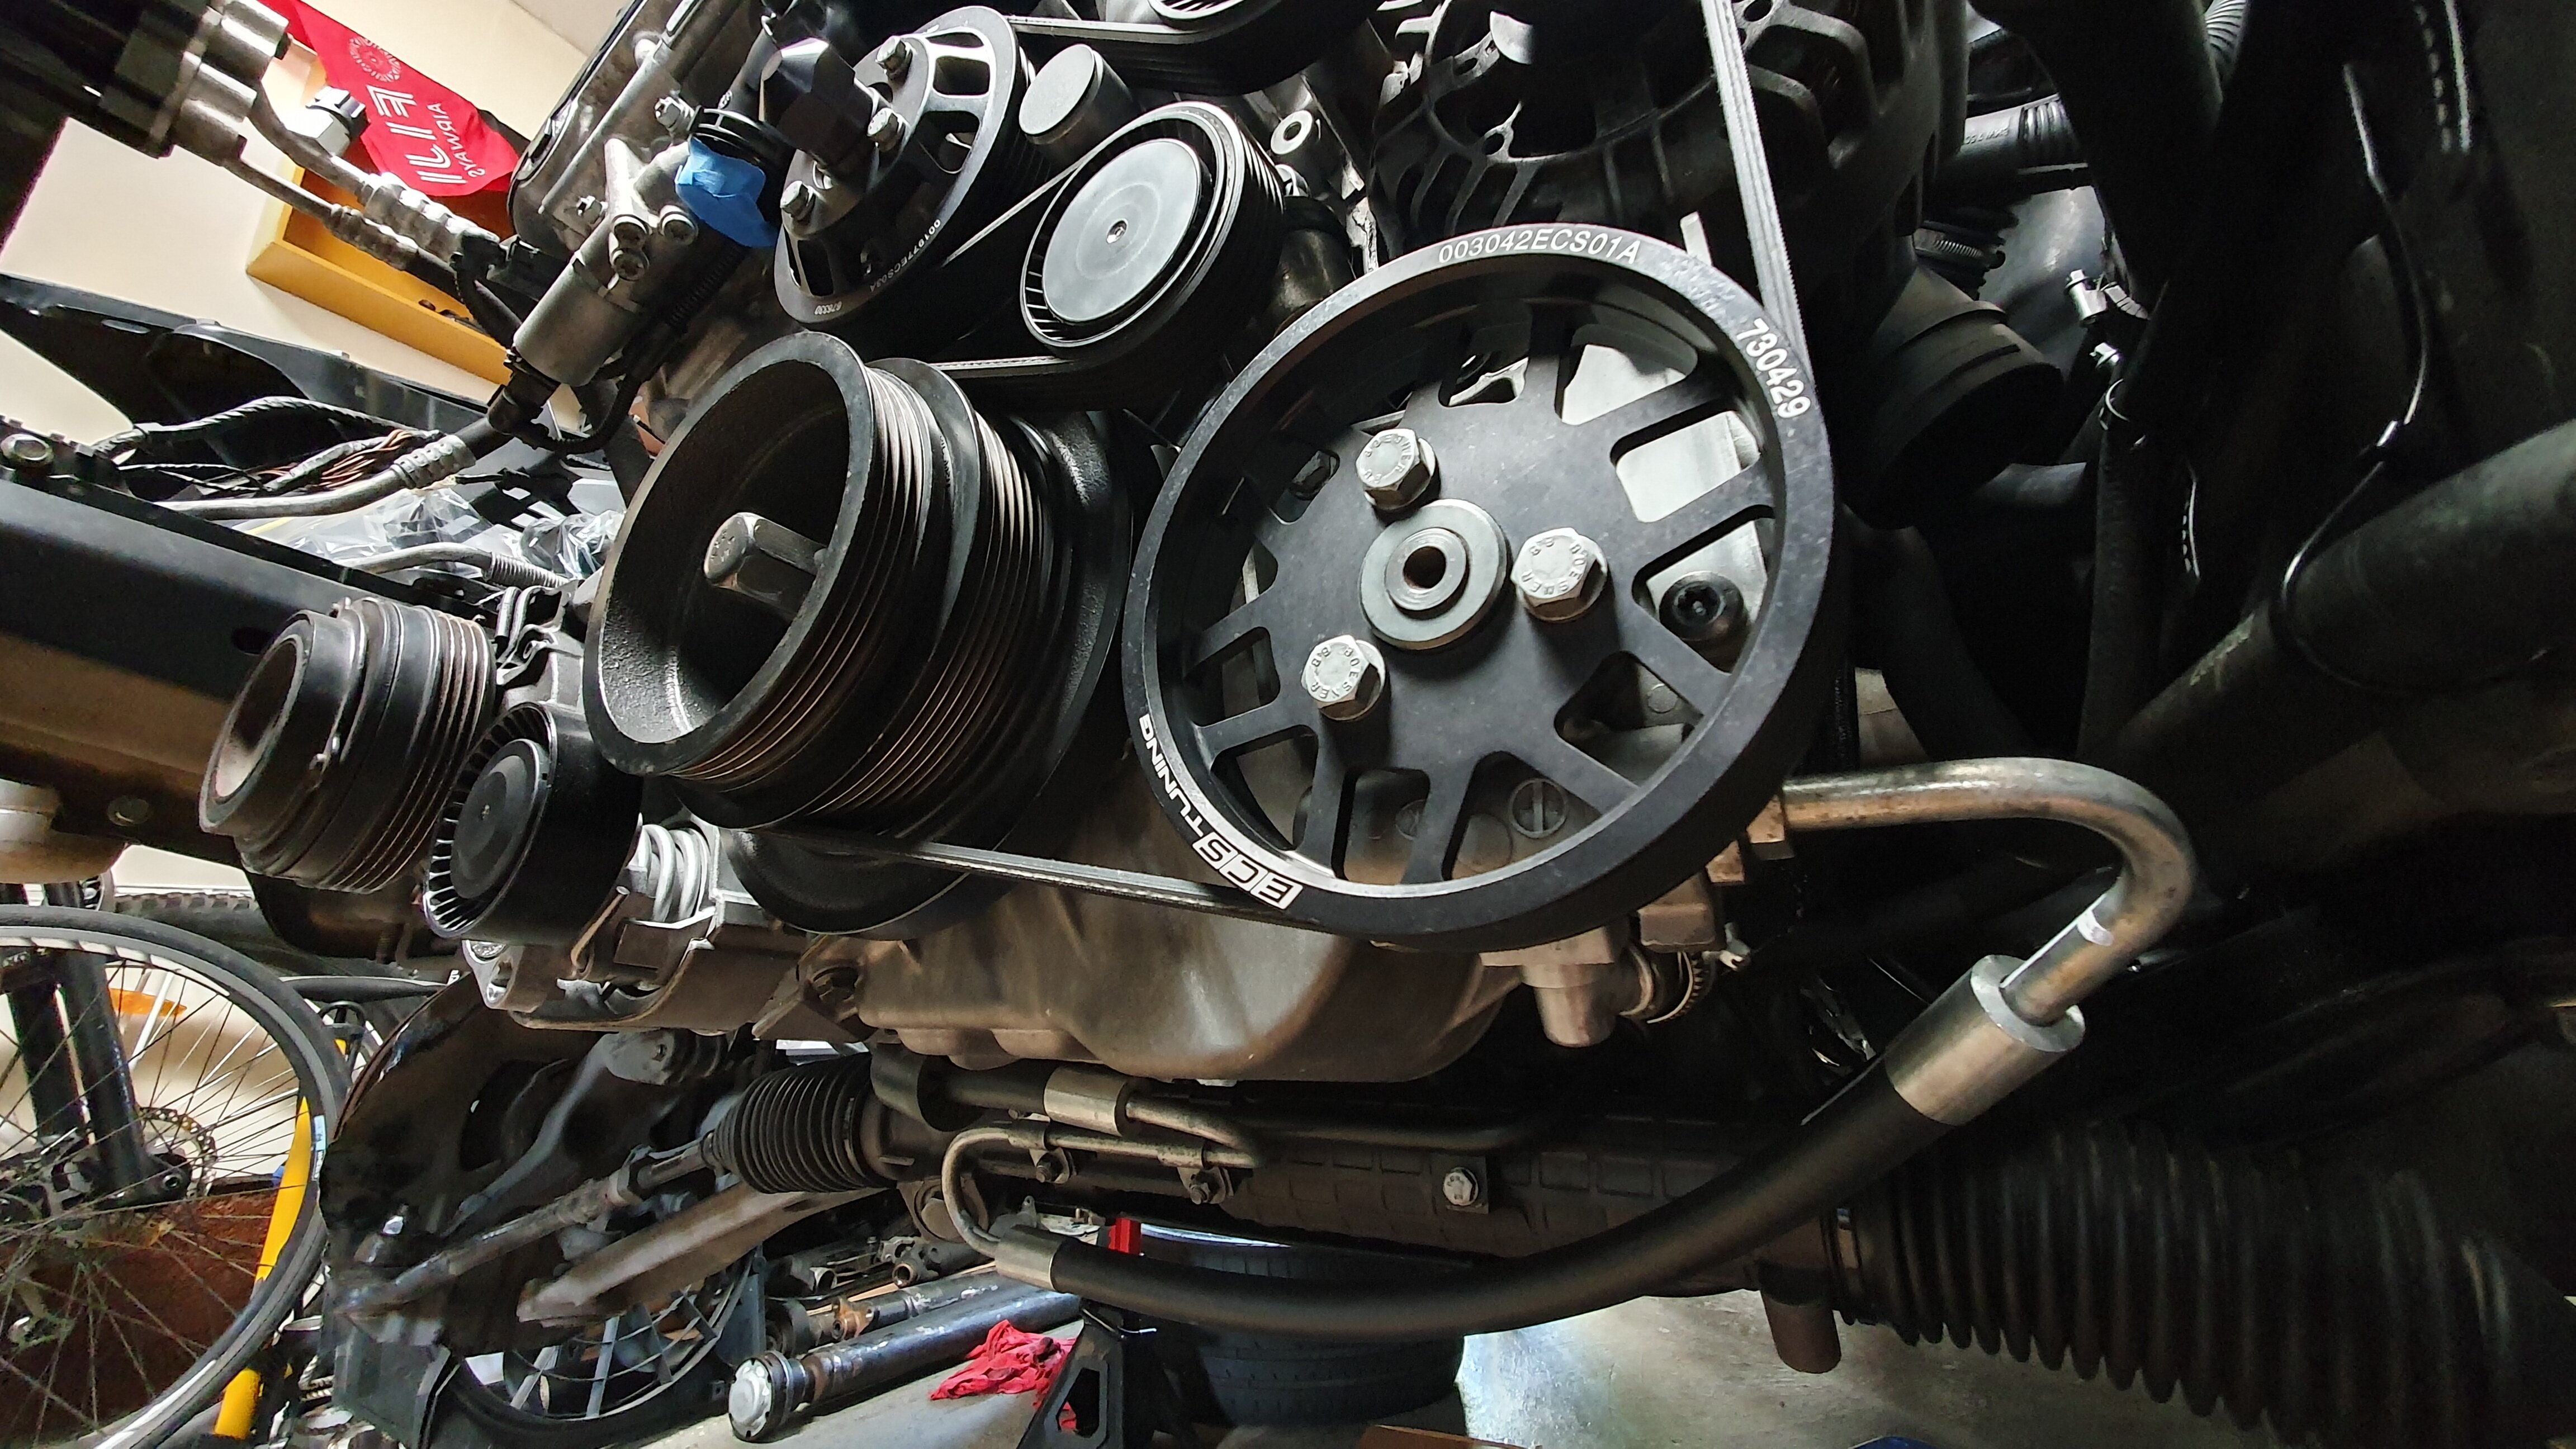
The new tensioners arrived and got bolted on, as well as the rebuilt DISA, new intake boots and MAF, aluminium water pump and power steering pulleys, power steering reservoir and hoses and also a fresh new dipstick, just because.

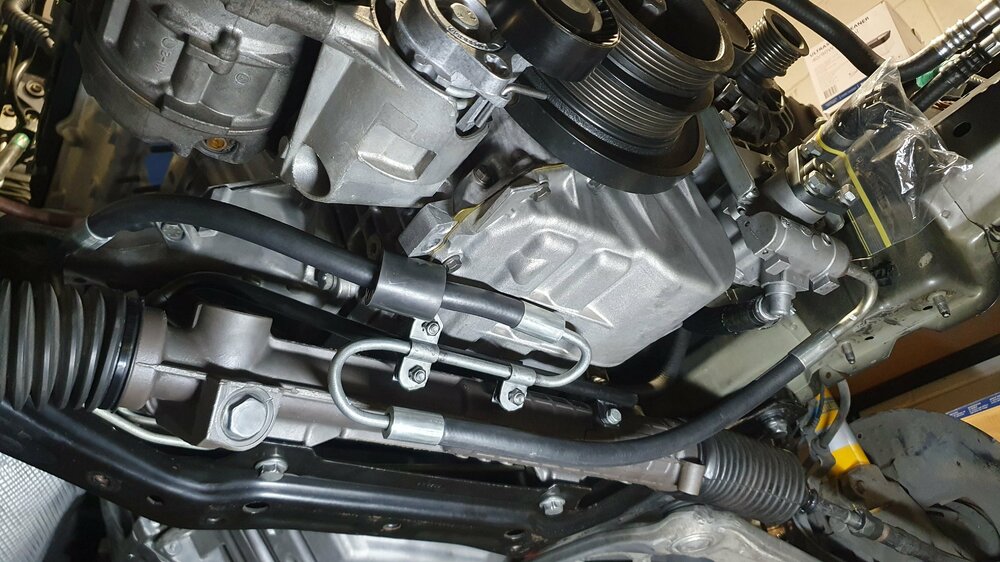
Gave the steering rack a good scrub and bolted it back onto the subframe. Kept the old tie rods for now, will chuck new ones on when doing the new suspension, brakes, rear subframe etc. Remembered the old PS pressure hose having a groove worn into it where it was rubbing against the underside of the engine block so chucked on a rubber sleeve on it to prevent the same from happening to the new one in that spot.

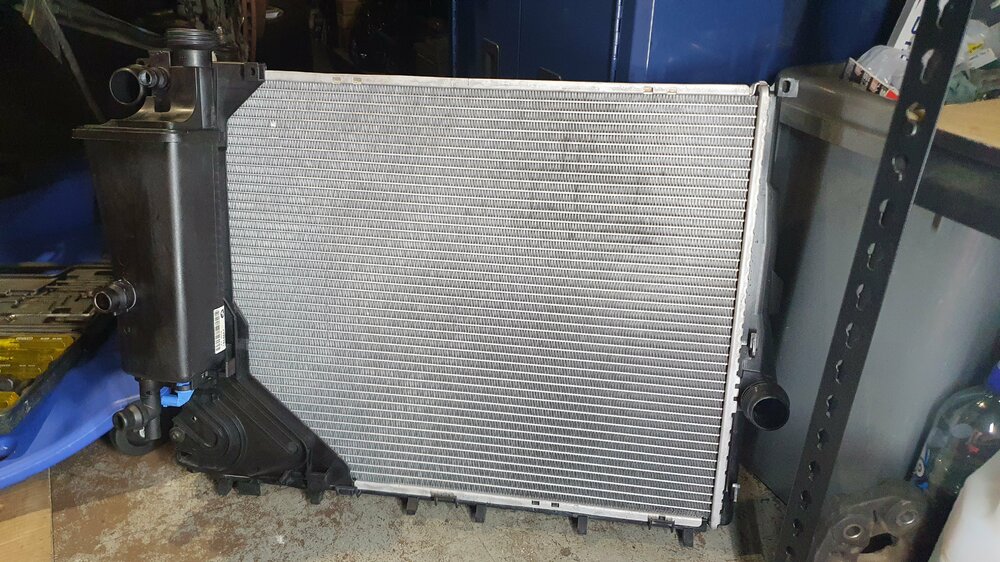
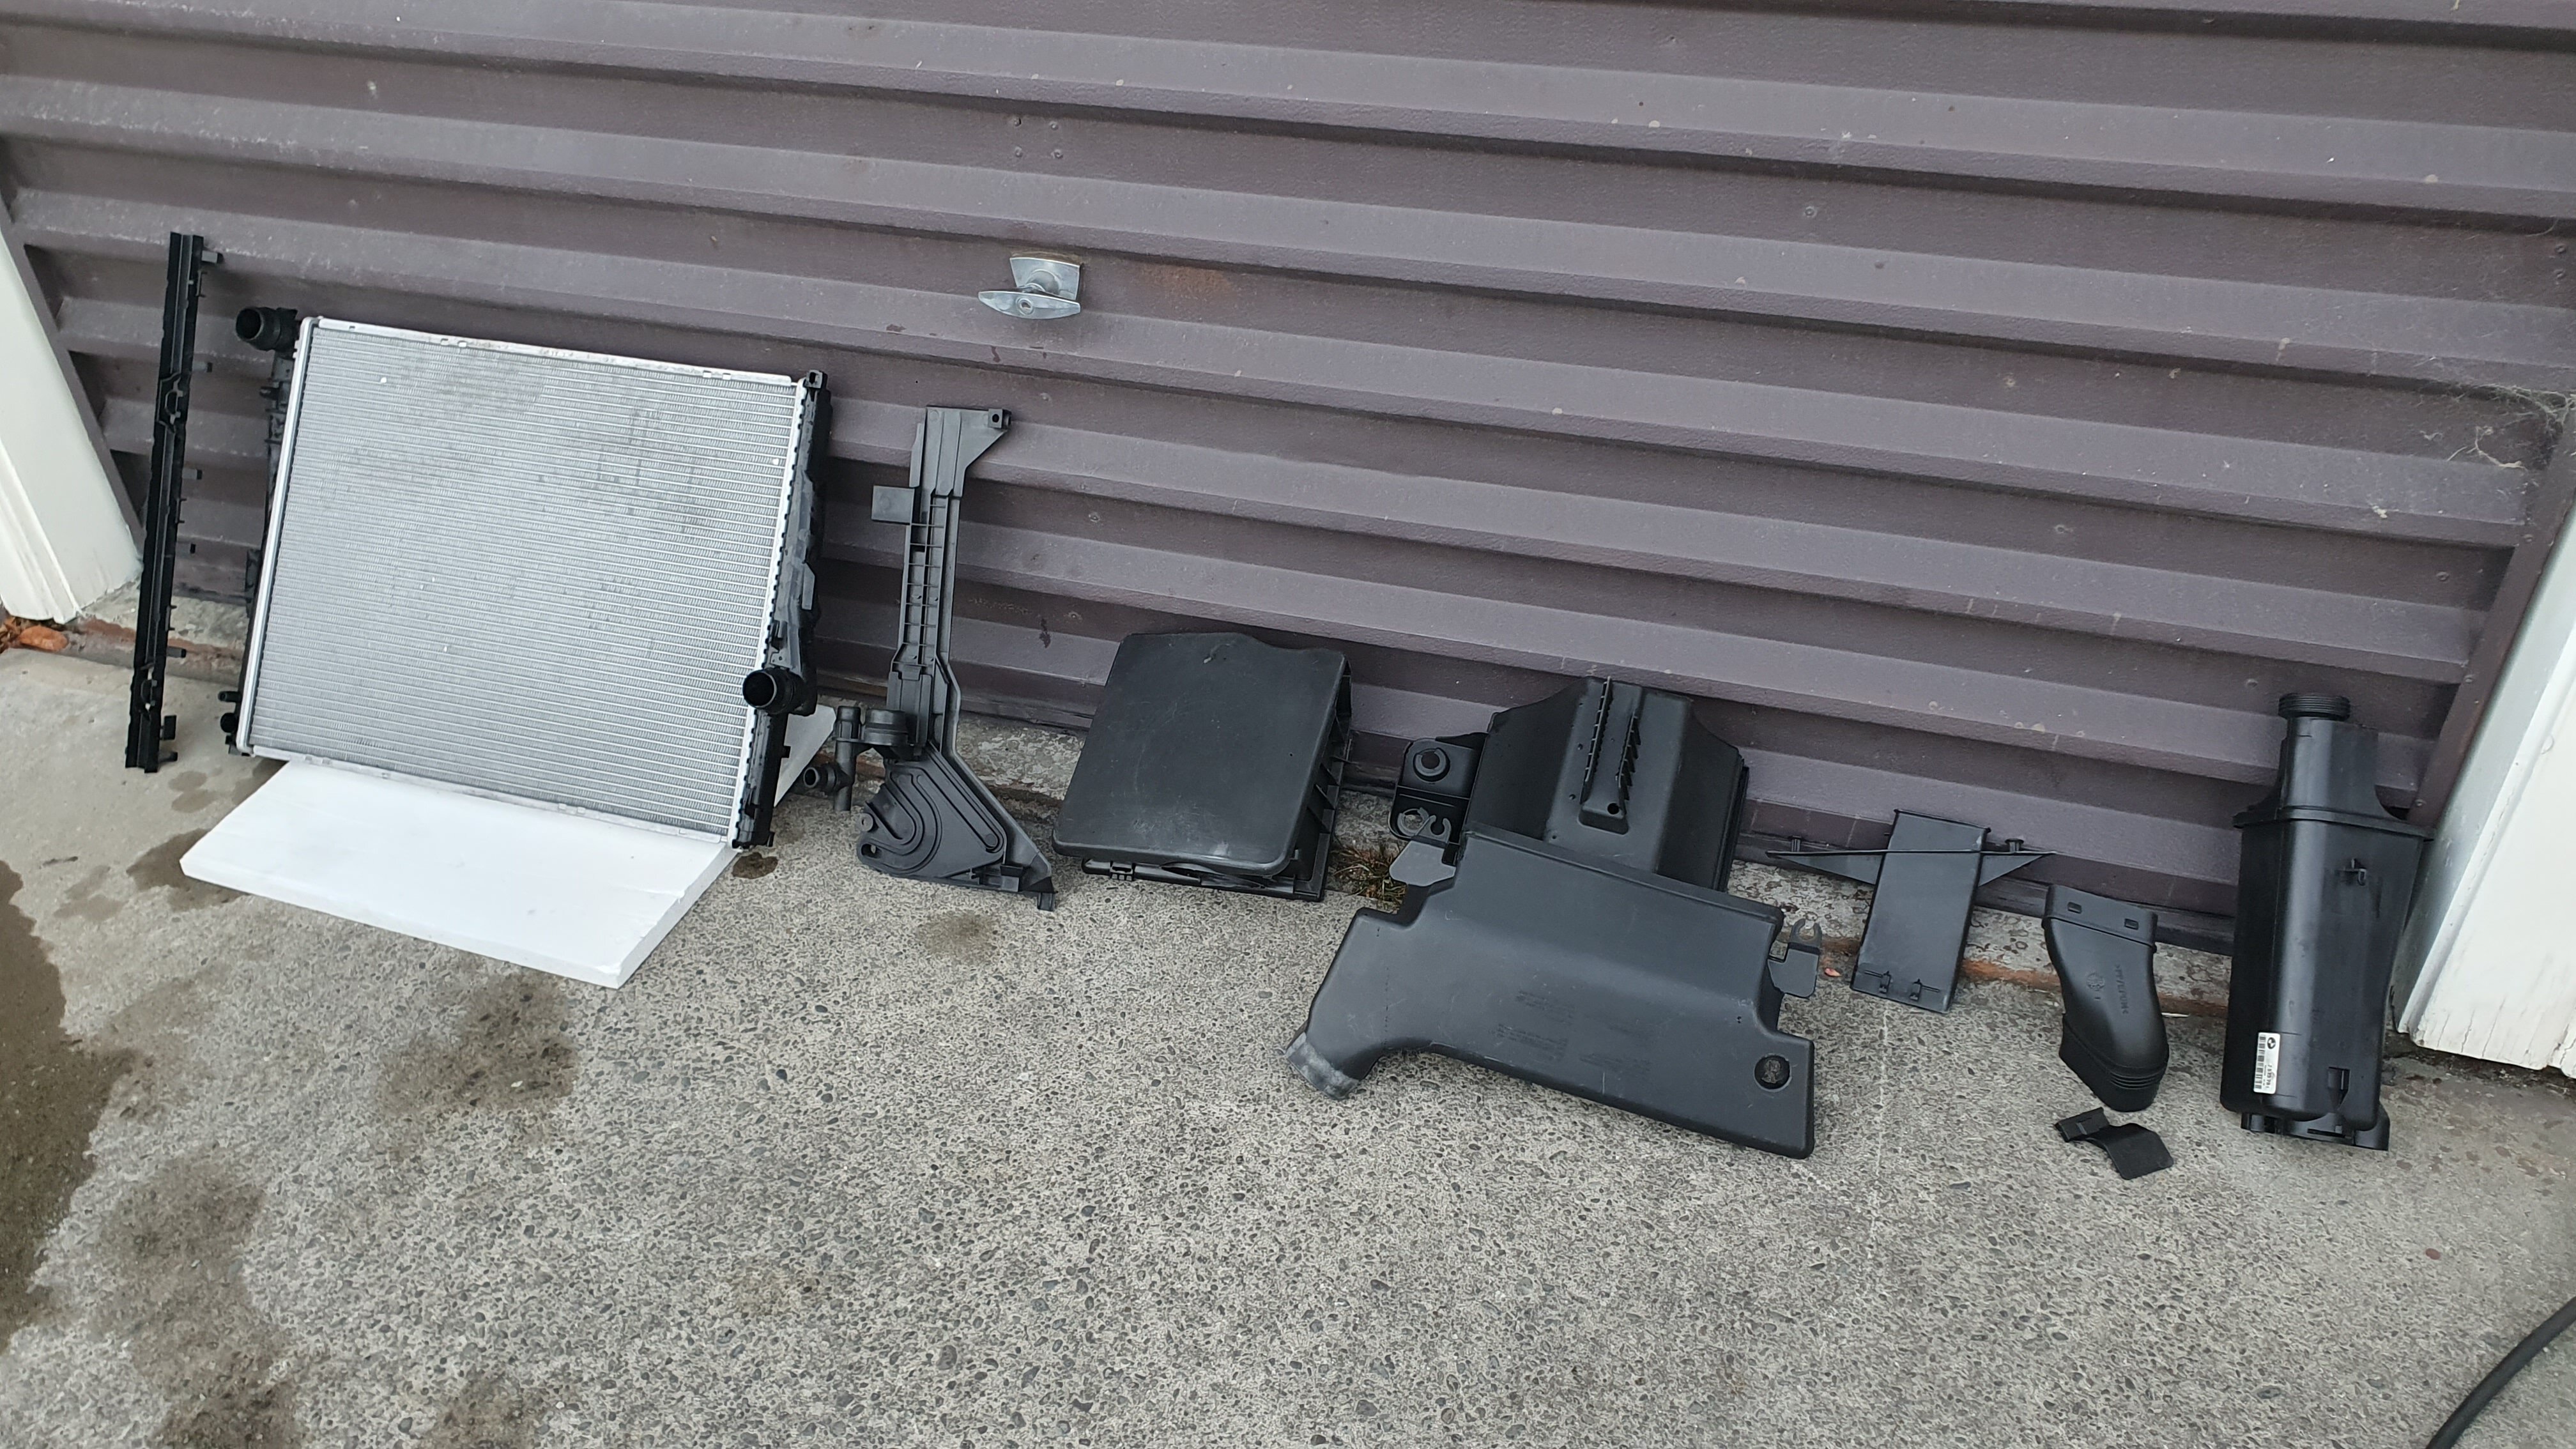
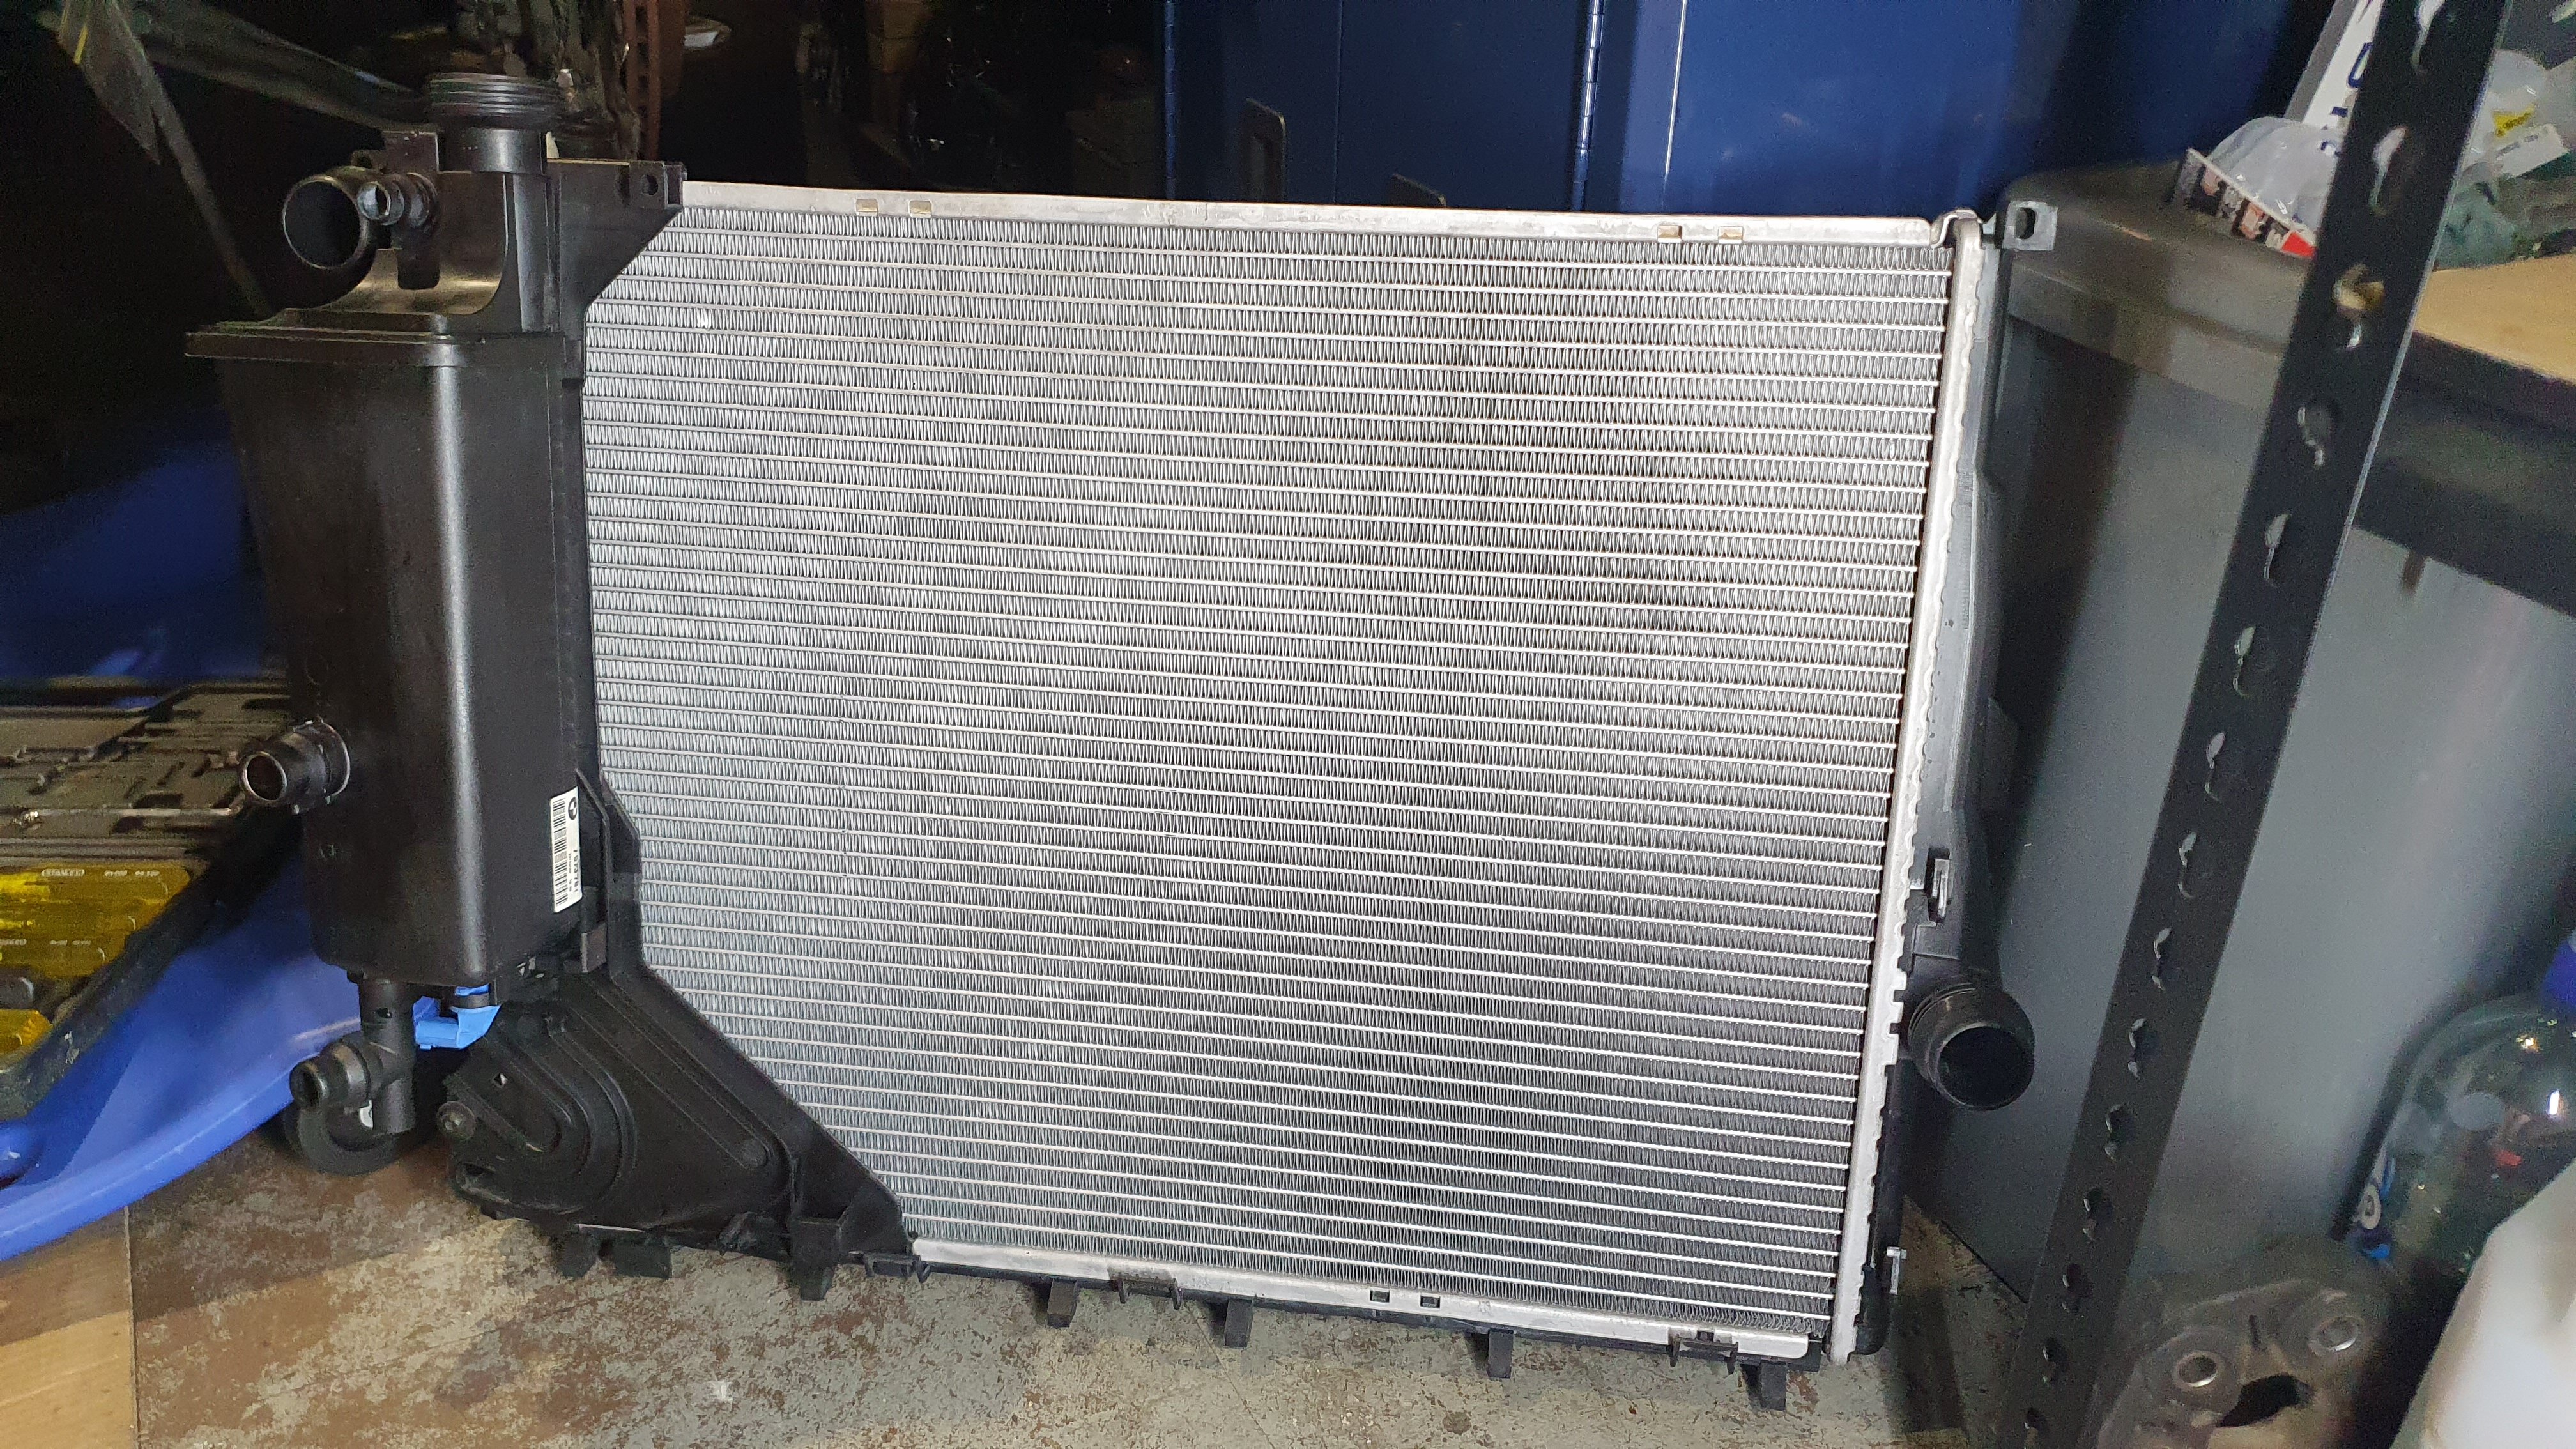
Washed all the cooling system and intake components and threw those on. The radiator and associated hoses are barely two years old from when I first bought the car, the engine donor also came with a near new genuine expansion tank dated 2020 so happy enough to reuse that for the time being.
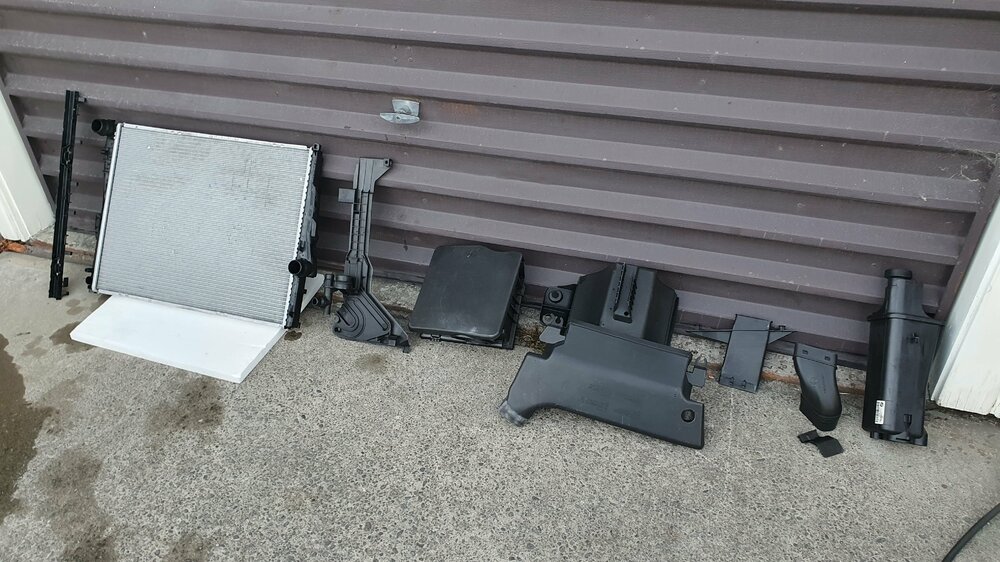
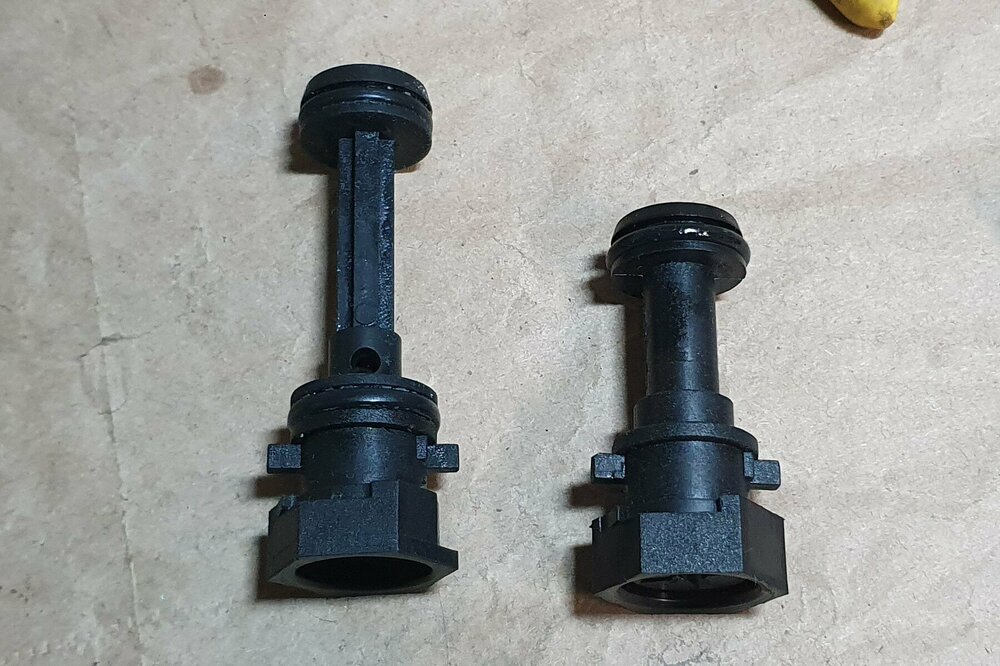
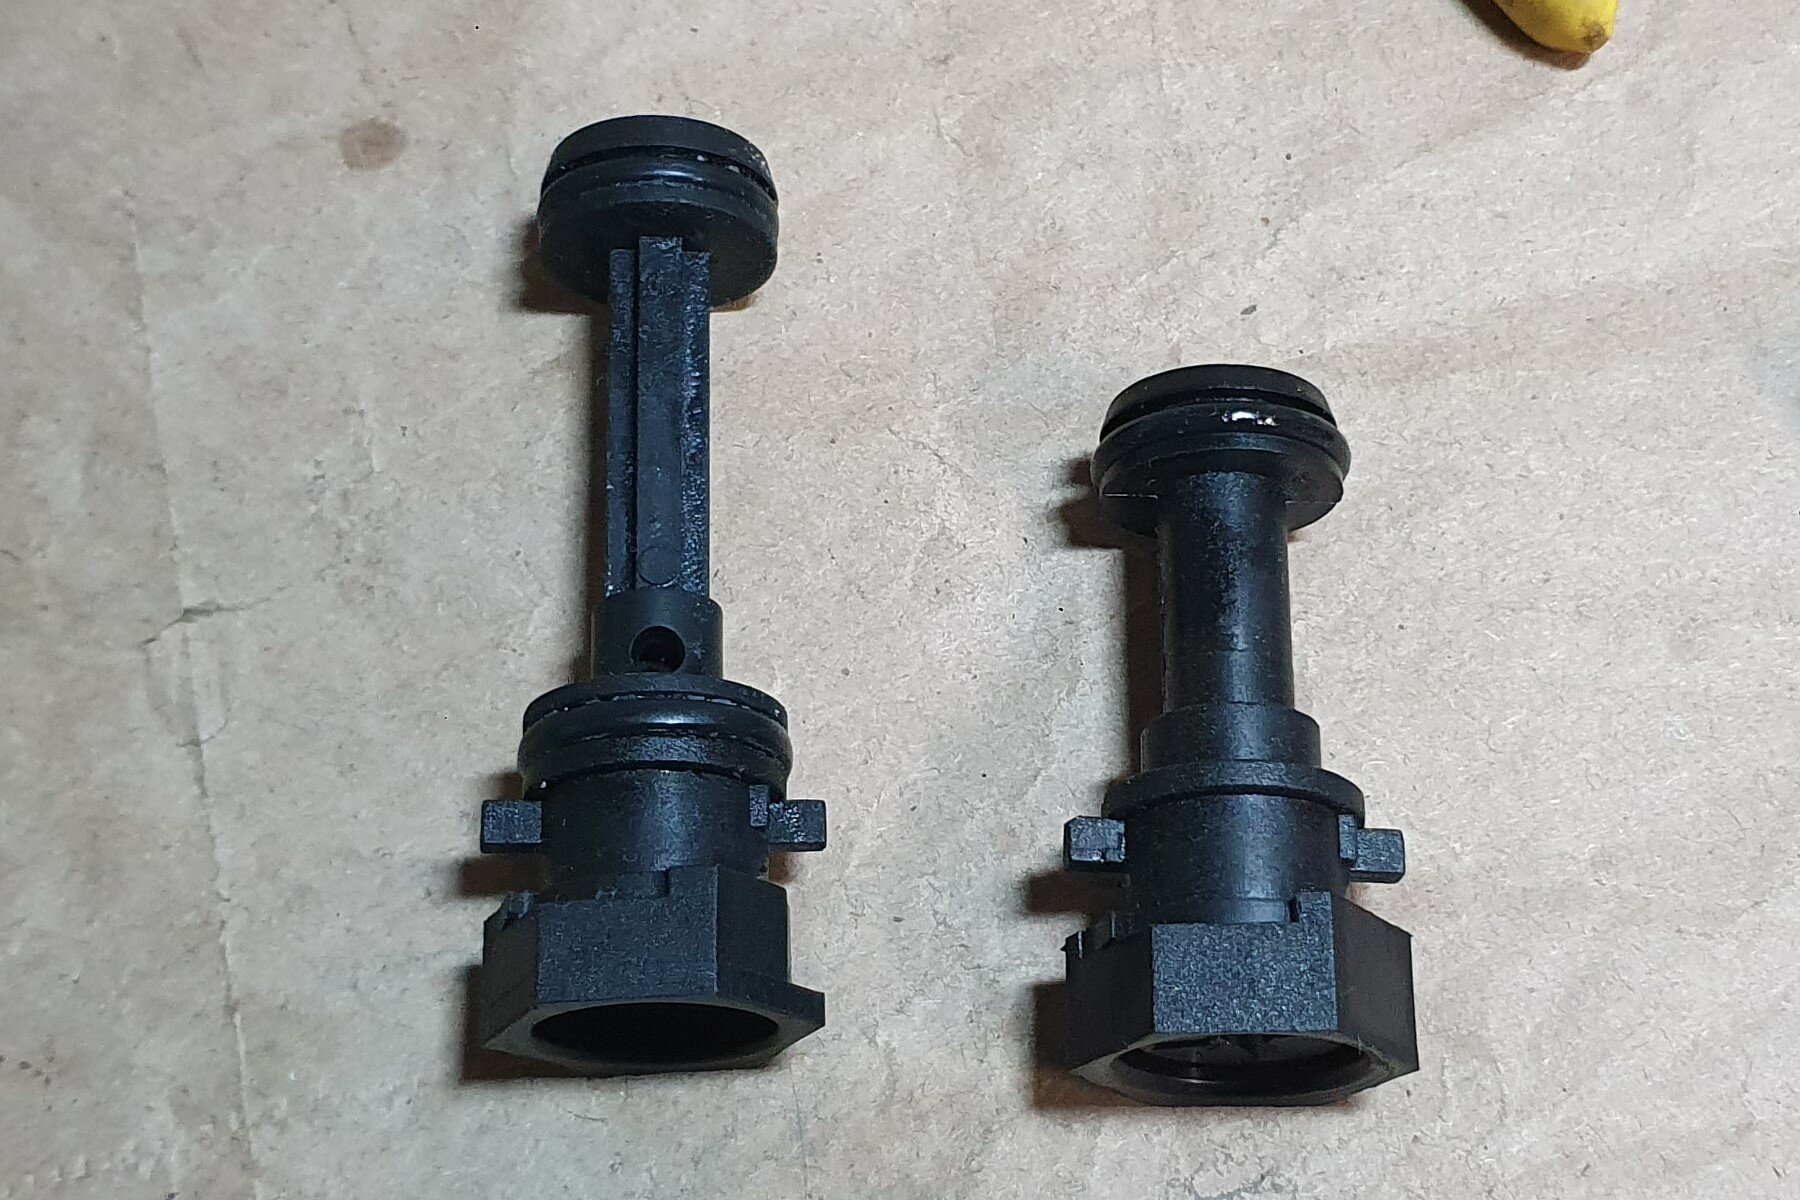
Made sure I got the manual radiator bracket along with the manual conversion so it all looks as it should and doesn't have the blocked off auto trans cooler dangling off the front. Remembered to switch over the radiator plugs from auto (left) to manual (right).
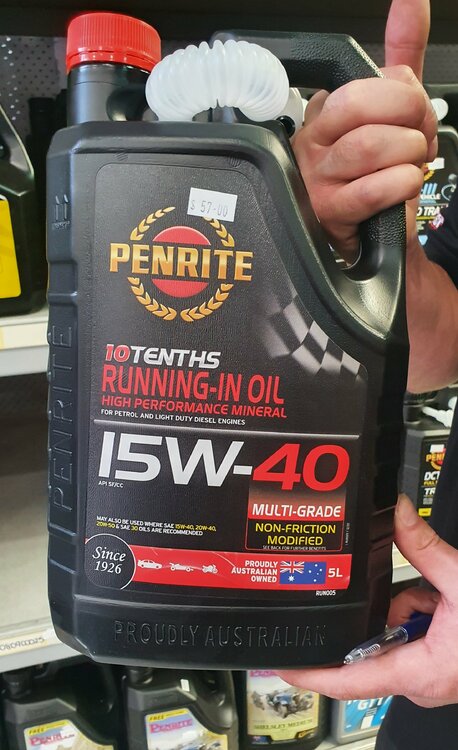
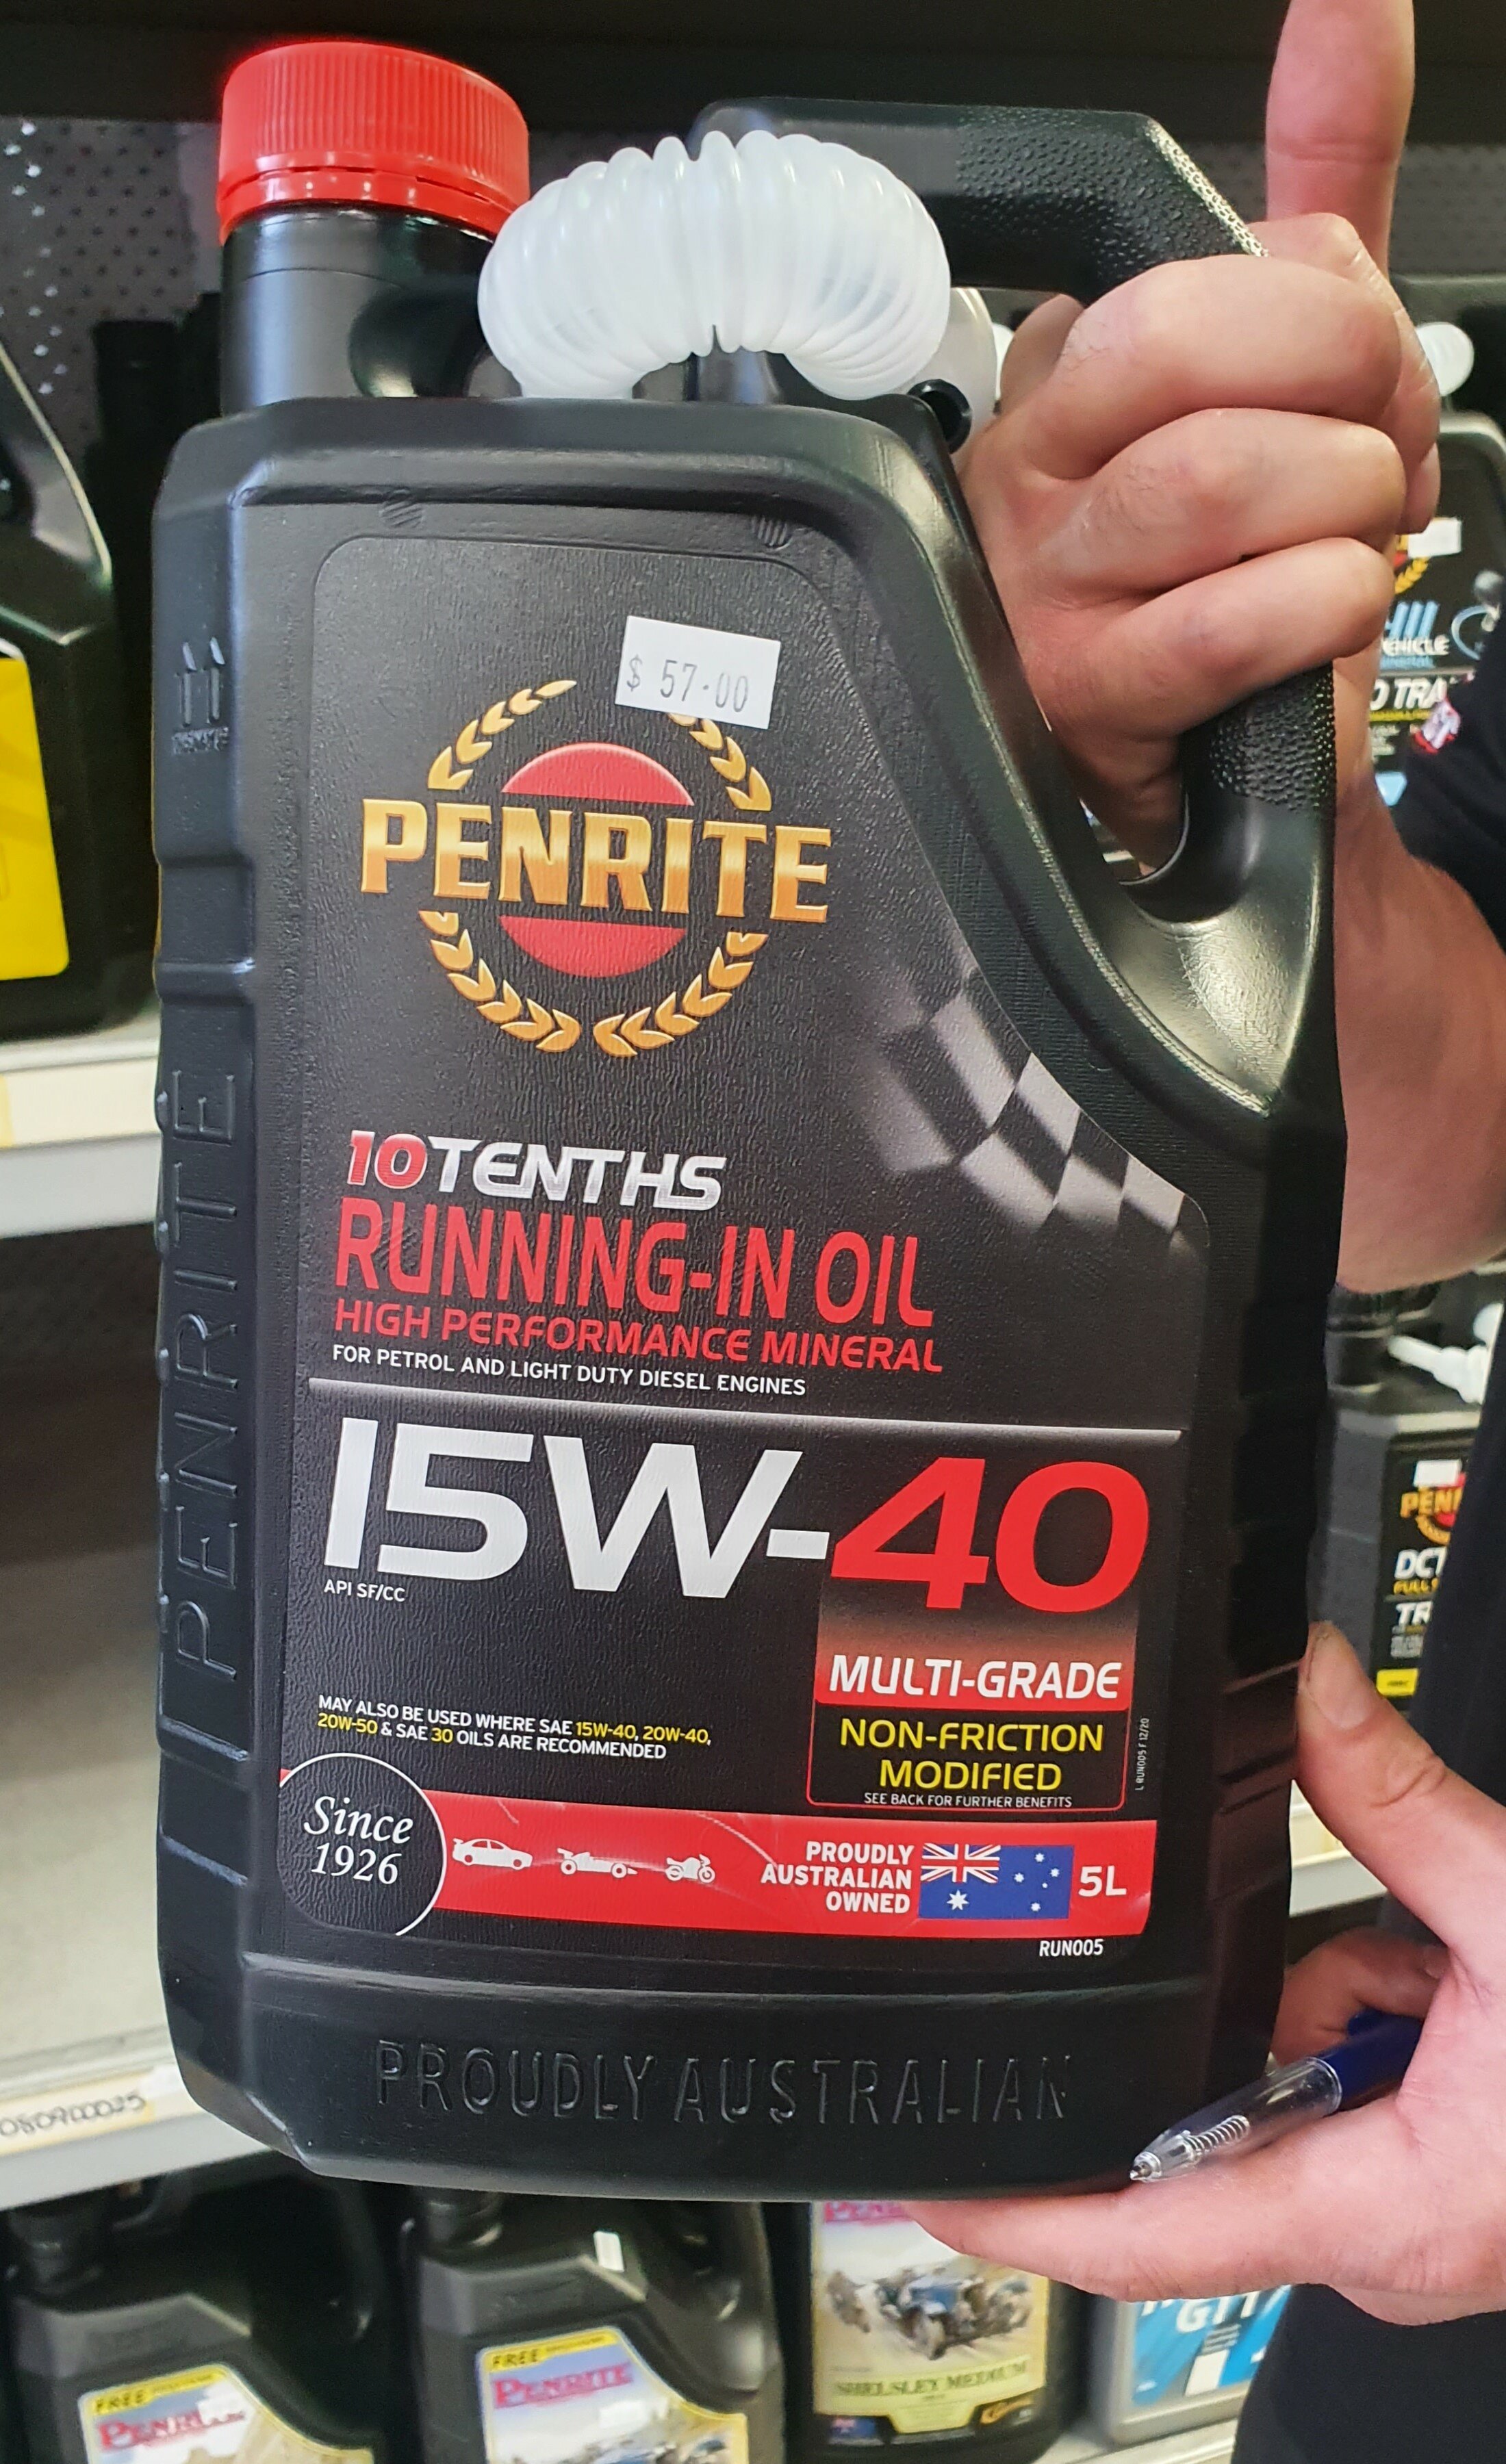
Filled the engine up with oil and turned it over a bunch of times by hand. Going with Penrite 15W-40 special running in oil for the break in period. Have heard good things about it so am sure it'll do the job. Will then switch back over to Castrol Edge 5W-30 that I've built up a decent stockpile of. Am also just using straight distilled water in the cooling system to start with.
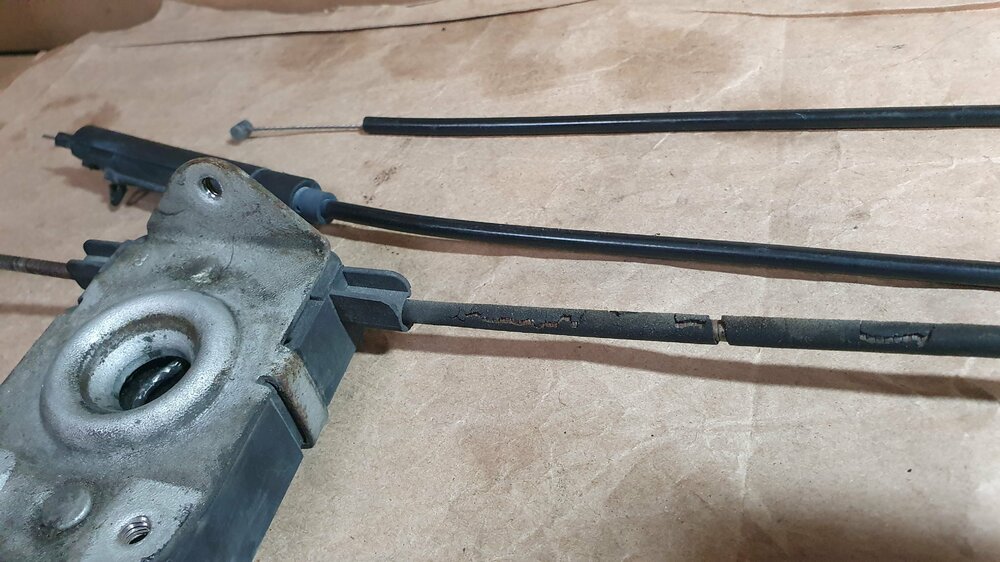
Just doing a tonne of cleaning and tidying up small annoyances like missing/broken clips and other imperfections that I have easy access to still. Not sure what sort of environment this car used to be in back in Japan but am noticing some weird items wearing away that I haven't noticed happen on other cars. The latest example being the hood latch cables, the plastic/rubber sleeve on which had completely crumbled away. Went for my ritualistic scavenge to Pick-A-Part and none of the cars there were suffering from a similar disease so was an easy search for a replacement. Luckily an easy task replacing the cables themselves as well without having to change the lock mechanisms. Gave those a clean and dash of grease whilst having the whole thing apart.
Hoping to receive the parts package this week still so can finish things off in the engine bay. Will put the front end back together in the meantime.
-
4
-
-
Nice stuff. Wish I had any sort of welding experience, will have to bribe a mate to give mine the treatment.
What was the reason you went with MK over CMP's subframe bushes?
-
Sorry to hijack a bit but what are people's thoughts on HPR 5? Have always stuck to Castrol Edge 5w-30 but seen a few jump ship. Any reason to go for one over the other or just what's cheaper at the time?
-
She's in!

-
4
-
-
Ended up having no luck with the exhaust manifold gaskets. Pulled one apart but the indent pattern is different between the two so gave up. A few more shops should be open tomorrow so will try my luck but pretty much resigned to dropping the engine in without them attached.
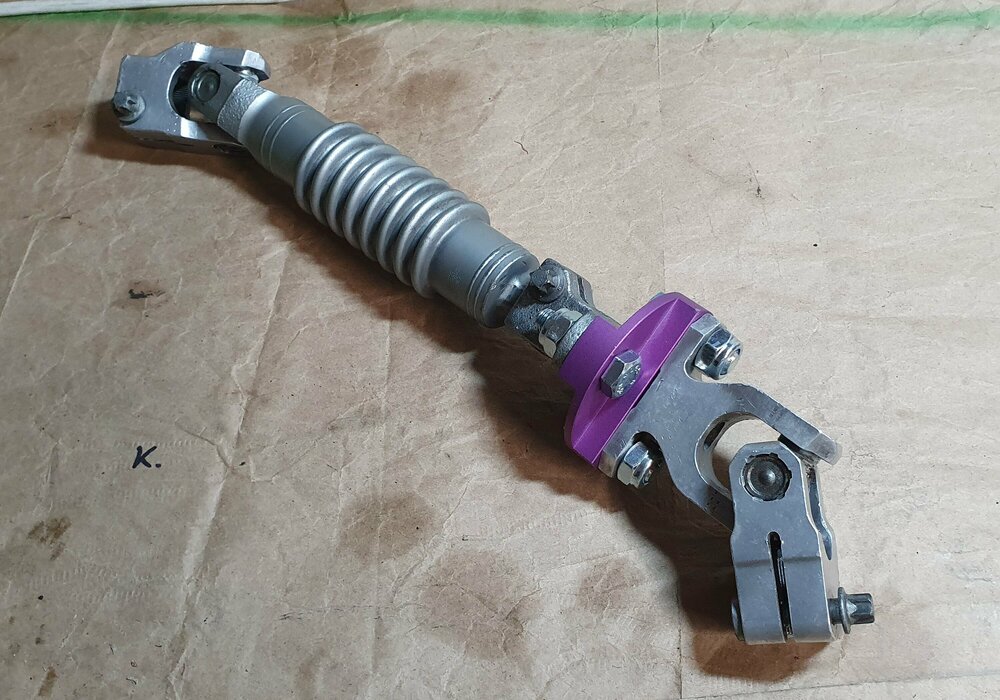
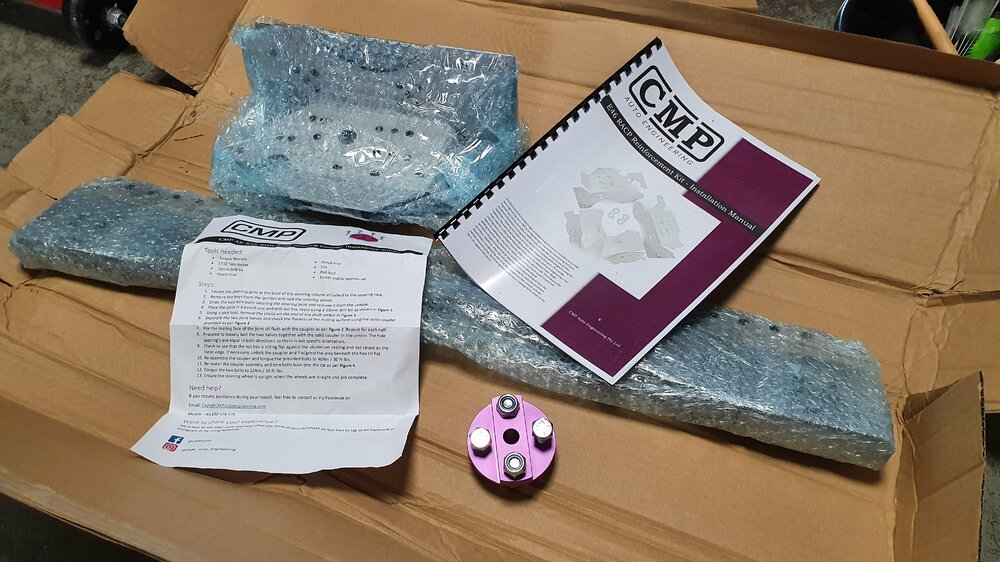
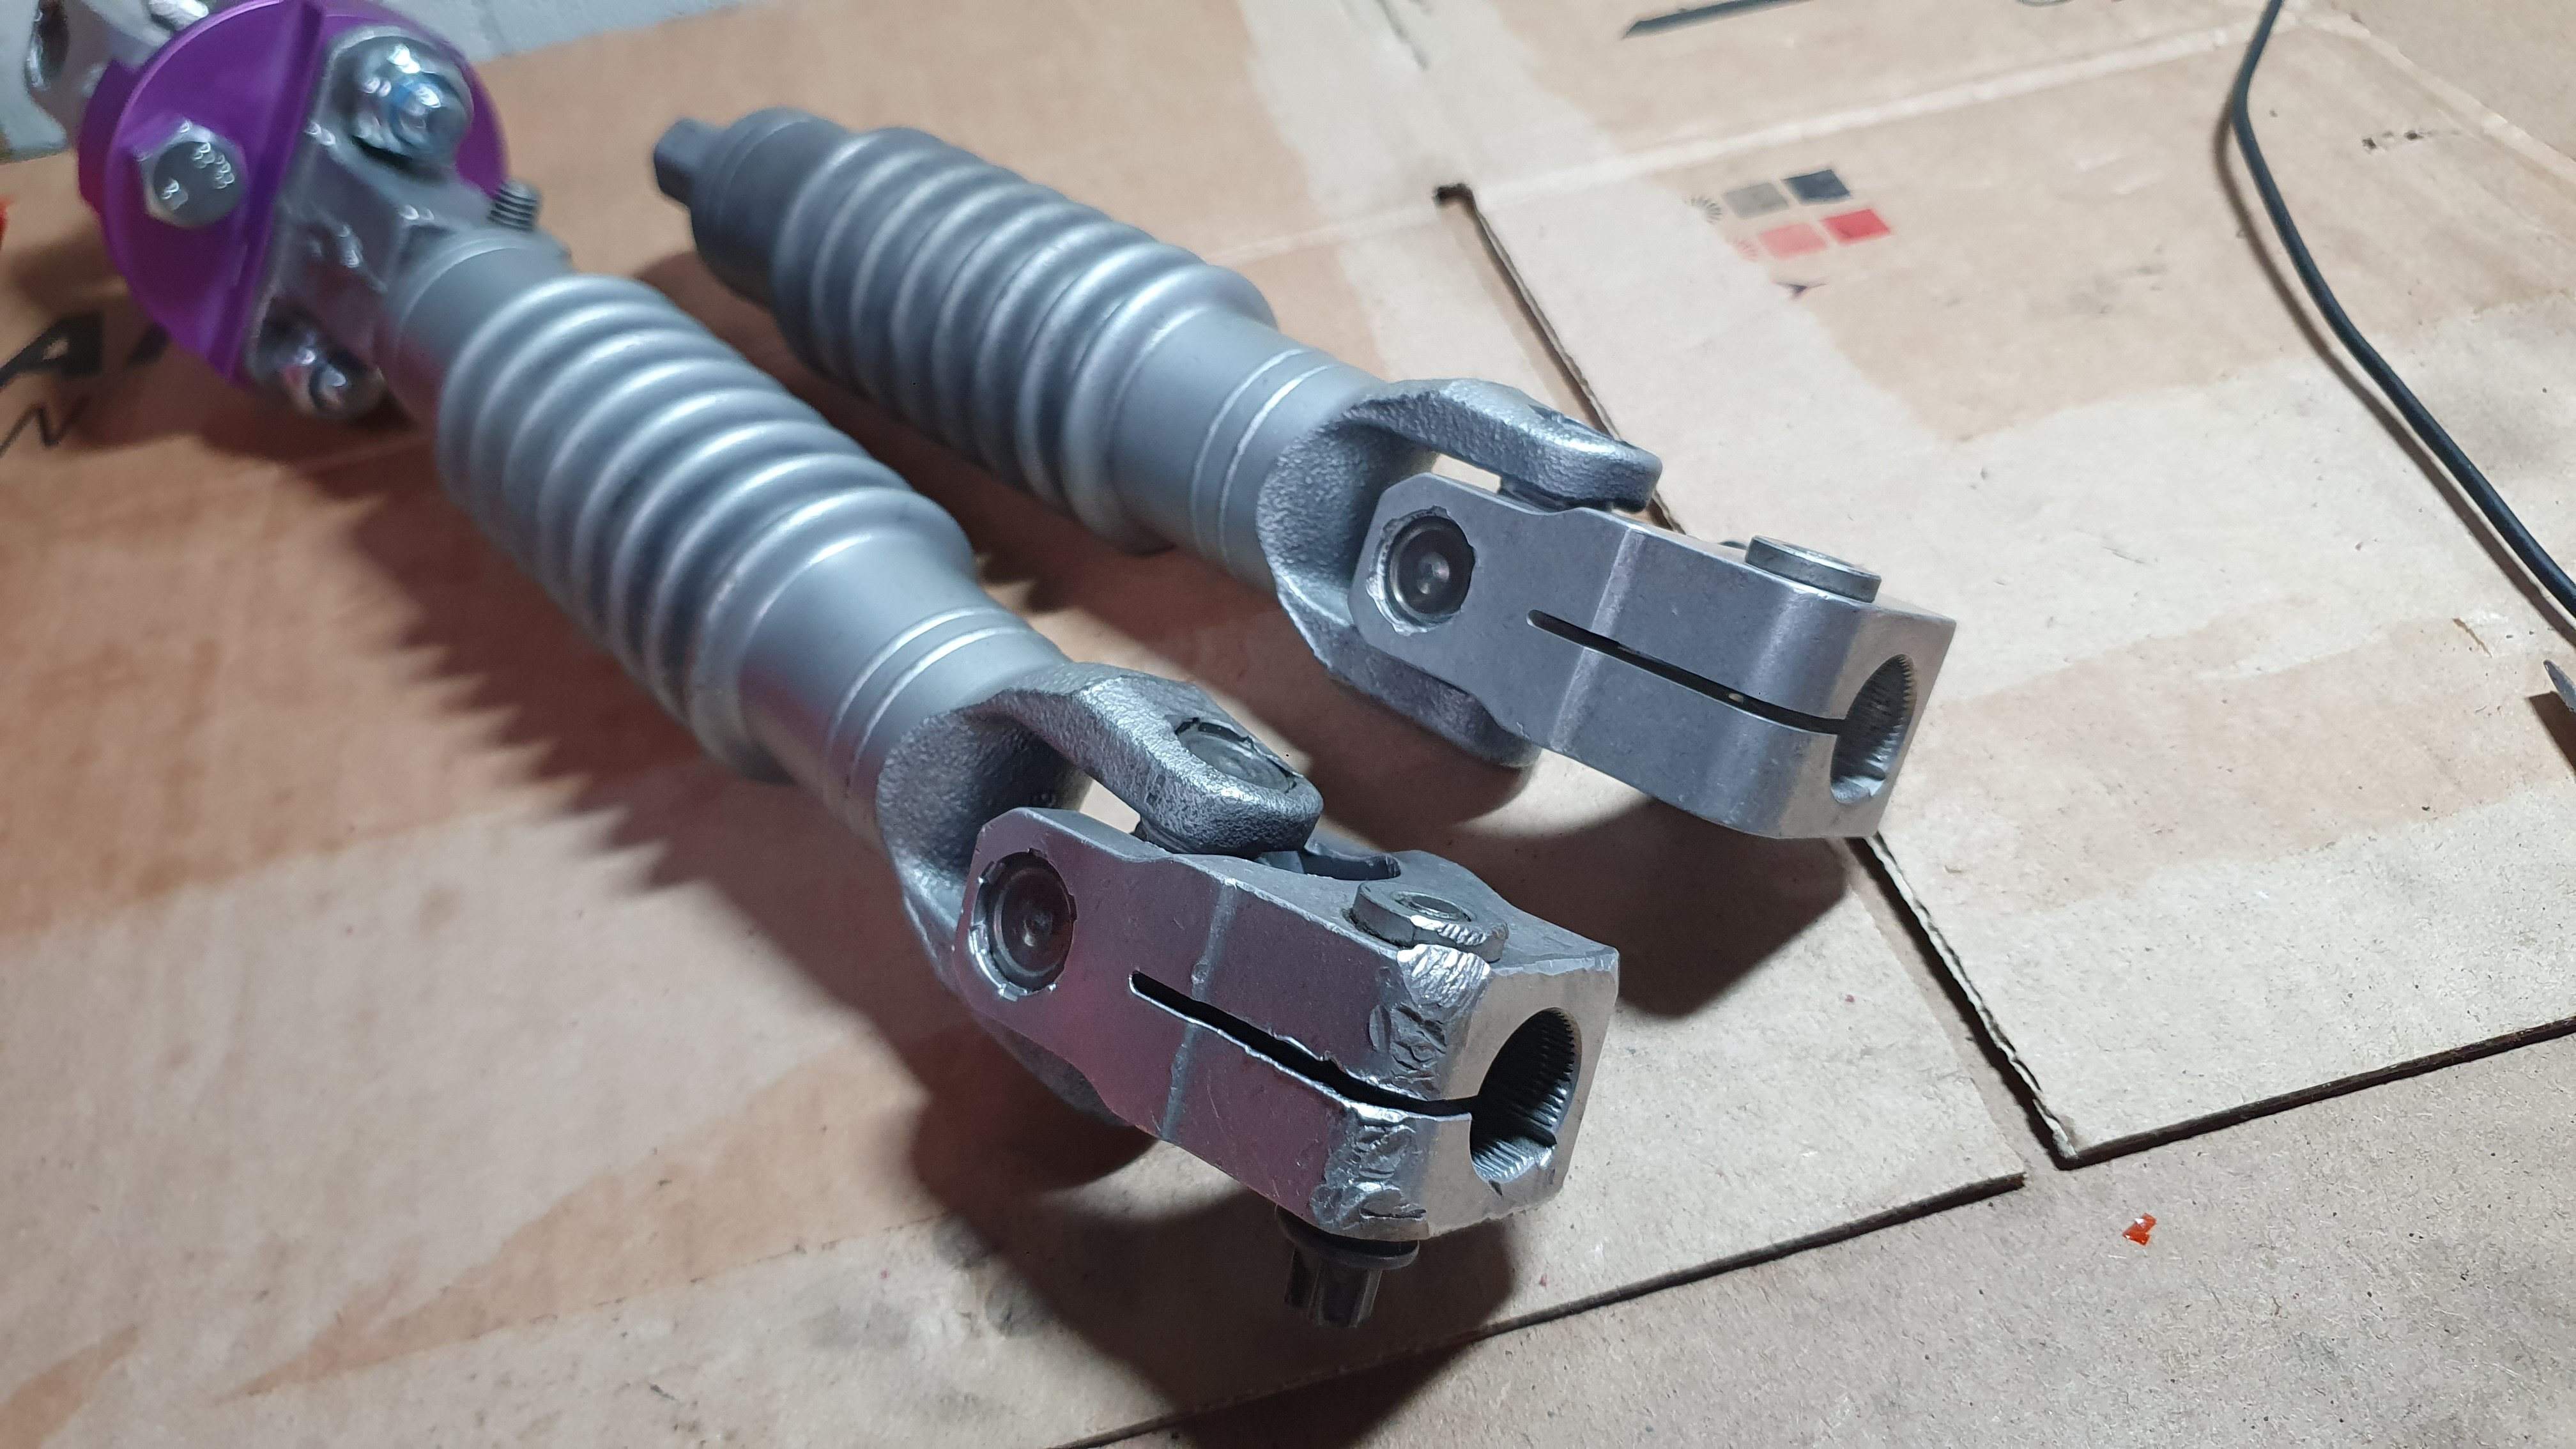
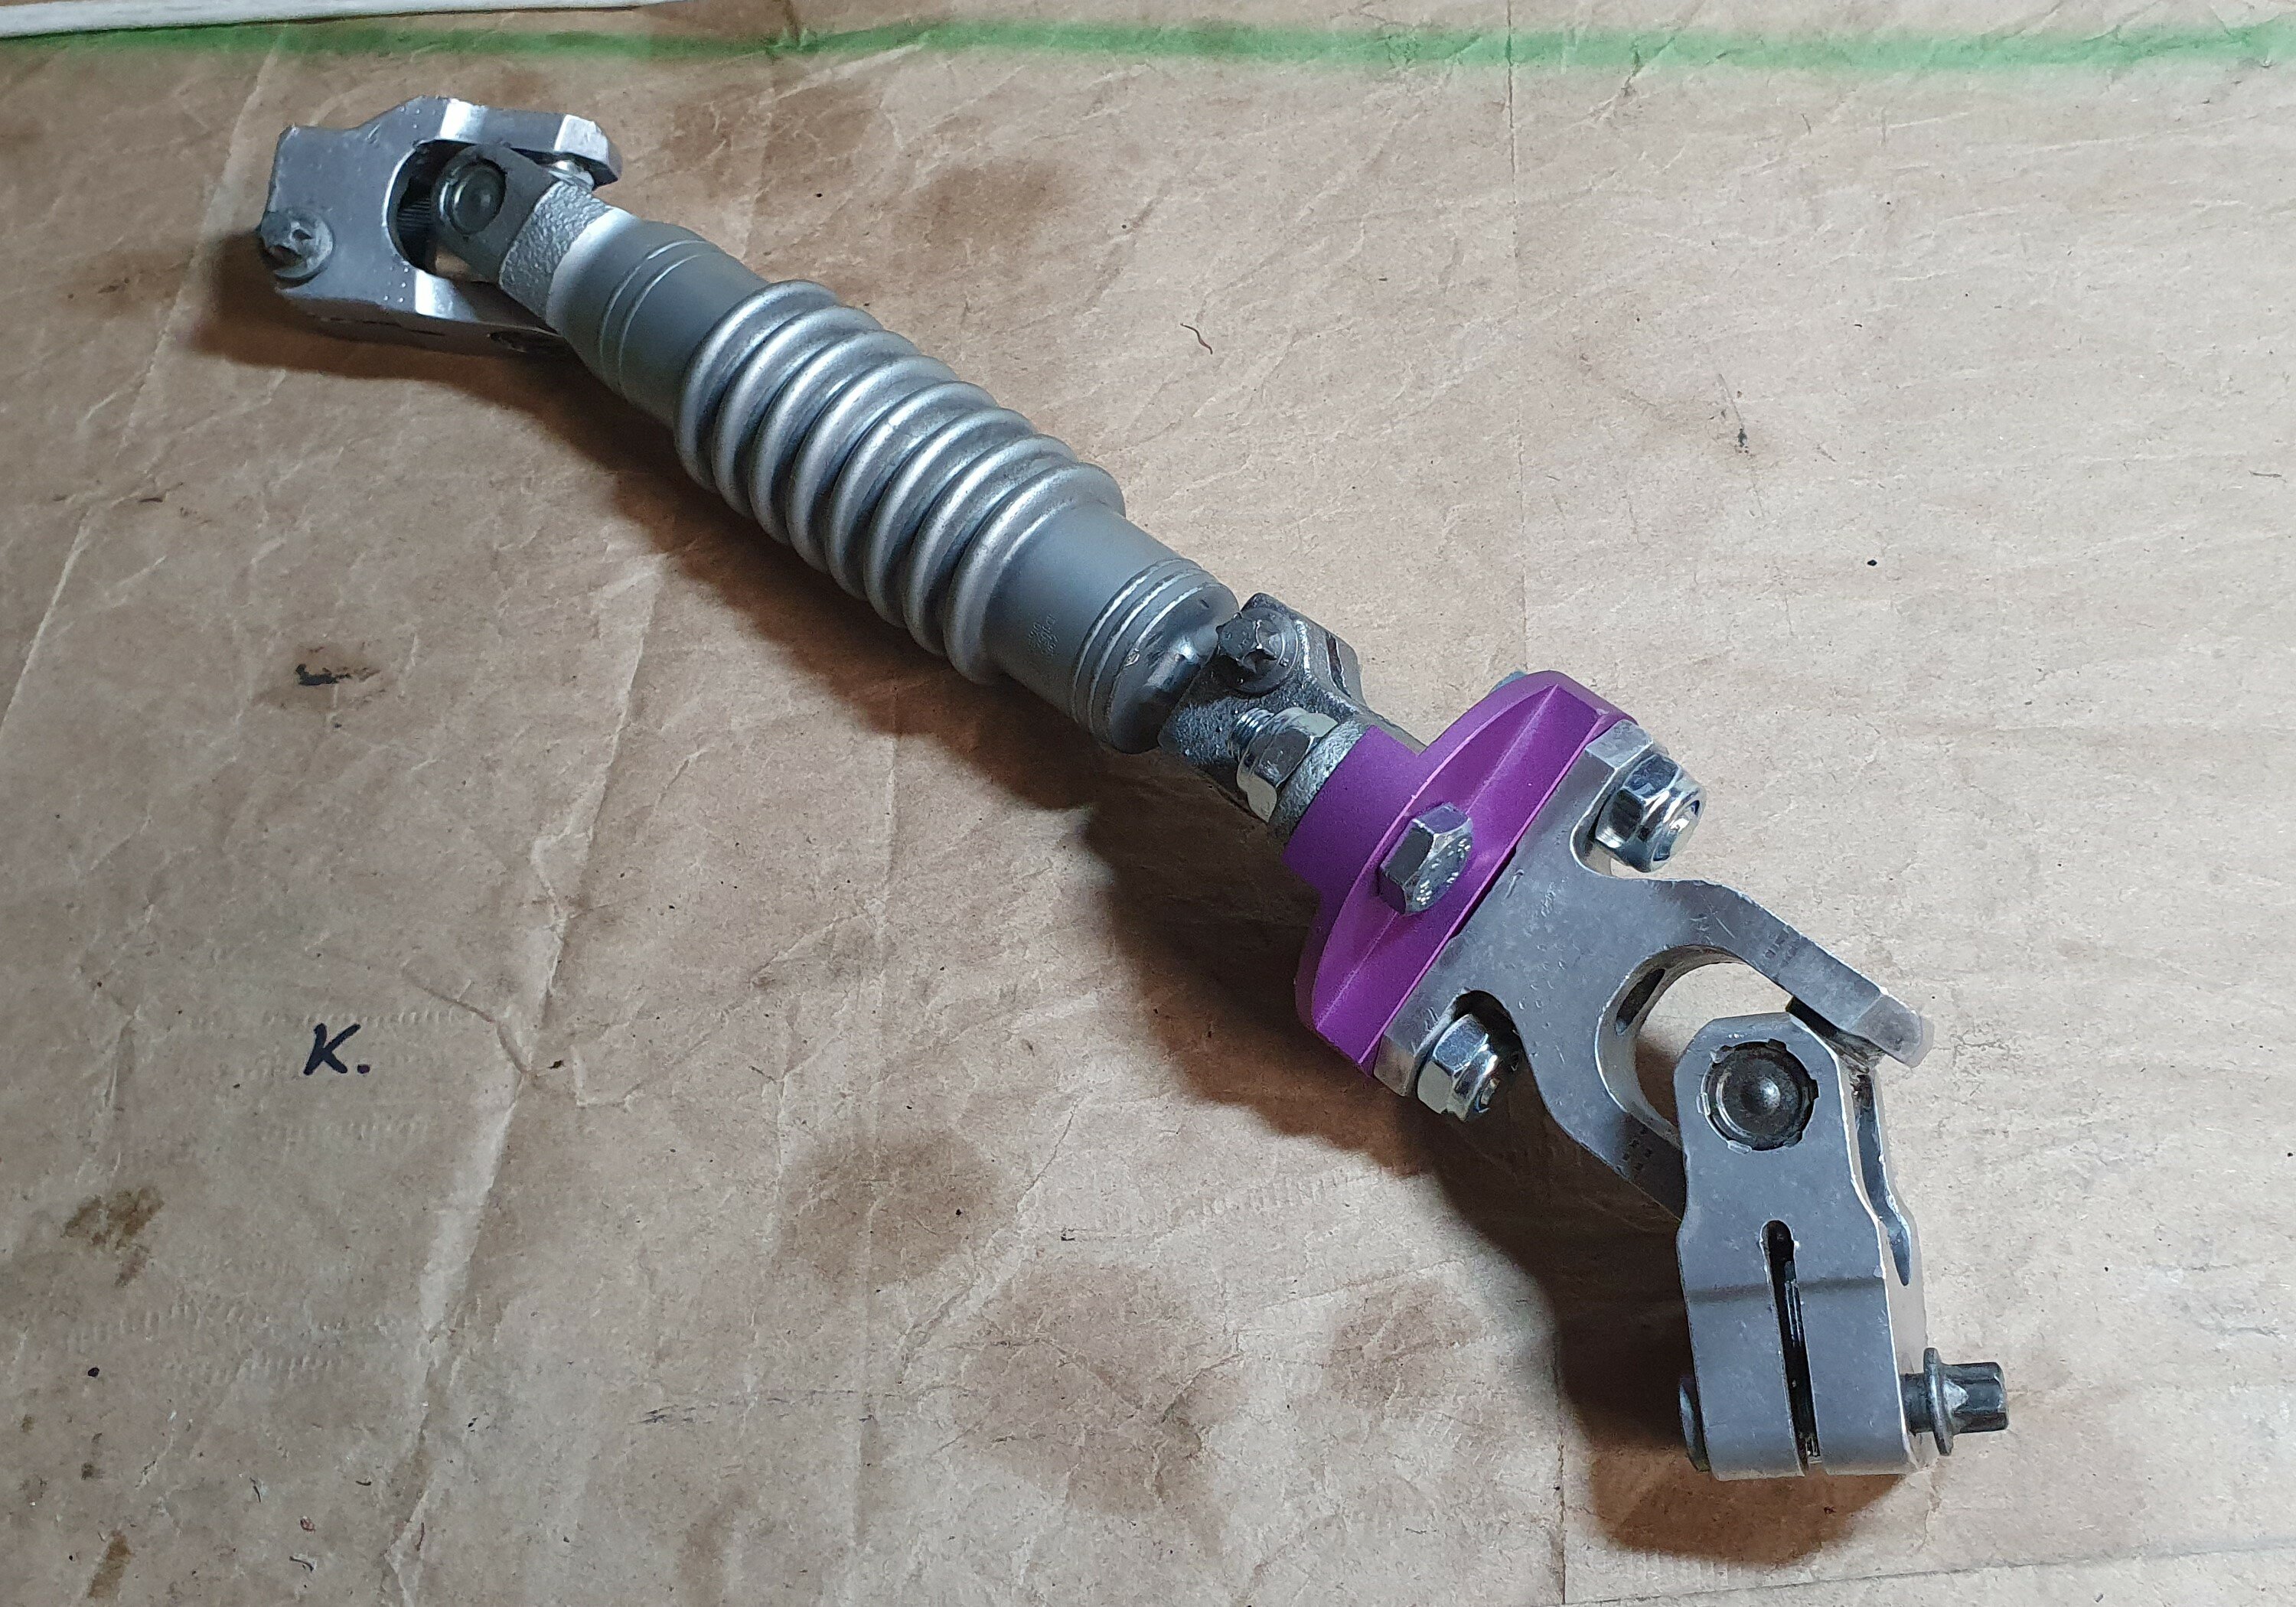
Put that to the side and got onto fixing up the steering coupling. Somewhere along the line it got gifted with this masterpiece from Ireland Engineering. Can appreciate the intention behind it but what an absolute piece of sh*t it is. I suspect it would be around 4-5 years old but already very soft and insanely squeaky.
Video: Ireland Engineering Steering Coupling
Compare that to the stock 20-year old rubber one from the engine donor car that still feels solid as (the cracking is coming from my wrist...)
Video: Original Rubber Steering Coupling
If anyone thinking of doing this "upgrade" ever happens to see this - DON'T.
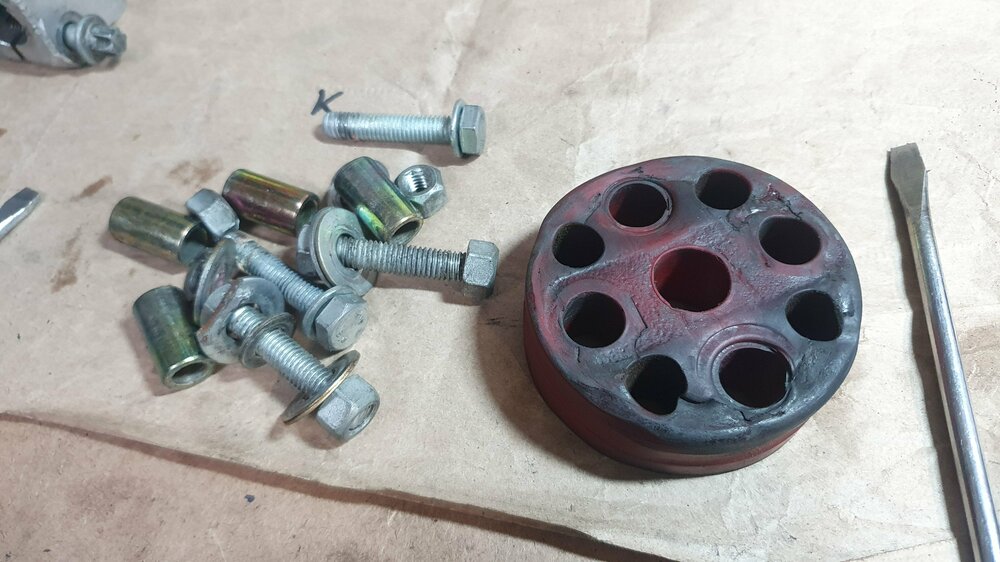

Got the parts nicely cleaned up, put a dash of white lithium grease on the pivot points and bolted the thing up. Did have to drill the holes a size bigger to fit the M10 8.8 bolts.
Was going to put the heatshield back on to make it a bit less conspicuous but that was just too mangled up to be of any use.
Haven't looked into what the cert/WoF verdict might be on it but can easily throw on the original spare coupling if they deem it an issue.
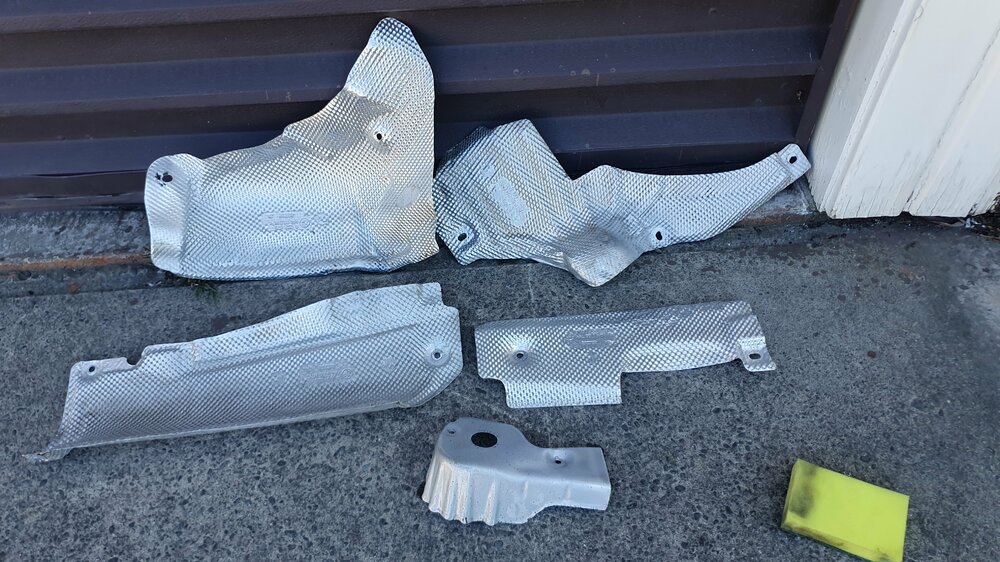
Otherwise, the freshly cleaned heat shields all bolted up, pretty much set for the engine install. Have a mate coming around tomorrow to help with the manoeuvring. Really regret not getting the AC system drained prior to this whole endeavour as that'll be a bastard to dance around but... will manage.
Tomorrow is the day.
-
3
-
-
Actually, just dropped the old set by accident and the heatshield and gasket just came apart. The gaskets themselves look identical. Will see if I can tidily separate the new gaskets and just clean up and reuse the old heatshields instead. Fingers crossed 🤞
-
1
-
-
The Eibach ones are a bit cheaper, look somehow beefier and tidier as well, to me anyway. But either or really.
I wouldn't bother painting the RTAB's if I were you. They're tucked away in the pocket anyway, don't think you'll see much of them even with the car jacked up. Would probably scratch the paint off installing them anyway. I won't be bothering with the subframe mounts either.
Send me a list of what you're after, will put in an order on a set tonight. Spareto has them in so will go with them, although not sure if they're priced each or come as a set/pair.
Just spent 2 hours driving around town checking all the Euro shops. Even the ones that are supposedly meant to be open according to Google Maps, Facebook etc. are all closed up. Not even a printout of their holiday schedule taped to the front door or anything on any of them. How bloody hard is that to do? A few are supposedly open tomorrow, as well as BMW themselves so will try my luck finding something locally still, but worth having a set on the way as backup anyway.
-
I'm thinking of these for the camber arms. I know the Hardrace ones are known to have no trouble going through cert but asked my cert guy about the Eibach ones, said they'd need to inspect the welds but overall should still be up to standard. Willing to take my chances, not really keen on introducing all sorts of silly colors. Was one of the reasons why I also opted for Eibach springs and B4's instead of the blueish H&R's and yellow B6's. Will be painting the brake calipers straight black as well so will be nice and clean.
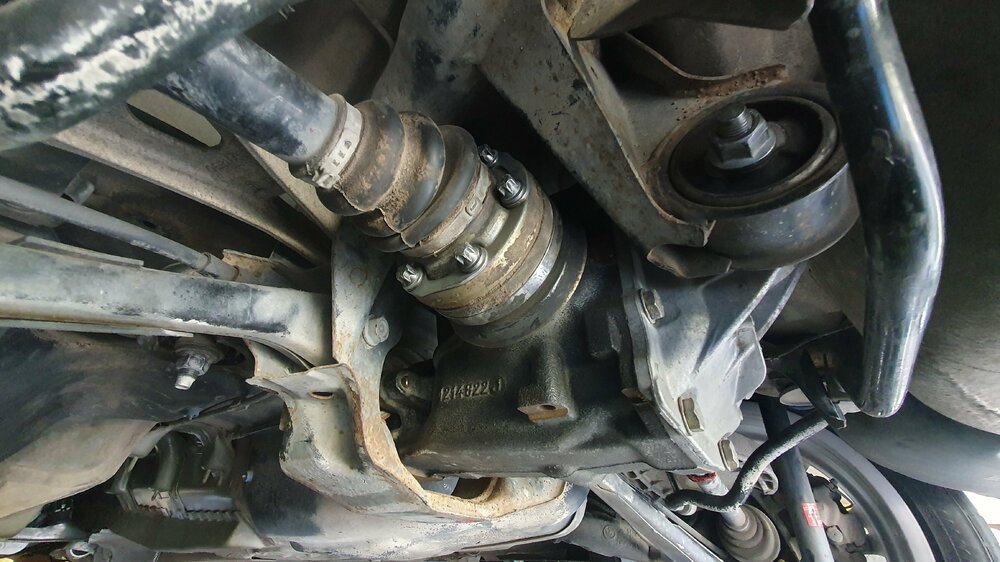
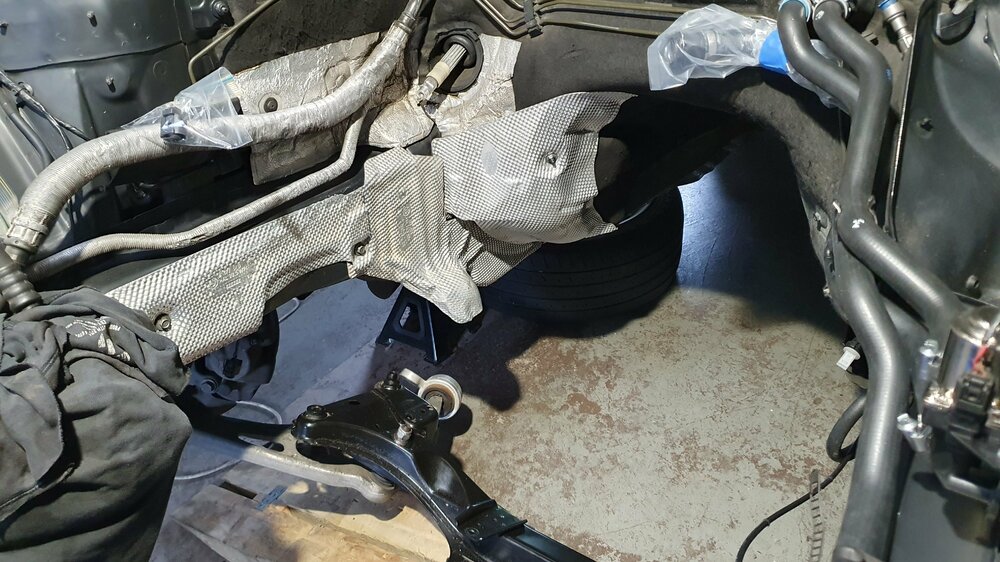
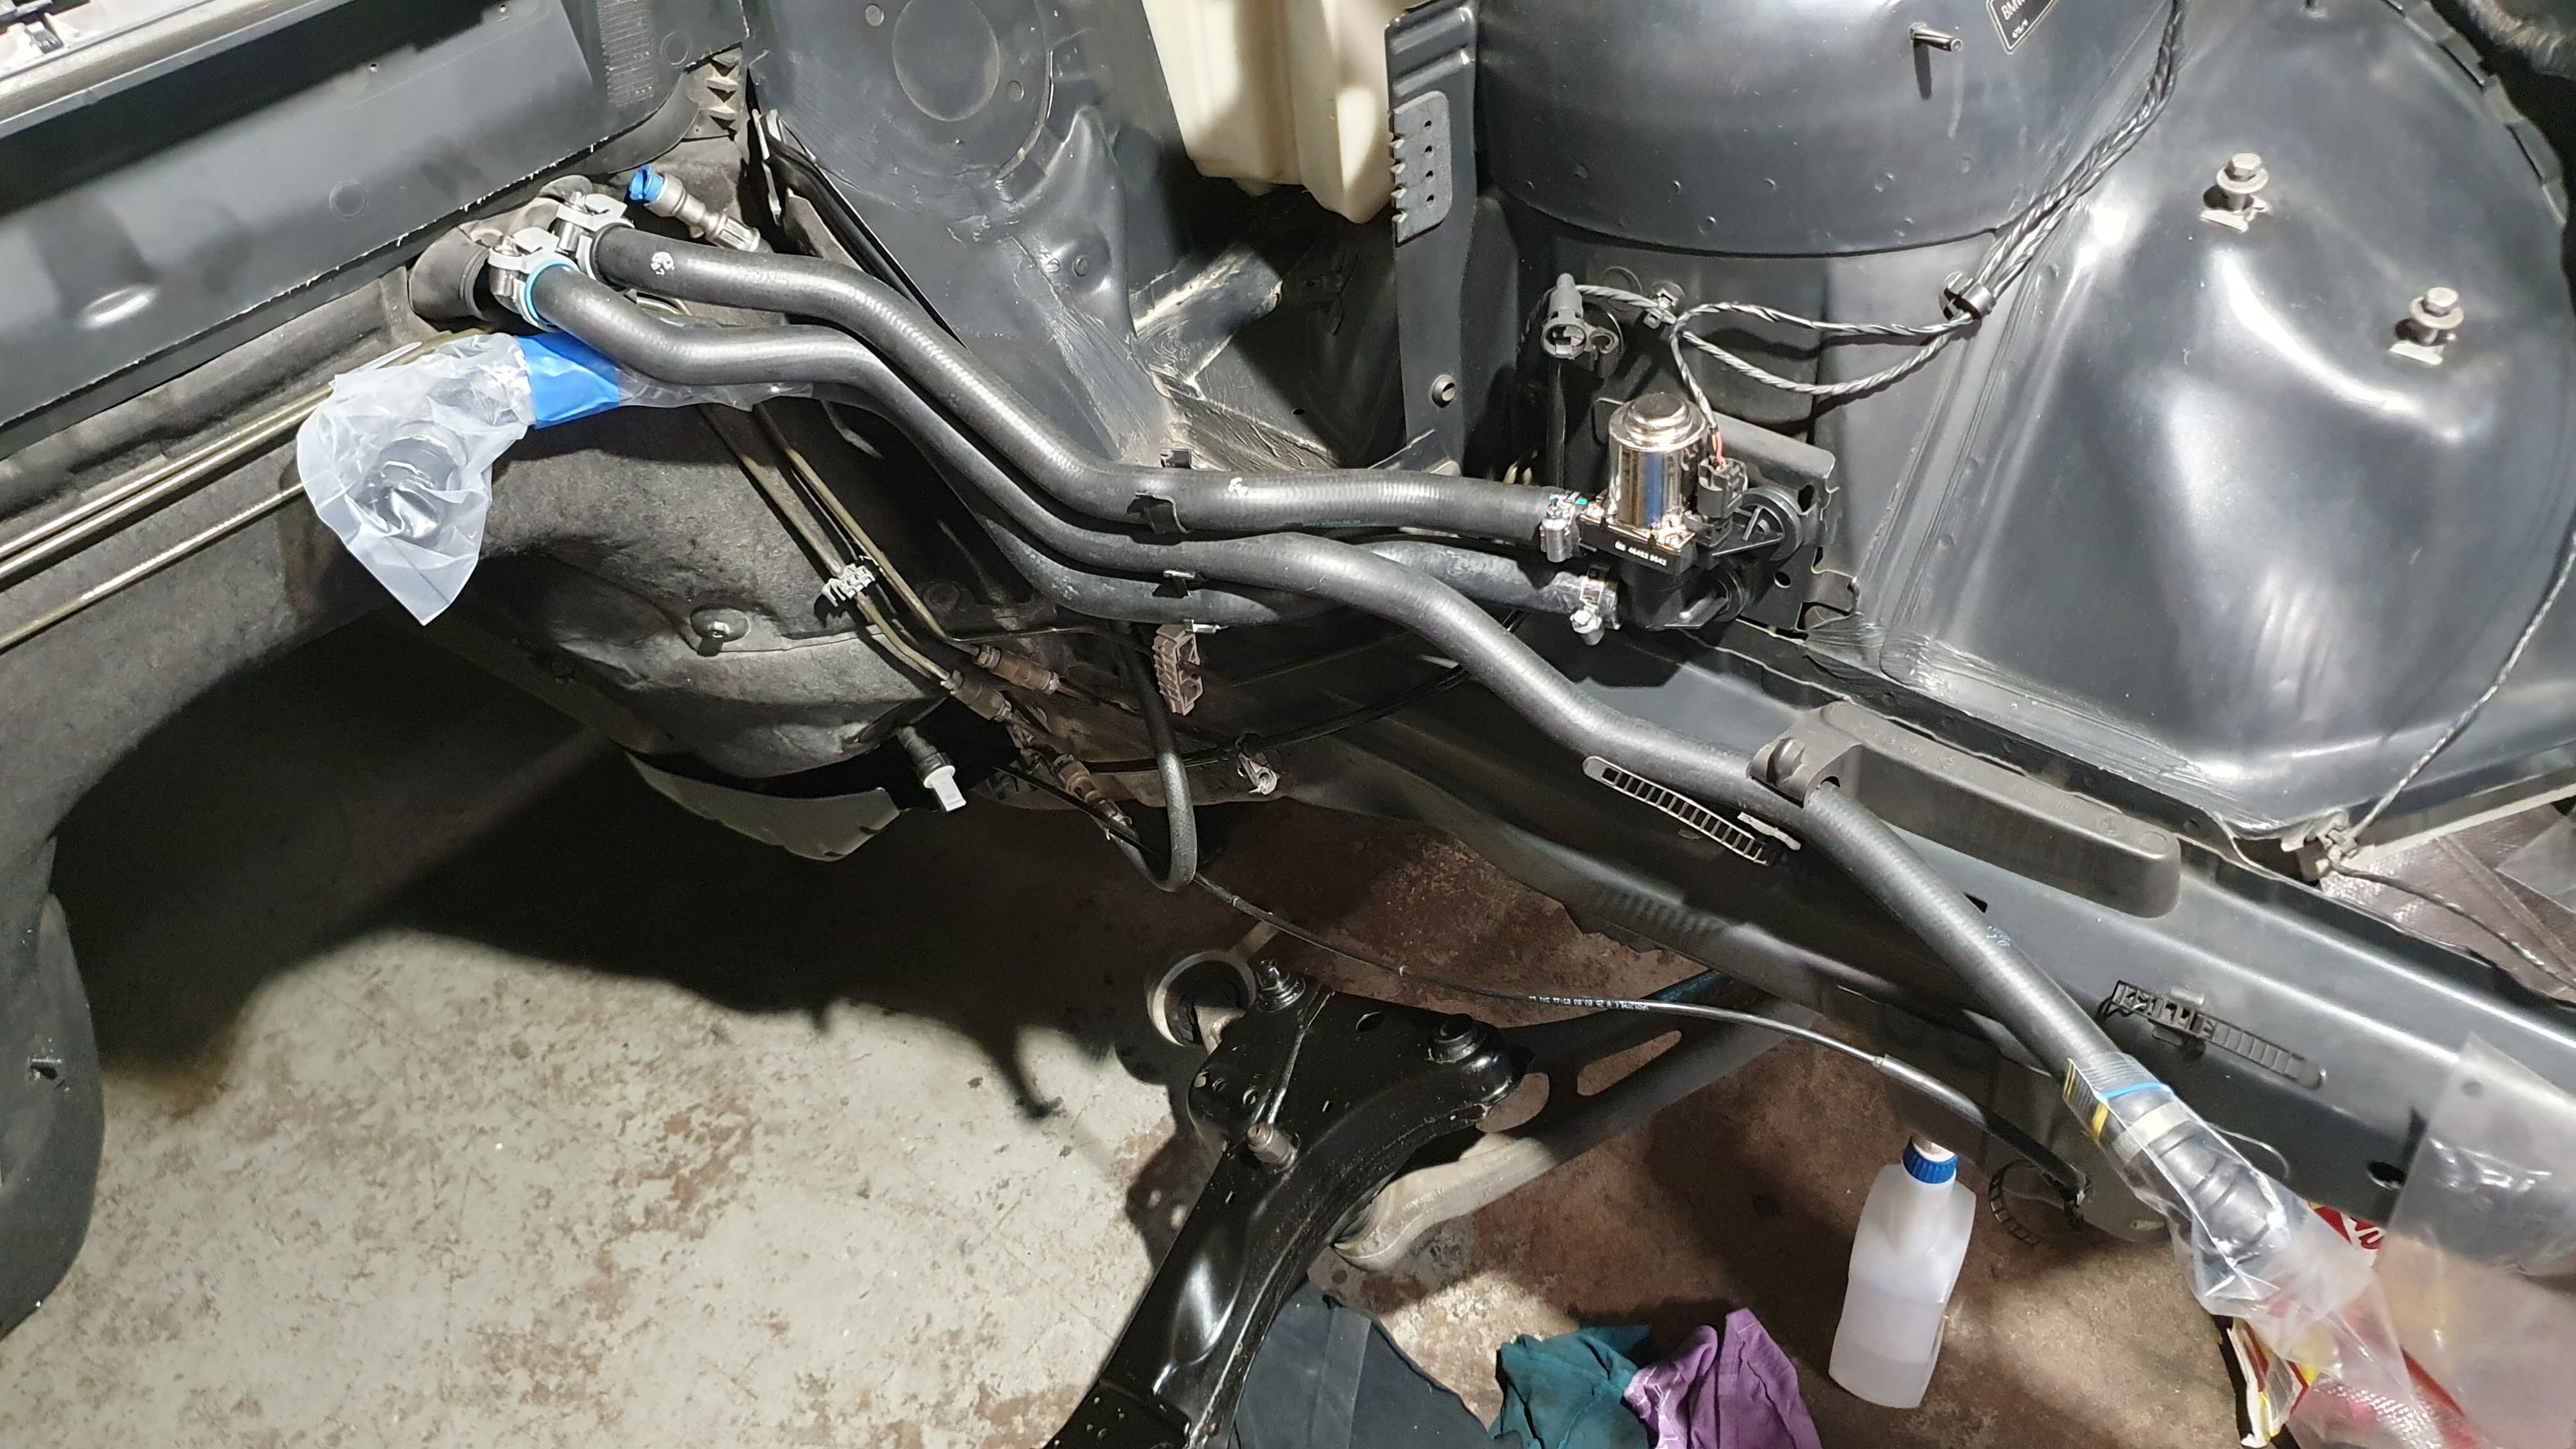
Boxed on with tidying up the engine bay. Took off the steering rack and dropped the front subframe to get a bit more wiggle room to the engine install. Cleaned off all the grime I now had access to as well as the transmission tunnel. Installed the new heater valve with brand new heater hoses.

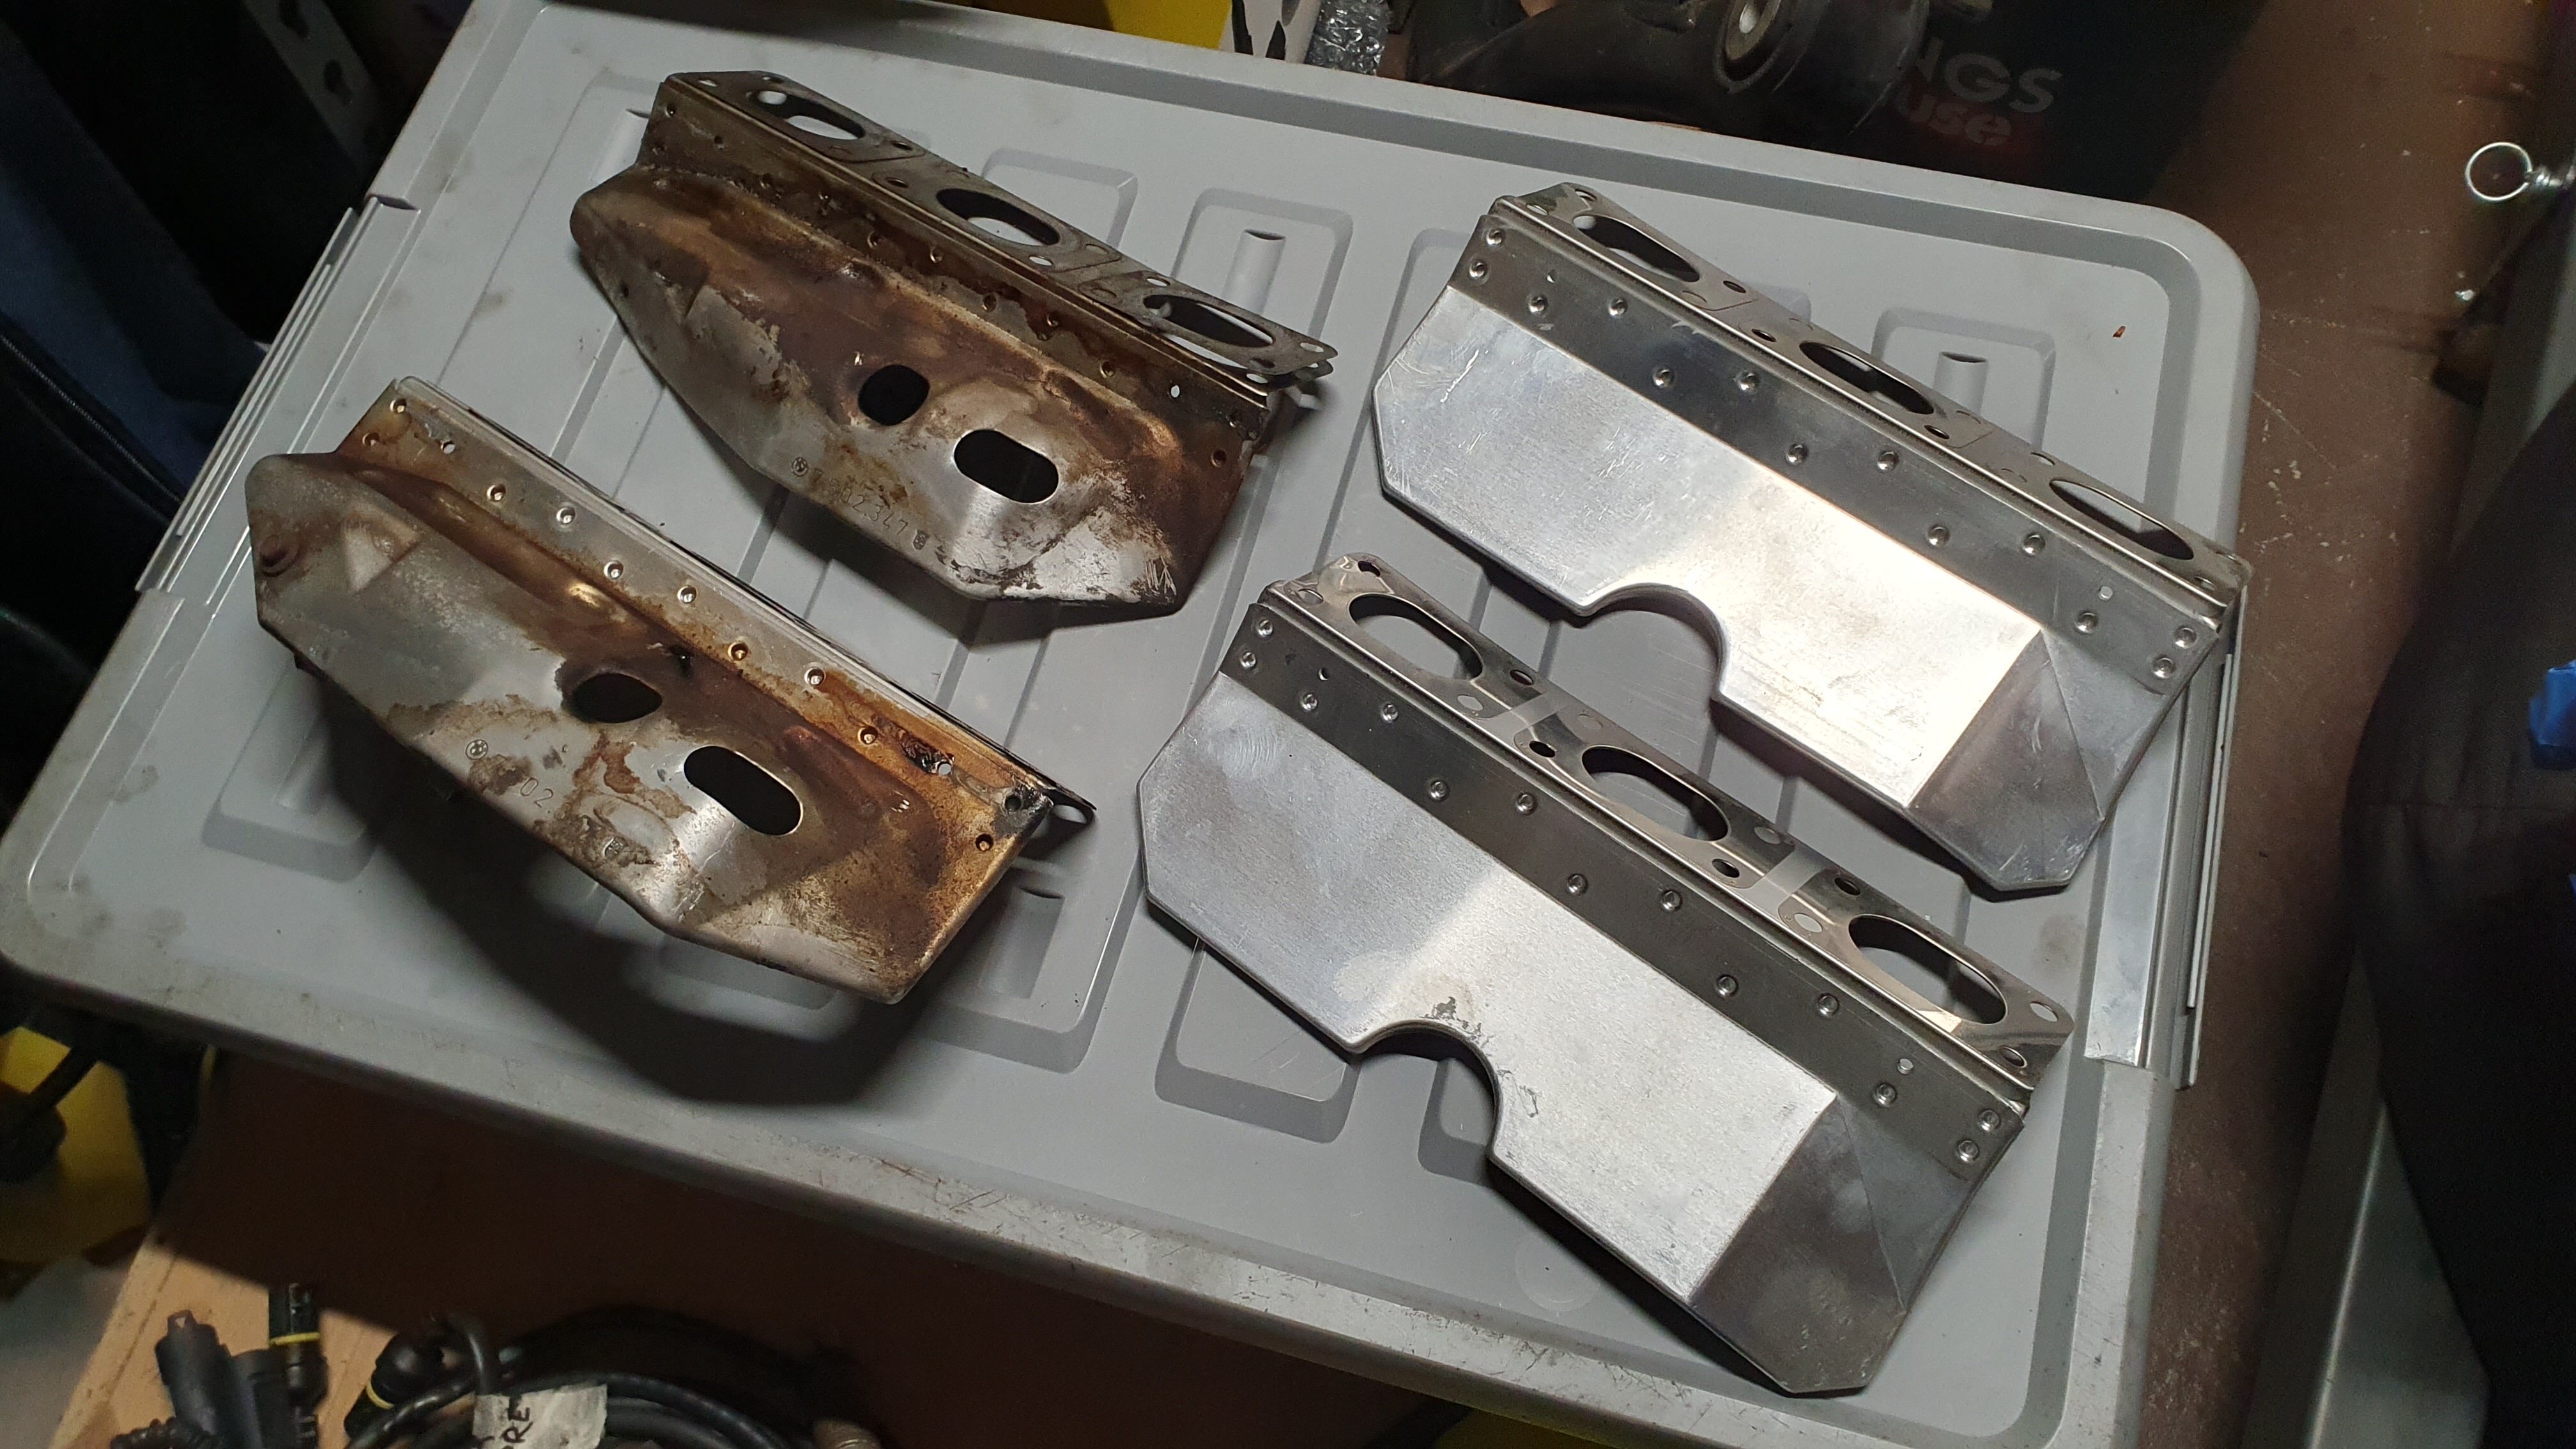
Gave the heat shields a good going over as well.
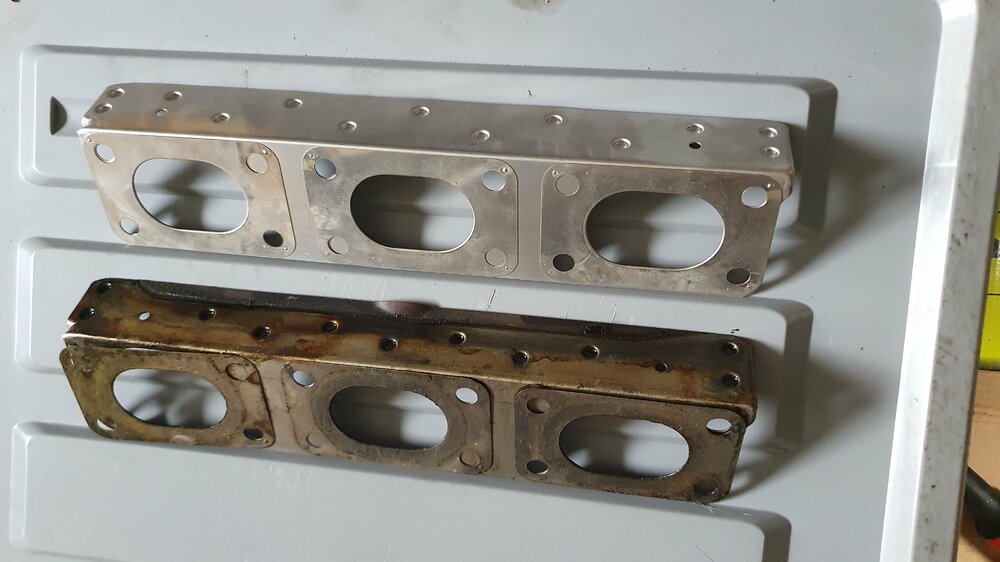
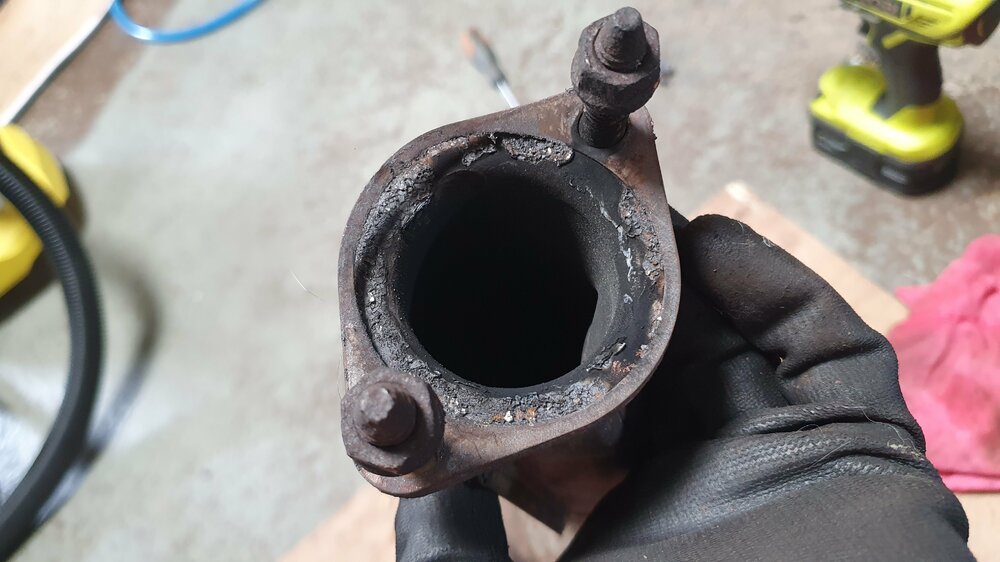
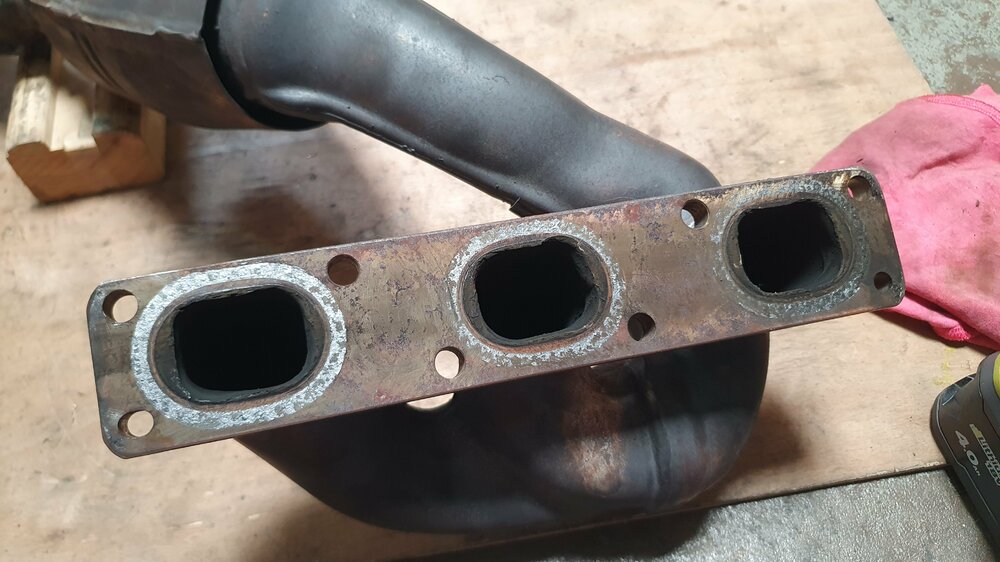
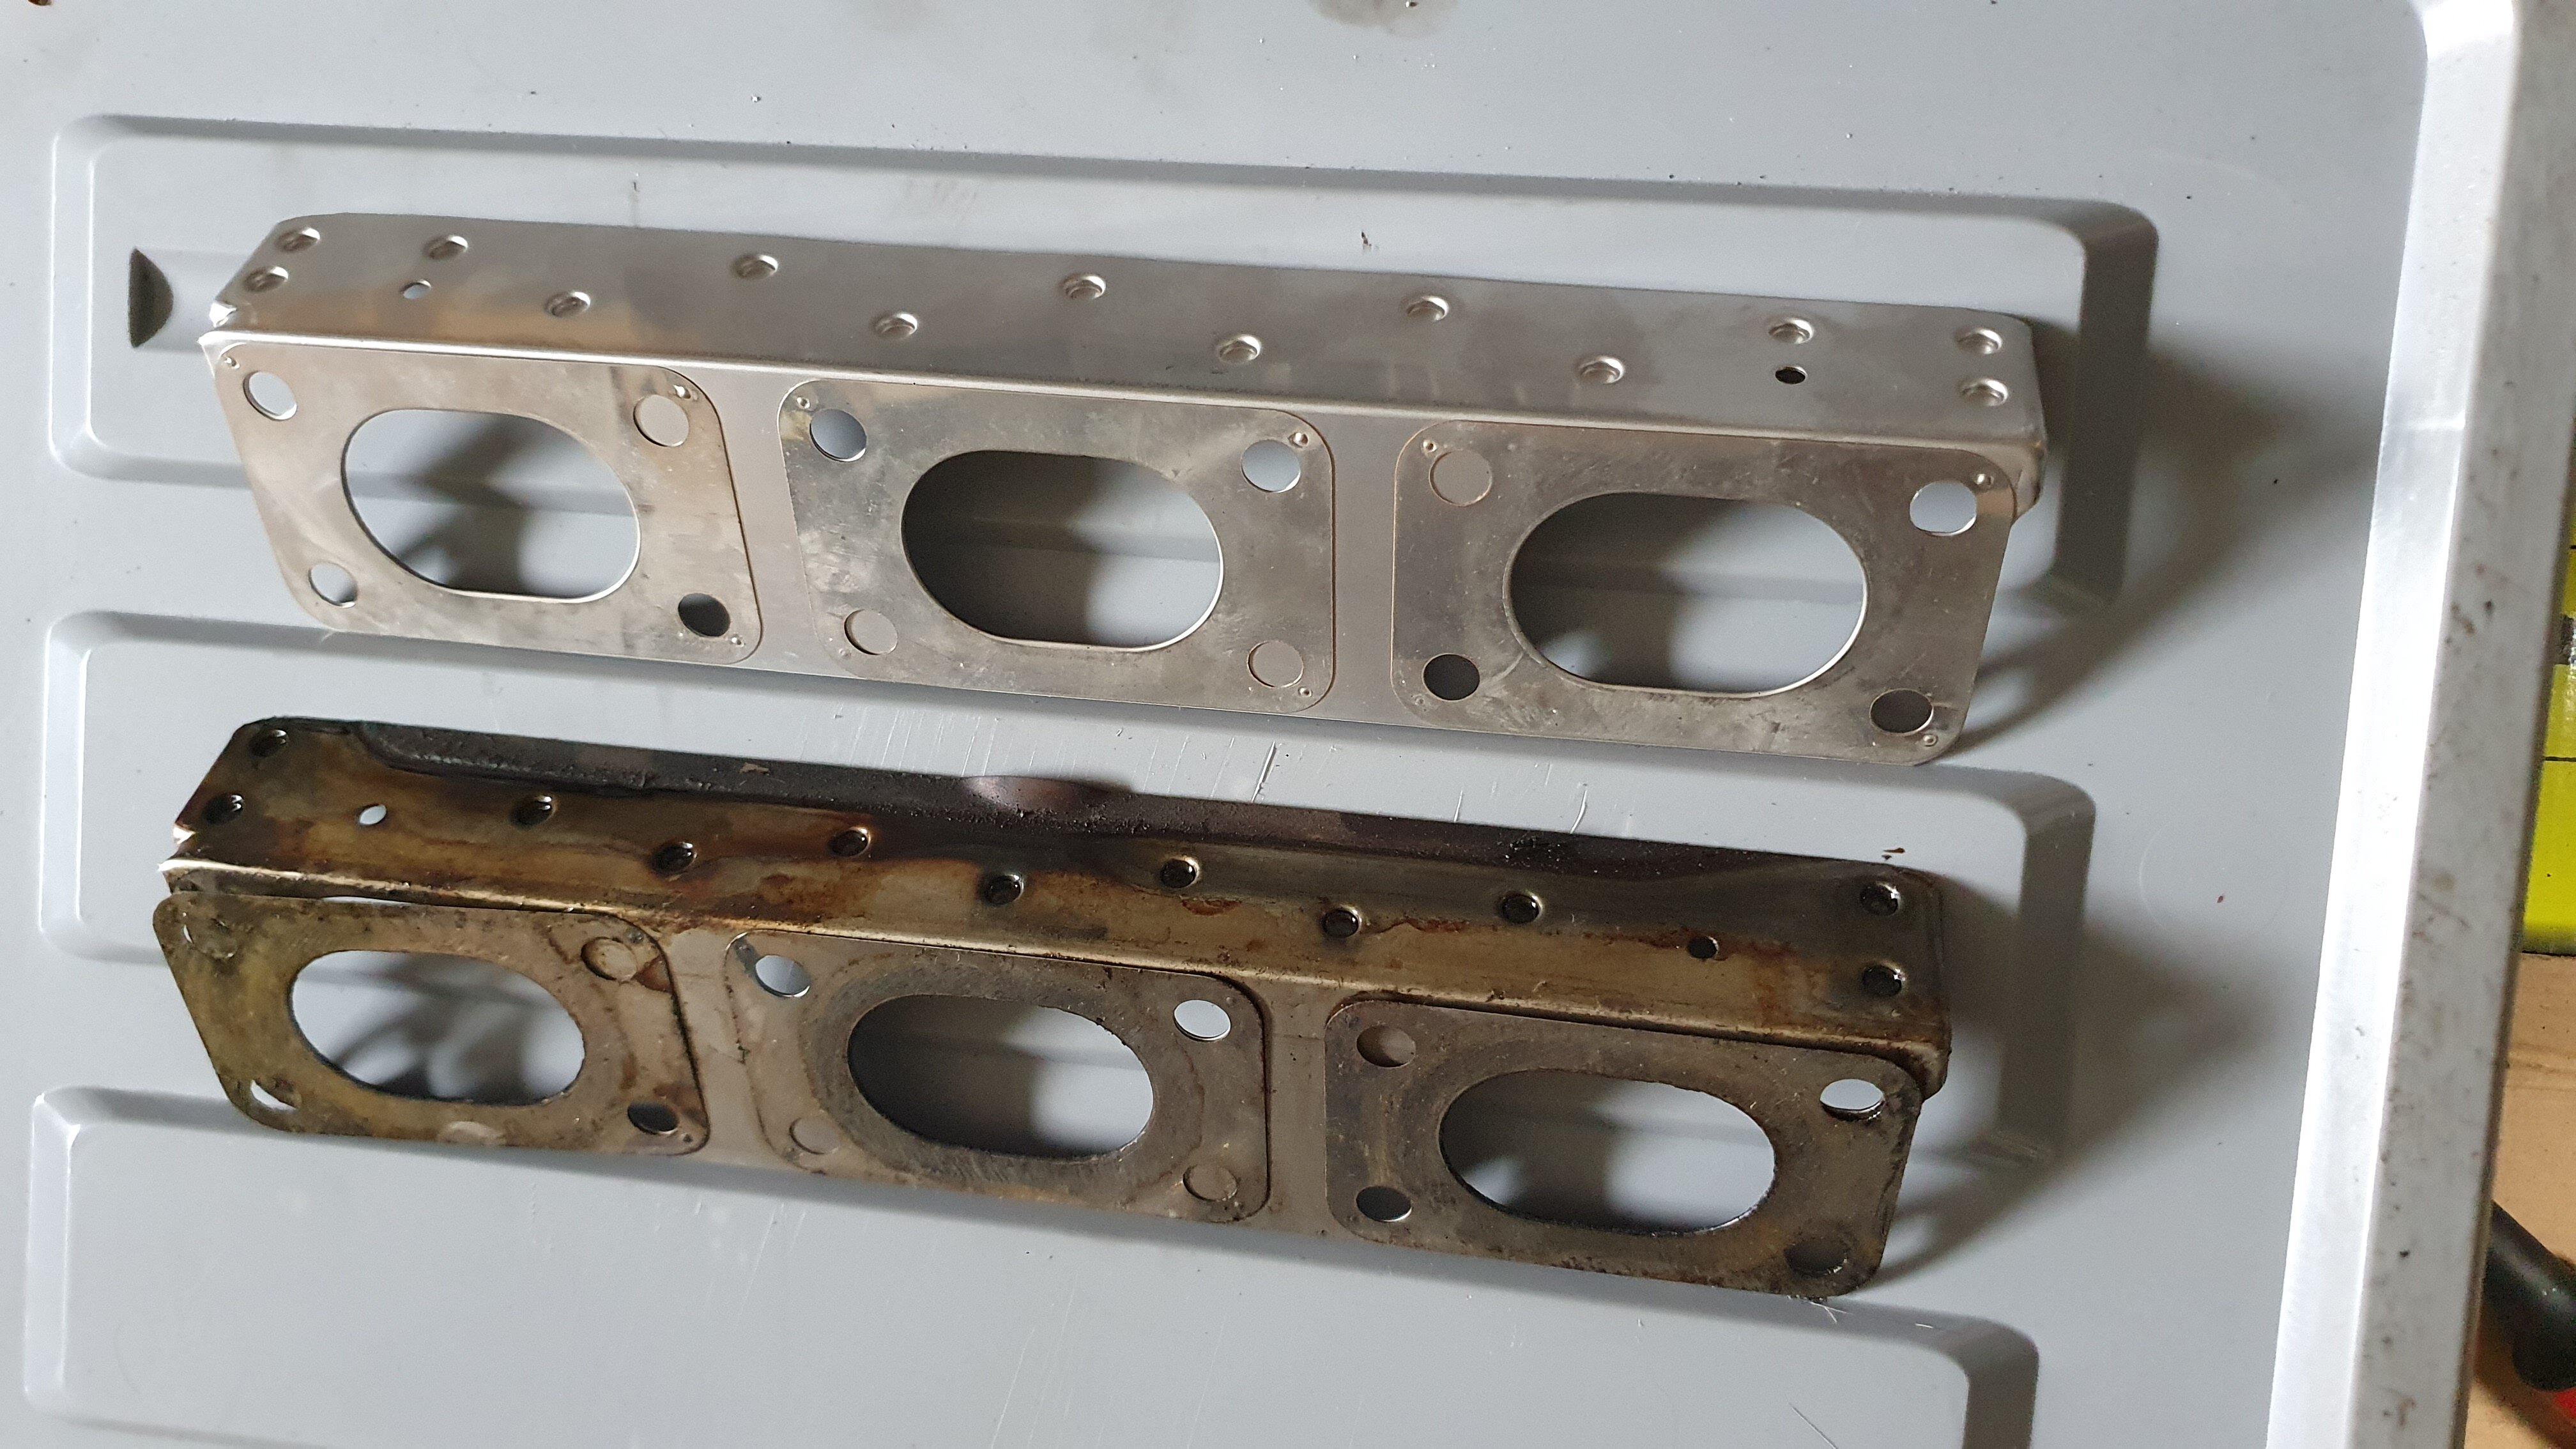
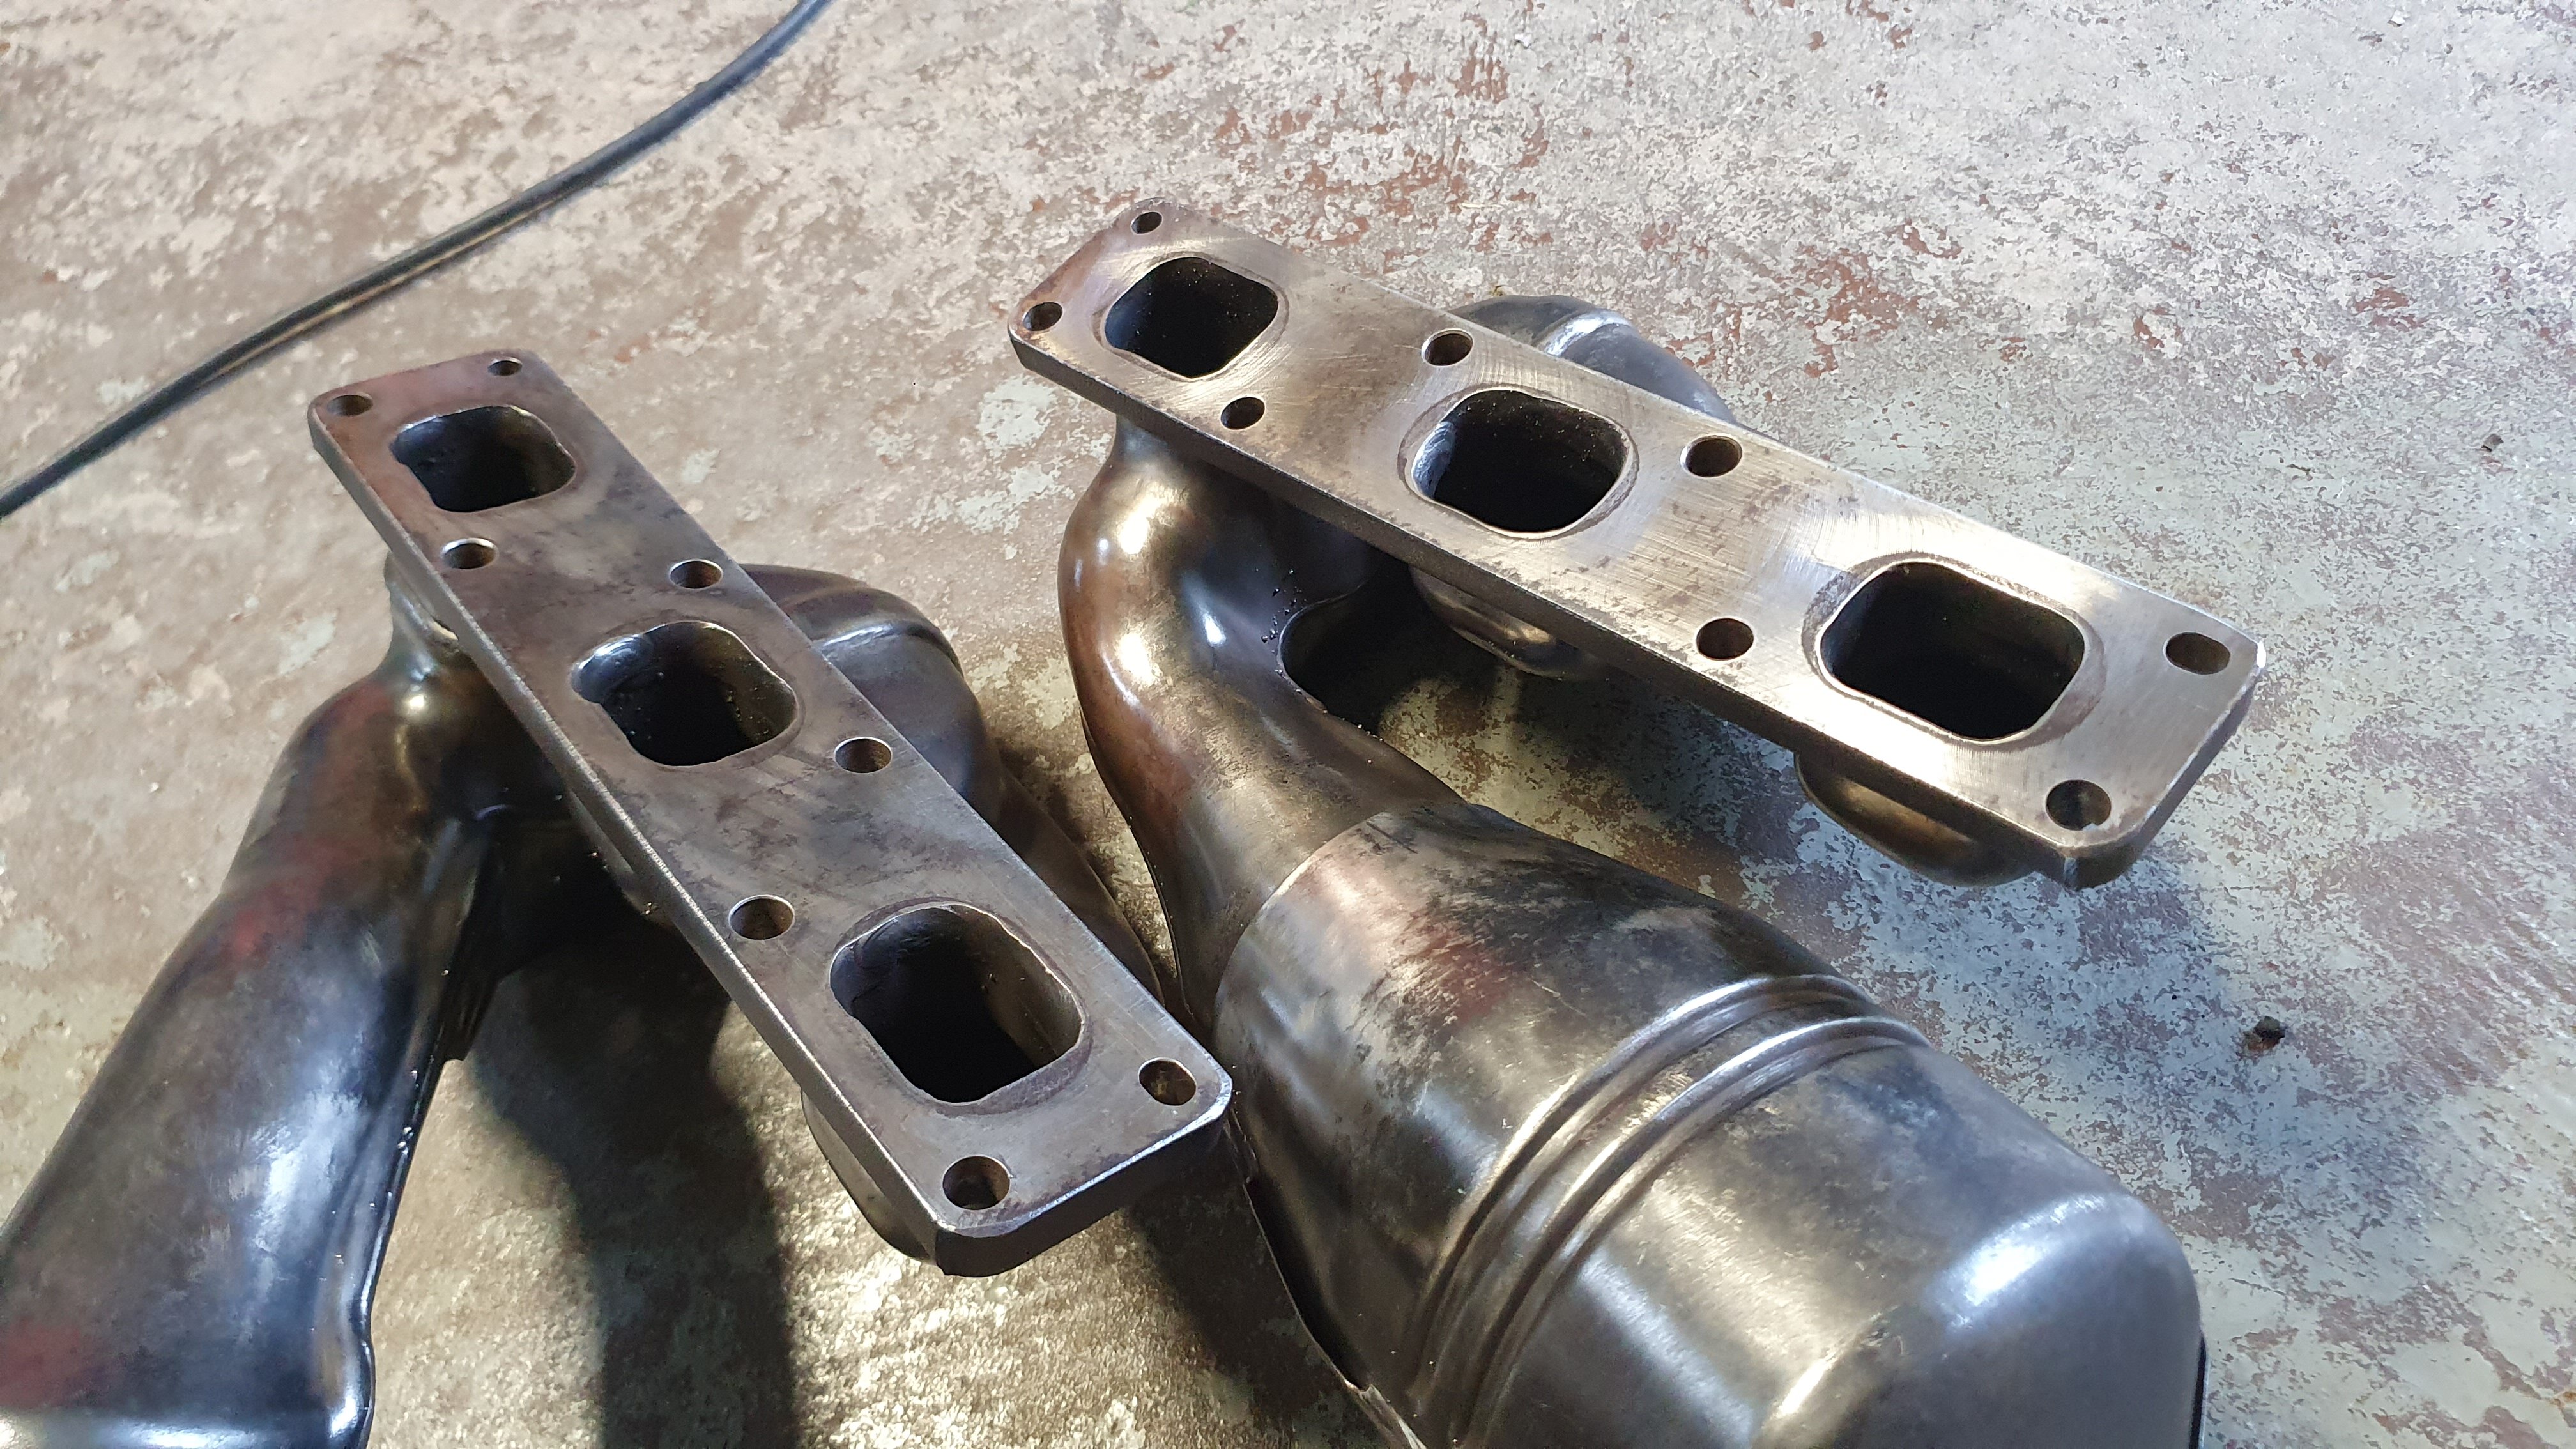
Freed up and reinstalled the exhaust manifold studs that had come out along with the bolts. Wanted to get onto bolting up the exhaust manifolds and then ran into trouble. Didn't think to check beforehand but of course I got the wrong gaskets/heat shields. The head gasket kit I got came with the US-spec gaskets that are a different shape. Could probably make them work but really not keen to start cutting corners at this point. So will be frantically running around tomorrow trying to locally source a pair in a hurry. Not sure how highly I rate my chances. Otherwise it's another order from overseas and another week's wait, and of course the unenviable task of installing the damn things with the engine in the car. Not a fan.
-
Yeah purple tag.
Didn't order everything in one go but pretty much sold on CMP's solid subframe bushes as well. Apparently cause next to no decrease in ride quality and especially worth doing if the subframe's been reinforced. The RTAB's I'm still unsure on. Not on CMP ones specifically but have read of some drawbacks with going monoball on those so might stick with OEM with limiters. Really impressed with their tech articles and the lengths Cayn went to when answering all of my silly questions. Dude basically wrote out a full essay when I messaged them, explaining everything from pros and cons of the bushes to what sort of welding technique and surface treatment to use for reinforcement plates. E46's are apparently the last model where the subframe wasn't rigidly mounted to the chassis, as well as having a rubber guibo in the steering linkage. Looking forward to seeing how it feels with those points fixed.
Don't think Eibach differentiate between body types with springs, only the xi ones were different. Got the same ones that @adro has on his touring so should be good enough for me. Did read about the E36 M3 bump stops. I think I first ordered OEM ones and then ordered those in as well so have two sets both front and rear. Will just go with the shorter ones of the two.
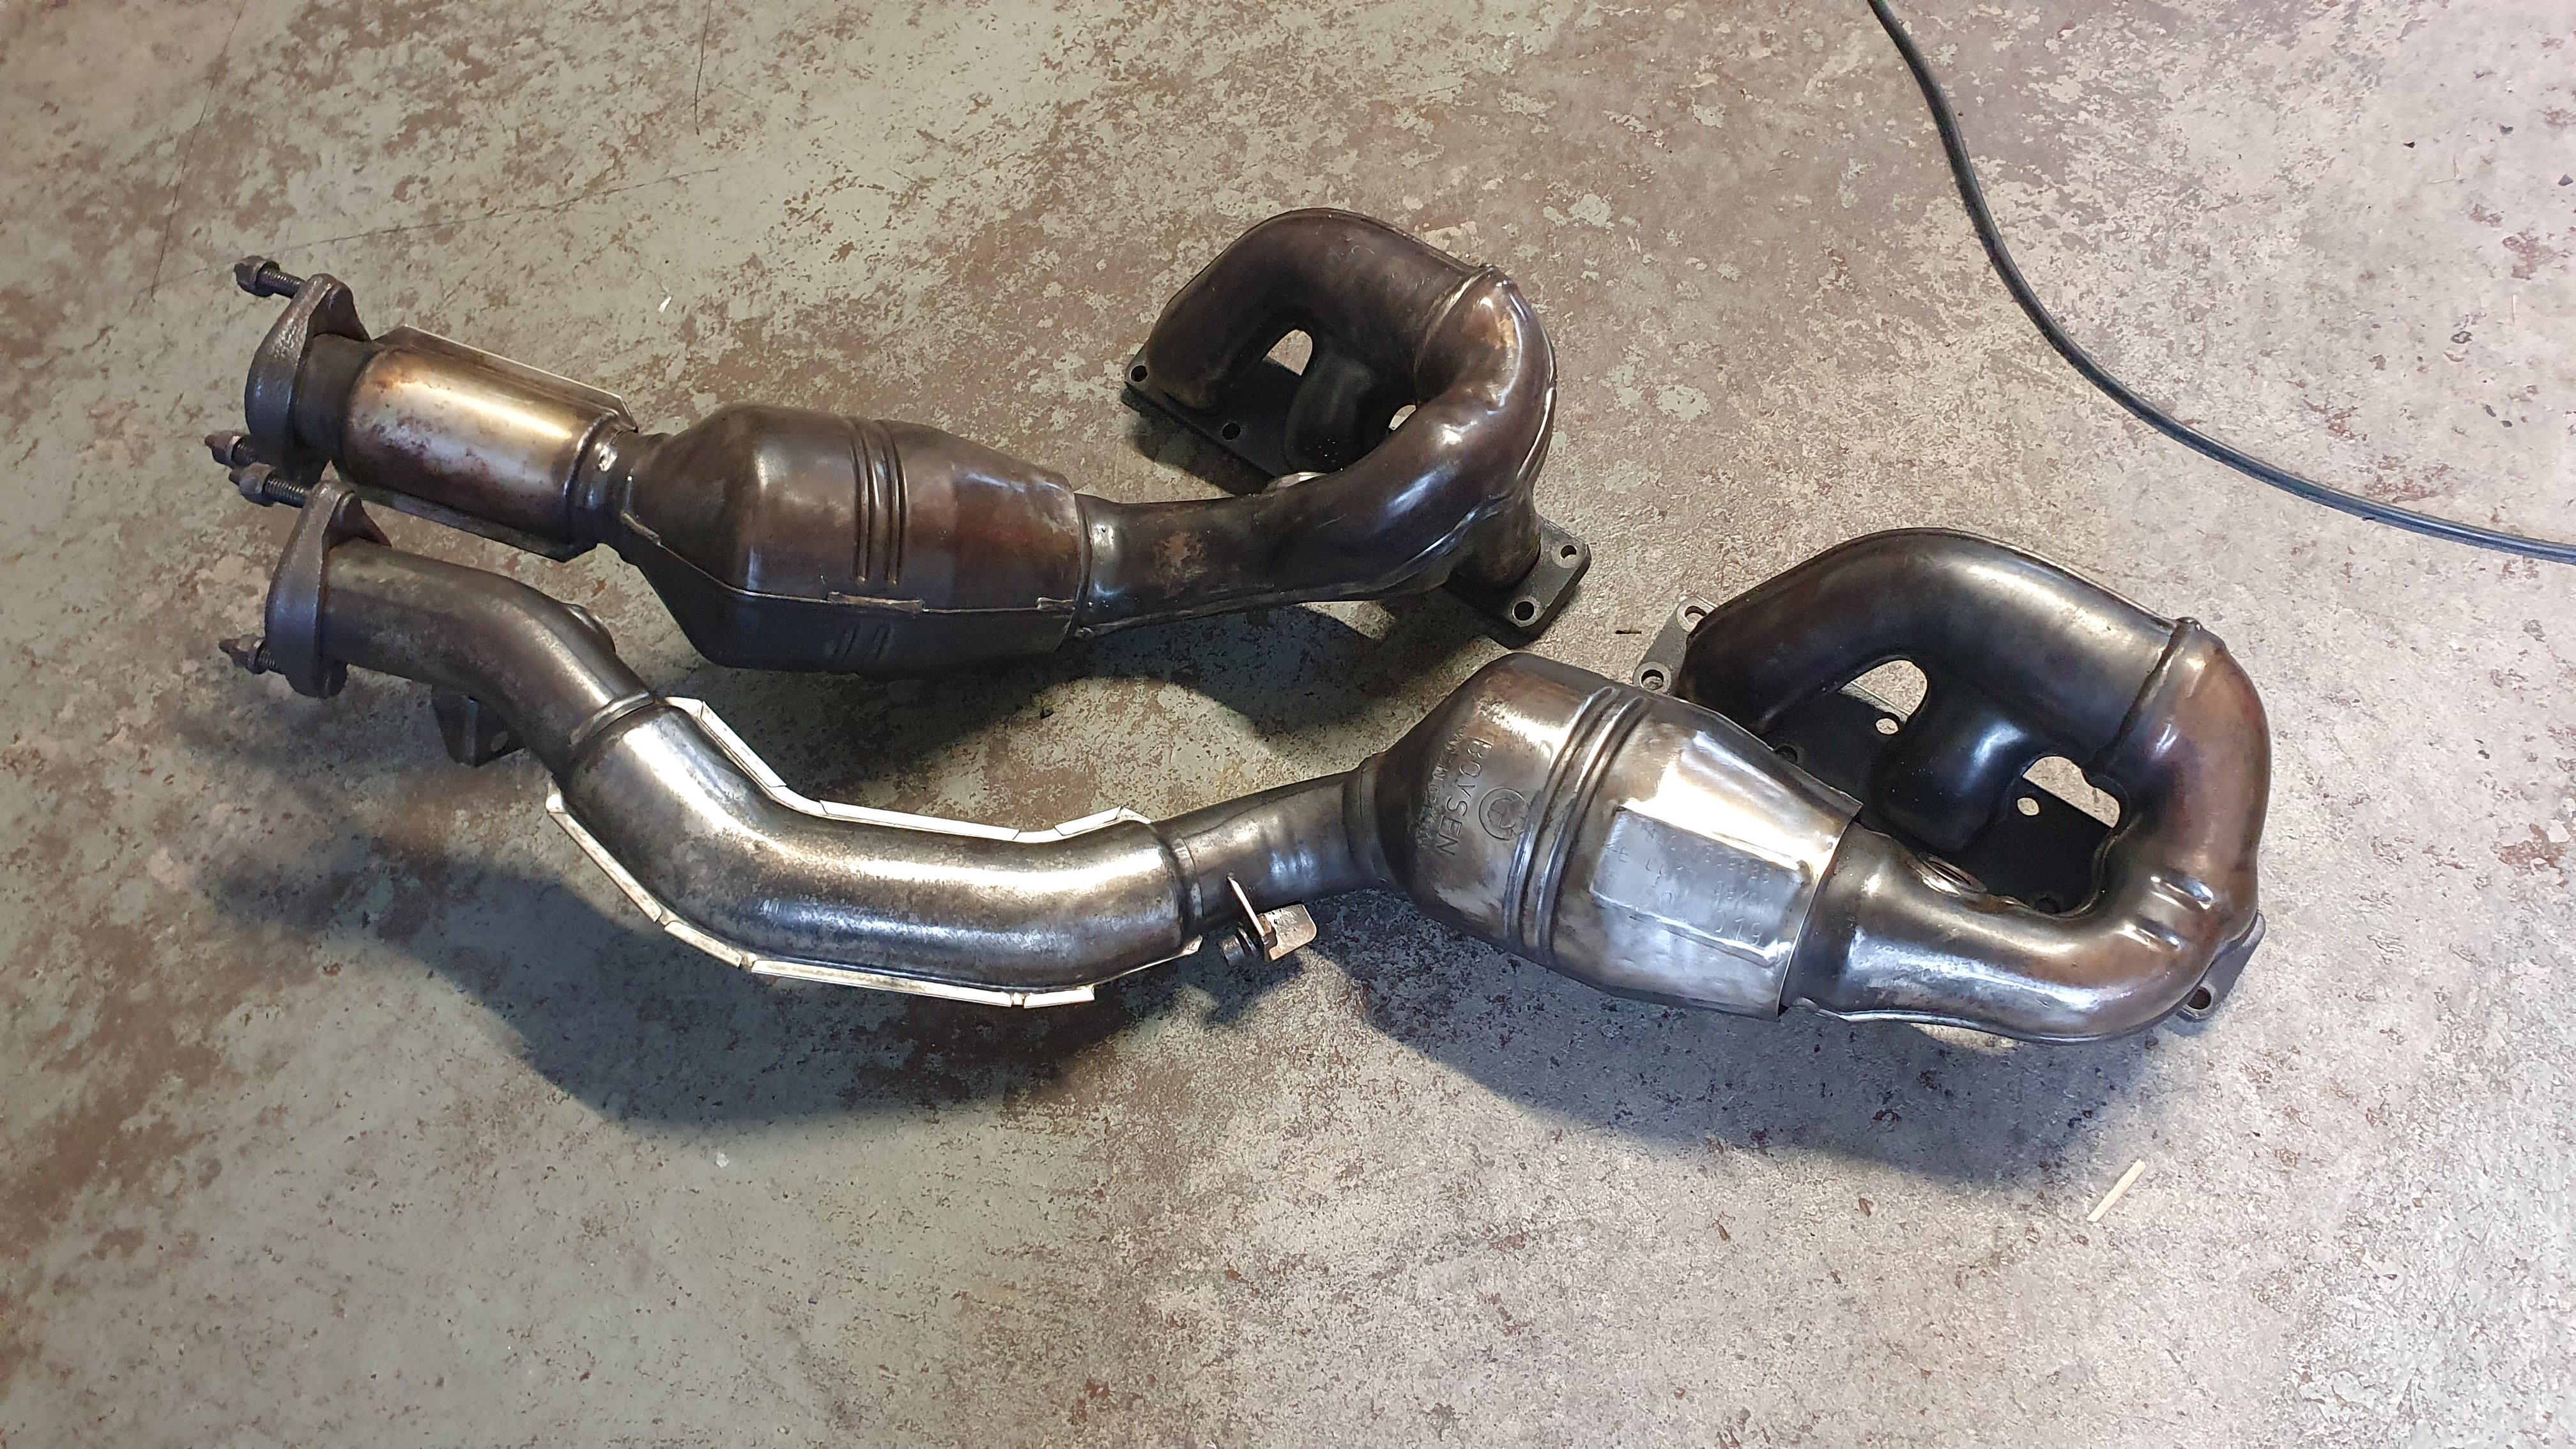
Might stick with the 325i exhaust then since the lack of flap looks to be the only real difference. I do recall a noticeable difference in tone between the 325i and the 330i sedan I had but that's probably more down to the engine rather than the exhaust. Did read how culling the secondary cats livens it up a bit and adds a bit more grumble but more wary of it stinking up the place way more.
The annoying part are the ugly exhaust tips. I bought these ones from Schmiedmann a while back thinking they're straight slip-ons but turns out they're meant for the full exhaust setup that they offer and don't fit over the stock pipes. Might just take it to a shop later on and have them weld those in.
-
Ho ho ho bimmerheads. Merrily having myself some festive wrenching here. With the engine rebuild near enough finished, I'm now just tying up all the other loose ends to hopefully drop it in before the end of the year.
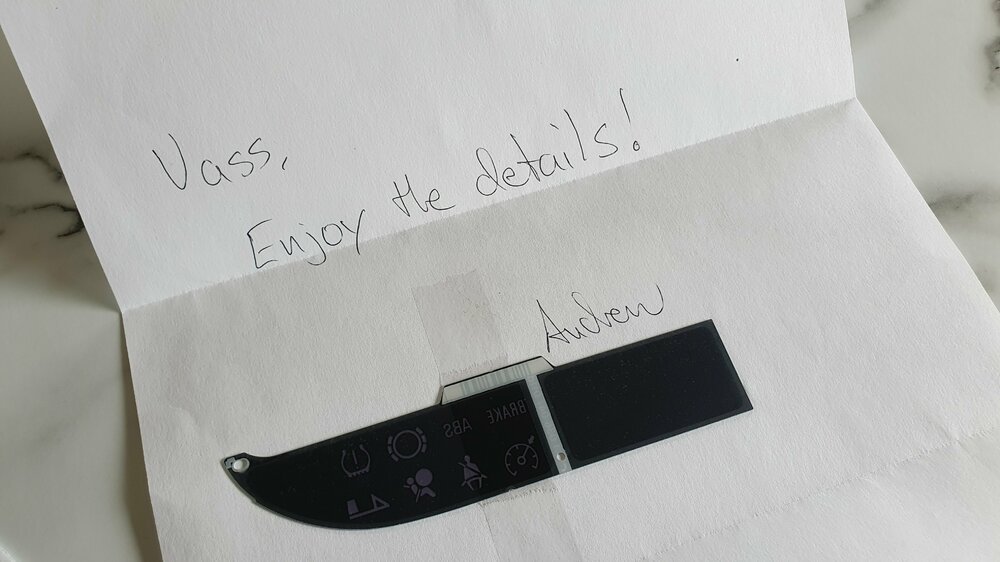
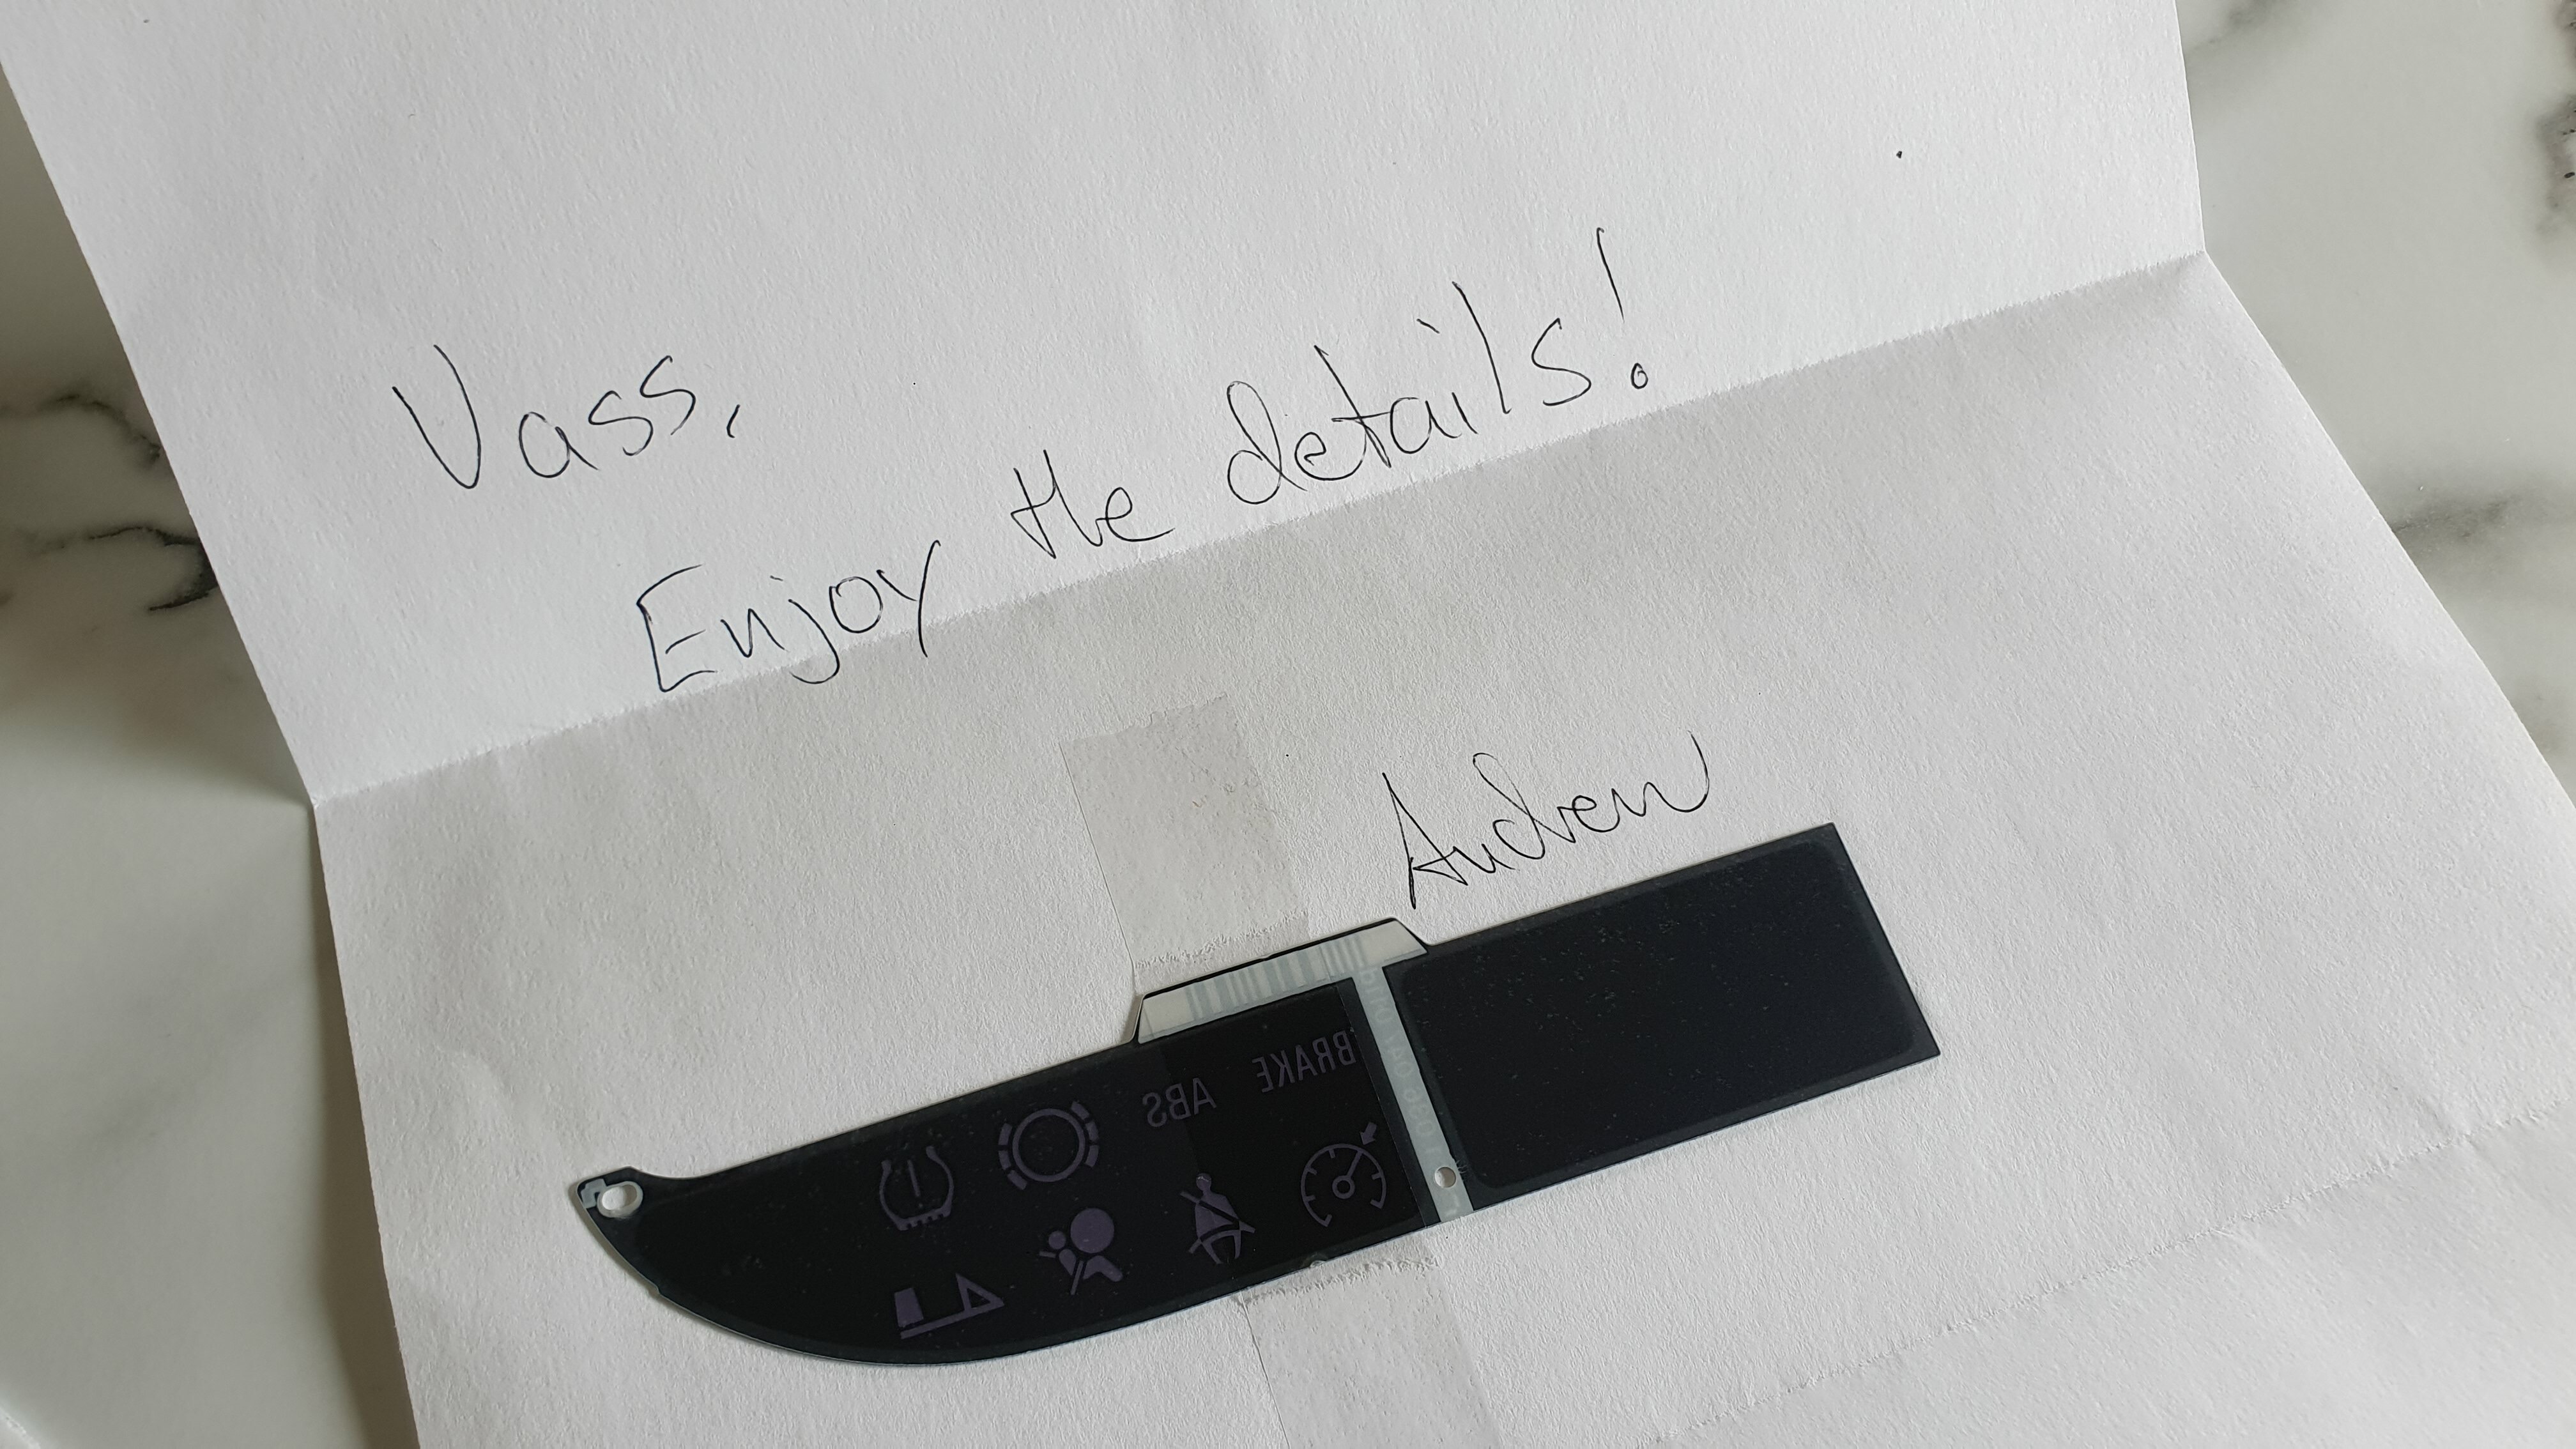
To start off, got a nice wee letter in the mail the other day. I'd asked on E46 Fanatics if anyone might have a spare manual cluster backing plate to block out the automatic gear screen and one fella gladly obliged. Bloody awesome community that. Came all the way from Pennsylvania and is a nice cherry on the cake.
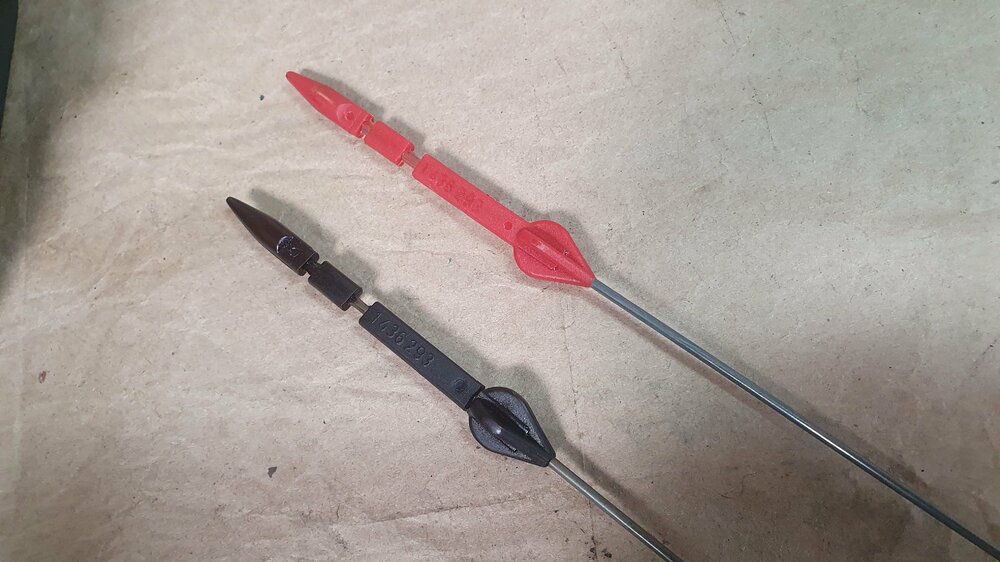
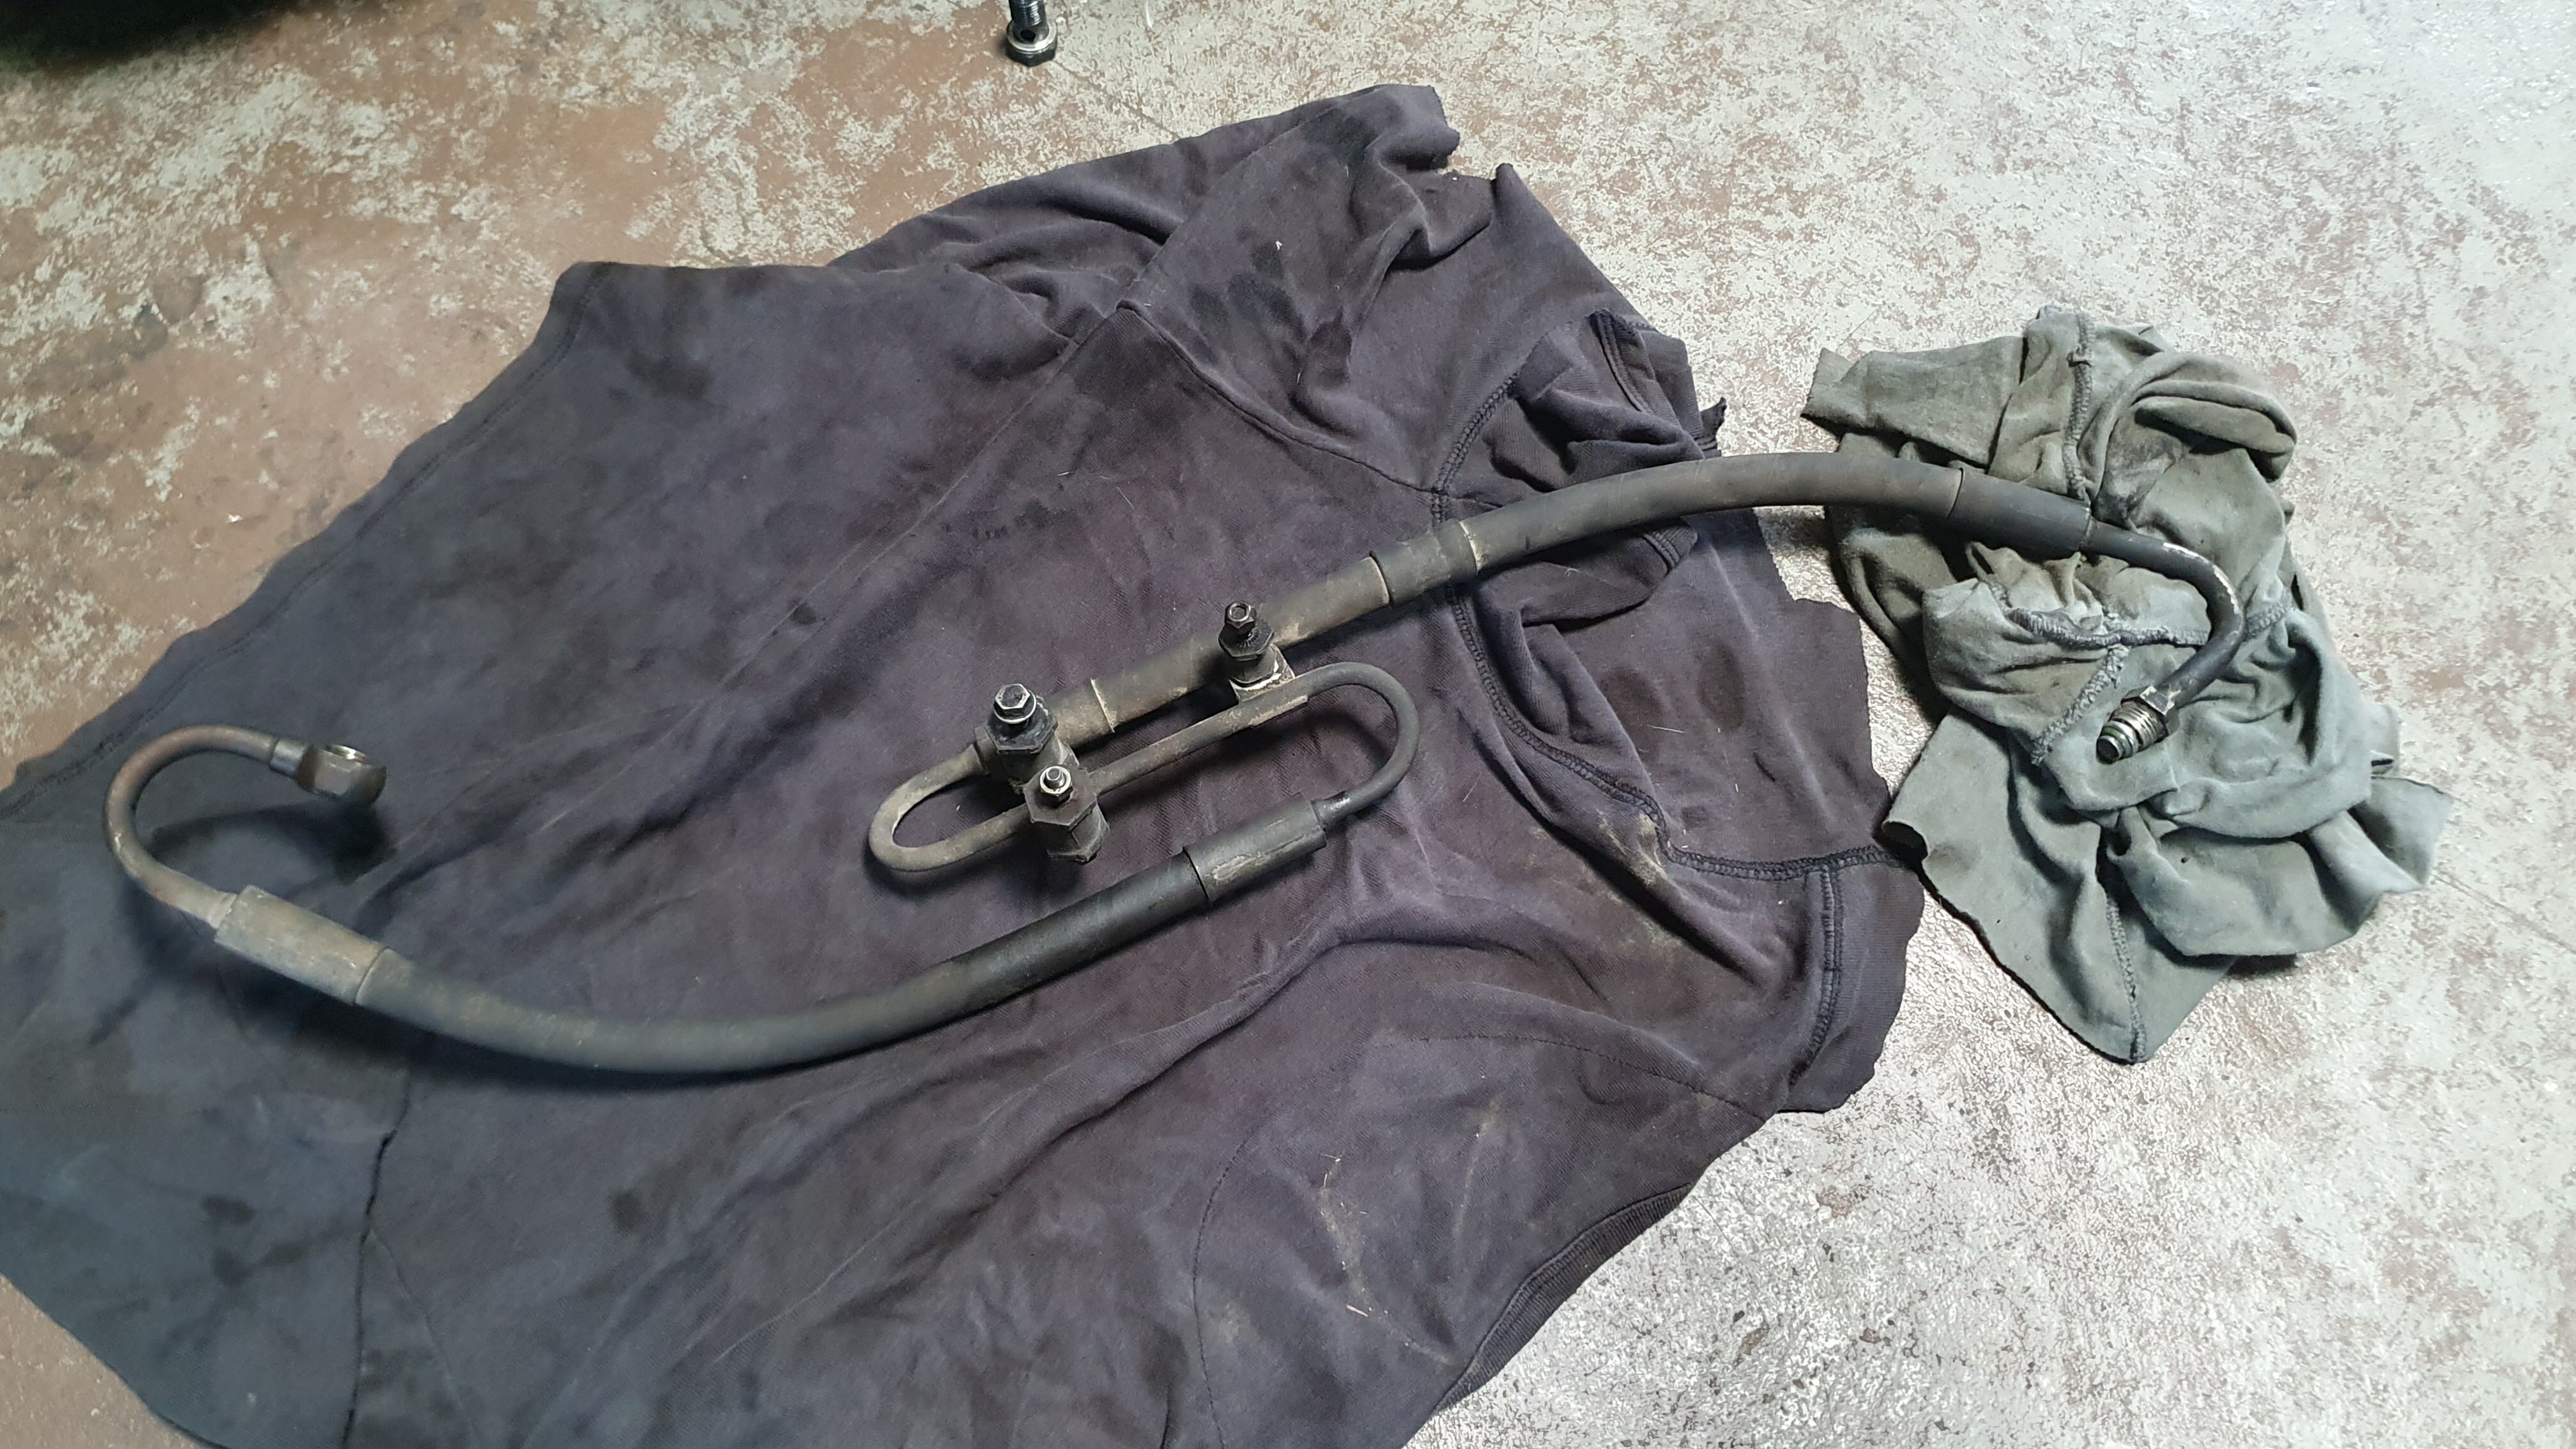
Had a bit of a dilemma with the power steering situation. The donor car came with an LF-30 pump that I had already pulled apart, cleaned up and refreshed with all new seals. Was prepared to bite the bullet and get a new high pressure hose from BMW for something like $400+ as those are different between the LF-20 and LF-30. Got a quote from BMW a few weeks prior and was told it's available on order from Auckland. Gave them a call to get one in and was instead told it'd need to be ordered from Malaysia and would be unlikely to arrive until sometime in January at the earliest.
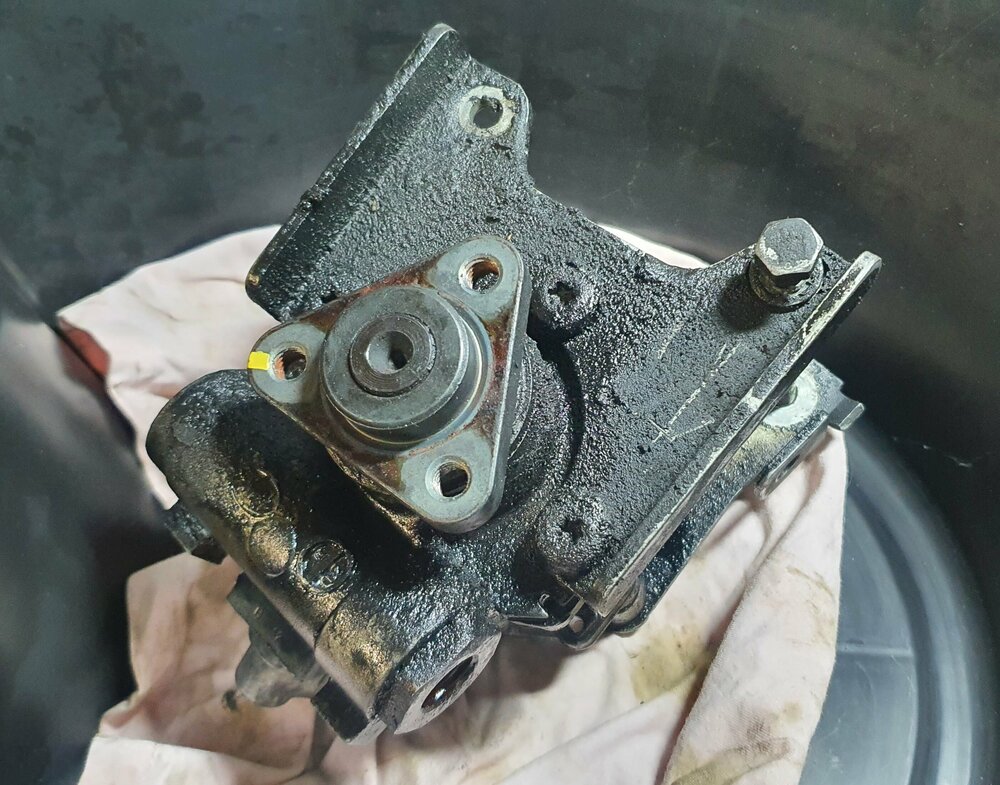
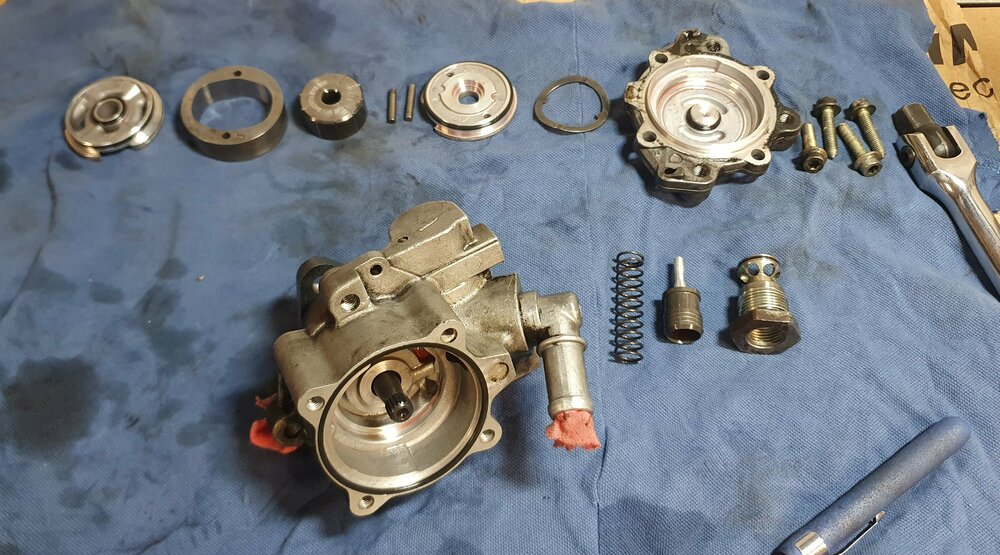
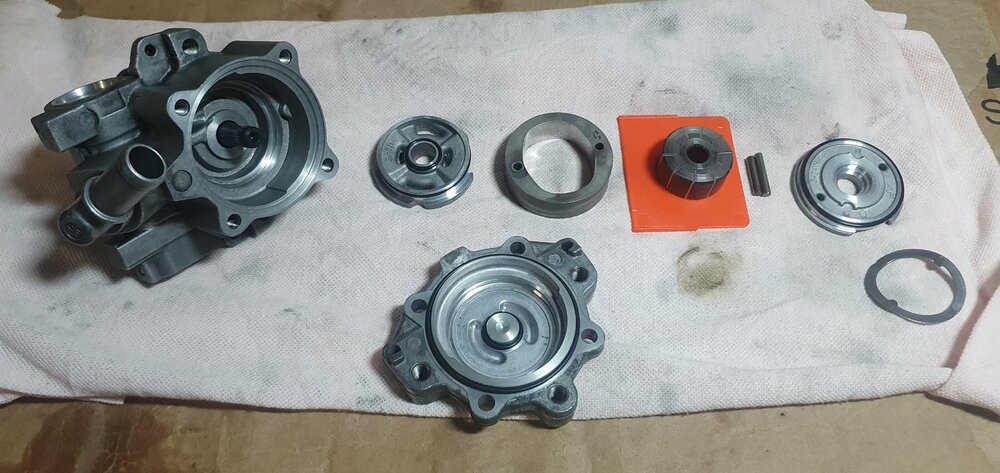
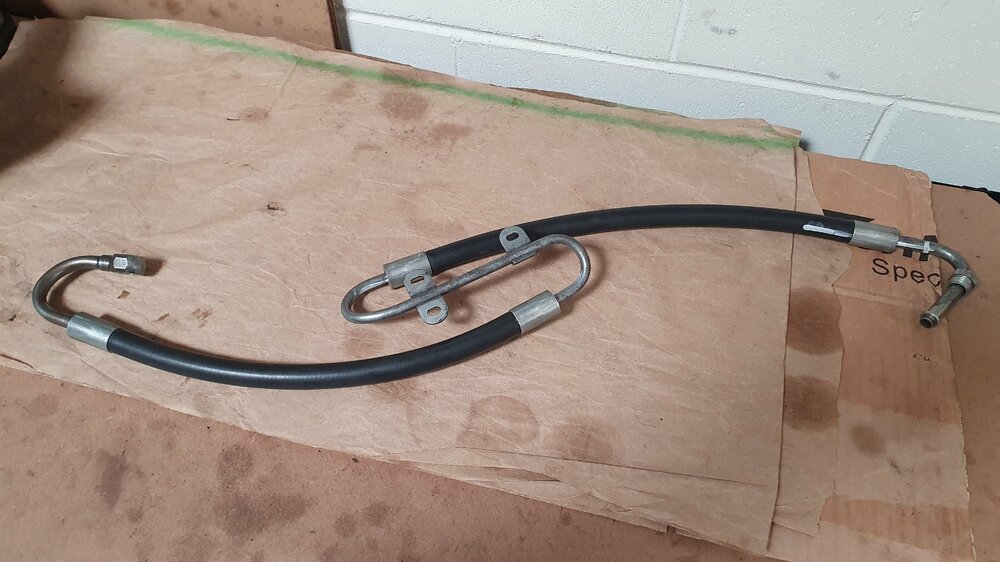
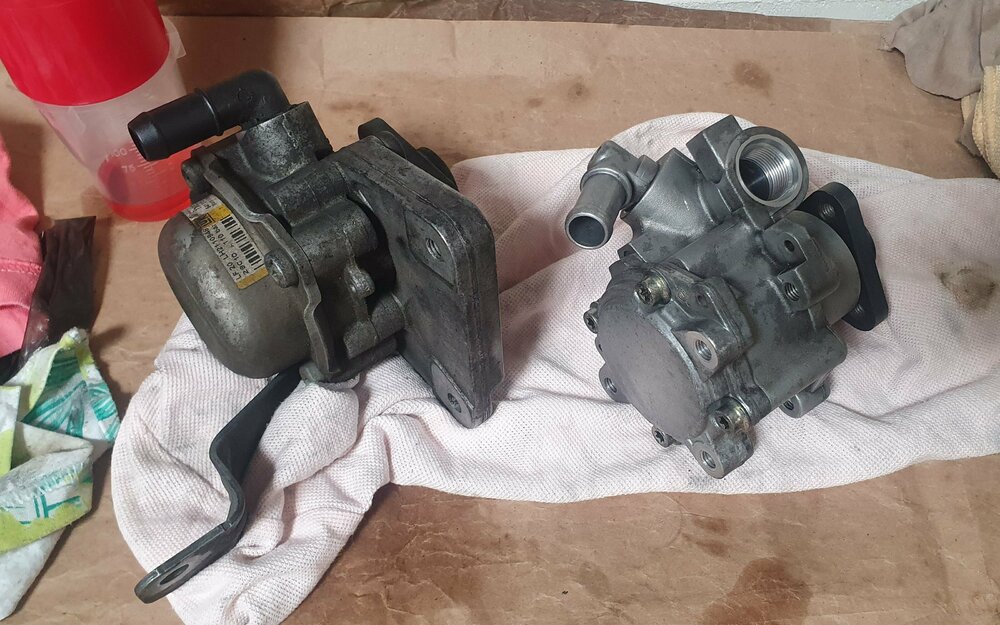
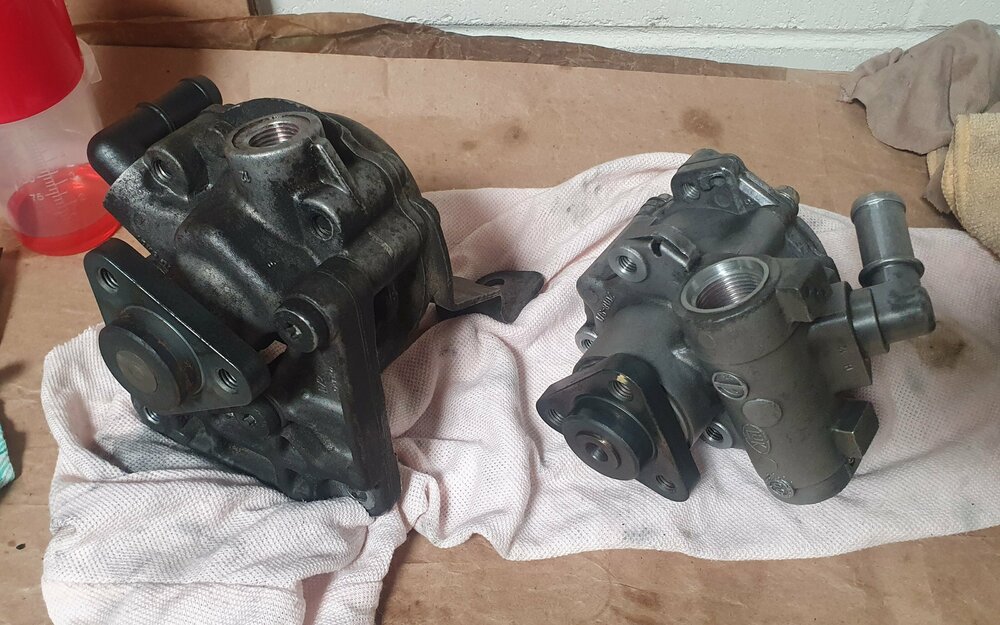
Looked over the current LF-20 hoses and they're actually in decent enough nick, problem is the LF-20 pump itself seemed to have some play in the shaft making an audible rattle, which left me a bit uneasy. Ended up going for another scavenger hunt to Pick-A-Part, hoping to either find a pressure hose for an LF-30 or a decent enough LF-20. Out of the 7 E46's there, the LF-20's had either been taken or they'd come with LF-30's so I ended up grabbing a pressure hose for the latter for just $16... then took it to Enzed and dropped $300 to get it refurbished. Smort.

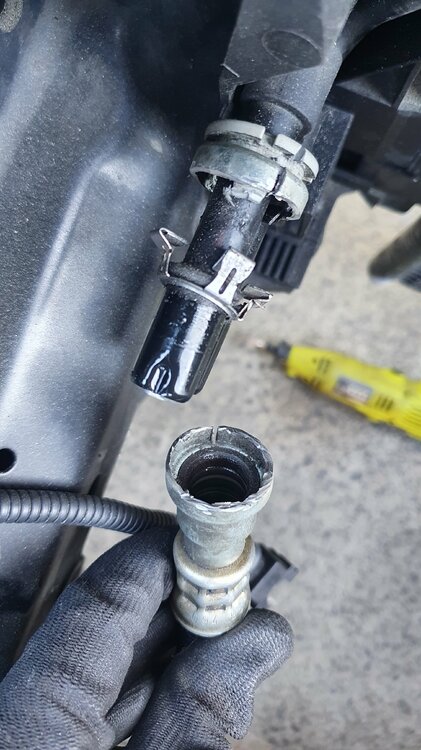
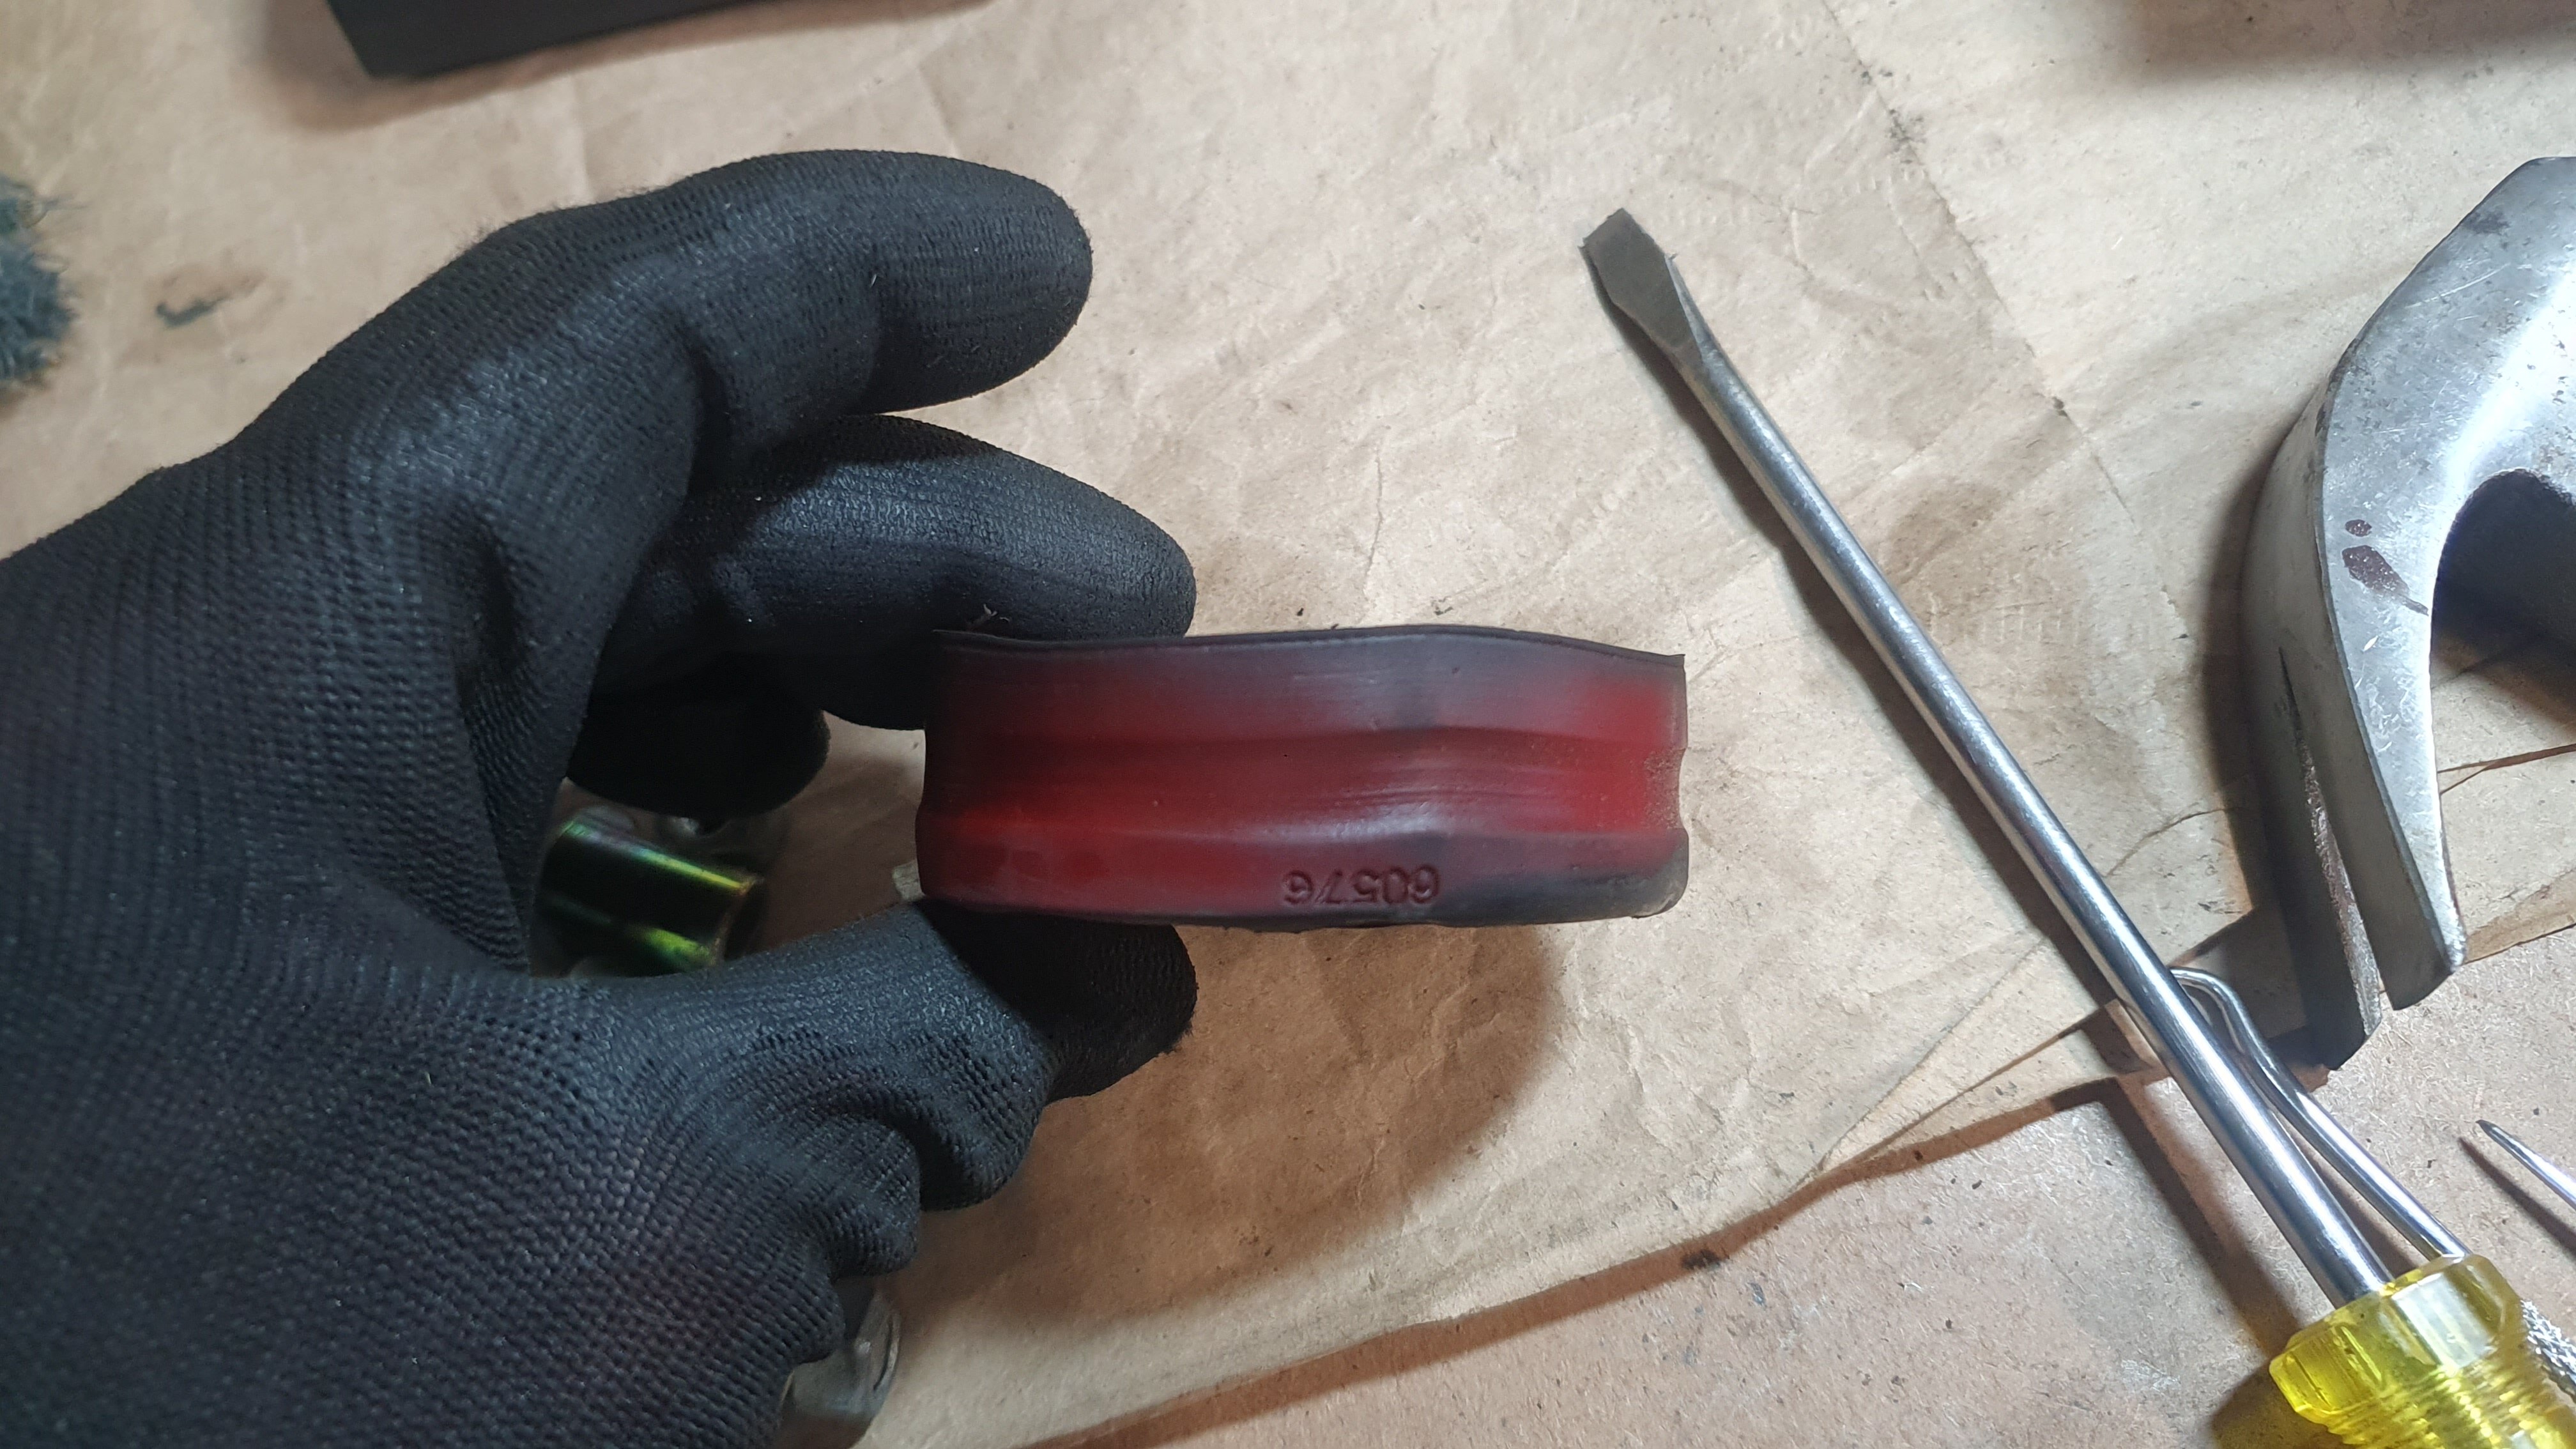
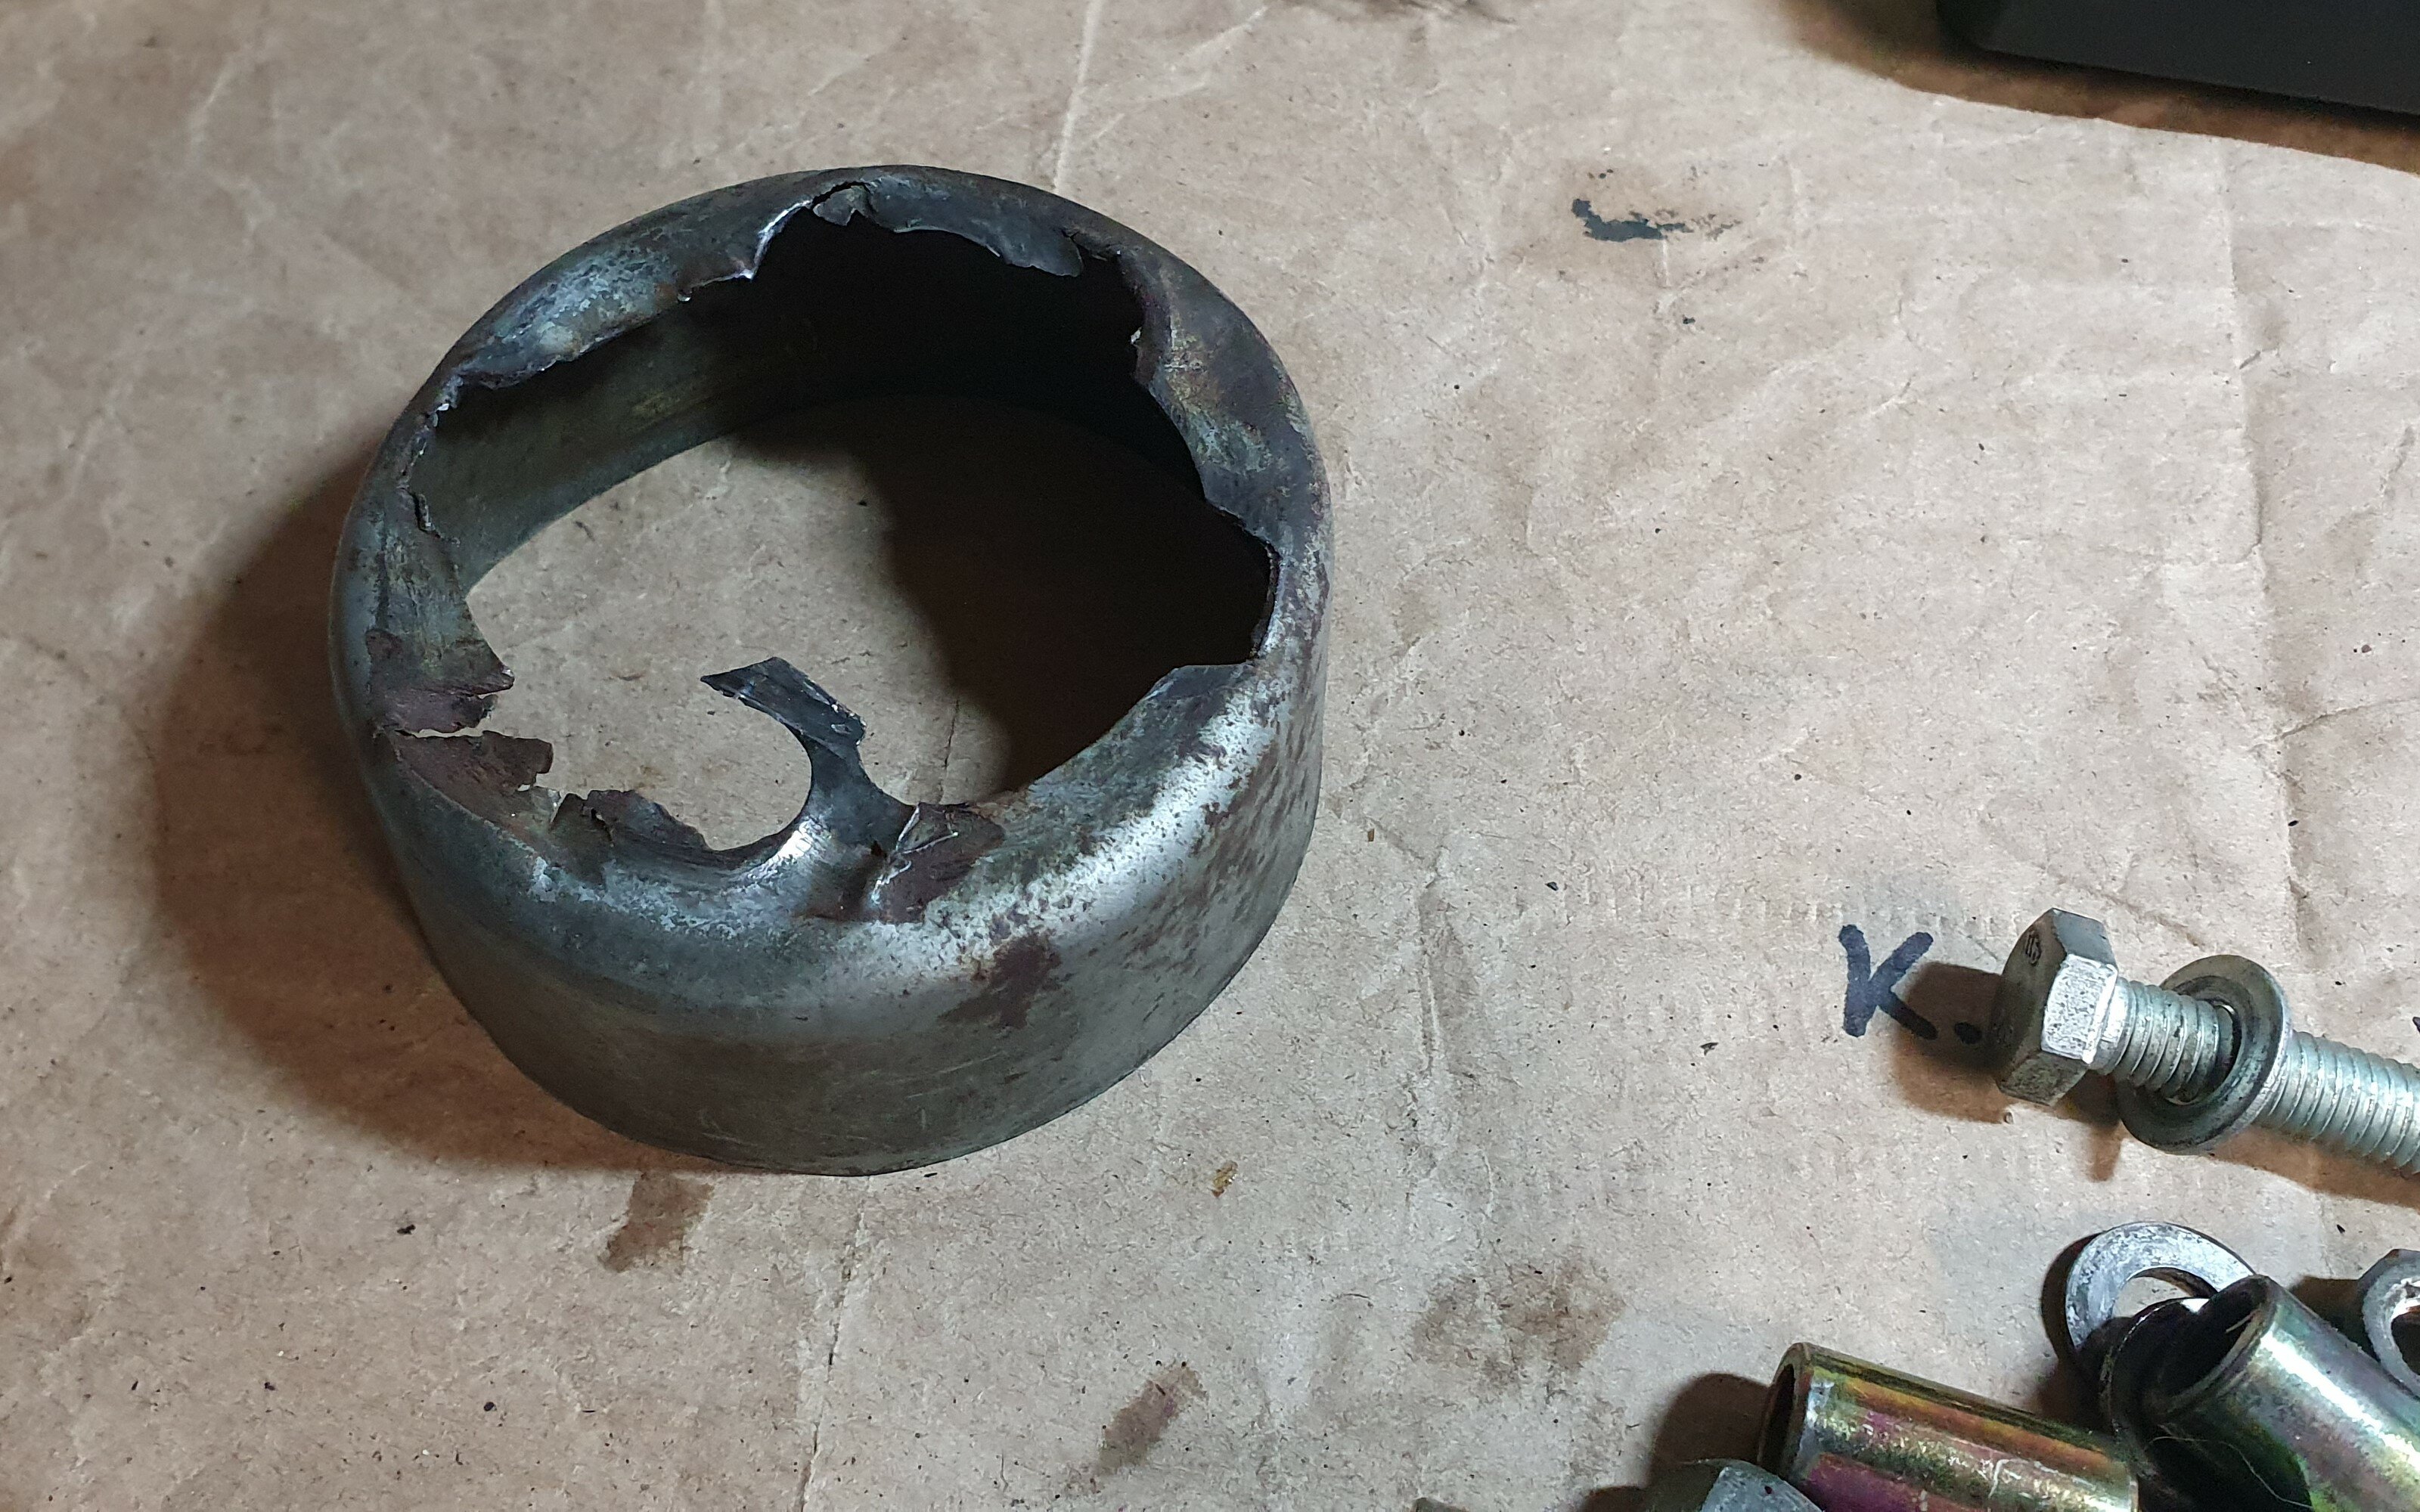
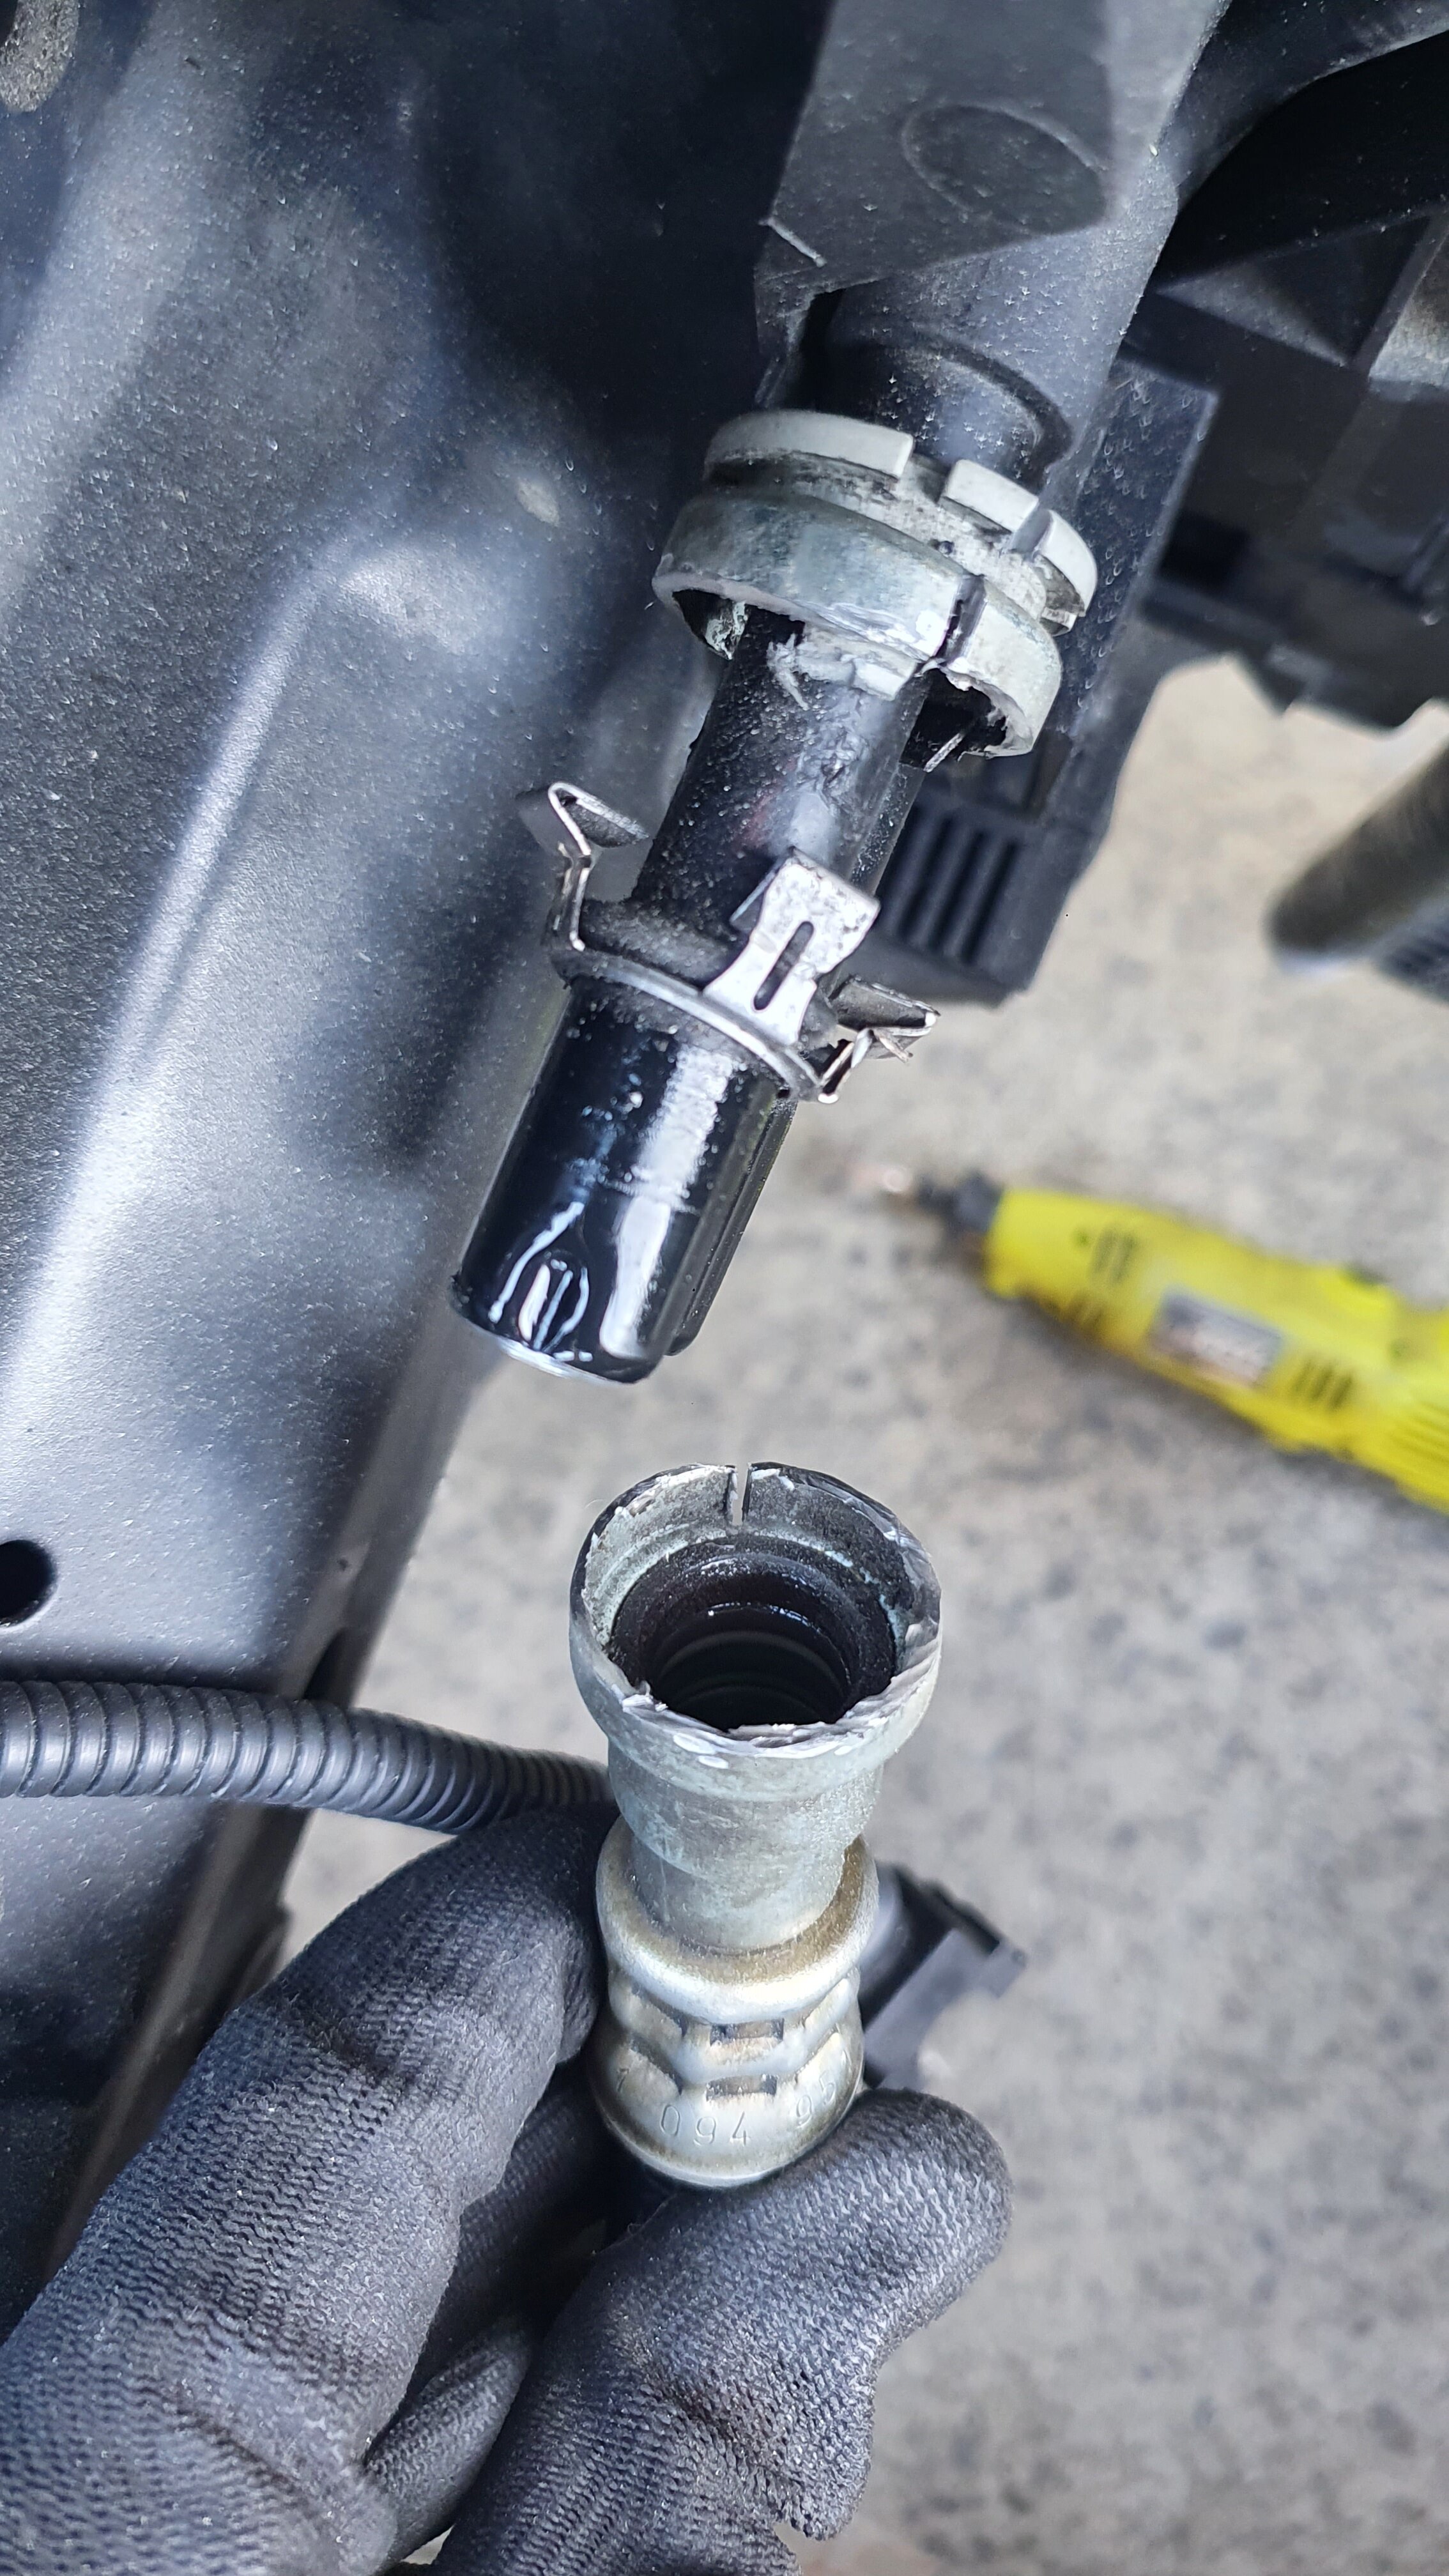
Finally got the final stubborn low pressure power steering line removed from the coil on the car that I'd given up on previously. Annoyed the hell out of me. Would not budge at all pressing the white clip in. Tried jamming in a cut up strip from a plastic bottle to no avail. Resorted to cutting it open with a rotary tool in the end. Stupid thing. Managed without any damage to the cooling coil and have a new line to go on anyway.
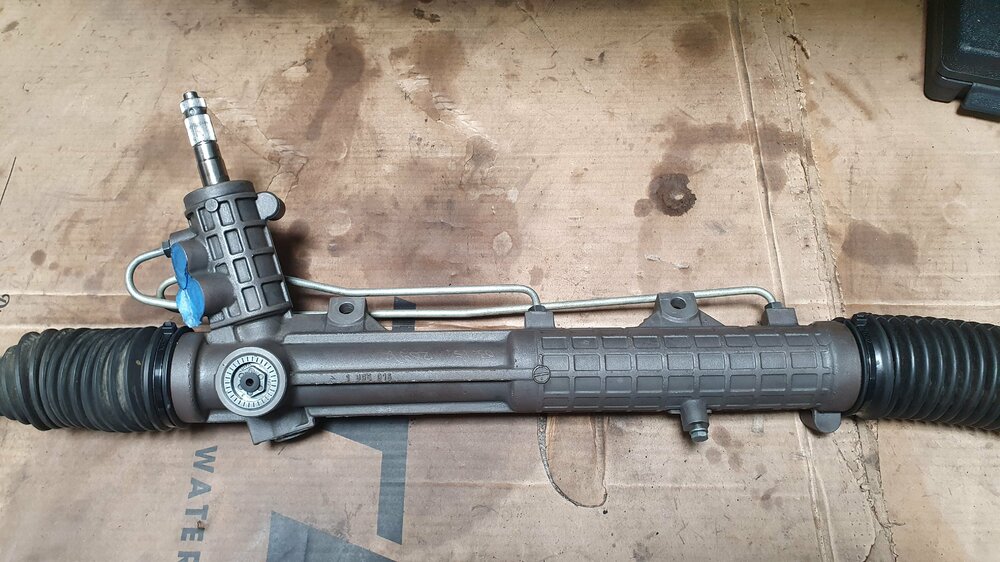
The steering rack itself seems in decent nick and I found this engraved in it when wiping it down.
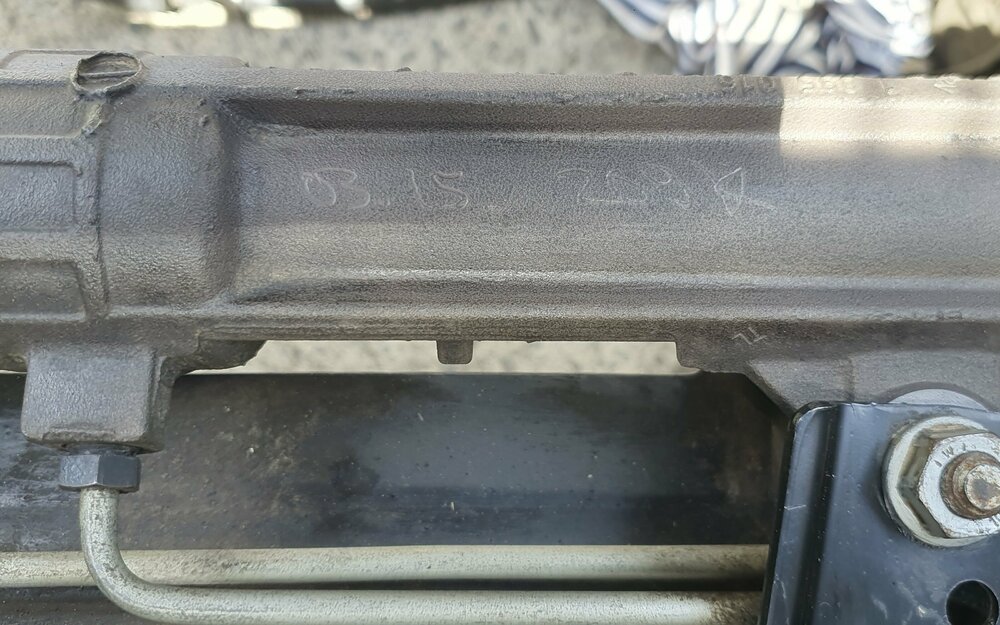
It seems to say "03.15 209k" so wondering if it's been refurbished in March 2015, at 209k km? Bit weird as I bought the car at 214k km's in 2021 and it's unlikely it'd only done 5k km in the 6 years, so assume the rack must have come from some other car at some point. Anyway, tangent.
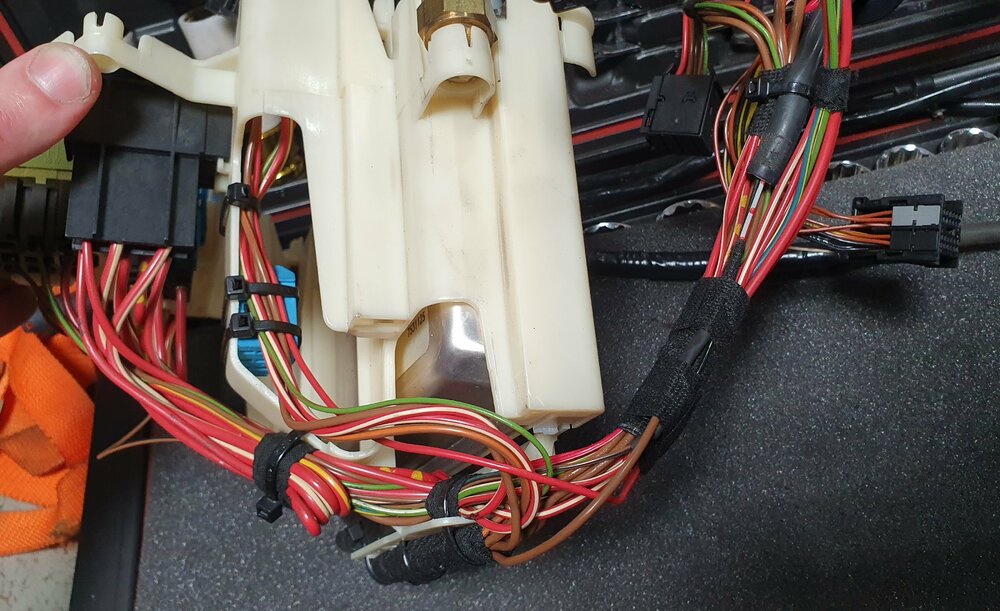
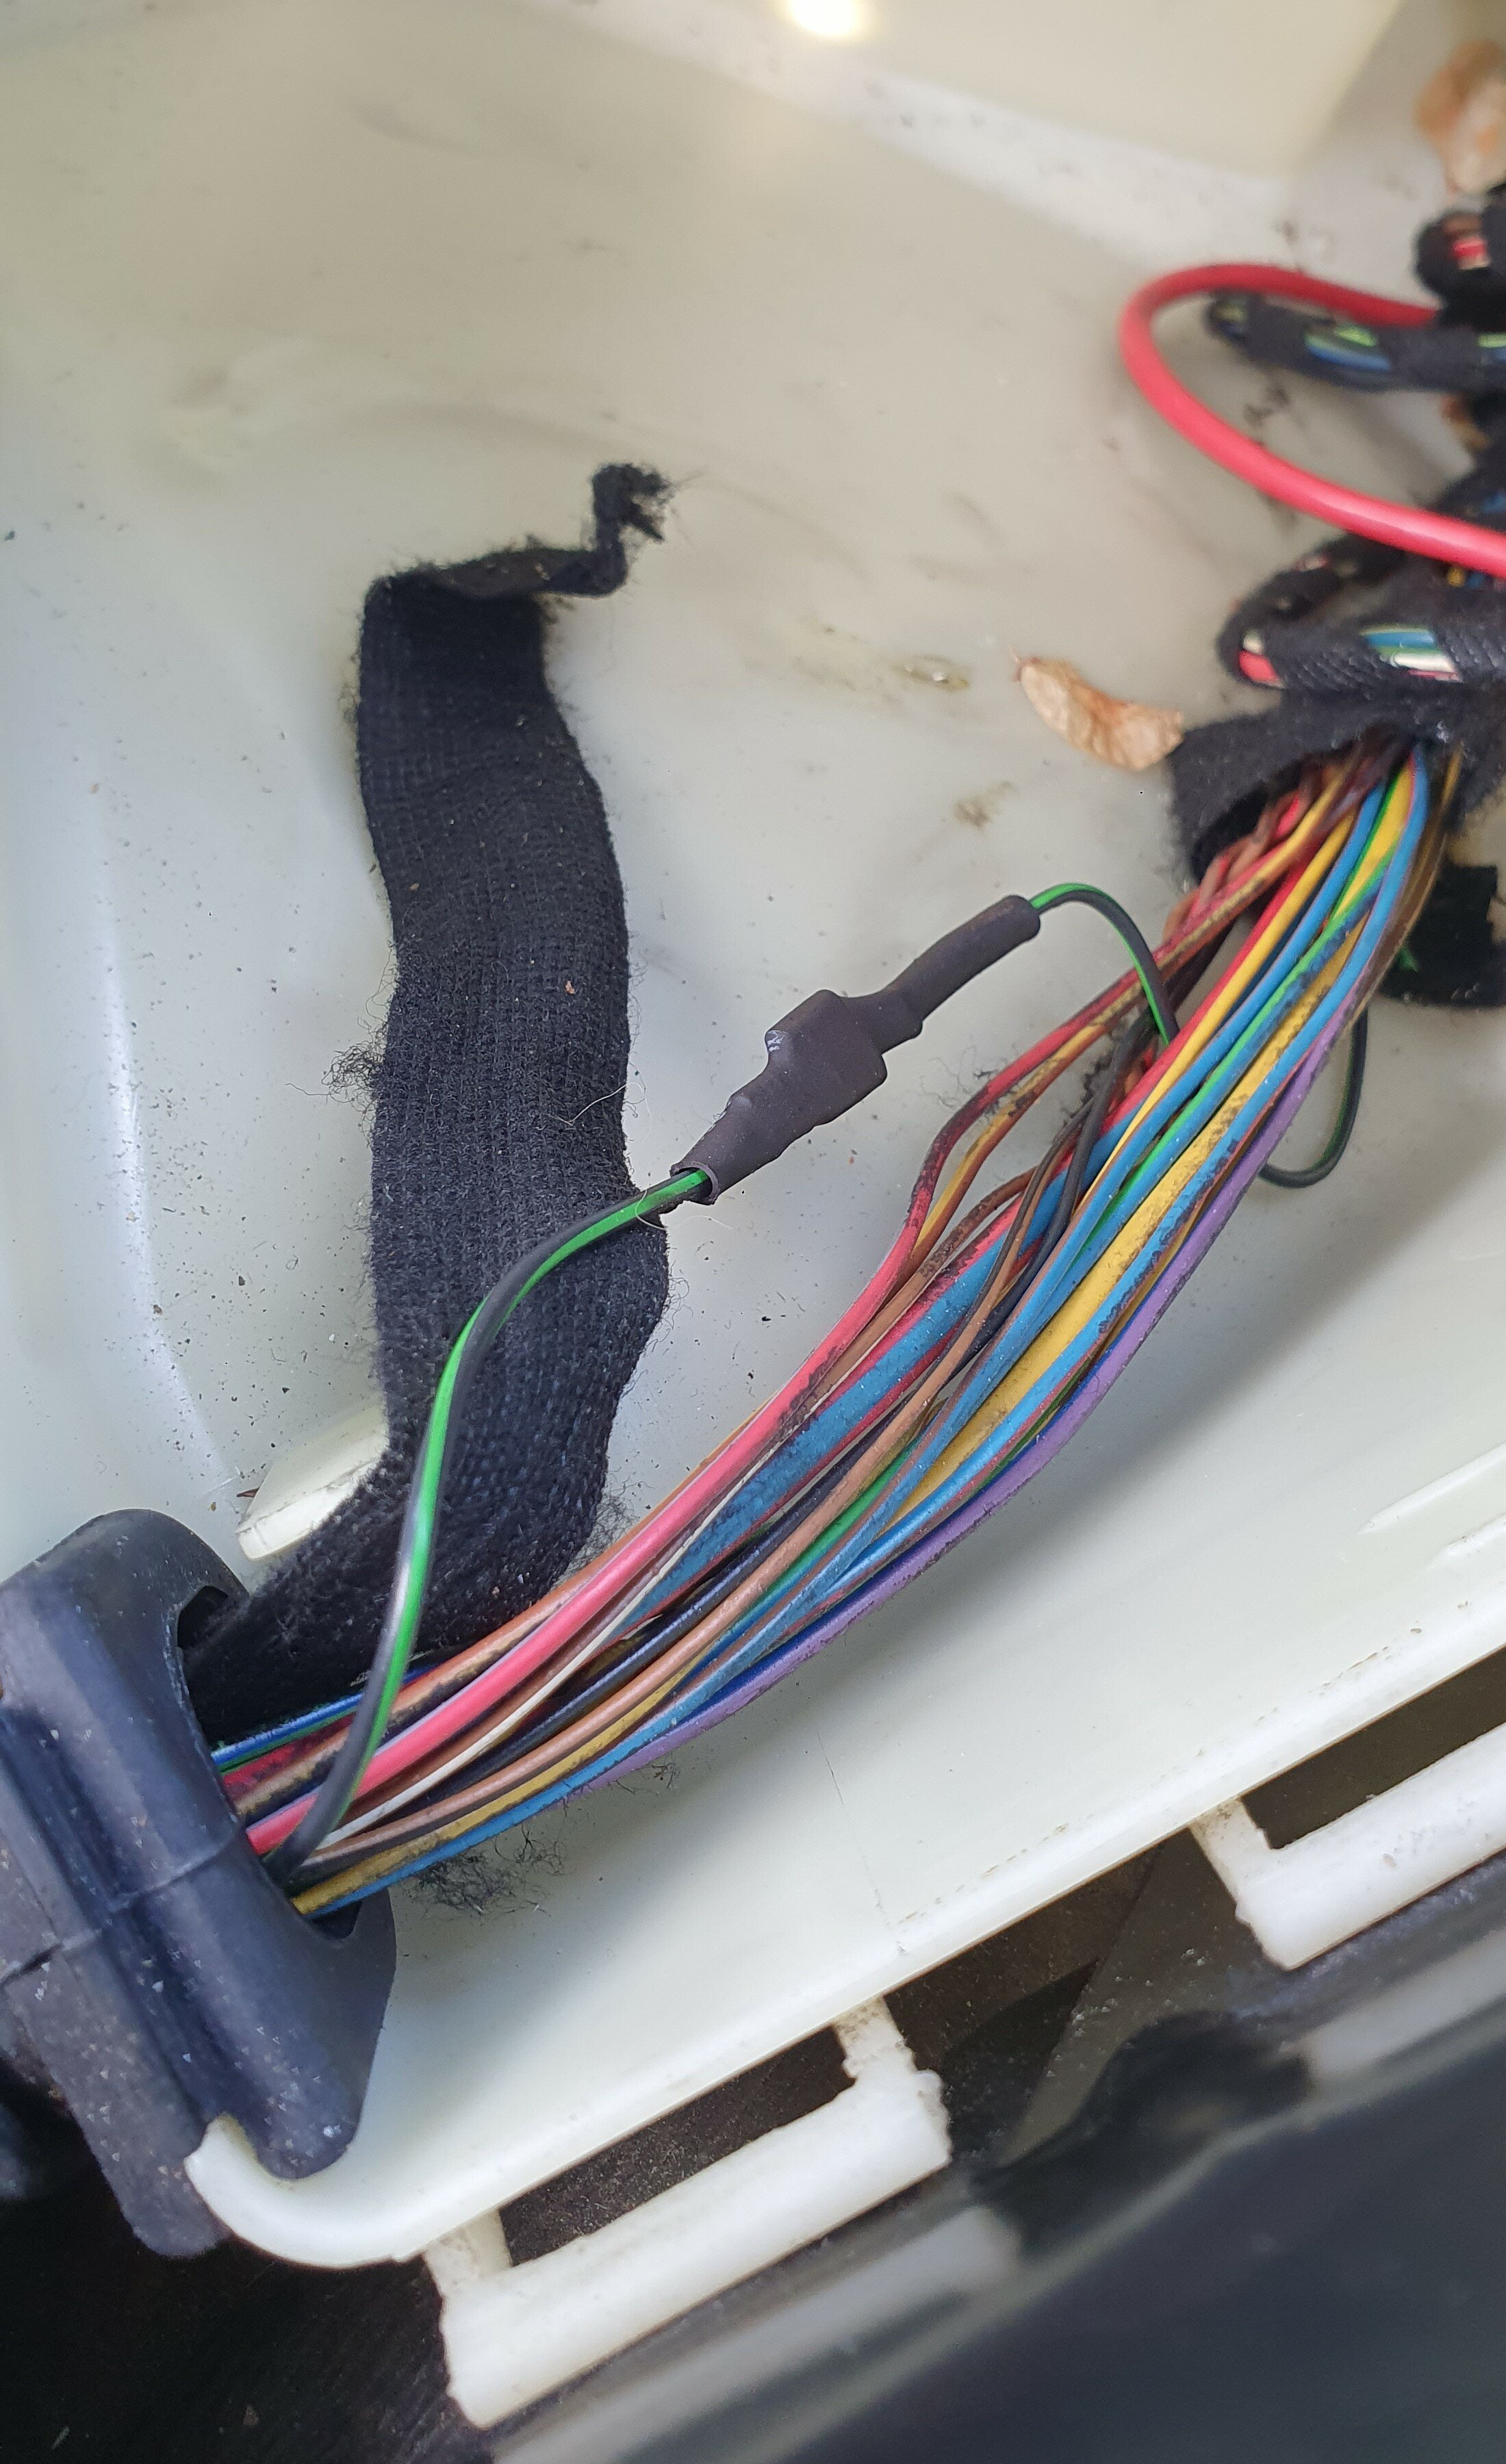
Tackled the wiring looms next. Did a thorough inspection and gave everything a clean, cleaned off a few oily connectors with some contact cleaner and replaced the bits of plastic corrugate sleeving in places where it had crumbled away it. Also removed the auto transmission / O2 sensor loom from the ECU/relay box and tidied up the reverse light wiring I'd left in a bit of a dodgy state previously. Properly crimped and heat shrunk everything in place and culled or tidily tucked away the remaining automatic transmission wiring bits going into the cabin. Also found some sort of... repair someone had taken on previously?

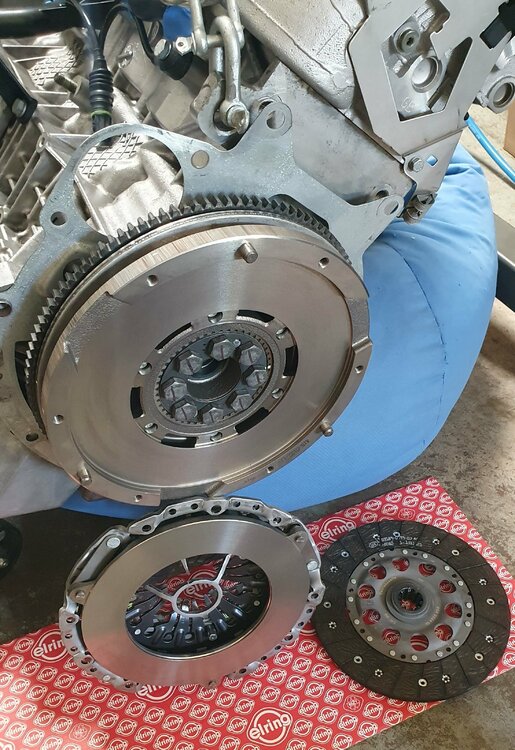
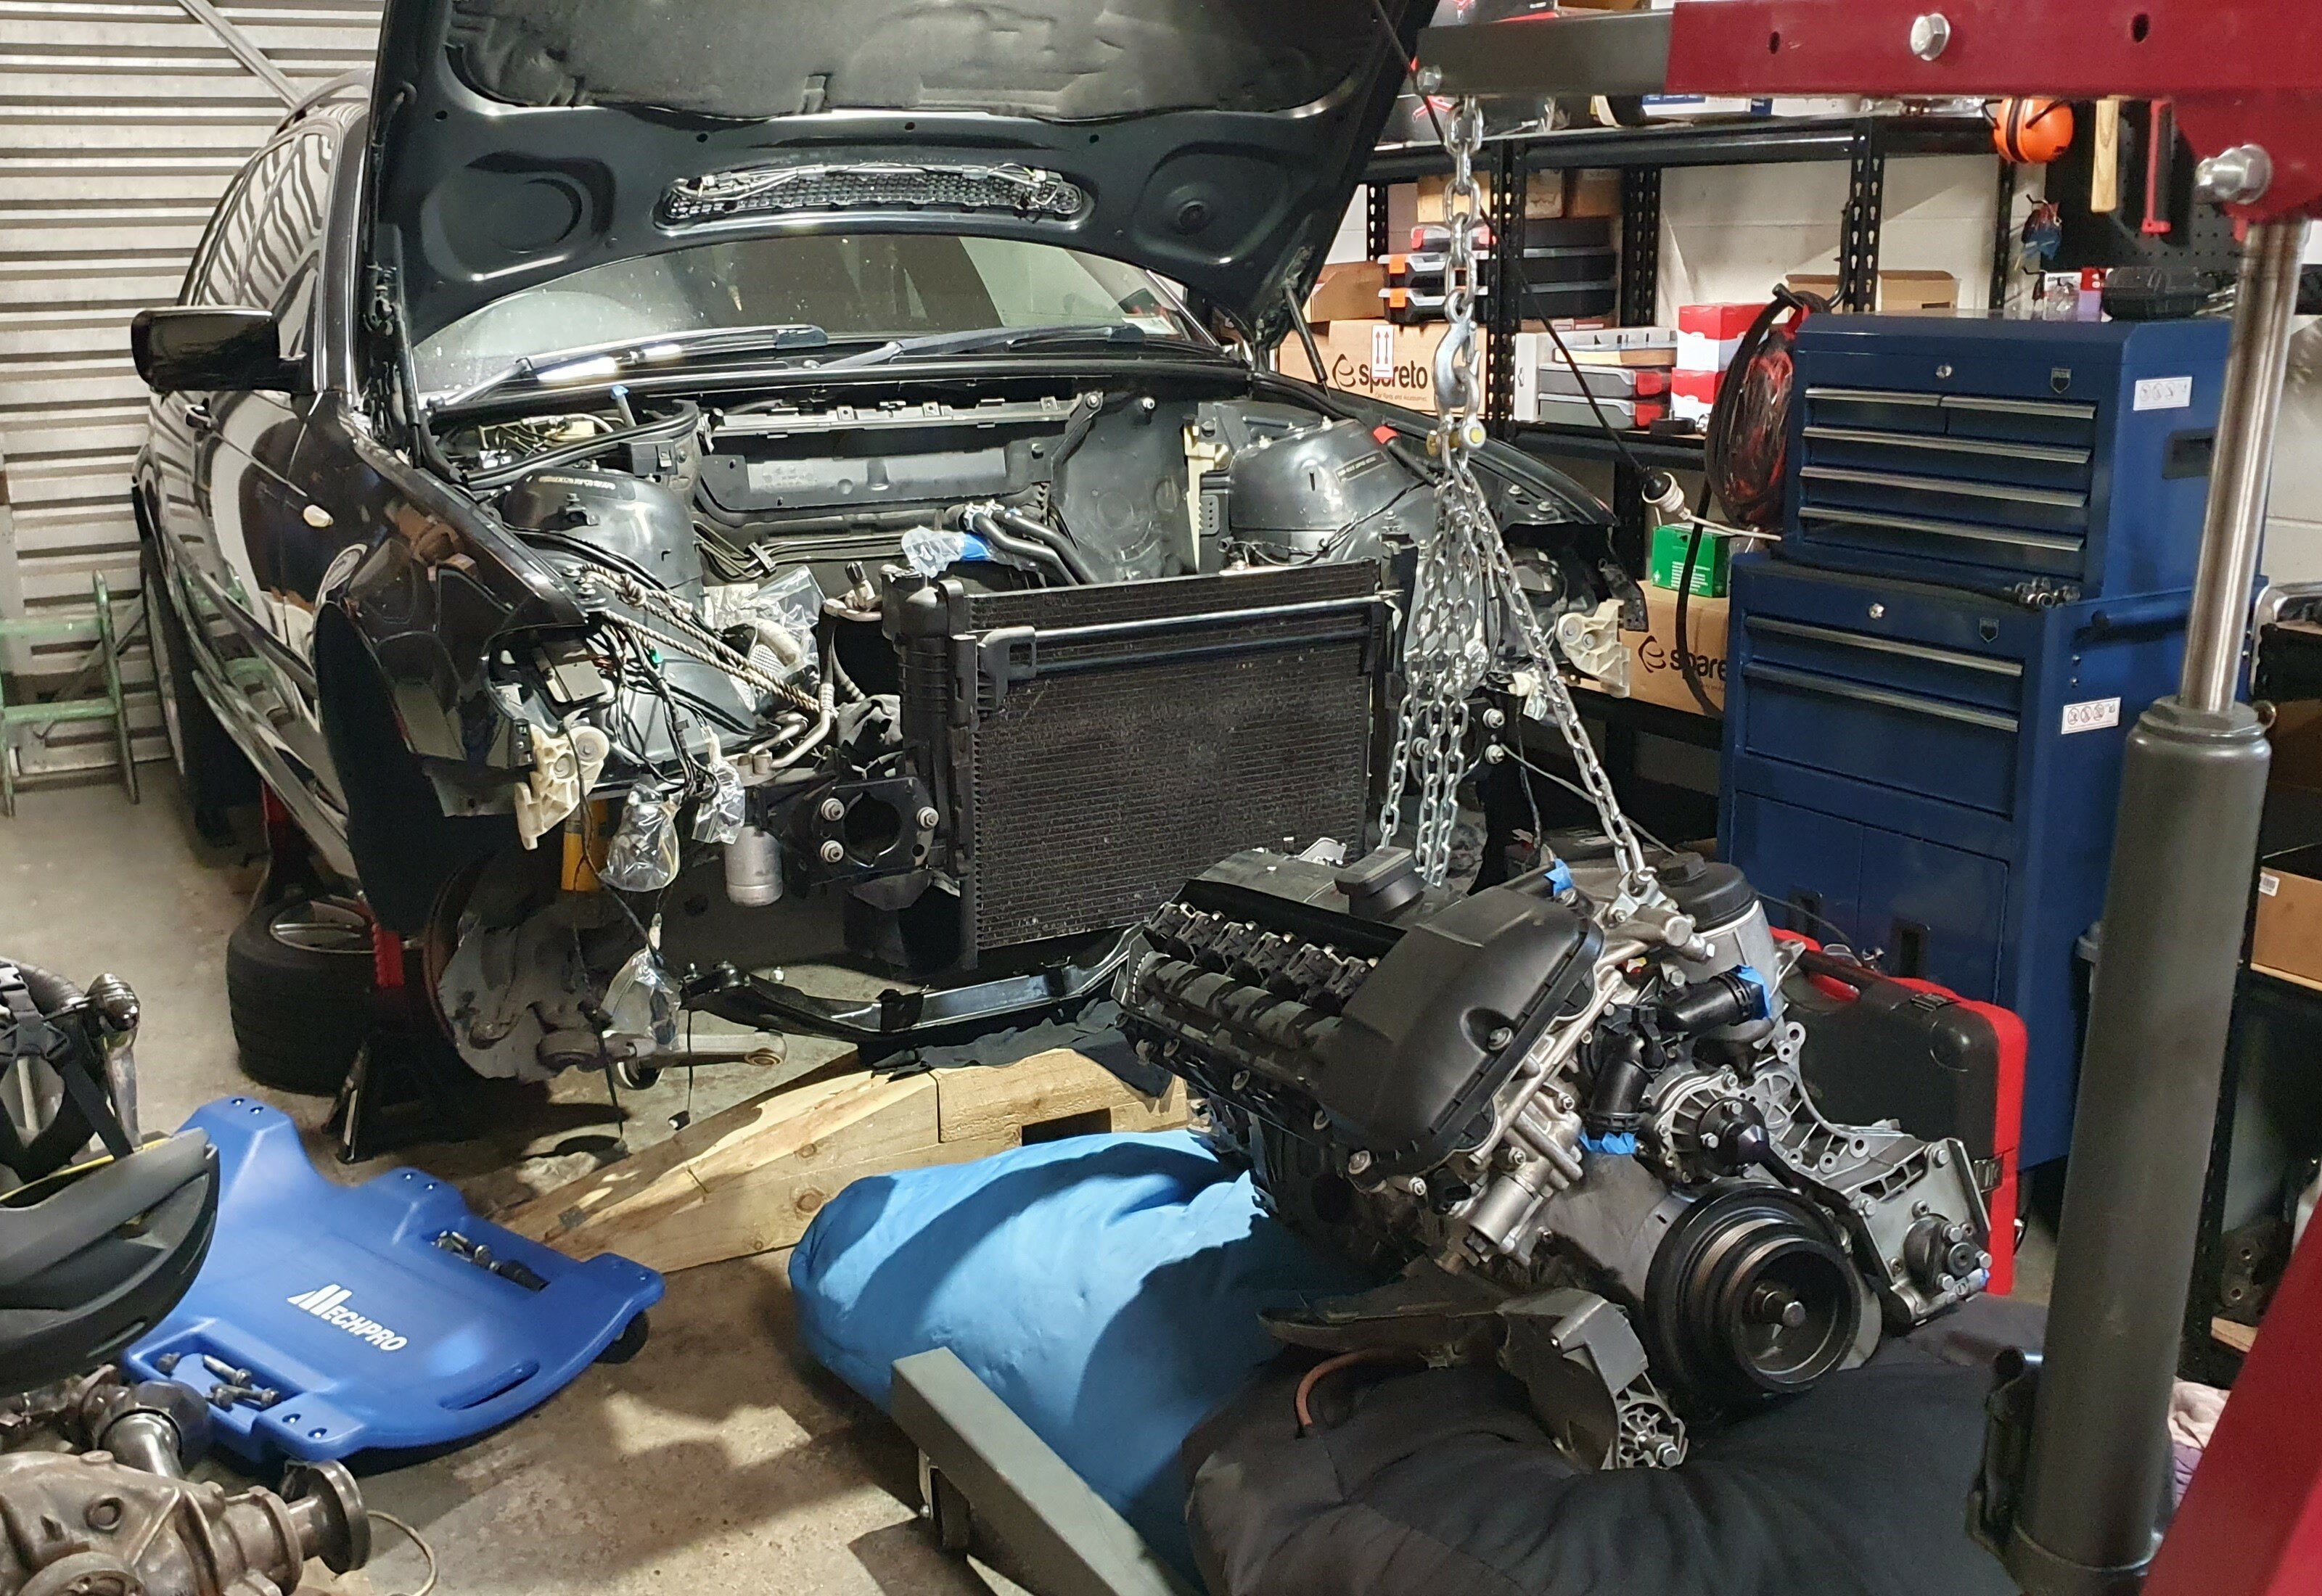
Bolted up the new dual mass flywheel and clutch kit I'd bought off @Eagle and mated up the engine and gearbox. Finally found a good use for two old bean bags my partner's been nagging me to throw away for a good part of two years now. Make a good cushy bed for the engine to take some pressure off the crane.

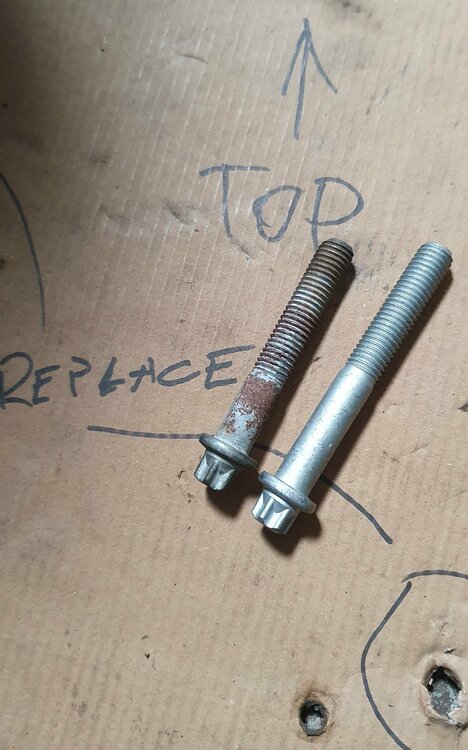
There's two E14 bell housing bolts that are longer on a manual box than they are on an auto so I made sure to order those in (part no. 23001222894). Looking at it, the auto ones would probably do the job but wouldn't engage the threads fully so best to be safe.
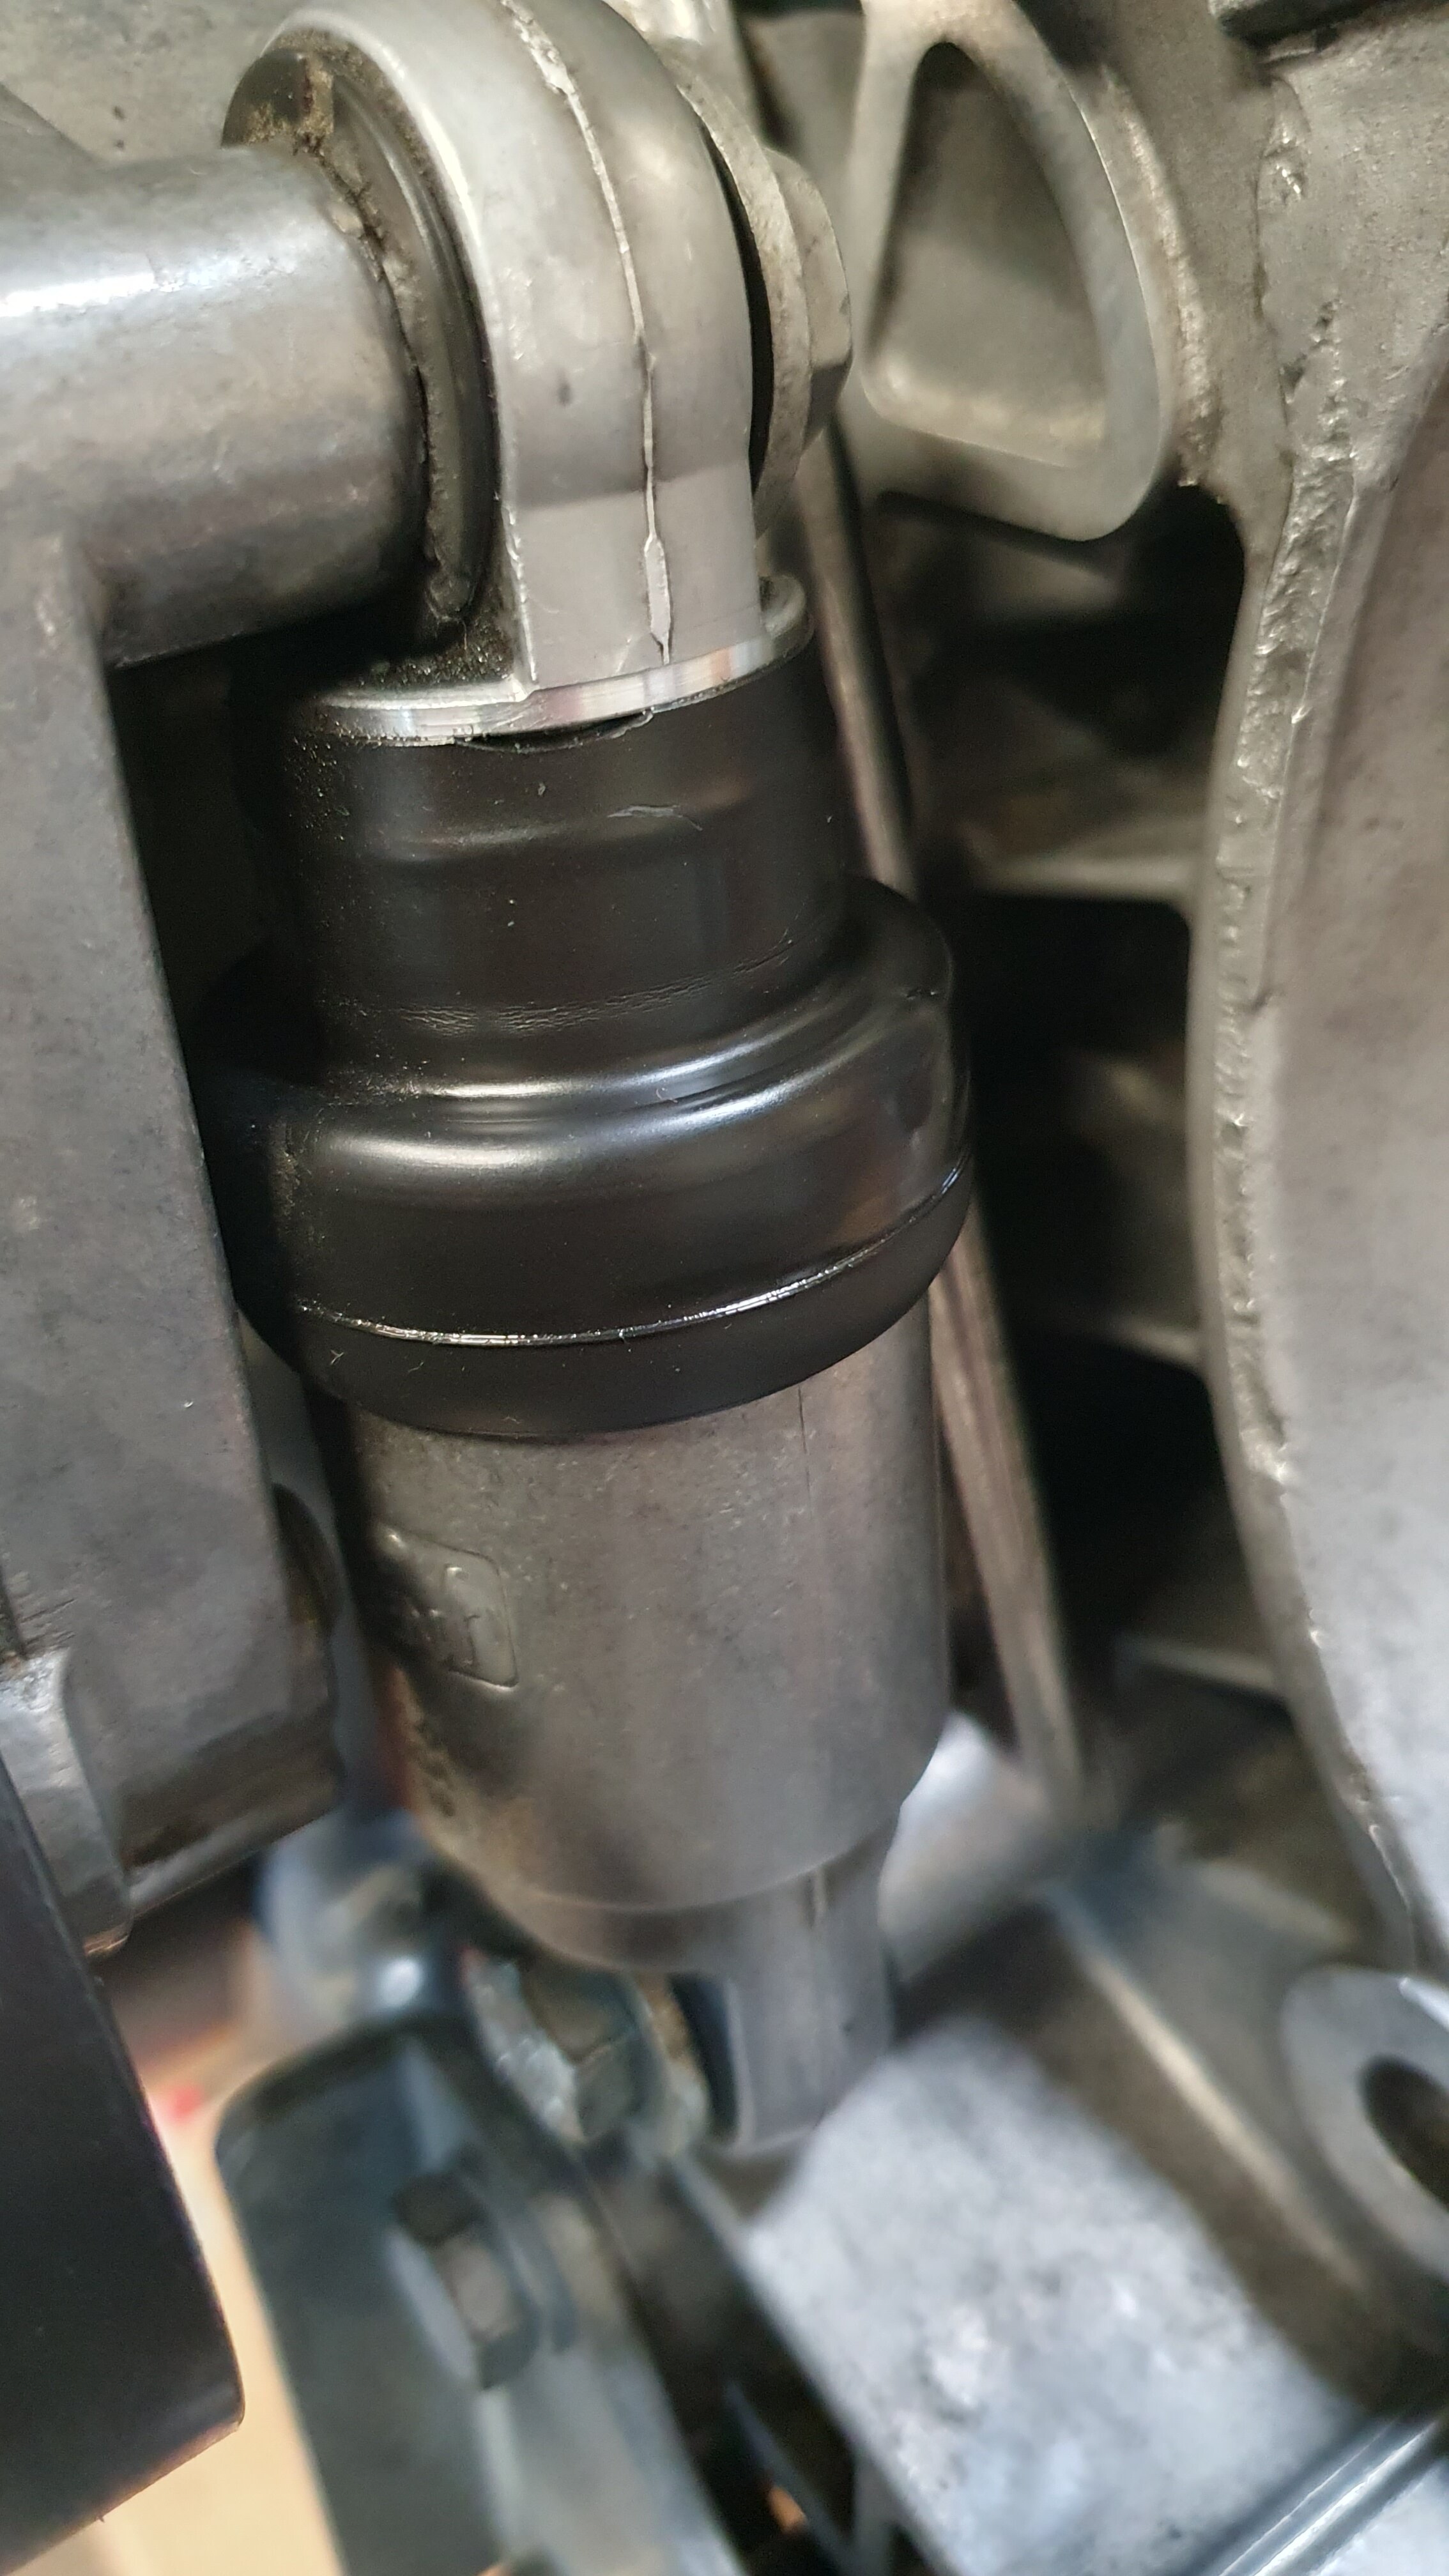
Got pretty annoyed when I got onto bolting on the main tensioner and it started spewing oil all over the place. Frustrating as it's barely a few years old. Bought it from FCP Euro as well so would be covered by warranty but can't imagine the return shipping costs would make the exercise worthwhile. Also discovered that I'd bought the wrong type of AC tensioner so have ordered new ones of both, should be here beginning of the coming week.
Gave the exhaust manifolds a good scrub and will look to throw those on prior to the engine install. Not a fun task bolting those on in the car.
Gave the whole car and the engine bay a good clean, it'd done a great job collecting pollen, dust and bird sh*t these last few months. Getting really annoyed at the horrid state of the paint now. All going well with the mechanical side of things, I suspect a full respray is on the cards in the not too distant future.
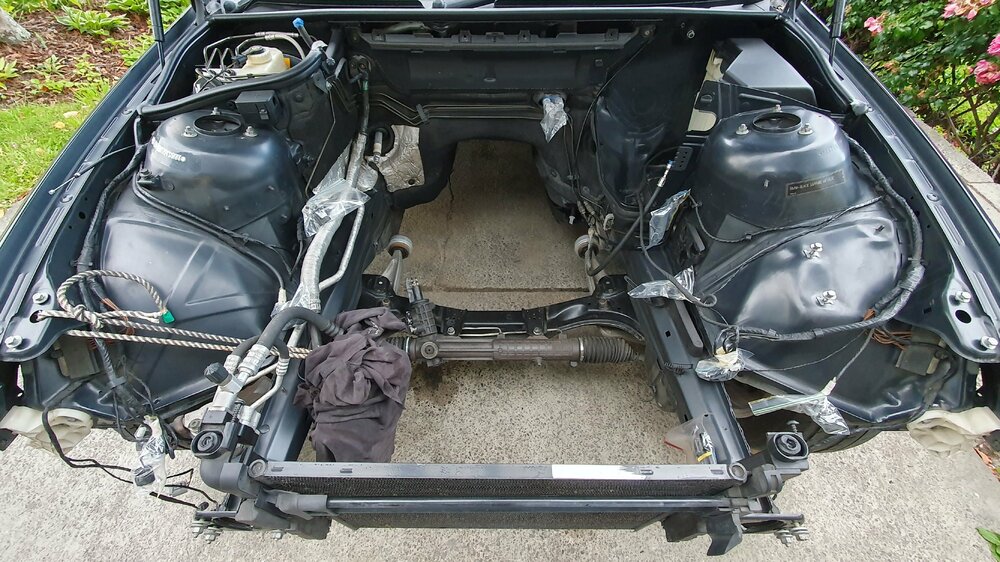
Have rolled the car back into the garage finally, tidying up the last few bits and will start tackling the engine install.
Plan is still to get the car up and running, break the engine in properly, go for WoF and start tackling the other missions that will knock the wheel alignment out of whack. Front subframe will get all new control arms, bushes, wheel bearings and tie rods, whole rear subframe will be refurbished and will probably throw in adjustable camber arms for good measure. With the subframe out, also aiming to tick off the reinforcement plate mission. Got a full kit from CMP as well as the weld in beam that goes along the back of the rear seats. Not sure if I'll end up going all the way with it but best to have it on hand anyway. Will also try out their solid steering coupling. Currently has a poly coupler that is a squeaky little piece of sh*t so definitely getting rid of that; more on it in a future post. 330 brakes are still waiting to be rebuilt. Some might have also noticed boxes of suspension bits on the shelf in one of the photos. Got a set of Eibach Pro Kit springs and Bilstein B4's all round on a decent deal from Demon Tweeks. Big pile of plans there but should feel brand new when I'm done with her.
As far as more immediate tasks, will probably take the driveshaft to a shop to get tested/balanced. Pair extra to get the rear part of the driveshaft send over along with the manual conversion from the UK but the dude didn't mark it at all when removing so no idea how it's supposed to line up. Bit silly.
Also haven't quite settled on what to do with the exhaust. Lined the 325 & 330 ones side by side and apart from the flap at the tail pipe on the 330, they seem to be pretty much identical? Leaning towards going with the 325 one if so. Am also thinking I'd like a bit more volume out of it so keen to hear some suggestions as to the best course of action, short of dropping a few grand on a full new setup. Don't want it to be stupid loud but in stock form it seemed barely even noticeable so just after a slight increase. What sort of difference would cutting out the secondary cats / resonator make? I assume deleting the muffler is sure to make it obnoxiously stupid?

-
3
-
-
Good to hear that some decent work was put into it and not a straight flip. Fair play to them on that front. Don't know if that justifies the asking price being what it is but meh.
Interesting that they seem to market it being LHD as sort of a selling point? Is that a thing? Personally would have thought that it acts more to its detriment so don't really get it.
-
2
-
-
A steal at that kind of money , despite the condition. Tempted to go on a roadie actually.
-
Absolute madness. Love it!
-
1
-
-
1 hour ago, Dogballs said:The box is the ZF S6-37BZ, genuine driveshaft.
Hot damn, that's awesome. I'd be very interested to know where you sourced that from. From what I've gathered, the US ZHP's were the only E46's that came with that box from factory. Is that where you got it from somehow?
I know the newer 1, 3 & 5-series came with those too but I imagine the driveshafts and shifter linkages from those wouldn't be straight fits to an E46 and would need modifying.
-
Looks an awesome car. Color scheme might not be everyone's cuppa but suits it quite well in my eyes, definitely unique.
Is the gearbox a 420 Getrag? And was the driveshaft a straight drop in or needed to be altered? That'd be my main concern going for cert.
-
-
Not sure on the coils. I don't put anything on mine but might not be best practice.
The rough idle might be a stuck idle control valve. Could definitely use a clean and a lube up after 15 years anyway. Would also clean the throttle body and MAF whilst in there. Might not be the main cause but would definitely help.
-
Interesting diagnosis. How hard would you have to be pushing it to crack a head?
-
34 minutes ago, Eagle said:Yeah should be easy enough to find one. I dont what the prices on them are but id assume a LF20 would be a ~$50 part.
Bit more than that but meh. Either that or ~$1000 for a new one. Add $10 for new O-rings and should be good as new.
-
40 minutes ago, Eagle said:Did the you hear the LF20 running on the car?. I dont know what the spec is for end play is on that pump but id expect around a couple of mm.
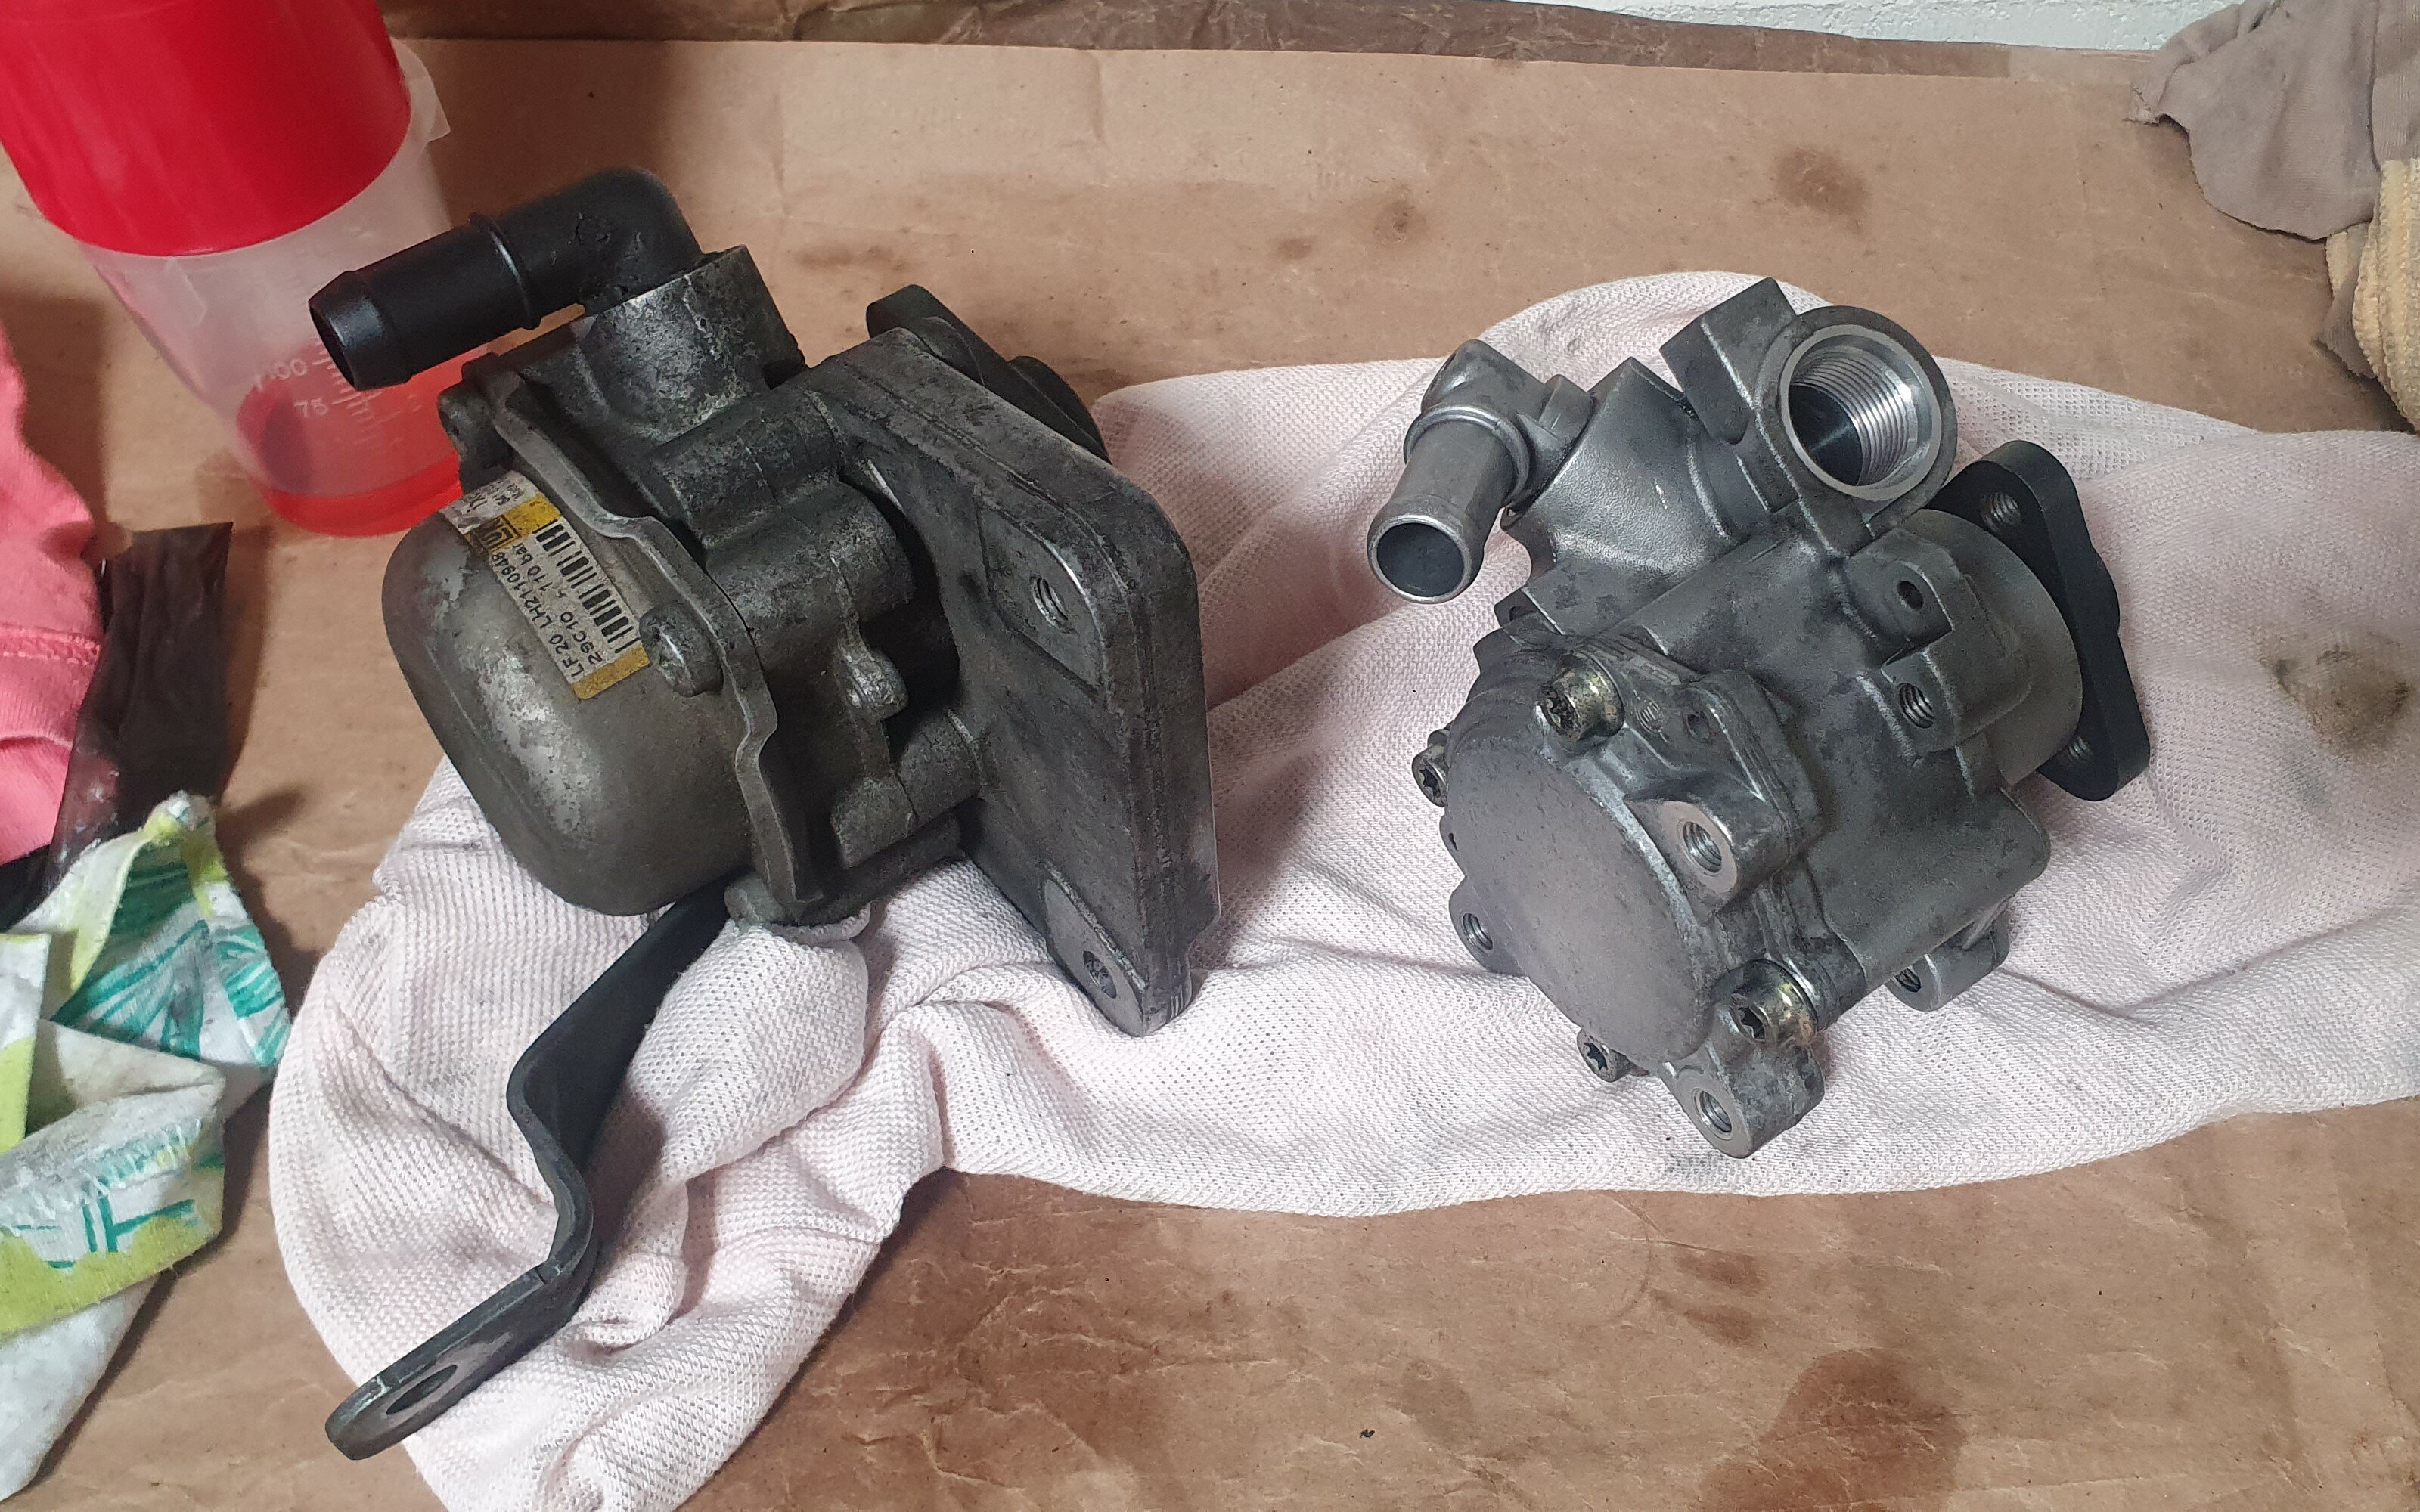
Didn't listen to it specifically but the car made no noticeable noises in general. I did compare it side by side with the 325ci I had at the time and that had no such play. Although just checked RealOEM and the coupe had an LF-30 so not a direct comparison. Will pop by Pick-A-Part tomorrow to have a gander. Looks like I'll only find LF-20's from what's there currently.
31 minutes ago, Gaz said:How can you tell the difference in pumps? I've got this sitting around, brand new if it's any use
Got both in front of me right now and that looks like neither. Doesn't look like an E46 pump that. Thanks though, appreciate the offer.
LF-20 on the left, LF-30 on the right.


Elias' 135i project
in Projects
Posted · Report reply
That looks absolutely mint man. Did you paint it yourself? What sort of paint did you use? Going to be doing mine soon but no idea what products to use yet.