Leaderboard

Popular Content
Showing content with the highest reputation on 10/04/19 in all areas
-
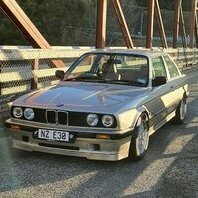
3 pointsReplace all suspension/bushing components/diff rebuild - Completed Apr-May 2019, 198,000km Since I purchased the E30, Previous owners had fitted Vogtland springs and Boge fronts with standard rears... impractically low, soft, paired with with the wrong shocks. Add to that almost 200,000km on the clock and most things were getting soft/perished, the rear beam bushings were particularly shot adding some exciting rear wheel steering to the mix when avoiding pot holes. After countless hours of research and sleepless nights pondering what I'd do, I purchased Bilstein B8 shocks & H&R Sport springs a few years ago, but they sat in the garage (shocks stored upright), being too busy with work to devote the time to completing the job. It's never going to be a track car being a convertible, and I'm not an overly 'spirited' driver, but I didn't want to return to the lofty heights of factory suspension & wanted something firm but controlled. I picked up the strut bar & cross brace from Garagistic on sale in the hope to keep everything nice and tight up front and make the most of the sport shocks & springs (I'm sure I could find stiffer/higher performance versions of these, however I liked their understated design). This year after quitting my job it was finally time to get them fitted. Crippled with an acute case of 'while you're in there' I had brought all other bushings for front & rear, all new wheel bearings (front left had failed a warrant). Diff was whining rumbling like there was no tomorrow so off to Kayne Barrie for a rebuild. Parts: -Bilstein B8 sports shocks -H&R Sports springs -Garagistic front strut brace -Garagistic front lower x-brace -Original 3.73 diff rebuilt with Z3 torsen -Rear beam bushings -Rear trailing arm bushings -Rear sway bar bushings & end links -Diff carrier mount -Front control arms -Front rose-jointed sway bar end links (Ford Mondeo 'upgrade' from E30 wiki) -Front strut mounts -Front tie-rod ends -Spring pads -Front disks, pads & caliper rebuild kits (rears replaced 2 years ago) -Parking brake pads & hardware -New brake lines (x6) -Wheel bearings (x4 - FAG, original supplier as noted on the old ones) -Exhaust hangers & gaskets -Engine & transmission mounts -Various new bolts, nuts for drive shaft, rear beam, etc. All bushings/mounts/end links/control arms Lemforder. Brake rebuild kits & lines ATE, standard Bosch pads. I removed the exhaust directly from the headers & removed as one piece. Then dropped the rear subframe as a complete unit and disassembled (loosening the half shaft retaining nuts before removal). The subframe came away easily as the rear beam bushings were completely separated You can see a 3-axis puller attached to the half shaft & hub... this was useless requires a press or back of an axe with spacer! Once this was all apart, I took these round to Nathan's (zero) house and with his help & the right tools we got all the old bushings and bearings out in an afternoon! This would have been a properly horrible job without his help! There were only a few very minor corrosion spots on these parts due to the copious amounts of factory protectant wax that was still clinging on, nonetheless while it was all out, I sent it off to be sand blasted, primed & painted: While this was all out, gave the under body a good scrub & check for corrosion... again the factory wax and face-lift galvanizing process had held up well. Once all the parts were back from the paint shop, I pushed all the bushings & bearings back in with a press Received the diff back from Kayne and set about re-assembling everything! (assembled on the car) The old front sway bar end-links vs the rose jointed ones Front strut bar fitted (required repositioning the clutch fluid reservoir). Unfortunately I've only taken it for a short run up the road (needs a wheel alignment) as I was down to the wire getting it reassembled (read 2 days) before I headed off to South America for 6 months (in Peru writing this!)... For now it's up on stands in my parents garage... Looking forward to getting it back on the road and will post re the improvement after I've had some time on the setup (back in December)! A few quick photos for ride height reference before it went into storage: Special thanks to my father for many hours of assistance, sweat and muscle. Nathan for his time, knowledge and good conversation. Kayne for getting the diff turned around before I headed to South America, during what was a really busy time for him!
-
1 point
-
1 point
-
1 pointI take umbrage, David at the above. I would hope you mean "If the car is driven to its full potential the use of 10w-60 maybe required" Brad, I do maybe 5-6 "driver trainings" a year. After every second training day, I do a oil and filter change.
-
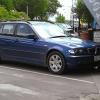
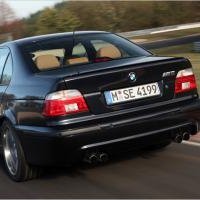
1 pointE34 M5 Touring (Italians get all the luck)
-
1 pointReplace convertible roof fabric & seals - April 2015, 177,000km After almost a year of enduring a 'leak free' roof (as described by the previous owner) it was time to replace the leaking convertible roof fabric. The leaking was coming through the perished stitching that connected the fabric to the frame... most of the loops had separated from the frame (don't drive with your soft top closed, windows open at high speed!). Parts: -New original pre-cut 3 layer fabric (canvas, rubber inner, cotton interior lining layers) -New front & rear bow seals -New tension straps -Sikaflex 225 (original rubber sealant as used at factory) -ADOS F38 high heat contact adhesive -Stainless steel high strength screws for tension straps and rear bow seal retainer (Auckland Engineering Supplies is very useful) -Litres of solvent (for old glue) -Rust-Oleum black satin spray paint Unfortunately I don't have a lot of photos from this job, but I used the original factory service video of canvas replacement (I have a copy if you need it) + the instructions that came with the fabric. It was easy to tear off the original fabric, with frame attached to car, then a few days with clothes soaked in solvent wrapped around glue cover bows (horizontal bars fabric attaches to) to remove all traces of the glue. Once the old glue was removed, I decided to remove frame, lightly sand it to remove some spots of corrosion and respray all parts with a black semi-gloss/satin spray paint. Refitting the frame is straight forward, however be prepared to spend many hours with shims getting correct alignment of frame to body (happy to assist people with this!). Then it's a process of re gluing the canvas to the frame (there are specific alignment cuts in the canvas to attach this correctly). It's very important particular attention is paid to the way the two layers of canvas are attached to the rear bow, and the final layer needs to be glued so that it pulls the canvas in around the rear bow. Done correctly, the canvas should meet at almost a right angle with the rear tonneau cover when it's closed. Some original inscription from the factory on the old canvas Before it's first outing I also used 303 Canvas protectant (kind of like scotch guard) to protect the fabric and make the surface hydrophobic I reapply this every 6ish months - 4 years on it's still looking near new: I also picked up an original rear window 'bra' on german Ebay to protect the rear plastic screen if it's parked outside on a hot day (it's been garaged since the roof replacement):
-
1 pointGoing legit... after ~15 years of being a rebel.
-
1 pointCerts are $650 now days and no it’s more than a tick the box exercise now far more extensive as the onus falls on the certifier to make sure it is done correctly and if you have a smash he’s not up for manslaughter charger. It now takes a good 3hours or more to certify a vehicle with moderate modification properly. Every single nut and bolt is photographed and documented by the certifier (the good ones at least) and anything that is not up to standard get written on a list of “remedials” I have been getting certs for years and know the rules like the back of my hand and even on my latest cert I got a list of remedials and the length I had to go to prove removal of side airbags were dandy and the remainder of the system was still functioning ect made me realise how difficult certification has become. You also used to be able to convert the likes of trailing arm systems into full coilovers, now you’d struggle without proper documentation to back up that the arm can handle the load, the bolt system is sound and the suspension geometry doesn’t change through the full travel. So no it’s not a tick the box exercise. You should see the paperwork certifiers have to fill out! It’s no wonder some are going to the electronic system now on an iPad to do it all.
-
1 pointAll cleaned up and fitted. Need to open up the drivers seat control box to fit a new bushing so i can put the recline/headrest button back on, and the switch covers for the thigh support on both seats are missing. Hopefully can find those in the e39 530i msport festering away at pickapart Mangere.