Leaderboard


Popular Content
Showing content with the highest reputation on 12/16/23 in Posts
-
2 pointsAnd now for today's edition of @Karter16's Random Side-Quests. On my to do list is the radio/nav. I've spent a lot of times working through various options and they all make me sad to some degree as there just aren't any options out there that give me the combination of OE-like and modern functionality that I'm looking for. The current trend in the E46 M3 world seems to be towards minimalism which is fine, but for practicality reasons I want to swap to a touchscreen nav setup that I can run CarPlay on etc. Ideally this looks OE-like, however having said that I'm not a fan of the dated "screen with buttons around it" arrangement that the original E46 nav had. Times have moved on with technology and it's unnecessarily pokey (in my opinion). That said I don't particularly want a big slab of a tablet stuck on the dash either. I'm currently tilting towards something like this Xtrons unit: This in itself makes me sad, as I would like to steer well away from the cheap electronics, but that said none of the main manufacturer's offerings enthuse me either. I'm inclined at this point to give the Xtrons a go. If it's rubbish/not reliable then I'll try something else instead. I'm technically competent so don't mind some effort to get things working well, I just need them to be reliable once I've got them setup... Anyway, back to my morning cup of coffee quest... Regardless of what option I go with, I want to make it feel as OE as possible. One aspect of that is replicating the original boot/splash screen used on the OE Nav. Now of course the OE Nav is more than 20 years old at this point and the original image is low resolution: I had a decent search on trusty google but was unable to locate a high-res reproduction of this image, so I decided to make my own. I actually used Figma to do this, which is a bit of a random choice, but I'm very familiar with it and its capabilities are more than sufficient for this project. Secondly Figma is a vector image tool, so what I'm producing here is a vector-based image which I can then use to output whatever resolution I like with no loss of image quality. Upscaling images by hand, especially graphics/text is part math and part subjective tweaking. To start with I take the source image, resize it to a suitable scale to work with on the canvas (I chose 1280w, large enough to see detail, without being too large and unwieldy). I then started overlaying the text and graphic components. When doing text I tend to use a contrasting colour so that I can get the sizing, etc. approximately right and see what I'm doing: Often the challenge can be working out exactly what font has been used. BMW made this nice and easy for me in this instance as they use their own "BMW Helvetica" font for everything 🙂 Once I figured out the exact size to set the font to, which is trial and error, I was then able to roughly put in the bars with the linear fades on each side. Getting the proportions of the fade right is again just trial and error and viewing at different zoom levels to judge what's right. I squared everything up and had an image that looked pretty much like the original, but higher quality. The next step is make sure it replicates the original as closely as possible which is a lot of tweaking and pixel shuffling. I find that the best way to do this is to take the image you've just produced and output it at the same resolution as your original image. This gave the the following: Looks pretty good huh! Actually when we look at the original and the reproduction side by side (repro on top, original on bottom) we can see I haven't quite got it right. In the reproduction the BMW text is slightly to the right. This is because I centred the text in the image between the fade bars which I made of equal width on both sides. Doing that on the face of it makes sense, but there's a good reason why BMW tweaked it slightly. If we look at this side by side (repro on top, original on bottom): We can see that BMW actually made the fade bars on the right hand side slightly wider than those on the left, this is to account for the fact that only the top right edge of the W extends fully to the right of the bounding box for the text, whereas the B on the other side is hard up against it. Although in my image the text is dead centre and everything is symmetrical, the perception to the eye is that there is more whitespace (or blackspace in this case) after the W than there is before the B. To account for this BMW actually made the fade bars on the right hand side come across to the left just a little bit. So let's adjust it: Getting closer, just a bit more to go: Now we're looking pretty good! It was a number of iterations to get to this point, but now things are looking pretty similar between the two. I'm happy with this now. All of that work means that I how have a fairly faithful, high res, reproduction of the original image ready to go for when I need it. This is pretty niche so I can't imagine anyone else really having any use for this, but if you do you're more than welcome - SVG and PNG downloads below 🙂 SVG E46 BMW Nav Splash Screen Vector.svg 1280w png 2560w png
-
1 pointCongrats, a milestone for sure !! I'm just going through my second cert (1st update) now and WoF set to expire the day after my booking this coming week at BMW 😕 At this point I just tell my cert guy I'll see him next time 😅
-
1 pointTackling the cert process was next on the list. First, got a fresh wheel alignment at the dealership, free of charge due to the previous mishap. Then, successfully failed WoF. Car passed otherwise but had to ask for them to fail me on the modifications as per cert requirements. And finally, the nail-biting part of taking it in for the cert inspection. Actually didn't go as bad as I'd feared. Made an effort to prepare as best I could - compiled a fat stack of receipts for all the parts and services I could find and also made a ~40 page booklet (mostly pictures) of the work done throughout the project. Definitely made the process much smoother. The inspector was impressed and very complimentary of the work I'd done, saying his job would be much easier if all clients came as well prepared, which was nice to hear. But then still had to fail me on a couple of minor bits. First, he wanted more info on the adjustable camber arms - info I had provided in the booklet that he didn't notice initially. Pointed it out, he took a photo copy of it and that was that. The other point was the thread engagement of the front wheel bolts. Minimum requirement is 6.5 turns of thread engagement, mine only got 6. The rear wheels were fine. Quite a weird one that with pretty much all components - wheel hubs, rotors, rims, bolts - being OE. Potentially could have argued my way out of it but felt it easier to just do what was asked for. I thought that maybe the E90 had slightly longer wheel bolts but having looked up the part numbers it turned out that the bolts on nearly every modern-ish BMW were the same, apart from the SUV's. Ended up going to Mag & Turbo who found me some bolts that were roughly 3mm longer than stock, giving me "8 turns of engagement". At just $5 a piece, $50 later I was all sorted. The dumb thing about it is that even with the wheel off, the bolts start to protrude out the other side of the front wheel hubs at 6 turns in so that's pretty much all the engagement you're going to get, no matter how long the bolts. But what do I know. Went in for a recheck on Friday, got the wheel bolts checked over and approved, paperwork signed, tag put on and off I drove with a stupid grin across my face. The one silly part about it was when I went back to the WoF place to see if they'd be happy to issue a new WoF despite the tag not being live yet. Friday was apparently the last day LVV were updating their database this year so I'd have to wait for middle of January at best for it to be online. Gave the WoF guy the paperwork, he called up the cert inspector, verified that the cert had been approved, then he called up some other dude and decided he didn't want to risk it. Bit annoying as it'll be more than 28 days before the tag goes live so I'll have to pay for a whole new WoF recheck but that's just the time of the year I guess. Technically, WoF is still valid until beginning of February so I'll just drive around with all the paperwork on board until then. I was under the impression that certification only picks up the bits that go past the modification threshold requiring cert - in my case that's the increase in engine displacement, modification to the brake pedal, 330i brake conversion and adjustable rear camber arms. But in fact he picked up everything else as well - slightly lowered suspension, solid subframe bushes, solid steering coupler, front strut brace, even the RACP reinforcement. Not an issue as it all passed but I was surprised those things get noted down as technically you wouldn't need cert if those were the only modifications. The other annoying thing is the wheels. Even if I went back to Style 68's or some other stock rims then technically it should be a WoF fail since the car was certified on the Style 193's. Bit absurd that but that's the weird cert system that we have - even if all you're doing are minor modifications, once you go for cert the car is then considered a modified vehicle and is basically treated like a hot rod that was built from scratch, so every little thing needs recertification. If I ever were to change wheels then I'd need to go for a recheck, they'd have to road and brake test the car on the new wheels at a cost of roughly $600. Whether that would actually be a thing you'd fail a WoF for in reality would I guess be down to the inspector's discretion.
-
1 point
-
1 pointGreat work, love the attention to detail! Looking forward to seeing what unit you go for.
-
1 pointIt's something that is a consideration, and Andy and I have spoken.
-
1 pointChristmas update ! Now at 314,000miles , 505,000km just keeps ticking them up, albeit a bit slower lately. If anyone is interested in being its next owner, im having thoughts about moving it on. I have 5 cars that remain in the fleet (19 BMWs in total at the moment) , probably should get the number down a bit. Needs an enthusiast owner that will keep putting the miles on! Can come on the m parallels with virtually brand new tyres, or on standard e46 wheels. Could do with either paint or a wrap. I havent got to rebuilding the driveshaft yet, but thats the only thing that needs to be done. I havent done it because i have a manual conversion here for it which is diesel specific and could go with it. oh too sevin 3079322
-
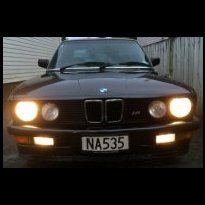
1 pointTinkered with some of the electrical gremlins I mentioned previously. First took apart the ignition switch. Blew out the dust, sprayed it throughout with some contact cleaner spray, cleaned the contacts with some strips of cardboard soaked in solvent, sprayed it all down again and reassembled regreasing all the contact surfaces. Pretty straightforward job. Trickiest part is taking it apart whilst trying not to break any of the plastic clips. Have only driven it a handful of times since but so far so good, no signs of the no crank issue but time will tell if that's fixed it. Then took apart the lights to check for any obvious issues. Main thing I noticed is that the problematic driver's side light must have been worked on at some point already. The date label on the igniter read 03.03.18 (at least I assume that's the date) and had a generic no-brand bulb with just 4300K written on it. The passenger side read 03.04.03 and had a Phillps bulb that I assume is original. So that's great. To start with, I just switched the bulbs over. Both lights now lit up but the driver's side took a good 5 seconds longer, so I assume the issue isn't the bulbs. Pretty weird that the driver's side light looks to have new igniter leads but is still acting up. Would be good to know why those were replaced in the first place. Left it there for now. I guess the first step will be to get new matching bulbs at the very least, then poke further. Will keep a look out for a cheap set of xenons for sale to poke around in as don't really want to risk messing up the only set I have. Then maybe further down the line go with an upgrade kit as seen in one of M539's videos.
-
1 pointI launch this POS at them: OK... "Launch" might be a bit strong... but it sure scares people when it's converting petrol into noise and aimed directly at them 🤣
-
1 pointcome on M57b30tu2 swap then ill get excited .