Leaderboard
Popular Content
Showing content with the highest reputation on 07/26/25 in all areas
-
3 pointsWhen deciding on the Gauge.S one of the ancillary decisions I needed to make was how/where to mount it. When he installed his Bryson designed an enclosure to go in the ash tray which is very nice, and I decided I would go with the same approach as it allows for the Gauge.S to be hidden away when not using the screen. It's also an easy swap back to the ash tray at any point. The centre console is specific to LHD/RHD, in that the cigarette lighter is on the driver's side. This meant that the enclosure Bryson designed needed to be mirrored for my RHD to keep the screen centered. Bryson kindly shared the CAD file with me and I was able to quickly make up a mirrored version for RHD. I also removed the features that I don't need (internal mount for the GPS unit and mount/faceplate holes for USB-C charging). The end result looked like this: As you can see it was printed on a textured bed which gives it a lovely effect. Now this all seemed too easy to me, so I decided to make it more difficult by doing a painted finish to more closely match the rest of the centre console components. As always with painting it's all in the preparation: This was then followed by several coats of matte black, before being sanded back to a completely smooth finish and then top coated with several more coats of matte black. I'm super happy with how it's turned out: In person it looks perfect to me, I can't find a single imperfection in the paint that I'd fix if I could. I'll wait for this to properly harden and then do some photos showing it in place. Just got to wait for the rest of the bits to arrive now!
-
2 points
-
1 pointBump. I'd like this out of my garage. I'm sure I'll miss it but such is life. $30,000 with the RAREM3 rego...
-
1 pointBefore the next few months of overhauling the car this is some previous stuff to catch up on. IMG_20250308_104937_536.webp
-
1 point
-
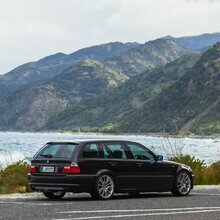
1 pointAbout time for another update. XHP - In my last post I mentioned I was going to drive it for a couple of weeks before throwing Xhp at it. Yeah nah not a chance, managed to wait all of 4 days before buying a license and flashing it. I started with stage 2 and quickly moved to stage 3, now just playing around with the settings, mainly torque reduction, rev limiters to match the dyno graph power, torque limiters and all those similar. Definitely made a big difference in waking up the gearbox, even in D it feels much more modern. Having a gear indicator in D and S is also nice too. Will keep playing around with the settings and see how it goes. Heated Seats - I found a set of dakota leather heated sport seats on marketplace and decided it would be a worthy upgrade for the wagon. A little bit of leather cleaner and conditioner softened them up and I threw them in. Still a bit of work left to go here, need to add in the extra wiring on the car side of the wiring loom as well as source an LCI IHKA for the heated seat buttons and figure out the coding. The seats also came with lumbar adjustment which is kind of nice. Wheel Spacers - The car already had a set of 12mm spacers on the rear, but it left a lot of be desired in both front and rear wheel fitment. I bought another pair of 20mm spacers to test out on the rear and switch the 12mms to the front. The front is now sorted, very happy with the fitment and no rubbing at all. Will lower it a touch to match the rear too. The rear still has a bit to go, with only 225s on an 8.5" wheel there is some stretch which I need to get rid of, once I get some 255 or 265s it'll help a lot. CP3 R90 Pump - An R90 popped up on FB and I couldn't help myself, don't see many floating around and this one was from darkside developments and has been refurbed already. Will pop it on the shelf and install later on down the line. To make any use of this I'll need to retune so I'm not in a rush on this one. Unfortunastely the connector on the fuel control valve is damaged and the seller didn't know at the time because it was still wrapped up, however I believe the valve is the same on the R70 so I should be able to reuse it, we will cross that bridge when we come to it. Water pump and thermostat - The m57 thermostats seem to slowly open earlier and earlier over time so that the engine never makes it to operating temp. Mine was ok but thermostat was opening at 83-84. Also replaced the water pump while I was there, the M57 pumps seem to be ok but they have a plastic impeller that is eventually going to die with all the heat cycling, replaced it with a metal impeller version. Overall the job was pretty straightforward. The waterpump did come with an extra nipple on it that isn't used on this car, easy fix by chopping off the end and tapping it for a 1/8" NPT fitting. A bung and some thread sealant later and we were back on track. The AC belt also caused some issue, given I hadn't read ahead to see that I would need a special tool to turn over the crank it took us much longer than expected to get the belt on. The final solution involved Tony under the car with two prybars turning the flywheel through hatch in the bottom of the bellhousing while I used a screwdriver to get the crank to grab onto the belt. A bit like mounting a tire. This all turned out to be a total waste of time, on my way home I flicked the ac on and noticed it not getting cold. Turns out the belt had shredded itself and got thrown off the pulley. The belt that came off was 5mm longer but the one we mounted was correct on realoem, will try the 5mm longer one and see how things go. Now that I've gone back to look at realoem it looks like there were two options an 830mm and an 836mm, the latter being forthe s1cba co2 package, which seems like a co2 refridgerant version? I've got R134a so I'm not sure why the 830mm won't fit. And lastly a good sunday wash. This photo really makes me want to lower the front more to match the rear.
-
1 pointSome more progress. Got my hardware back from zinc coating, all Organized again now. Got the rear subframe back in. Along with new rear inner brake lines. got the steering rack fitted up into the front subframe with some spacers I machines. Also swapped on some new e36 outer tie rod ends. just waiting on rear wheel bearings to show up and I can start putting trialing arms back in.
-
1 pointAnd a little interior update. Bought a new gear gaiter, handbrake boot and armrest cover and recoloured my leather to a sexy cinnamon brown. Not sure how well the vinyl door card inserts will wear but I have some spare leather I can recover them with if required.
-
1 pointAnd these are some of the part that I have been collecting this year and it will my job to install over the next 2-3 months ready for summer. Main things with be an M3 LSD, axles, steering rack, rear subframe, rear spring arms and some M3 coilovers. Along with f8x m2 brakes a GM to 6hp21 swap just to name a few.
-
1 pointTime for a fresh windscreen. The old screen was covered in little rockchips from living up a gravel driveway and was probably still the original screen. The sensors also didn't work very well - both rain detection and auto lights, the lense was pretty cloudy after many years of UV. A decent rock hit the screen a couple of weeks ago on the way to work, conviently large enough for a replacement screen through insurance. I ended up going through Smith and Smith Mt Wellington as they were nice and close to work. Overall they did a great job, trims seated nicely with nothing scratched, 10/10 would recommend. I was initially leaning towards trying to get it replaced with OEM because that would always be nicer but after some research it looks like it is pretty difficult to get done. Of course paying the difference is always an option but when an E91 screen is ~$1400 I don't think so. I ended up not sweating it and they replaced with an 'equivelant' brand. I've got no issues with the product so far, apart from the sun strip at the top missing. I figured if it was an average install and the glass was subpar I could have whinged enough to get an OEM replacement. What a difference a fresh screen makes! To anyone with a chipped up old screen it is well worth the effort.
-
1 pointGot a message from the panelbeater tonight that the cad was done. Went and fetched it after work, wasted no time as I was quite excited to have it back. Hired a trailer and jumped in the touareg to collect it. overall very happy with how it looks, yes there are some minor imperfections if you’re being very picky but for the money I paid you absolutely cannot complain. Rust hole is fixed (they chopped a piece of the cowl out to access it, then welded it back in and painted it blending up the a pillar), rust holes in firewall fixed, rust around boot seal lip fixed and painted, as well as entire engine bay/front structure painted. All of that cost half of what another shop had quoted for just the engine bay paintwork. next up I need to waterblast the underside of the car, strip out all the suspension and under seal the whole underside. If anyone has any reccomendations for a good underseal product that can be applied via brush/roller that would be much appreciated, unfortunately don’t have anywhere where I can spray.
-
1 point
-
1 pointGreat to have another touring afficionado on board. Love it! Did see this car for sale a wee while back, did look like a mighty fine package. Congrats on picking it up, the turbo diesels in those are absolute beasts. Love the wheels & body kit too.
-
1 pointBefore I post up pics and a bit more detail, here's a summary of what we've done so far... M62B44 engine from donor E39 540i 5hp24 gearbox from donor E39 540i E36 oil cooler and E39 hoses DME and EGS from donor E39 540i ASC from 99 B 318ti Front brake calipers E46 330i Rear calipers E46 328i Coilovers E36 M3 steering rack M62 power steering pump + reservoir Frankenstein E36/39 PS hoses E9x M3 steering wheel Steering shaft - PG Hydraulics Driveshaft- Driveshaft Specialists Custom driveshaft hoops Sump and subframe - Cybul E30 sway bar custom mounts Strut-mounted tie rods E28 OEM engine mounts Modified E38 headers Stock exhaust E38 alloy wheels E36 M3 alloy radiator 320d viscous fan (E39 clutch) E38 AC compressor, E36 condensor, E36 and custom hoses DME 5.2 (pre-97 E39) EGS 8.55 (96-97 E39) Nissan Dualis expansion tank Interior swap (beige to black) with microsuede headlining Started out with this lump. 135K kms on the clock and ran really well. Had been used as a farm vehicle then sat for a while so I got it for a song. Spent the first couple of months stripping everything I would need and getting the motor ready. It's a dirty job... The motor turned out to be in really good nick so really only needed a good clean. I replaced the valley pan, coolant hose o-rings, valve cover gaskets etc whilst the engine was out and stripped and powdercoated the typically sh*t valve covers. After a bit of research I settled on a sump kit from a Polish company called Cybul. Build quality is great and came with modified sub-frame, engine mounts, custom sump (to fit over the steering rack) and a modified oil pump - though the latter is relatively straightforward to do yourself - though it's not quite the plug and play solution promised in a RHD car. Turns out this swap is a great deal easier LHD which is why BMW never did a production V8 and Alpina only did a LHD B8. Anyway, more on that later. The sump was super easy to swap and the subframe and engine mounts all bolt up with no problems. Subsequently had to modify the driver's side mount to accommodate the A/C compressor - and I now understand the Adamat kit is a better fit if you intend to keep A/C, although I don't think the build quality is quite as good. It was about this point that Josh (hybrid) came to see how it was progressing so I pretended I wasn't going to clean it anymore. Since he can't stand things not being clean he attacked it with a bottle of degreaser and a toothbrush. The results were very satisfying (to be fair, I didn't leave him to do it alone!!). < More to come...



-min3-min.thumb.jpg.44d2d17fd586cb640e7774bf35e77550.jpg)
