
Neal
-
Content Count
1897 -
Joined
-
Last visited
-
Days Won
19
Posts posted by Neal
-
-
So a couple of things.
AA should have registered the new battery with the car. But also the car would have needed the correct charging profile for a no agm battery . Basically a recode of battery type should have been done.
If it hasn’t been done already check the negative battery lead. It has a IBS terminal that will disconnect the battery in an accident , over current etc.
Quick way to check is to put a multi meter on the negative terminal and a ground point on the negative lead. You should see almost no resistance when using ohms setting on multimeter.
Overview of IBS
-
@kwhelan Thanks for the heads up on USB C charging specs , better understanding now , I didn't realize it supported different voltages. eg , 5 - 20 volts. Makes sense as 65 watts over 5 volts would need thicker cable compared with 20 volts at 3 amps. Will stick with the BMW USB C 5 volt variant.
Otherwise if wanted fast charge something like this would be good to hide away and just add pannel insert. Could be an option for rear passenger device charging though.
-
On the charging front I thought I’d stick with wired so I’d have data / audio / charging. It also gives me the option to turn off appleplay if I’m after a higher quality audio stream from the phone via USB. Notice the wifi transcoding for CarPlay over wifi smears the treble a bit using Spotify / Apple Music. BMW didn’t implement usb CarPlay.
Thanks for the heads up on the cable chip. I’ll thinking of using a USB 90 degree male to straight male for the snap in adapter mod. I’m using a iPhone6 snap in adapters and modded the dock area a while back to take a larger iPhone. I’ll make sure it can support the 15 watts available from the BMW USB c.
Good point on the rear outlet. Current there is no 12 volt points in the back . Was thinking for phone charging and.audio Do have a Plugin usb c 40 watt charger in the SUV for tablet. Could add a 12v point in rear.
Also noticed that 7 / x7 series have a USB / tablet bracket and trim built into rear seats. But don’t think I could do that to the M3 seats.
-
Those focal isubs are quite efficient so you may get away with 35 rms. But personally I like the sound of 80 rms as you’d get nice clean peaks to 160 watts. Also remember the focals have a long term power rating of 90 rms so you won’t push them to distructive limits.
35 rms on the 4 inch door speakers is plenty. Audsion should have nice clean amplification.
-
The nice thing about usb is backwards compatible so it’s 4 wire data connection should work of the hub or off USB 2 on evo. My plan is to use the usb c off usb 2 and possibly the regular usb off a hub for back seat use ( daughters phone when in charge of playlists 😀) I’ve added the FDL coding for a hub when I was trying to get usb 2 working after the ID6 retrofit. Found the issue to be a different USB FDL but left it configured.
Was looking at the console area behind the snap in base area and there looks like it could be mounted in the same manner as the console bunker light.
Also thinking of modding the iPhone snapin adapter connector from lightning to USB C so I still get the benefit of docking new usbc iphone. Would still get the benefits of the aerial boost from its amplified passive aerial in the snap in and the cooling fan.
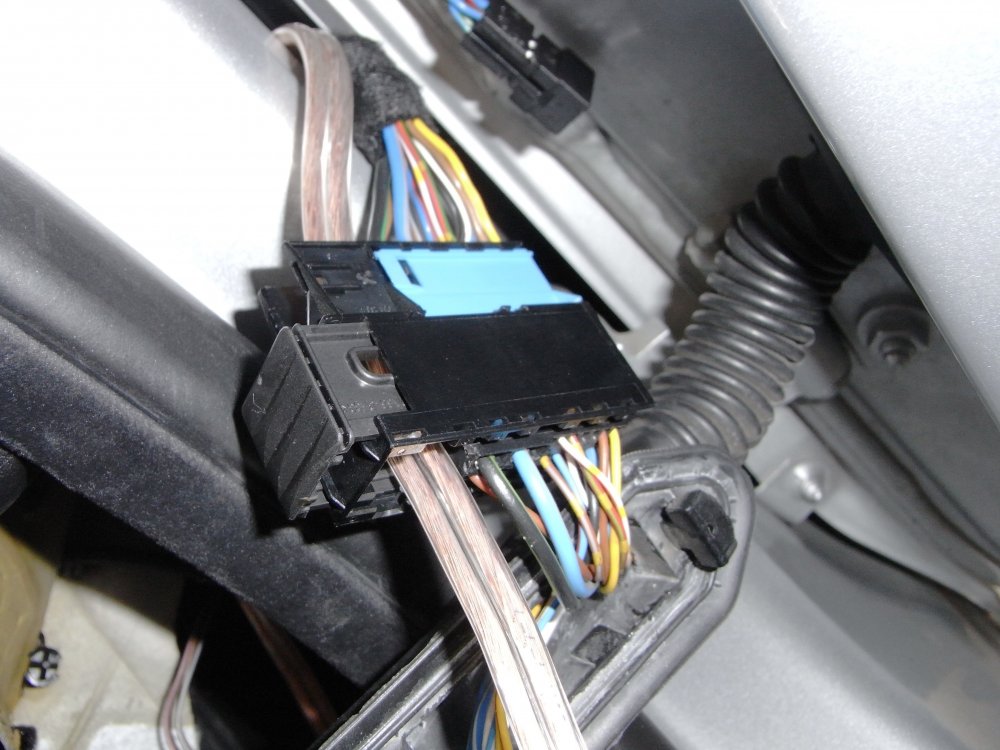
For the power NBT USB ports has 2.1 amps of total charging but the USBc adapter also has +12ve and light pin. On the G series it looks like they can use a power feed from the Fem module which no doubt can turn off for parasitic drain. But this gives 3 amps of charging if used. So just working out where to augment the power from. Last resort will be a spare switched unused position in rear fuse box. Or maybe divert power from snap in plate.
Let us know what you were thinking for powering the usb hub . Not sure if the area is pre wired for the blue connector.
This is what I’m think of for mounting position. It might need a custom 90 degree farka connector for depth but not sure at this stage.
-
 1
1
-
-
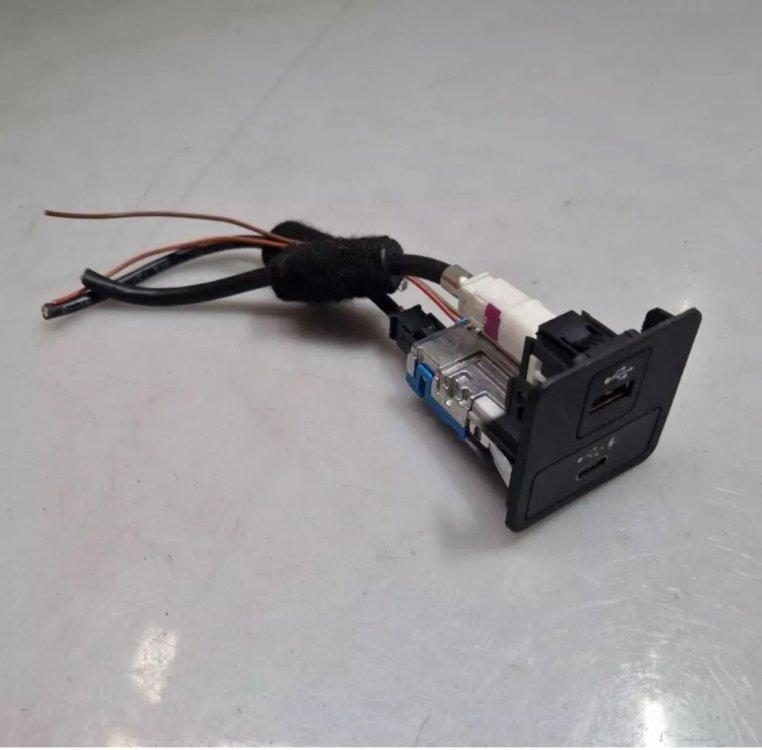
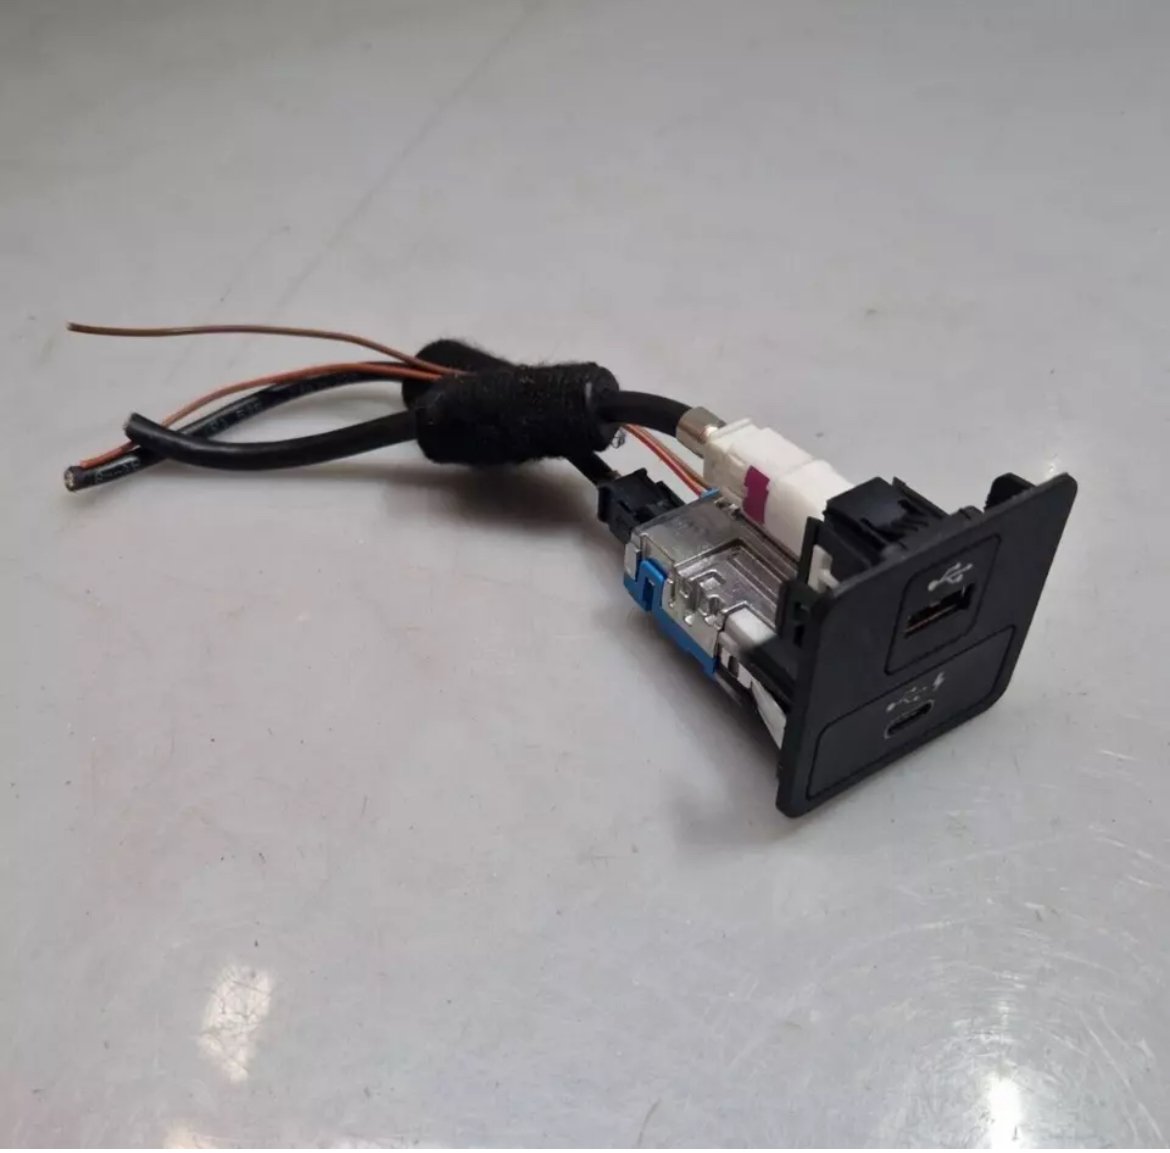
Next small project, IPhone 13 user so pre empting new model next month. Need to change from BMW iPhone Snapin lightning to USB C for lossless audio / bmw apps / phone charging duties.
Going to use a usb c adapter from a G12 7 series and install in console and connect into a snapin port on Idrive. Will add power and light circuit . Should give 3 amps / 15 watts of charging.
-
1
-
-
Those V12 jags a few years earlier sounded awesome. That and the ACS group A e30 M3s
-
Did the retrofit for Speed Limit Information and used the earlier YouTube video process to insert the BMW enablement certificate ( FSC ). Using the BMW cert and vehicle option code will mean it won’t get turned off with any BMW dealer software updates.
I ordered the Kafas2 / connected idrive camera FSC certificate via Part no for SLI Kafas2 Camera 66502444948 . Basically put your vin number into the Fahrgestellnummer field. Got an email a day later with a BMW issued FSC. Cost was $75 nzd via PayPal.
Vehicle Order ( VO ) was updated via Bimmer utility and it coded the Kafas2 camera , Digital Dash and Idrive. ( thanks @Dogballs ) Then injected the SLI FCS into camera ecu via esys.
Then a simple case of enabling it in Idrive setting. Went for a drive and seems to be working ok. Only thing I might change is the FLD coding option under NBT where you can change the SLI country option. Will see what other signs it picks up. The good thing was it’s displaying the speed limit value in Kmh rather than miles.

-
3
-
-
Man that sucks , damage + insurance delays + overseas order. BMW slow at the moment . My BMW f80 parts took 6 weeks for some items recently.
-
2
-
-
I wouldn’t be so sure with that change. I do run Shell oil ll01 fe 0w-30 I’m my turbo m3 but I don’t think I’d use a thin oil on a higher reving NA M engine.
Perhaps check this part number if you can’t get TWS. https://www.turnermotorsport.com/p-210886-bmw-m-twinpower-synthetic-oil-10w-60-e46-m3-e39-m5-e60-m5-e9x-m3/
-
I didn’t. I did price a nz map update for a uk car but it wasn’t cost effective a few years back. They have been great on other M parts though.
-
Did the first part of the VO coding as you suggested via Bimmer Utility so it's available via the cluster and it's FDL coded the entries in the Camera , Kombi and NTB2 . Just need to sort the OEM FSC to enable the function.
Will email schmiedmann around the process for retrofit FCS codes and order 66502444948
-
-
Just trying to work out if it’s a universal world wide FSC verse Europe.
-
I need to double check , but I think this is it.
edit , link below not for Kafas2 camera , more searching to do
-
Just re-read your post , smart code FLD for cluster and NBT 👍
-
Cheers , I have the KAFAS2 camera so should read the speed signs . Only thing with adding 8th to Fa is I’m not 100% sure how it will code my retrofitted ID6. If it VOs the NBT unit is suspect it will kill the id6 FSCs .
Trying to do it in a way that an OEM FSC is used for SLI so it stays put after dealer servicing . Haven’t quite got my head around it or effect on idrive. If the process just does fld on ntb then good.
Have watched this a couple times ,
-
I don’t need it 😀 , but one of those, why doesn’t that work anymore problems to solve.
It’s a bit like Speed Limit Information on the dash. I don’t have it so have become target fixated to code it.
-
 1
1
-
-
No , thought it might have been I needed to turn off carplay to get apps working via Bluetooth, usb , tried both , but no change.
I dont have a connected drive subscription so not sure if that is a factor ,
It was saying in the App notes that bmw apps needed to be enabled , but doesn’t seem to make a difference. When I click the i button on how connect in the app I just get a blank screen

-
1
-
-
There was also a heap of room to mount crossovers if you go passive. This was my e46 coupe door. I just used double sided tap and hot glue. The crossovers I used where massive, largest car audio ones I've seen so heaps of depth in there

-
1
-
 1
1
-
-
Just some ideas for you
Speakers
There a number of STL files available for e46 midbass adapters so you may find something already done that you can download and print SLT files for e46 , I came across heaps when looking for F30 adaptors.
You have a couple of choices mounting wise .
- IB where the speaker uses the Door as a baffle , door needs a hole cut if you up for that. It will extend the low end from the 6.5s . Will get them into mid sub bass frequencies
- BMW door card mount, works out to be a semi-sealed enclosure , there might be around 5 - 6 litres of air space which is a bit small for a 6.5 , can give tighter upper mid bass , but will roll off the bass quicker from around 80 hz.
- If going active , I would recommend running a bass blocker capacitor just to keep the tweeter safe from amp pops or tuning mistakes, You'll appreciate they are easy to blow with 20 watts or more with low frequencies. Something like one of these each side in series with the positive terminal 22 uf capacitor , will drop -6db / octave from 1800 hz . High even to add protection , but low enough not to interfere with the HU crossover. ( I'm guessing somewhere between 3000 - 4000 hz for tweeter )
AMP / TA , I do like your option of running active stage for a couple of reasons.
- The headunit may have a better crossover in it's preamp that the Alpine passive covers.
- Having TA on front stage more important than rear from a drivers seat perspective
- You may end up fading the image to have a front bias so rear speakers will only need a watt or two of power , HU will be fine for that.
- Battery gauge , there is a wire size calculator in the spreadsheet below. But amp looks to be 8 gauge . Short distance so you won't need 6. Jaycar sells by the meter
For the front speakers however , the tweeter and midbass distances may end up being quite close in distance length , In which case there maybe little gain in fine tuning front image TA between mids and tweeters , so passive becomes effective as you only need offset the drives side with some extra delay.
Head unit EQ & TA
- 13 bands is quite useful , Can get you closer to target curves of your choice.
- TA can be done in two ways , Via distance , ( Good start ) or using Impulse ( more accurate ) When done it helps level front image above bonnet.
I can help you measure this , Can bring Mic and laptop so can use REW to measure both the Car response to the speakers and impulse tune TA. Very good spreadsheet Here The spreadsheet can be used to load into REW app and then it's quite straight forward to tune the 13 bands to it. On the target curves something like a Harman / JBL target curve would be a good place to start . Has a bass rise and a treble fall. Sounds more Hifi ish to me when engine / road noise is competing with bass frequencies.
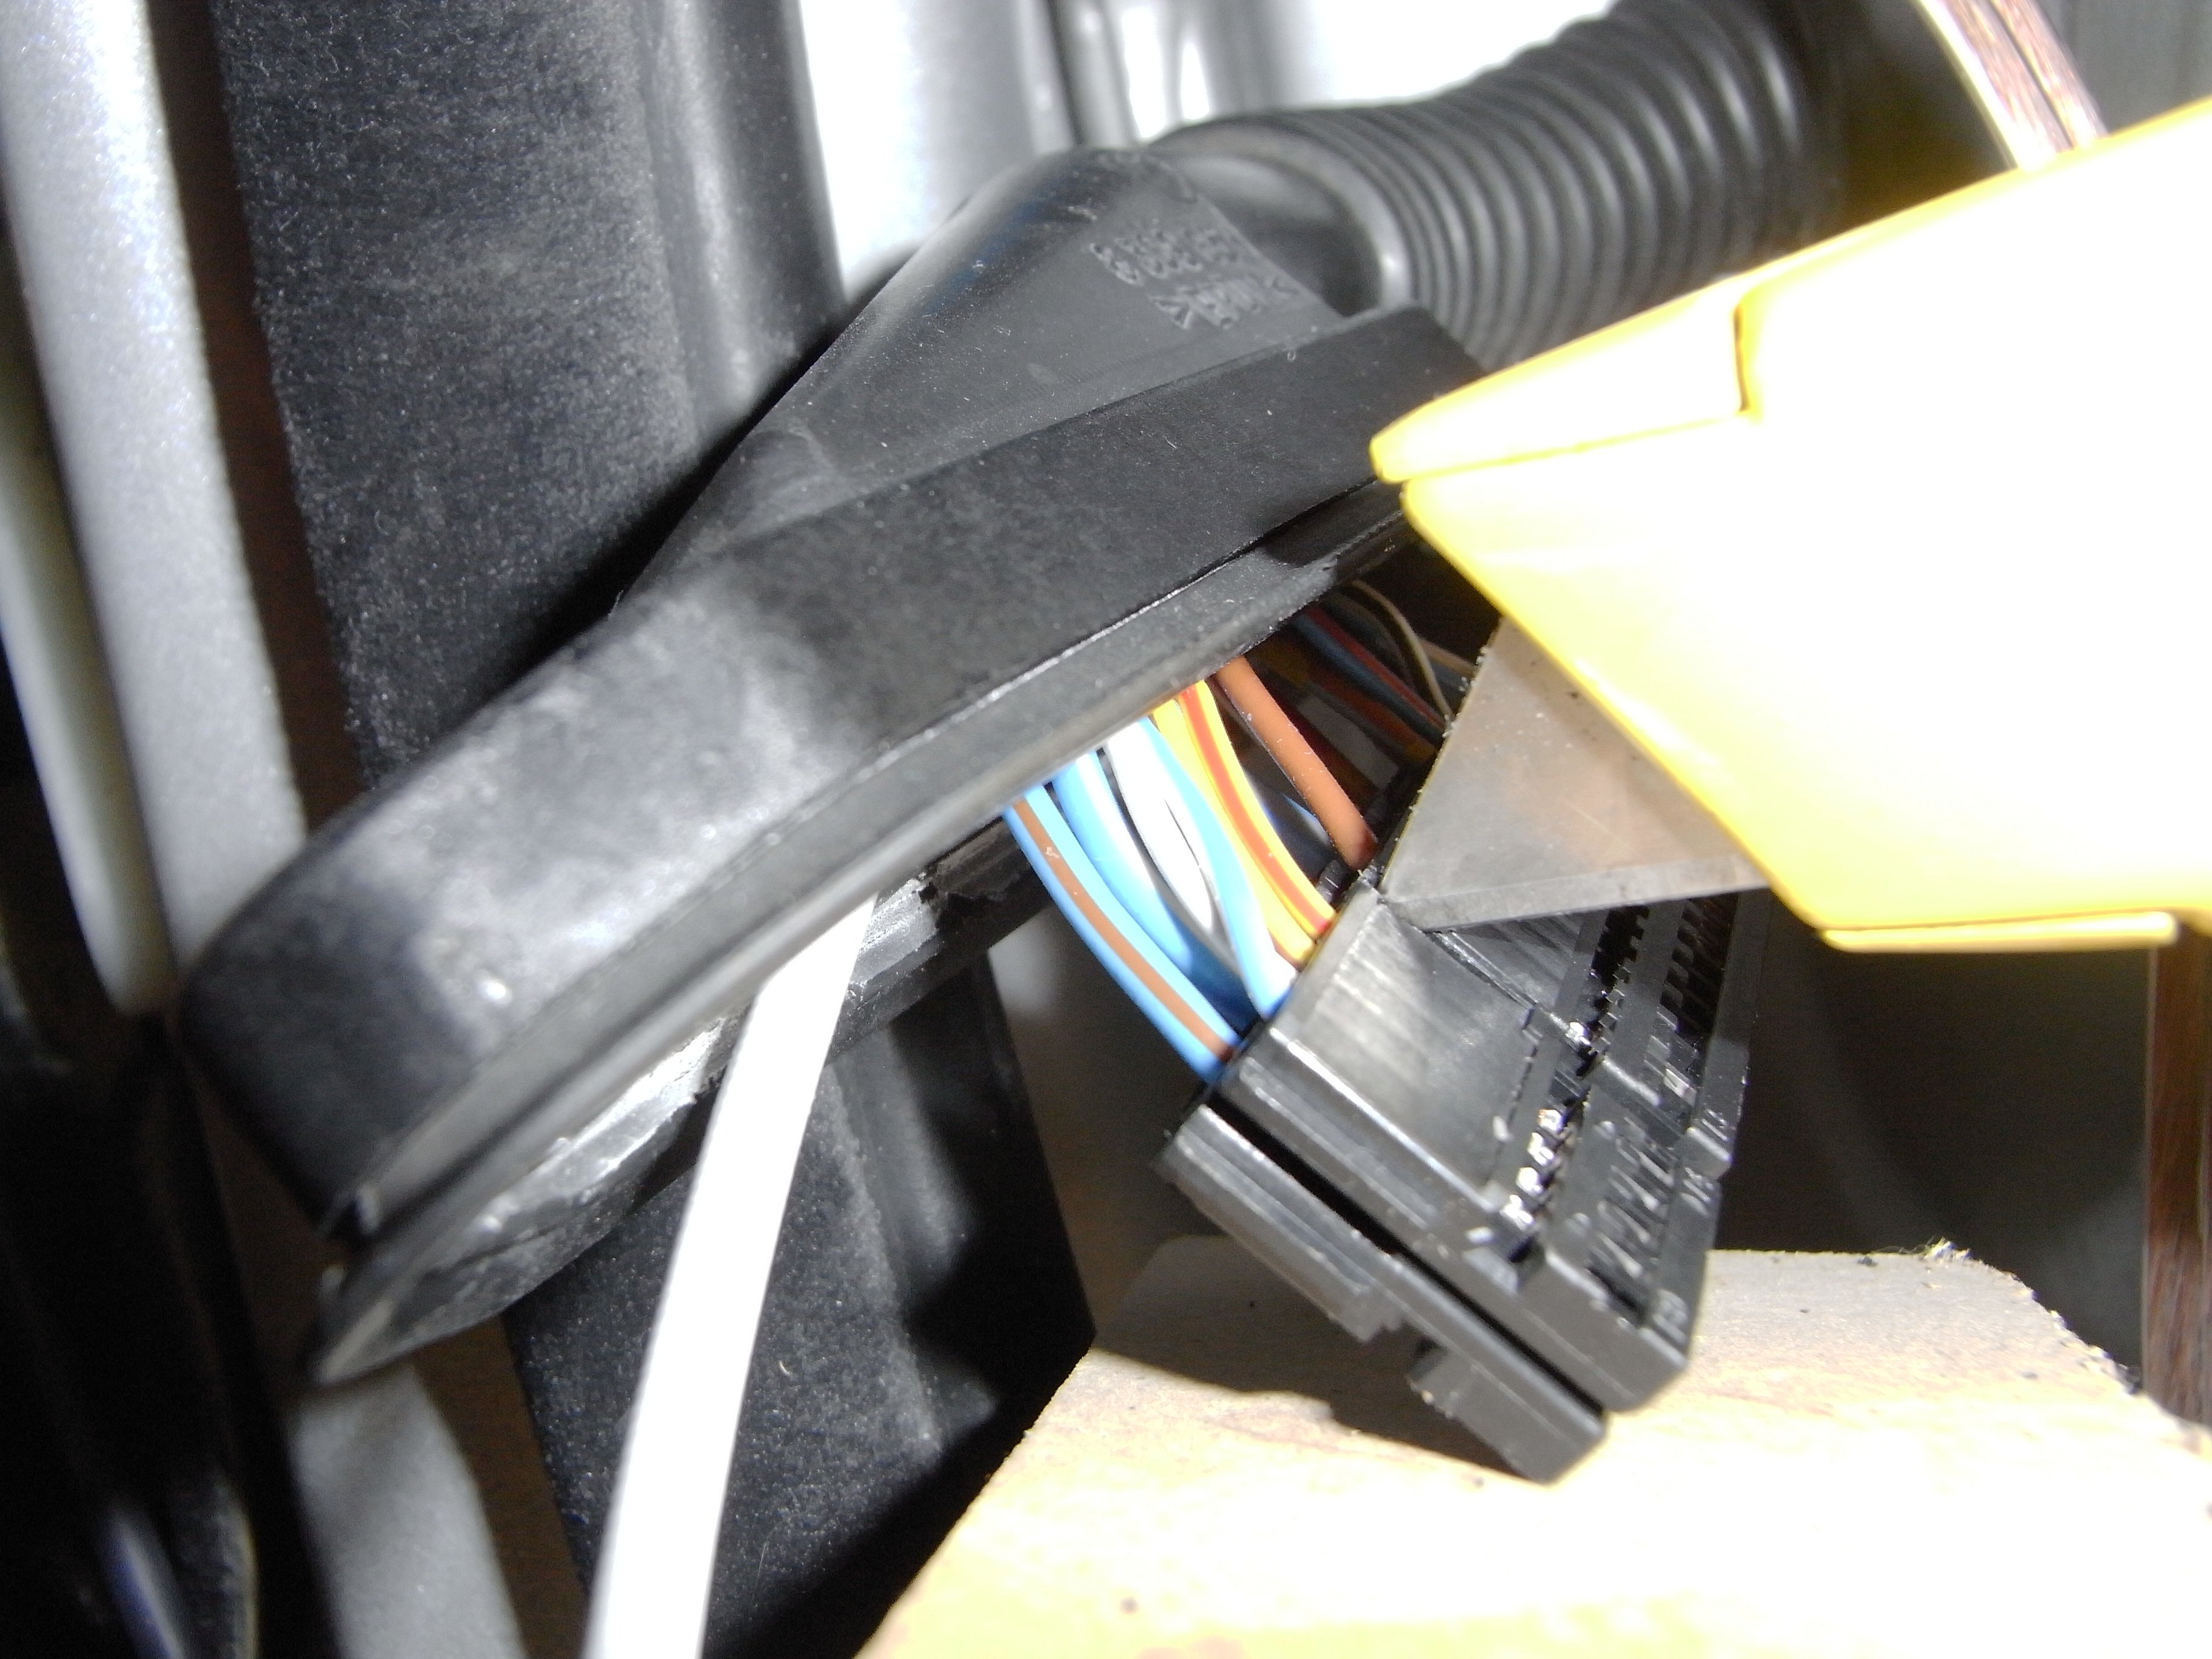
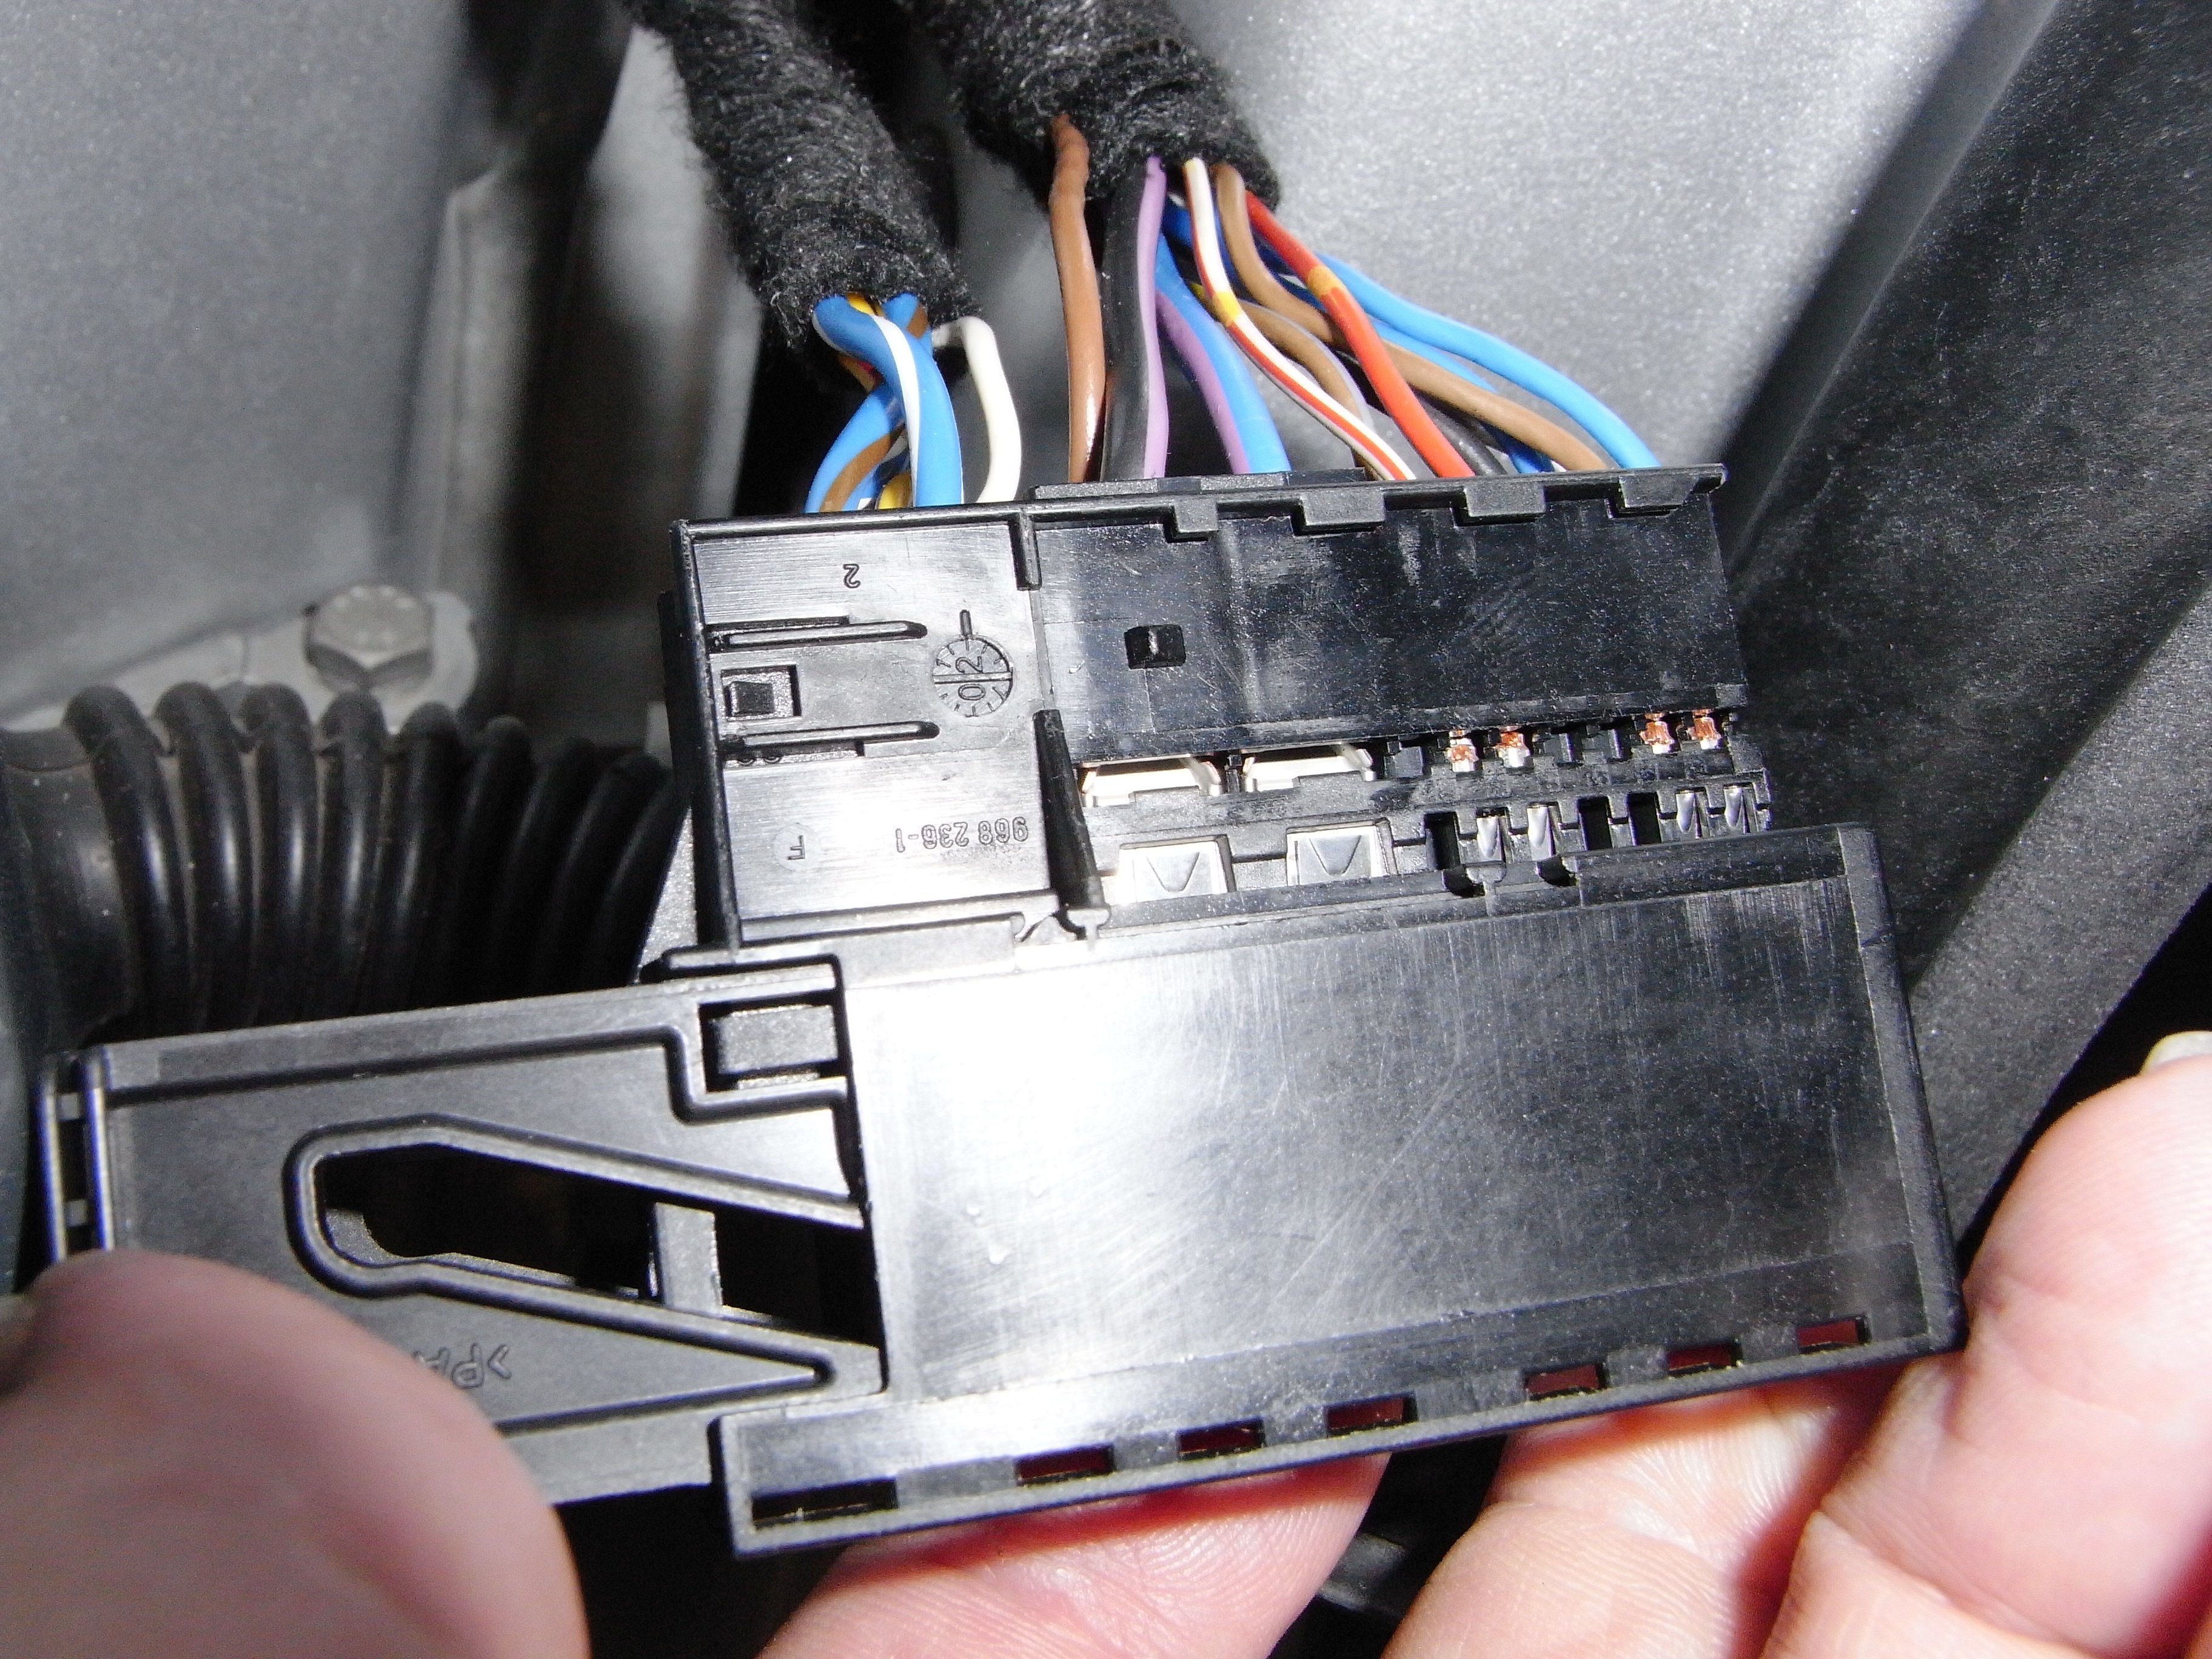
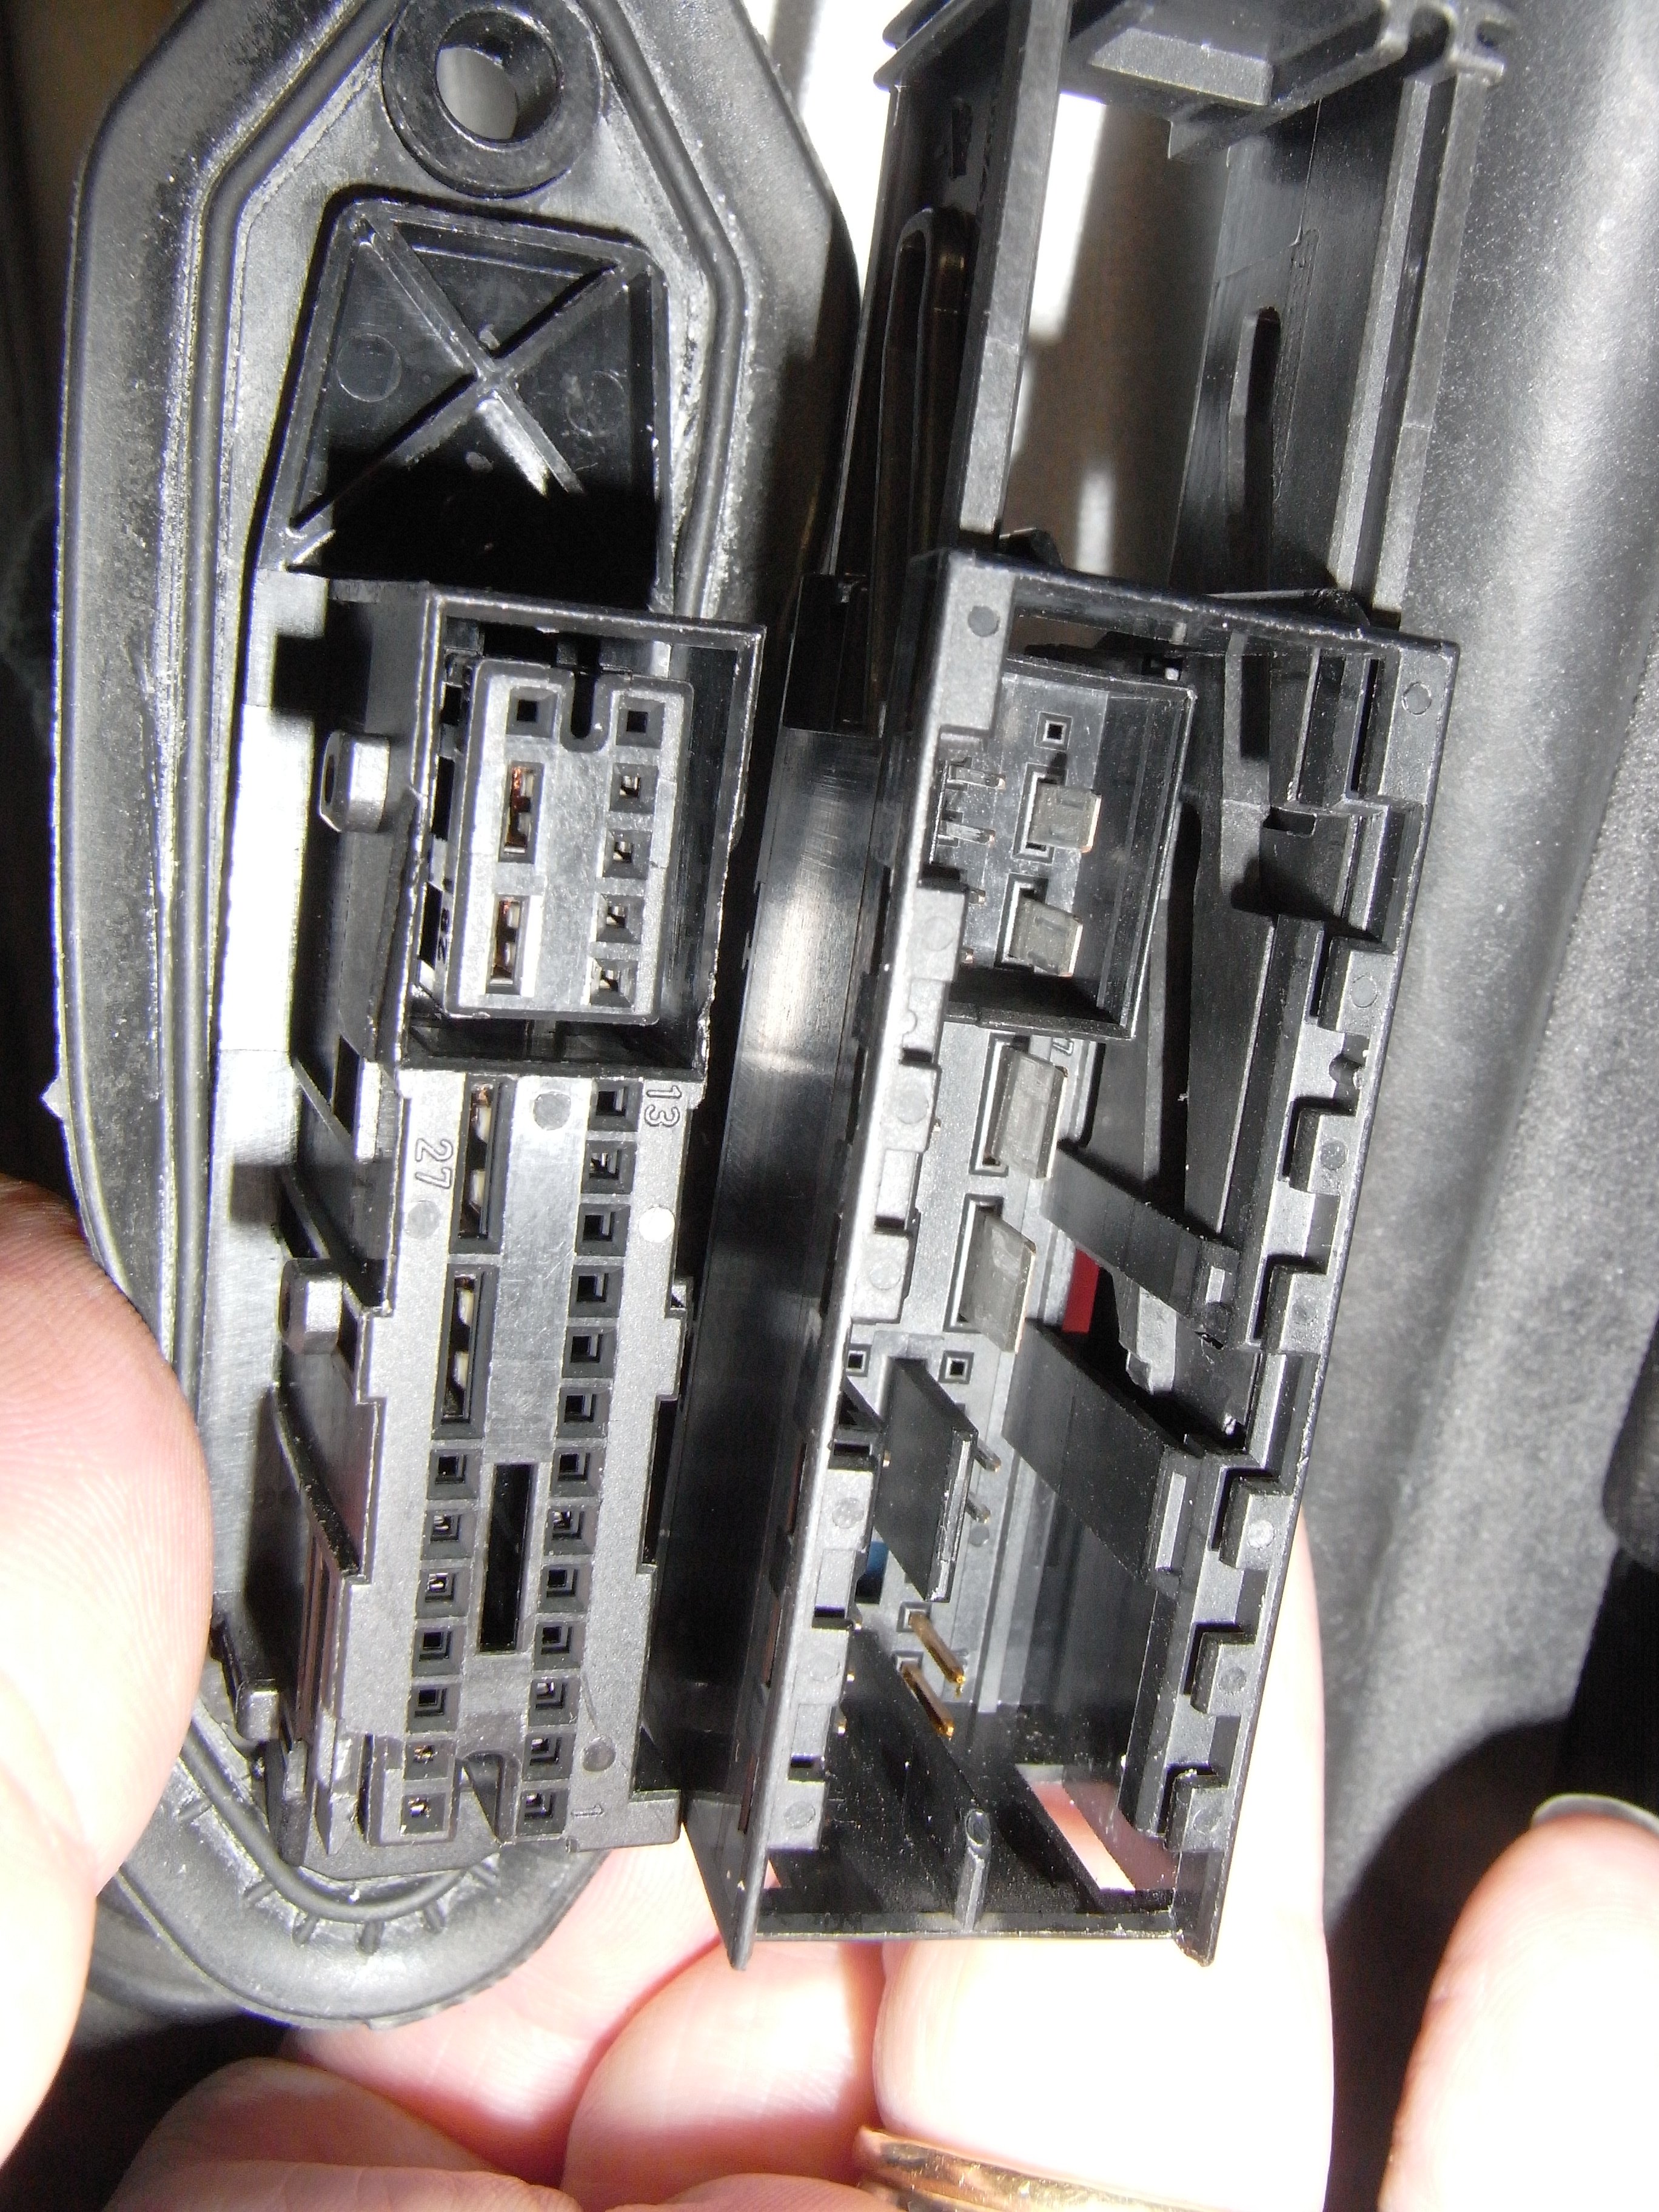
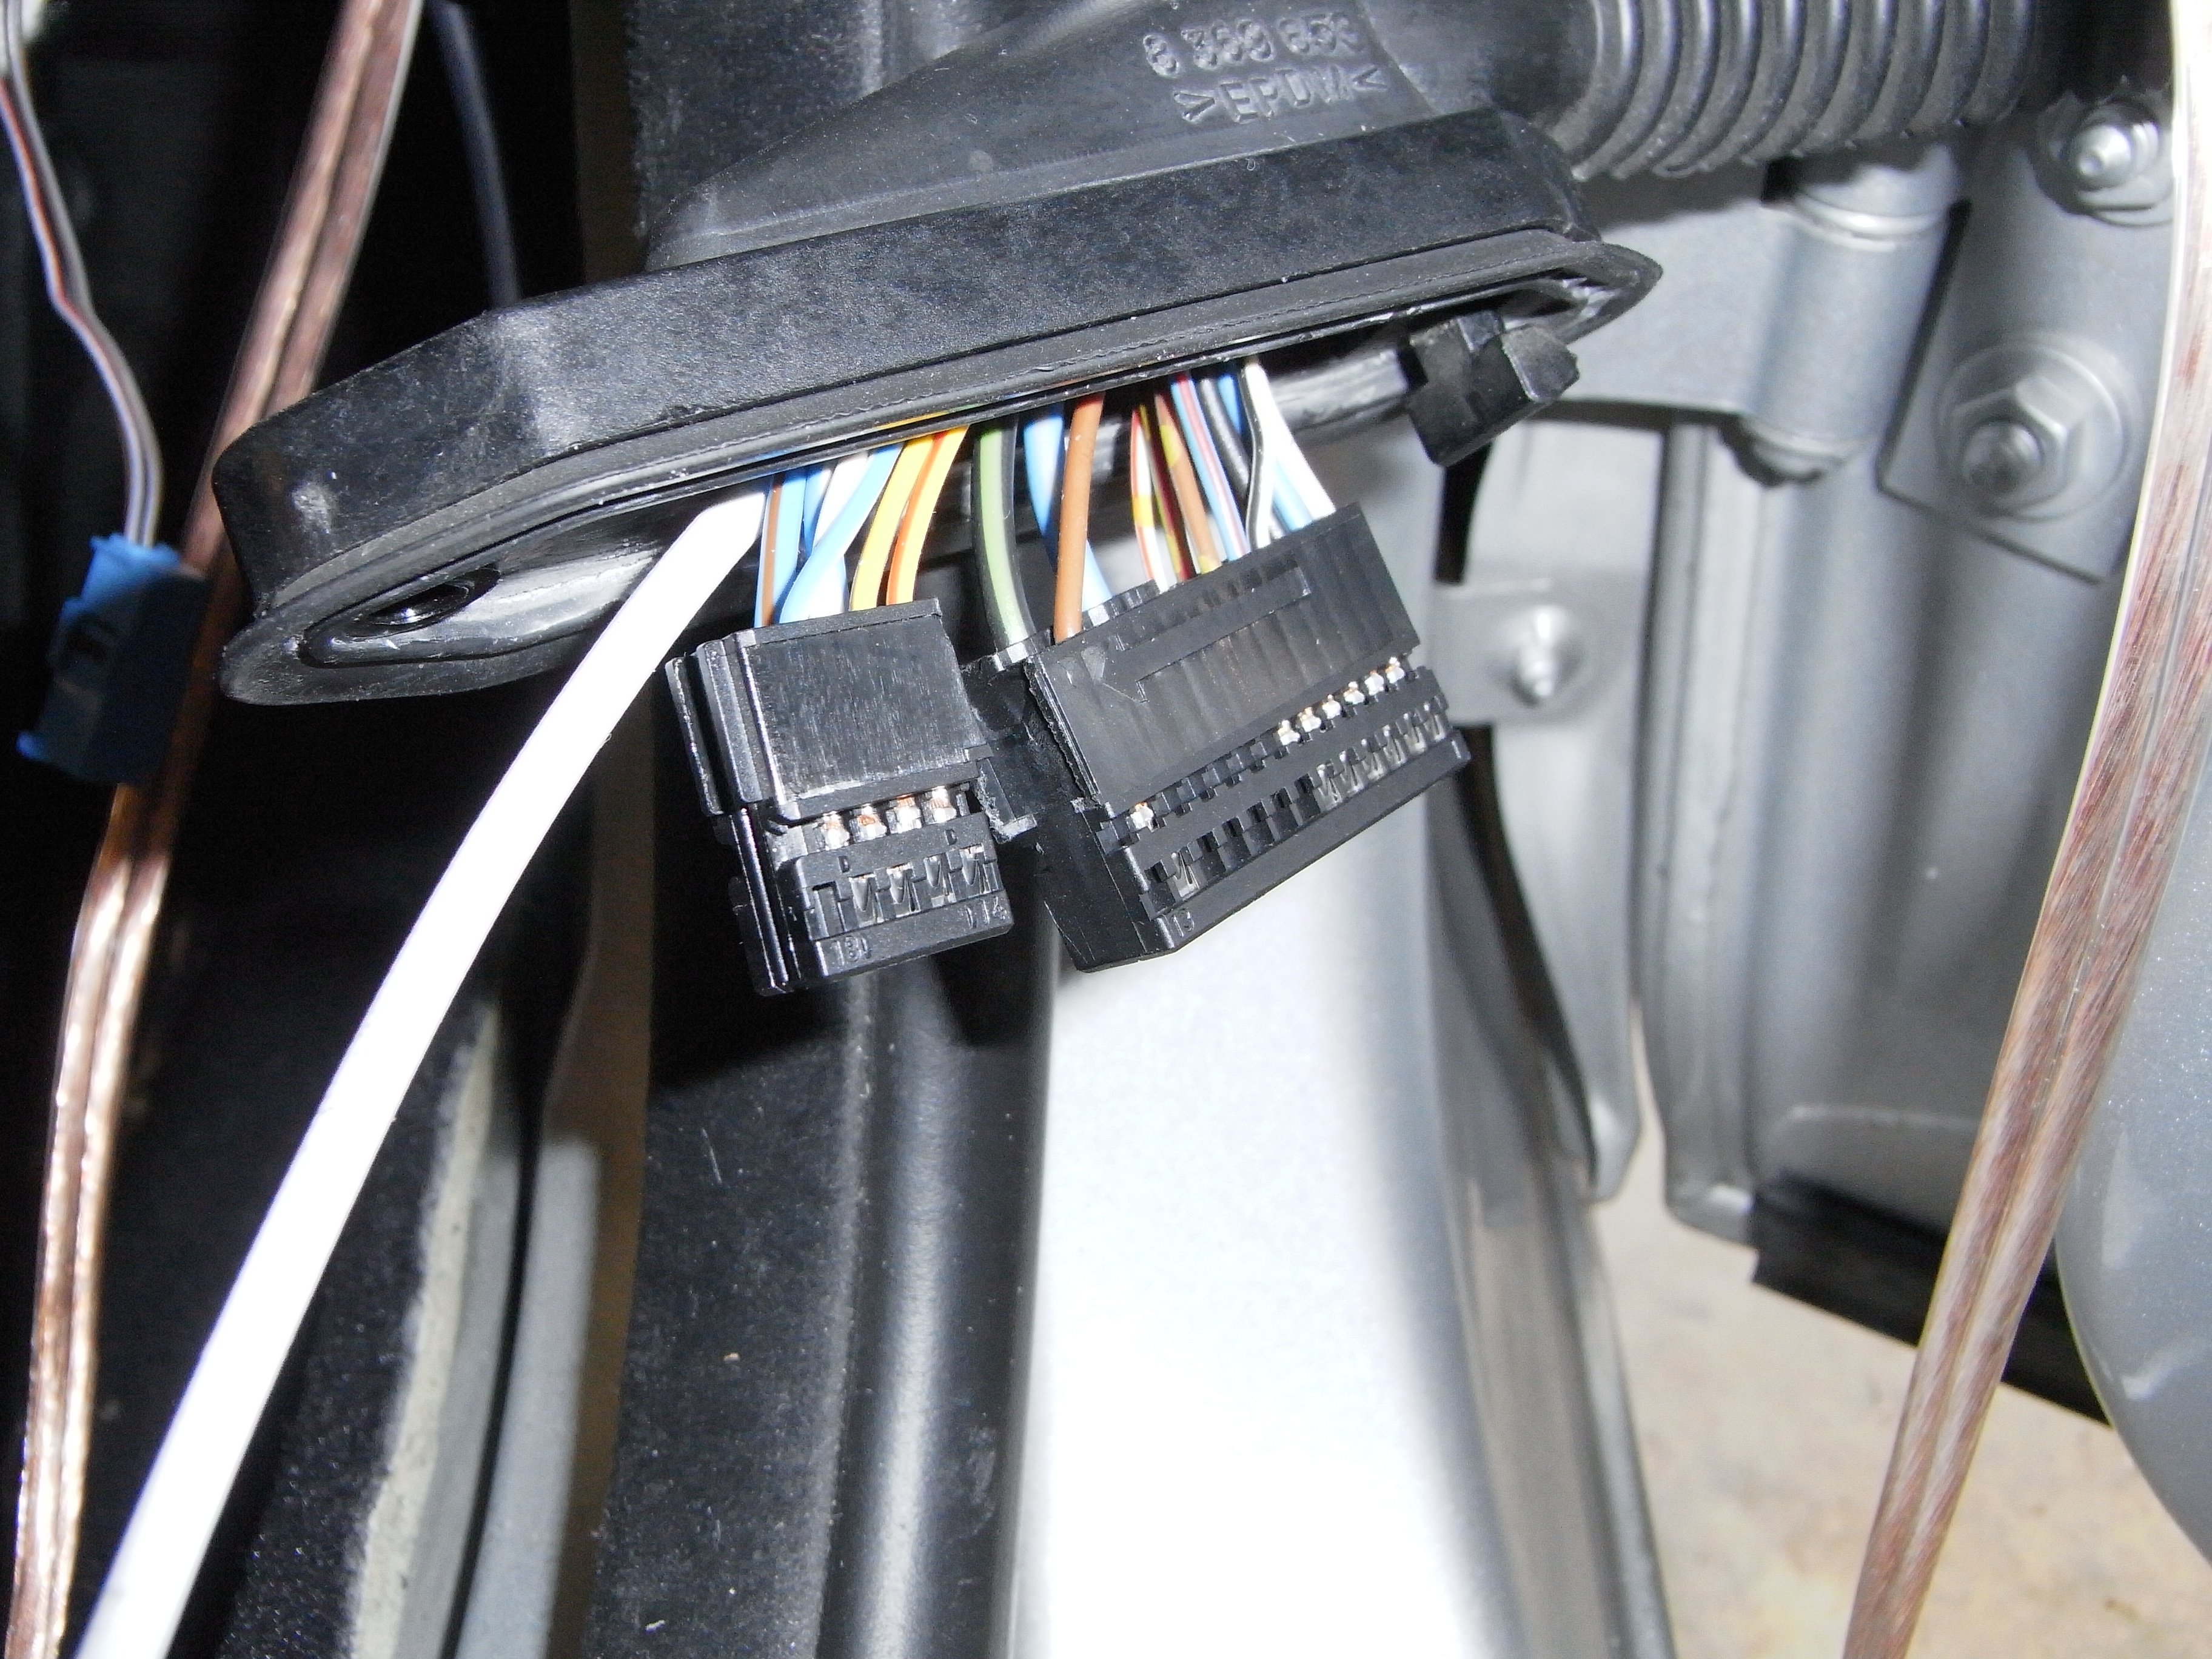
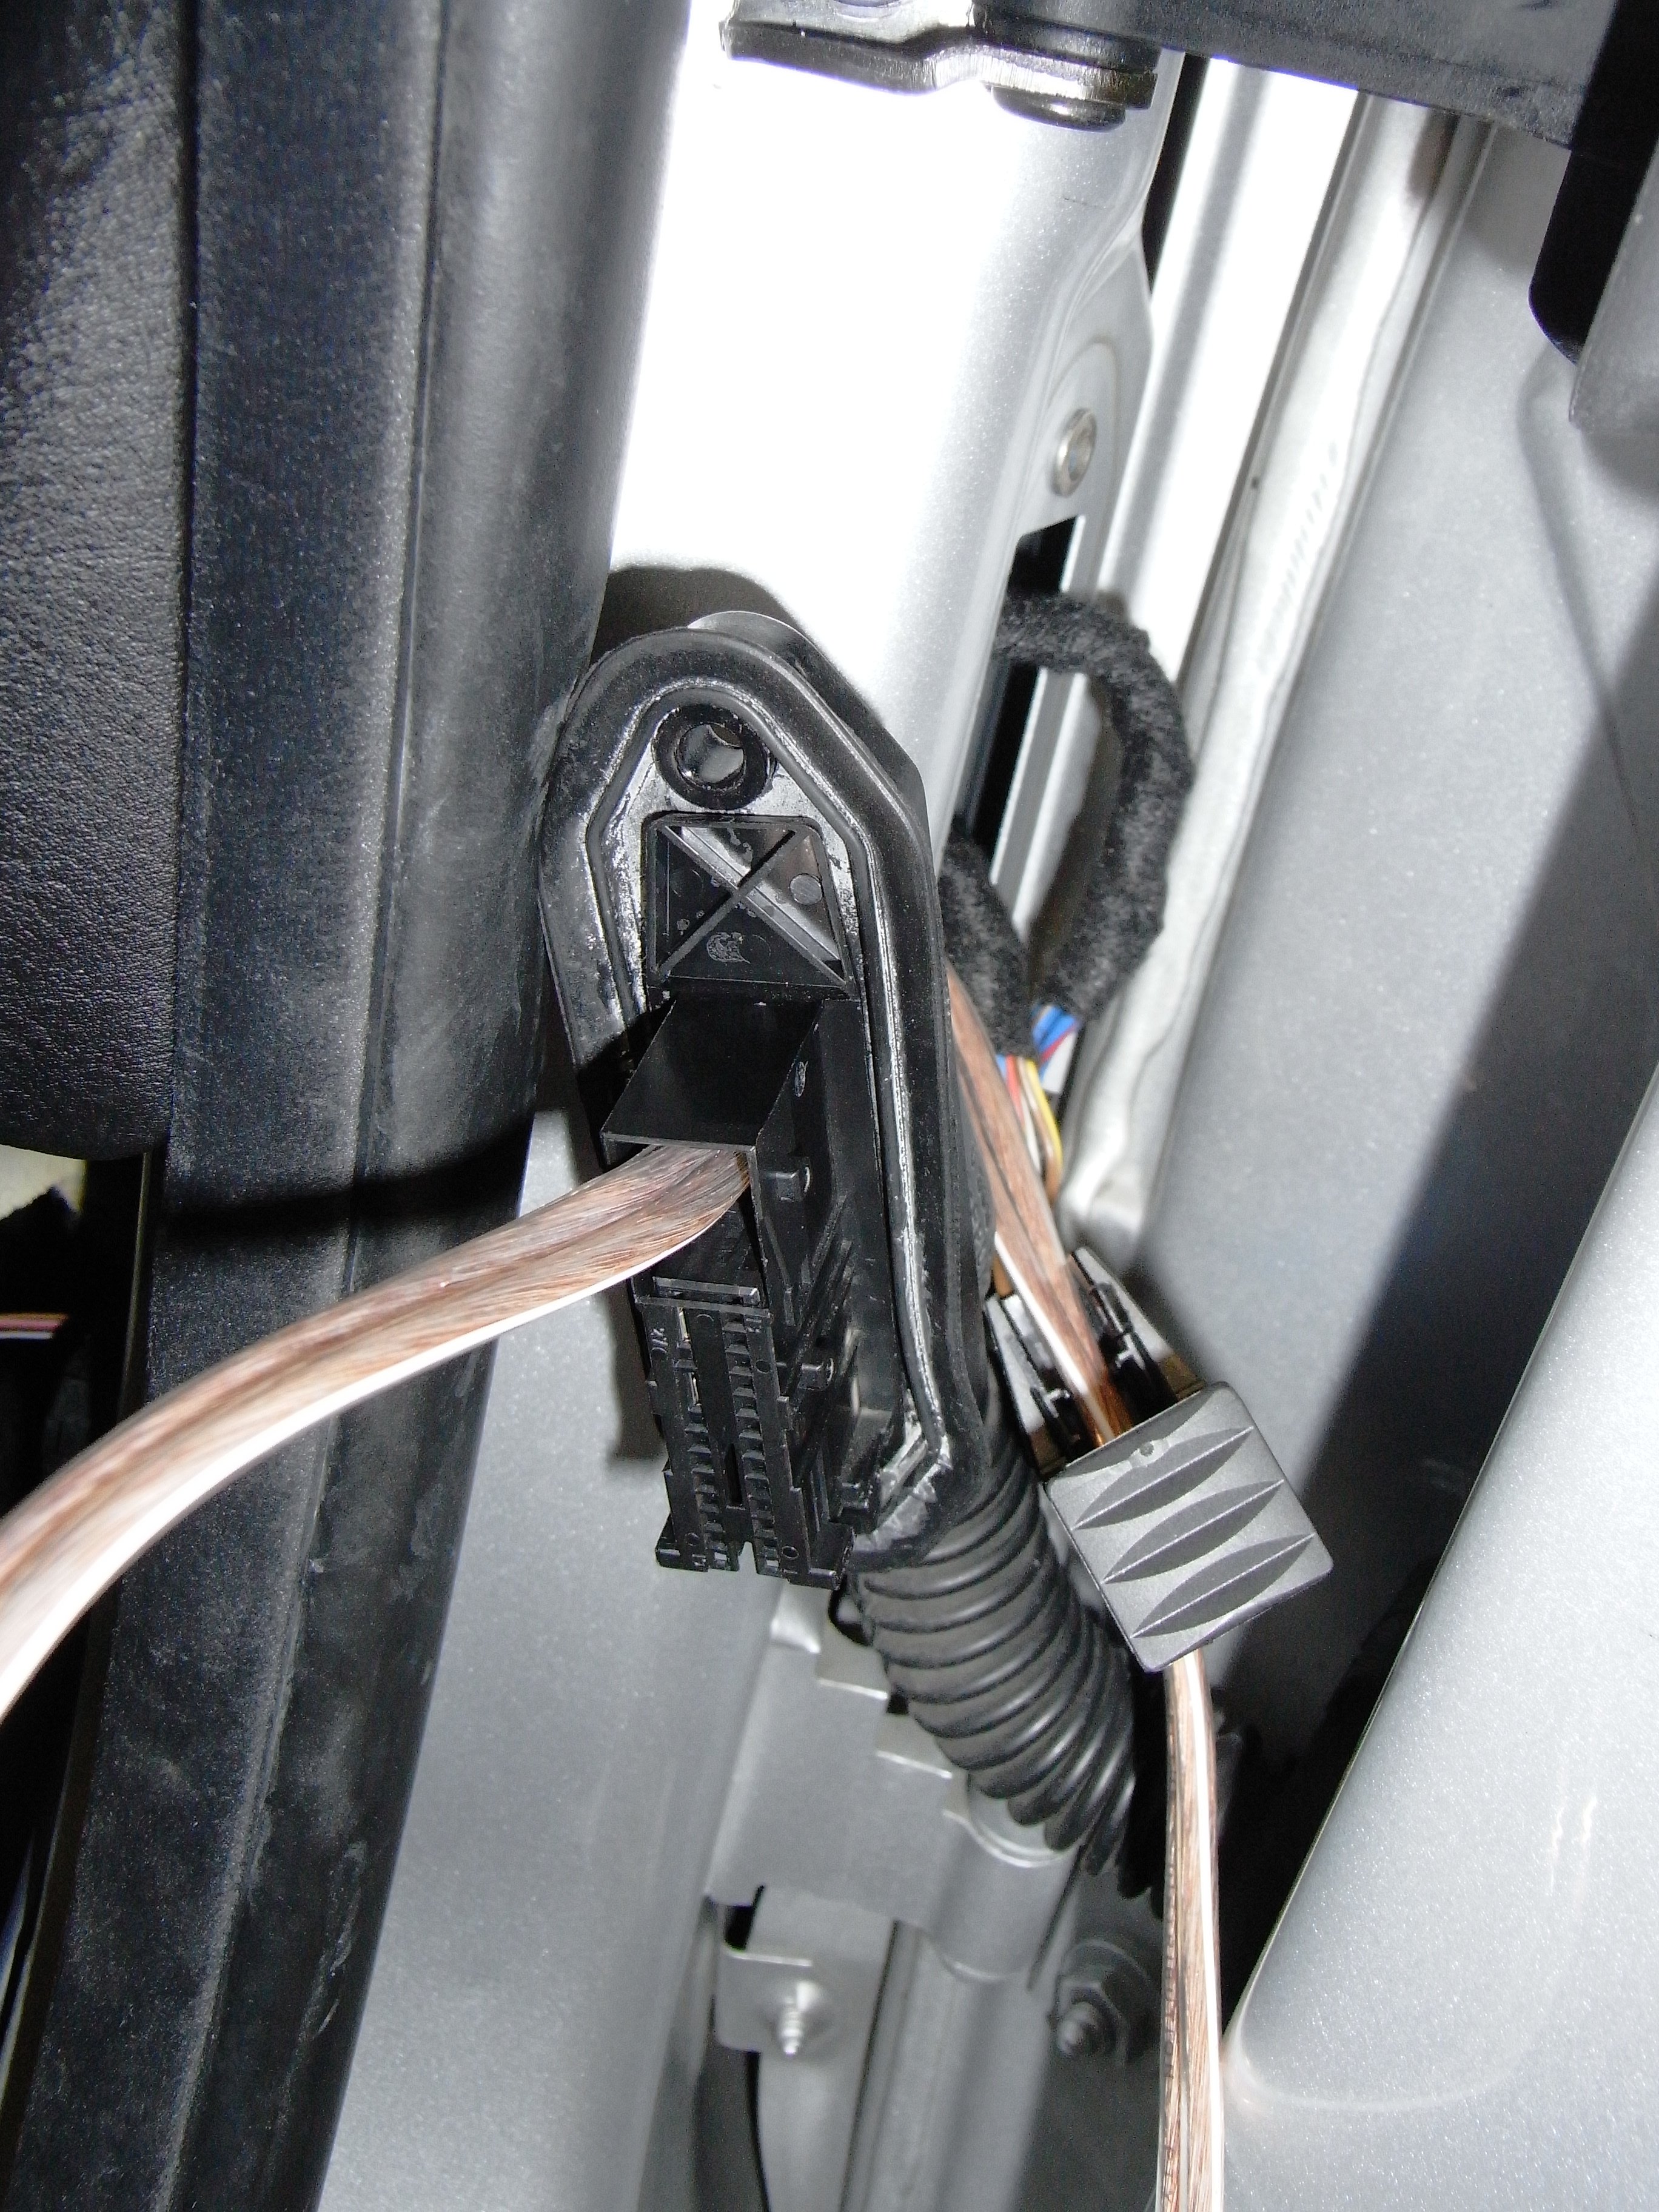
Door connectors
Caution as door wiring airbag goes via them. The usual disconnect battery before working around them goes without saying. Also stops the airbag light on dash coming on and needed a reset via usual BMW programing tools.
- Straight forward to take out, easy to take out kick pannels
- Connector parts by pulling connect tab
- The audio / speaker connector clips out on one side of the connector , was able to leave it inside door wire garter on my install rather than chopping it off
- Other side doesn't clip out , But the plastic is soft , used stanley knife to cut through the speaker section of the connector, Again didn't chop it
- With running speaker wire through the connectors / door wiring garter / door I used curtain wire as a pilot and taped the speaker wire to it
Pictures


-
1
-
Looks good Olaf , On your speaker cabling e46 wiring has a good gauge of cable on mid bass. 1.5mm2 cable from memory so good enough to carry a 200 -300 rms into 4 ohms.
Otherwise the door connector audio section clips out on side and you can carefully the cut part of the connector other side . The rest of the connector is keyed so airbag / mirror / power window part of the wiring doesn’t move. Then it’s each to route aftermarket cable through. It can be done in a way where you can return it back to factory later if needed. Sing out if you need any pics.
-
1
-
-
At least it’s not e46 coupe rubber door seal prices. But that one’s a WTF !
-
Very cool car , congratulations. Rumours are the 2010s LCIs have slightly better performance. I guess ZCP is like the competition model in the next gen M3s ( USA name for them )


F80 M3 Base audio system upgrade
in Audio & In Car Entertainment
Posted · Report reply
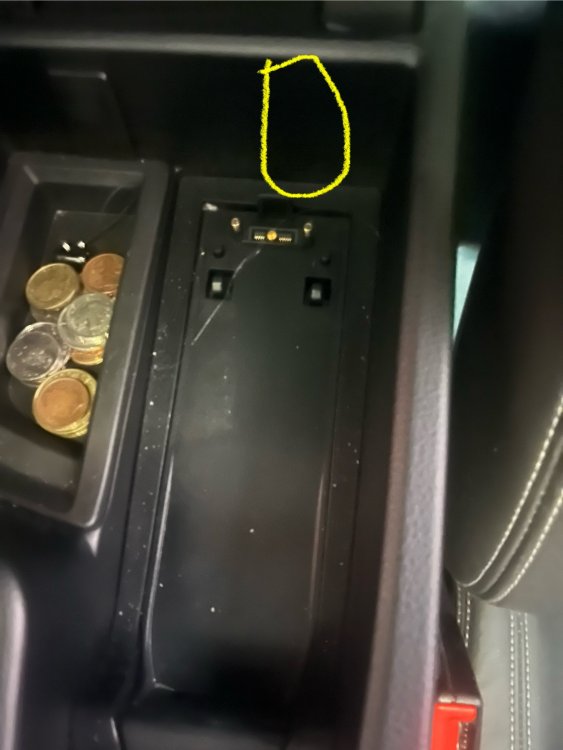
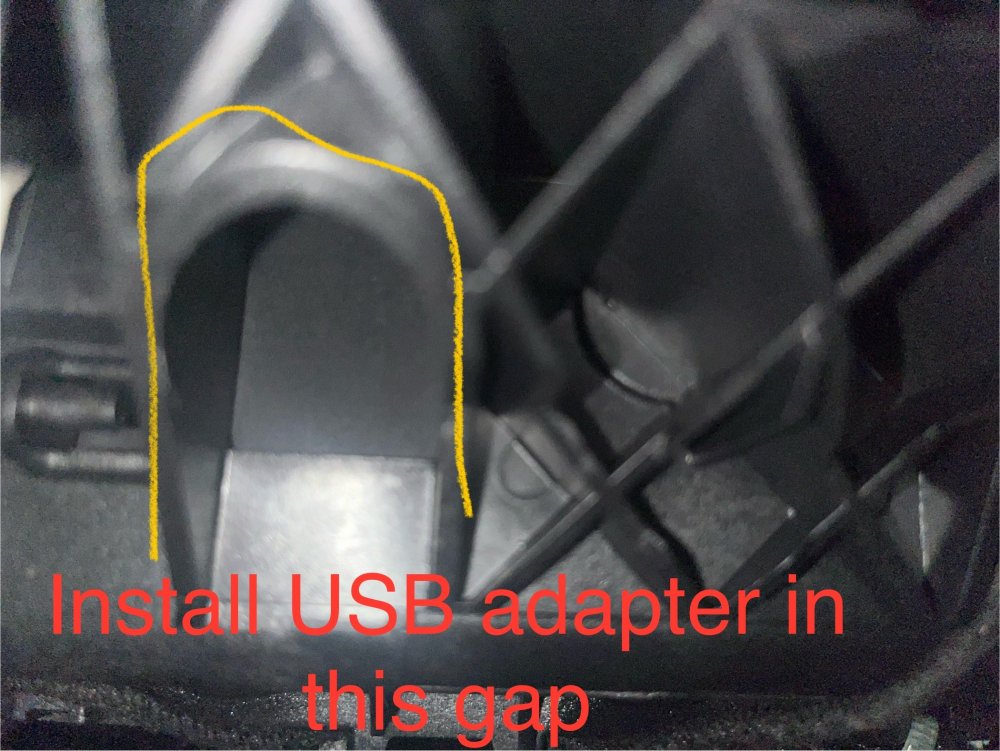
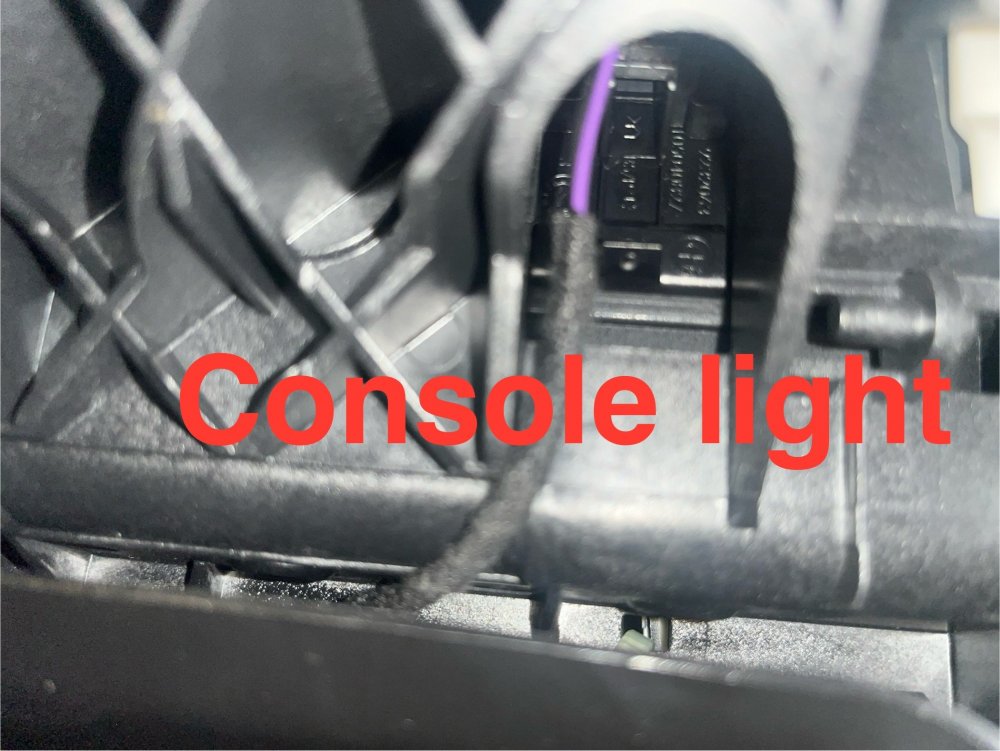
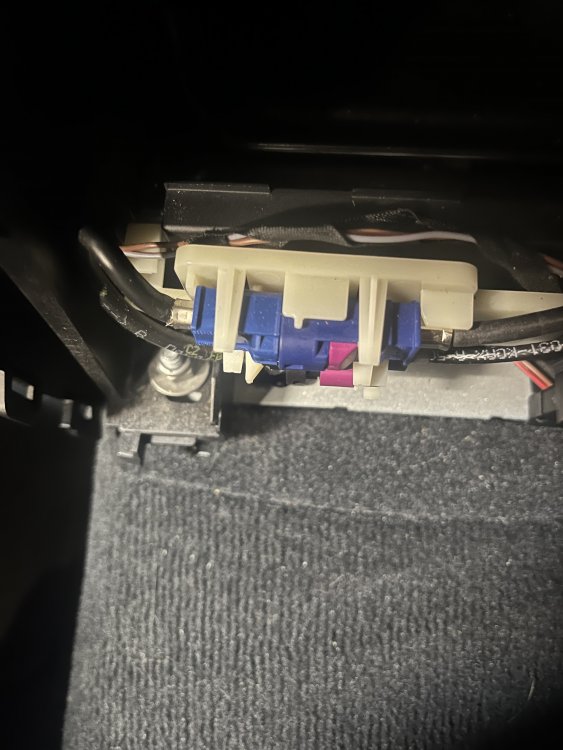
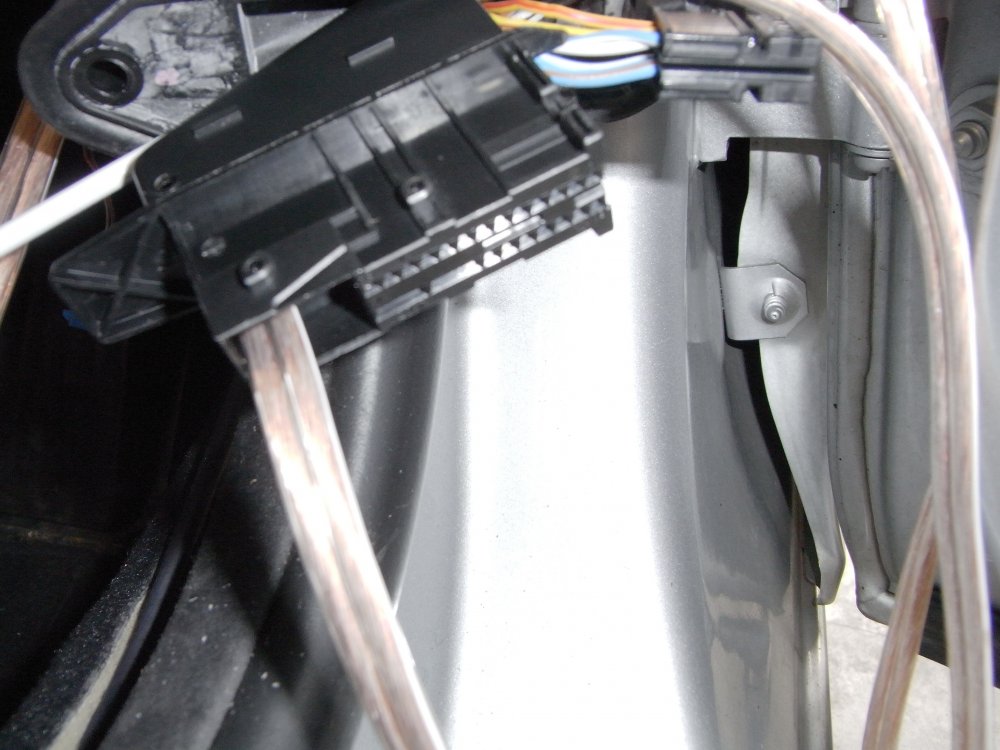
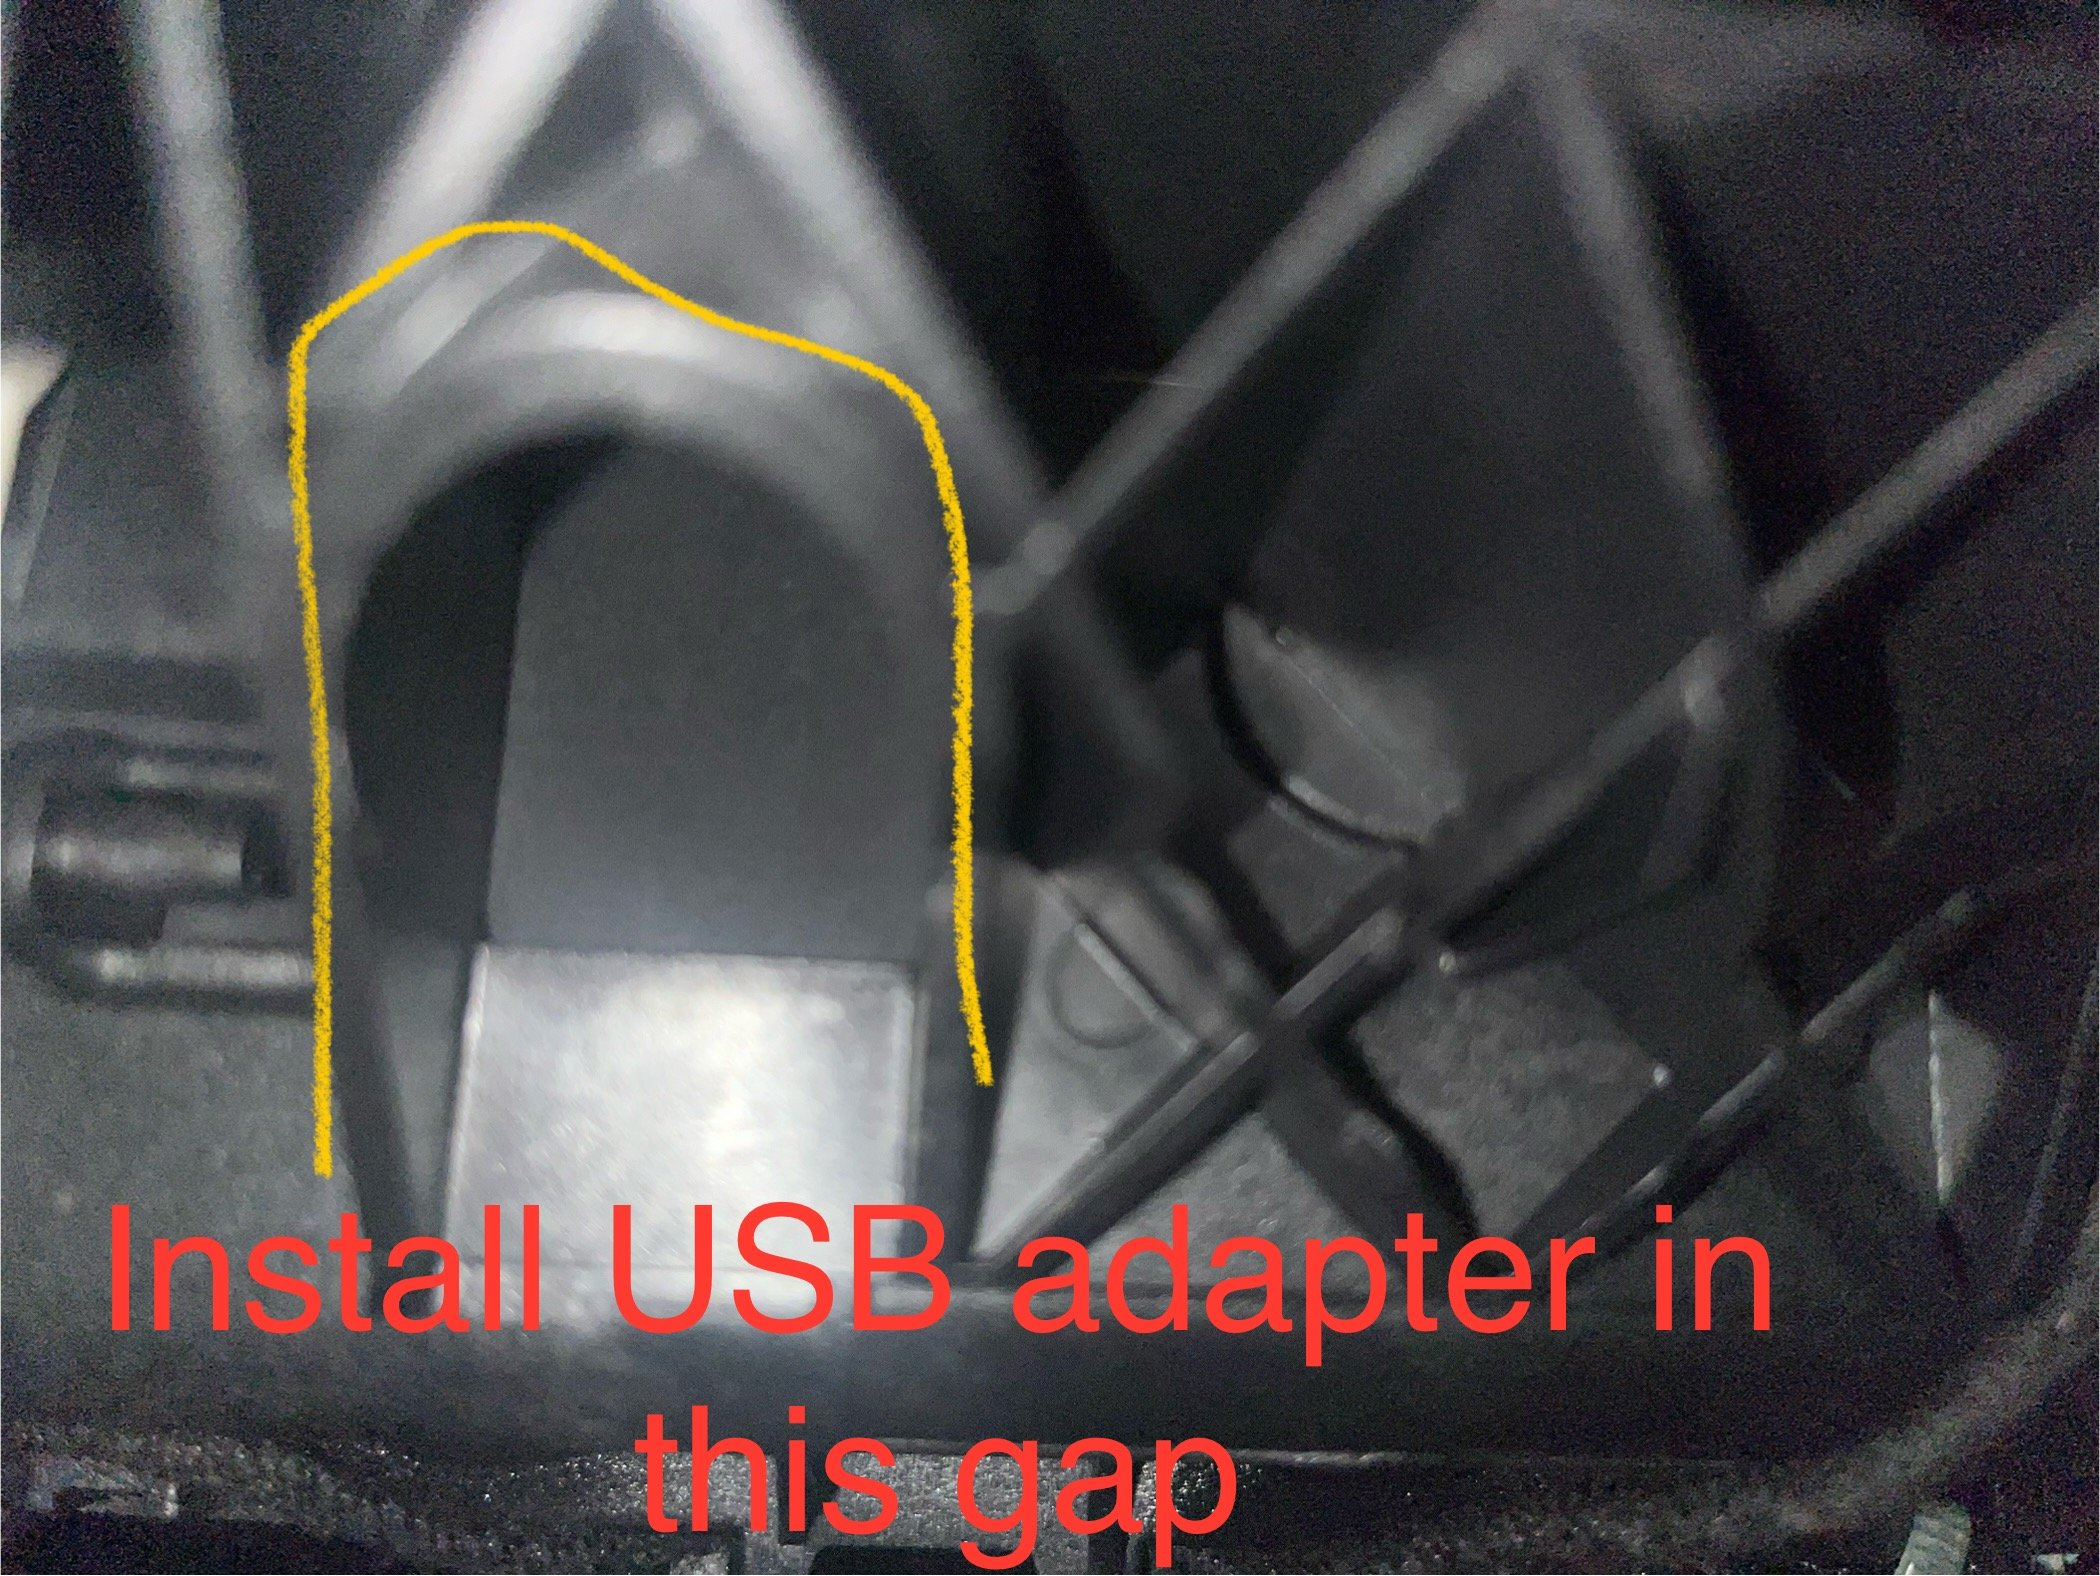
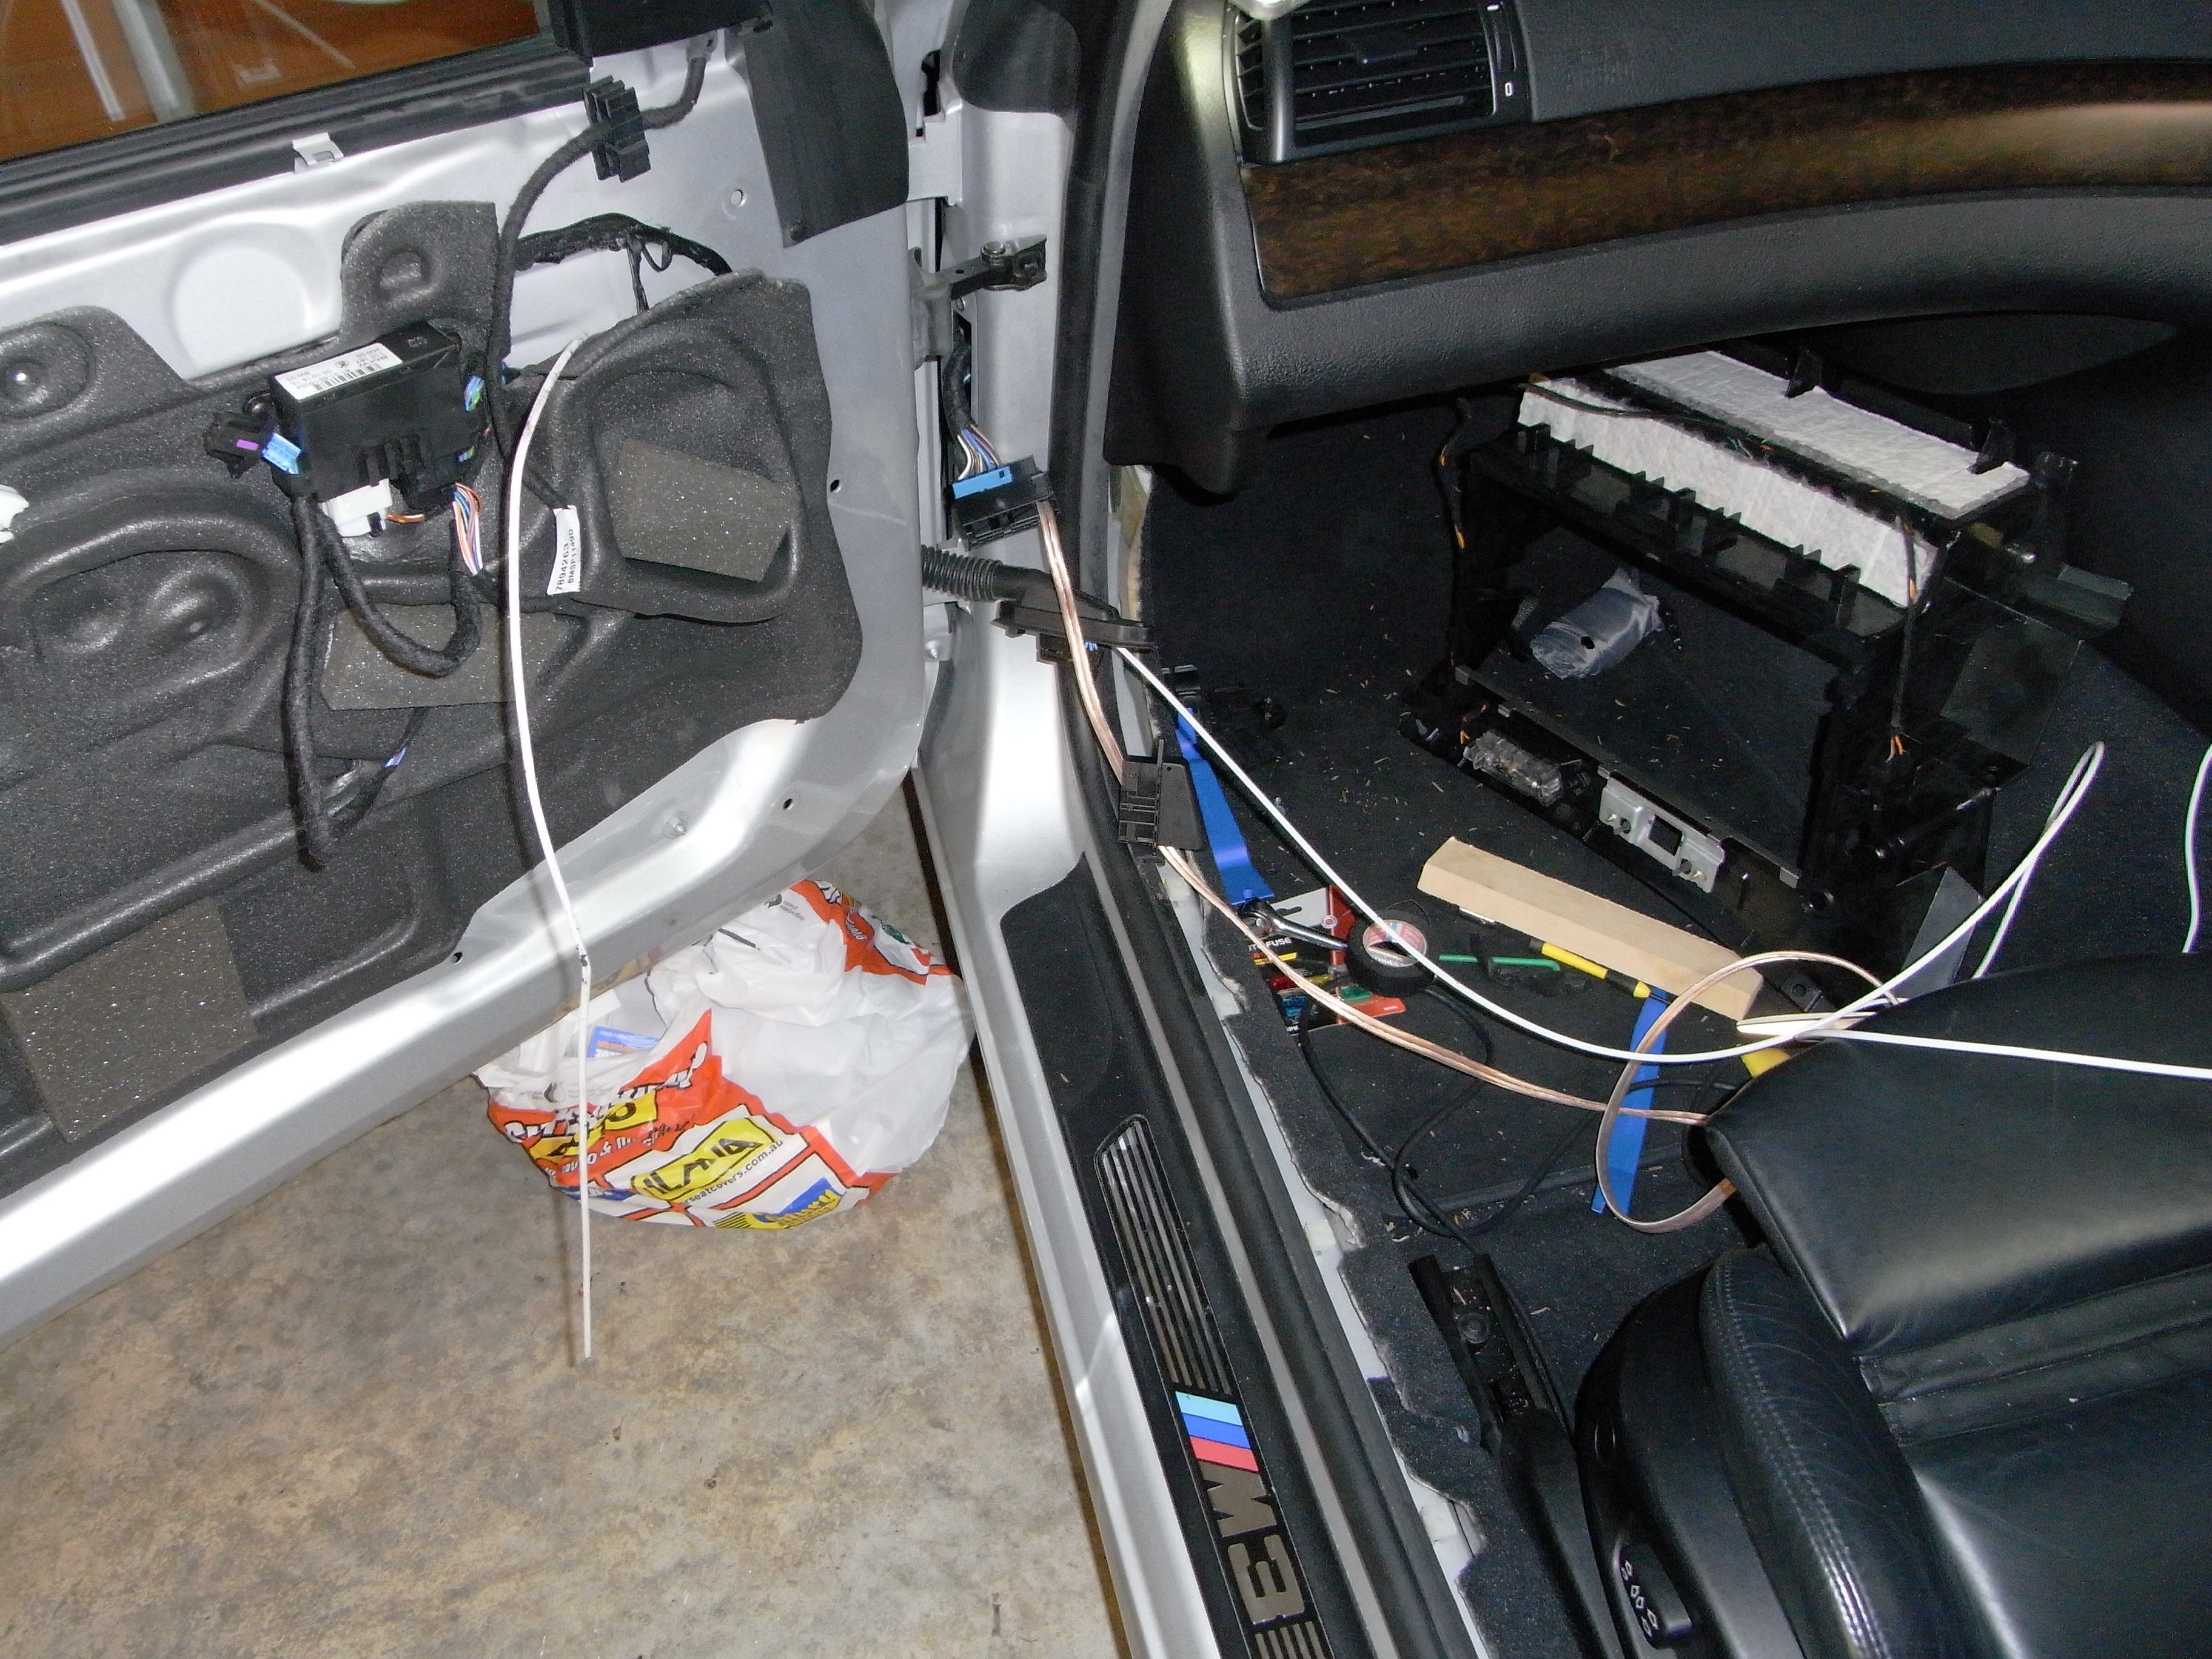
Parts arrived today. Will change location as not enough room to mount USB adapter into back of armrest. Would require too much plastic to be removed around the armrest hinge area. I also tried the usb adapter into where the console light fitting . Didn’t go far enough back depth wise.
I’ve also abandoned the idea of putting a usb extension into the back seat console freash air area. Think I’ll stop with a 12 volt outlet.
I think this will be plan B location. Looks like it will fit