Jeff E36 37 Report post Posted January 25, 2016 question, where did you do the joins on the rear panel - roof? im wrapping mine atm and cant work out how i should do these panels. I actually am not wrapping the roof, I intentionally left it black - so I haven't joined it. I just cut along the C pillar bit where it dips to the roof. If I was going to wrap the roof I'd probably join it along those lines? Quote Share this post Link to post Share on other sites
Pidge 12 Report post Posted January 25, 2016 (edited) Wow! Great to see you doing your own thing and building what you want. Even better to see your making new friends along the way! Looking forward to the pics once out the garage! Sent from my iPhone using Tapatalk Edited January 25, 2016 by Pidge 1 Quote Share this post Link to post Share on other sites
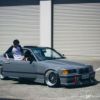
Jeff E36 37 Report post Posted January 30, 2016 UPDATES: Big update for you all - detailing the last modifications and work to the E36 before finally getting her to the 2016 4 and Rotary Nationals Show & Shine! There was one thing missing about the rear end of the car which didn't suit the look, and that was the cutesy stock exhaust tips I still had on the car, so, in order to beef it up a bit, and also give her a bit of volume, I had the rear muffler removed, and replaced with stainless steel pipes. Ultimately I would've preferred to install an aftermarket muffler, but in the interests of time and funds, I decided to go with this temporary option to make it for the show. I have to give a huge thanks and shout out to Juhan and the team from Backyard Developmentz for helping me out with doing the cutting, and welding. They are a busy bunch, all trying to get their *own* cars finished, but he offered and took the time to knock out the exhaust job in one night for me. Really appreciate his efforts! With the ride height dialed in to a drive-able height, there wasn't much else for me to do with the car other than to take her to the show. I made up a decal which I decided to place on both my doors, which are the names of the few key individuals that really helped me make this car come to fruition. I wanted to illustrate to people that this car is by no means the product of one man's work - but a team of people coming together and pooling their skills and resources. This list of names does not reflect the *only* people who helped me - but they are the people who spent the countless late nights with me, working in the garage till the ridiculous early hours of the morning, sharing sleep deprivation with me. They are the people who impacted me, and the progress of my car the most. Without these people, this build would not be where it is. It would not have made it to the show this weekend. And for that reason, their names will always be on this car. It is as much a product of their work, as it is mine. SHOW DAY The time had arrived. Time to take the cars in to the show and shine, set up, and show the country what we had spent so long to put together. The set up day began with our StanceMob member Bryce, arriving at our place to convoy to the show together. I think some of you may appreciate his absolutely clean E36 on Modenas, running genuine Ferrari centercaps: We then lined up our little convoy together, and wow ... it was just stunning to see our work finally on the road. In these pics, the car was at it's raised height for driving, the plan was to drop her down for the show once we were there. Arrived outside the show and took a few cheeky snaps ... Once inside, we dropped the car back down for it's intended show height ... And that's the way we left her for the show. The next day was sensational. My first experience as a competitor at nationals, and it was an awesome experience. Meeting all the people who have been following my build was incredible. It was really fulfilling to have strangers approach and ask about the car, showing interest in the work done, and the process of making it happen. What made it all worth it for me - was being able to step back, and watch people just stop dead in their tracks when they saw the car, and then continue to turn their heads sideways to oogle and look closely at all the fine details we put in. It was a great feeling to see people appreciate all the hard work put in to the car. It was also extremely fulfilling when people would ask about the colour of the "paint" - only for me to reveal that it was a wrap, and not only that, it was all done by ourselves, in our garage. The responses I got from that was priceless. Again - it made all the hard work finally worth it. The day ended on a very slightly sour note unfortunately. In the packing up process, I was raising the rear of the car to get her home safely - however, one of my rear shock mount bolts decided it wanted to cross-thread, and no longer sit tightly and hold my shock in place. A silly little problem, but one that meant it was no longer safe to drive home. With the help of my lovely girlfriend, my friends, and StanceMob family we managed to organise a quick and affordable tow truck to take her back home. And that's that! So for now, I'm going to relax. I intend to edit some photos, kick back in the sun with some beers, spend time with people who I've been neglecting due to this build, and catch up on sleep. The next time you see the car, hopefully it'll be on the new wheels I've intended to have for them since the beginning of the build. I'll keep you all updated on any changes to the car though. Thank you for following my build, and reading my story to this point. It's been awesome sharing my journey. Peace. Jeff P.S. - Does anyone know how to fix the threaded shock bolt/hub problem? Anyone able to lend me a hand to fix it this coming week? 5 Quote Share this post Link to post Share on other sites
qube 3570 Report post Posted January 30, 2016 damn this is looking really good! and that 280zx....!!!! Quote Share this post Link to post Share on other sites
Lewis91 114 Report post Posted February 1, 2016 Messaged you, might be able to help with the shock mount dude. Quote Share this post Link to post Share on other sites
Rubix 434 Report post Posted February 3, 2016 Gorgeous build.My own preference would be to delete all orange lights (Replacing with clear) and run M3 mirrors, and no plates for the show.Other than that it's a fantastic quality build, and everyone involved should be proud. It's good to see this kind of work being done in people's garages and backyards.Well done on the wrap! Looks excellent, I'd love to do my car however don't quite think I'd get it looking so nice. Quote Share this post Link to post Share on other sites
Jeff E36 37 Report post Posted February 4, 2016 damn this is looking really good! and that 280zx....!!!! Thank you man! Haha we'll be putting together a build thread for her 280zx like mine too! Obviously won't be on this forum of course, but I'll link it for whoever is interested when it's up Messaged you, might be able to help with the shock mount dude. Thanks bro - appreciate the help! Gorgeous build. My own preference would be to delete all orange lights (Replacing with clear) and run M3 mirrors, and no plates for the show. Other than that it's a fantastic quality build, and everyone involved should be proud. It's good to see this kind of work being done in people's garages and backyards. Well done on the wrap! Looks excellent, I'd love to do my car however don't quite think I'd get it looking so nice. Thank you for the feedback man! I actually have a set of clear lights for front and rears, it made the whole car look a little too dark for me - but I guess I have the option to change them for different vibes whenever I feel like! I'm also keeping my eyes peeled for some M3 mirrors, but not gonna pay the ridiculous prices people are asking for them at the moment And thank you for the feedback on the wrap, it's quite possibly the part I'm most proud of - really pleased we managed to do it ourselves. Hoping to inspire others to do the same, backyard/garage builds FTW! Quote Share this post Link to post Share on other sites
Daniel0663 30 Report post Posted February 4, 2016 Keen as bees for Angela's build thread! 1 Quote Share this post Link to post Share on other sites
Olaf 3382 Report post Posted February 4, 2016 yeah, love the wheels on the 'Z. the grey rocks on your e36, too. I saw a Z3 done up on RetroRides in gloss grey very similar, loved it. Quote Share this post Link to post Share on other sites
Jeff E36 37 Report post Posted March 5, 2016 (edited) UPDATES 05.03.2016: Righto! It's been a while since my last post, but I promise that's for a good reason, and the wait, has most certainly been worth it. If some of you follow me on my photography social media page, many of you will know that last night I received a very nice visit from the Work Wheels NZ man, bearing the gifts I have been waiting the last 6 months for ... The picture speaks for itself really. Although they were delayed several months due to manufacturing defects in Japan - David from Work Wheels NZ was outstanding in his service for the delivery of my wheels in the end.The wheels are Work Meister M1 3 piece, specs 18x10 et-2 on all corners. They are gunmetal grey face with polished lip finish, and gold plated accessory hardware. Needless to say, beautiful. The next morning I was off to Autostance to see Matt and Heino to organise my tyres and fitment for the new wheels. We got straight to test fitting and discussing what tyres would be best suited for the wheels. My friend Daniel willingly agreed to come by and help me out where possible today too, and take photos on my behalf when I was unable to After a few discussions, it was time to slap the tyres on! Heino with a pyrotechnics show in the middle of the day. The tyres fit just right for the fenders, so it was just a matter of time before we got each one fitted up... At the same time, I wanted to change the E36 lug bolt wheel set up to a stud and nut set up - I much prefer it this way as it is much easier to remove/change wheels, not risking the wheels while messing around trying to line up the darn wheels with the hub. The Meister center caps cover up the bland center holes which normally leave something to be desired. Decided to take a quick cheeky photo with all 4 wheels on the car ... At this stage, I was stoked to say the least. The car looked damn good with the Works - I have yet to see anyone else local running this wheel set up on a BMW in New Zealand, and I have no idea why nobody has done it sooner! After this, it was time to adjust and correct some of the crazy negative camber I had before, to make the fitment more flush and sensible Not too much of an issue adjusting the camber thanks to easy to use adjustable rear camber arms As a final bonus touch, Matt offered to give me some colour to my exhaust tips - unfortunately Roni's sticker was burnt, but of what *IS* burnt, looks like it might be permanent Great blowtorch skills Matt, 10/10 hahah. All that was left, was to take her outside ... At this point, just couldn't get over how damn good she looked. I'll really let the images do most of the talking. Many of you may have noticed I am no longer running the LTW wing in these images, don't worry, I will be putting something on the rear - something crazier hopefully It's been a huge wait for these wheels, but today has been an amazing day, finally putting this car together with the wheels I had in my mind from the start. The final product is every bit as perfect as I had imagined. I still stare at it now and can't believe it looks the way that it does, and that it's my car. It's come so far over the past few months. I have to give a huge shout out and thanks to Matt and Heino from Autostance today, who basically lent me their assistance and skills for the better part of the day to get it all sorted in one go! Also have to give a big thanks to David from Work Wheels NZ for helping me organise and bring these beautiful wheels to New Zealand! The build isn't 100% finished, but it's certainly getting there. I still have a few things in store for it, and then after the visual customisation is done, it'll be time to look at doing work under the hood ... For now, I'll leave you with this one last pic - see you on the next update! Peace. Jeff Edited March 5, 2016 by Jeff E36 8 Quote Share this post Link to post Share on other sites
Daniel0663 30 Report post Posted March 5, 2016 You already know my reaction Jeff hahaha see ya tomorrow at the bimmersport meet. 1 Quote Share this post Link to post Share on other sites
Gaz 1067 Report post Posted March 5, 2016 Love it. Not sure the dark centres go with the colour of the wrap but could just be the way it comes up on my phone. Quote Share this post Link to post Share on other sites
Ahmedsinc 414 Report post Posted March 5, 2016 I'll be that guy - how the hell is that much stretch legal?? Quote Share this post Link to post Share on other sites
zero 1162 Report post Posted March 5, 2016 What size tyres? 1 Quote Share this post Link to post Share on other sites
Jibs05 86 Report post Posted March 5, 2016 #sweg 1 Quote Share this post Link to post Share on other sites
hybrid 1045 Report post Posted March 5, 2016 Love the whole thing ... Im a sucker for mesh + stepped lips. Very very well done. The cool thing is when you want a change you can just do something to the centres and boom new car. 1 Quote Share this post Link to post Share on other sites
kiwi328i 118 Report post Posted March 5, 2016 I just went through the whole build. I am guessing by the time I post this there will be another set of wheels on it...lol Nice work bro! Quote Share this post Link to post Share on other sites
Jeff E36 37 Report post Posted March 6, 2016 You already know my reaction Jeff hahaha see ya tomorrow at the bimmersport meet. Thanks again for your help bro Love it. Not sure the dark centres go with the colour of the wrap but could just be the way it comes up on my phone. Cheers man, fair enough - maybe might look different in person vs in photo? Personally I love the colour of the wheels with the wrap, but hey that's just me - all subjective right? I'll be that guy - how the hell is that much stretch legal?? Haha the tyre in the pyrotechnics photo was huge stretch, we didn't end up running that, it was just to experiment and see what it would look like. With that said, I think you already know the answer to your question. What size tyres? 225/40 #sweg #nosweg I just went through the whole build. I am guessing by the time I post this there will be another set of wheels on it...lol Nice work bro! Hahahaha am I really that bad!??! I waited 6 months for these Works! Hahahha. Thanks though bro Quote Share this post Link to post Share on other sites
Jeff E36 37 Report post Posted March 6, 2016 Love the whole thing ... Im a sucker for mesh + stepped lips. Very very well done. The cool thing is when you want a change you can just do something to the centres and boom new car. Weird, this didn't come up in my last reply for multi-quote, so you get a special solo reply haha But thank you for the kind feedback, I'm the same, this must be my favourite wheel for E36 now hahaha. And yup, definitely swapping the centers in the future is something on the back of my mind! Quote Share this post Link to post Share on other sites
///MPROVD 131 Report post Posted March 6, 2016 Love the build bro, was good talking to you today looking forward to seeing hows this progresses 1 Quote Share this post Link to post Share on other sites
Nobimmer 694 Report post Posted March 6, 2016 Looks good mate. Quote Share this post Link to post Share on other sites
Jeff E36 37 Report post Posted March 8, 2016 Love the build bro, was good talking to you today looking forward to seeing hows this progresses Thanks man, and yeah good chat Will definitely be talking more in future regarding what's happening under the hood I'm sure haha Looks good mate. Cheers! 891.jpg Dahahaha, breakin' dem necks Quote Share this post Link to post Share on other sites
_ethrty-Andy_ 2144 Report post Posted March 8, 2016 Cool what tyres did you end up running? And can I by the ltw wing haha Quote Share this post Link to post Share on other sites
Jeff E36 37 Report post Posted March 10, 2016 Cool what tyres did you end up running? And can I by the ltw wing haha 225/40 in the end, and sorry I sold my old 2 piece on already! The one I used in the pics was borrowed. My own wing just arrived this week, planning to modify it before mounting Quote Share this post Link to post Share on other sites