Leaderboard


Popular Content
Showing content with the highest reputation on 05/07/14 in Posts
-
3 pointsEven better for an E31....
-
2 pointswhat's your budget? Makita angle grinders are decent and not too expensive.
-
2 pointsOh gawd! I think the SLAB's have returned.
-
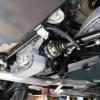
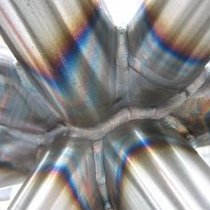
1 pointI have been in 2 minds as to whether I should post my experience with the dreaded E46 M3 chassis crack, on one hand it is negative for resale purposes while on the other it is potentially good information for fellow Bimmersporters and I reckon the repair is up to any scrutiny. I found the crack after viewing a Reddish Motorsport video, I had looked before (with the entire subframe out) but I did not look in all of the right places so I don’t know if is new or was existing. In my case the crack was located in the classic spot (i.e. left hand rear subframe mount at the floor crease). Why do our cars fail here? Don’t know but previously we could comfort ourselves that very few cars were affected but it seems to me that as time goes on (i.e. km’s) the instances increase exponentially. After stripping the vehicle underside and inspecting all of the subframe mounting points I found that there was only 1 crack and that it was fairly small (30mm long). Based on this I decided to weld the crack, fit reinforcing plates, inject BMW structural “foam” and repaint the underneath of the car. Bearing in mind that the size of the crack (small) + the internal and external reinforcing being applied I chose to epoxy the reinforcement plates on rather than weld them. I had the necessary gear/skills to weld and it would have been cheaper but I felt it would have been too “invasive” when all things were taken into account. I also decided to use the structural foam in the LHR and RHF cavities as these are the 2 places where the cracking normally begins. This is because the LHR subframe mount is subjected to tensile stress (from motor induced rotational torque (anti-clockwise look at the rear of the car) and axle induced rotational torque (anti-clockwise looking at the right hand rear wheel). The RHF subframe mount is subjected to compression stress (i.e. the opposite of the LHR). The other 2 mounts (and ultimately the whole floor panel) really only seem to fail once these 2 stressed mounts have failed. There are plenty of DIY’s out there so I haven’t gone into the full detail here, a few things to note though. Regarding the rear mount, since I had the subframe out I chose to blank off the rear cavity (using expanding foam) from the bottom of the car rather than inside the boot as per BMW’s T.I.S. Regarding the front mount, I spent a lot of time estimating the size of the cavity that the mounts are encased in and found that it is quite large. This prompted me to use expanding foam to keep the structural epoxy localised around the mounting point, this is not something I have seen done before. A lot of people use a hand actuated epoxy applicator gun but this is very hard work, instead I made up a mechanised unit as per the following photos. Regarding costs the BMW structural foam was $263 per pack (2 x 420ml tube pairs) – I brought 2 packs. The reinforcement plate epoxy was $40/tube – I brought 4 but could have got away with 2. If anyone is interested I have the gear I used for this job available (diff/axle carrier frame, reinforcement plate templates, reinforcement plate clamps and foam dispenser gun). 1. Crack viewed through the RHR sway bar mount (exhaust removed) 2. Close up of the crack 3. Home-made reinforcement plates (2.0mm) 4. Underside stripped and mounting points cleaned up 5. LHR mount ok apart from crack to the left (you need to look out for separated spot welds as well as cracks) 6. LHF ok 7. RHF ok (circular shape around thread is not a crack, it is the boundary line between the body panel and the threaded insert) 8. RHR ok 9. Crack ends drilled 10. Crack welded (gas - 2 passes) 11. Plates coated with epoxy after scouring with 60 grit and cleaning with electrical contact cleaner 12. Reinforcing plates fitted and compressed into place with 2D clamping plates (rear), not something I have seen done but a must I reckon 13. Front reinforcing and clamping plates (all left in position for 1 week) 14. Car fully masked in preparation for underside painting 15. Underside primed after degrease, scuffing and prepsol cleaning 16. LHR mount after base and clear coat 17. RHR mount after colour 18. LHF mount after colour 19. RHF mount after colour 20. Fuel tank back in 21. Rear axle on its way back in (note blue painted support tool which made the process quick and easy) 22. Expanding foam being applied between rear mounts as per the T.I.S 23. Expanding foam being applied to RHS of front mount cavity (through OEM drilling) – LH done too (although I didn’t fill the LHS with structural foam I prepared all sides in case I want to do at a future date) 24. Expanding foam being applied to the centre of front mount cavity (through new drilling) 25. Expanding foam being applied to the “tunnel” that runs between the front and rear cavities (modified version of T.I.S method) 26. Holes plugged (plugs at 11:00 and 4:00 o’clock in photo) 27. 4 x BMW structural foam packs plus homemade applicator gun 28. Applicator being used to fill RHF subframe mount cavity 29. Applicator being used to fill LHR subframe mount cavity Last photos show exhaust re-polished and rear box – 3rd and final piece of work in the “gutting” exercise - last remaining fibreglass packing removed from the inlet section (patch at 2:00 the only evidence) plus underfloor plastics repainted
-
1 pointwould move both LSD and skids further up list, but other than that sounds good!
-
1 pointThats not too bad then. Will look good on them for sure. Im pretty interested in getting some weaves so I might look into it. You might just hear from me again! Anyway keep up the good work, that colour is the best on E30s im my opinion too
-
1 pointChanged from 225 / 255 combo to 235 / 265 combo. Dropped the profile by 5 on front and back to retain rolling radius. Did this for no other reason than more tyre on the road and it's the standard widths for the CSL. Only issue is the recommended rim sizes for the tyre is 8.5 & 9.5 inches respectively. I'm running 8&9 respectively .The reality is I'm not getting any abnormal tyre wear and no issues with tyre rubbing. Handling wise the only noticeable difference has been grip. But I suspect this is down to tyre choice rather than width. Mate was running 10 inch rears with a 275 / 19/ something on the rears. Filled the arches nicely but did have slight rubbing with rear passengers in car
-
1 point$1 reserve to find a true price
-
1 pointOMG......... OMG OMG OMG
-
1 pointMore practical than an 8 Series Jules........
-
1 pointStrikes me that, if it checks out, you'd be unlikely to find one with lower kms. If the engine is good and low kms it's worth spending a bit on the outside. Dave got close to $30K for his with 25K kms more on the clock but in better condition. Don't reckon it would cost $8K to get the exterior ship shape if the rest is good.
-
1 pointGood donor for an E30
-
1 pointrego lapsed so just been revinned (duh face plant) why do people do this , costs nothing to put the reg on hold can even do this online
-
1 pointYeah boys love talking about how we deal with our nuts... The angel eyes look good, btw, quite an improvement
-
1 pointWell, that makes two that I've heard of. Best I've managed so far is splitting the carrier pin on a 750mm breaker bar trying to loosen the hub nut on an old turbo Startlet. End result was a large bump and a couple grazes from where I used my head to break my fall.