Leaderboard


Popular Content
Showing content with the highest reputation on 01/02/24 in all areas
-
2 points
-
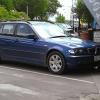
1 pointHi Bimmersport! It's been a while since I've posted here. Those of you who know me, know I still have one car left in NZ - it's time to sell it though. I'm losing where it's being stored and there just isn't any point in keeping it in NZ, and after just imported my racecar to Aus - I know how much of a pain that is. Trademe Link here: https://www.trademe.co.nz/a/motors/cars/bmw/listing/4496562823?bof=DfmoGjuv My Aussie mobile is +61 499 019 778. I'm planning on coming back W/C 29th of Jan to get any work done to the car and ideally sell it. Cheers
-
1 pointThanks! I'm actually really happy with the Xtrons so far! Of course some of the reliability testing will only come with time, but I've had no issues so far and overall the product has been better than I was expecting. I believe that for Nav you need to purchase the extra long harness: https://xtrons.com/extension-cable-exl007 or https://xtrons.com/bmw-e38-e39-e46-e53-extension-cable-exl005 and for HK those Xtrons pages mention that you need one of these as well: https://connects2.com/Product/ProductItem/CT53-BM01
-
1 pointIn case anyone is wondering.....
-
1 pointOpps - broke the forum rules. I'm looking for $30K.
-
1 pointBU will VO code your HU in about 20sec, or if you’ve made retrofits without FA updating, you can individually change the settings easy enough. 3 of the 4 things you need to code are easy, the odd one being the phone cradle. You may need to change the USB options to activate usb2 and/or activate the usb hub option depending on the phone cradle config.. I’d try VO coding it first if your FA is stock/up to date. esys comes with a complimentary “I hope this doesn’t screw it up” feeling every you are about to press the code button.. BimmerUtility = easy
-
1 pointInstall. Disconnect battery , I read a story of someone that didn’t and managed to short a quad lock connector on the back of the idrive unit main connector. Needed a new unit. When disconnecting battery make sure you tie a rag around the boot latch. Becomes problematic if some closes boot in this state. This is quite straight forward in the F3x / F8x. Tools needed Plastic trim removal tool Torx T20 driver Pick tool for Pushing lock tabs on some of the connectors Towel to cover lower console area to avoid scratching area from idrive unit Screen install Pop vent trim off gently , it just clips into place Remove 2x t20 screen screws from screen, gently lift screen on one side up, unit will then come out easily Remove cable by pressing in connector lock tab , firmly pull connector away , may need a wiggle Push connector into new screen and push screen down, add Torx screws and careful that you don’t drop them
-
1 pointSad times, but life moves on. @OLLIE no discount for Bimmersport members… pfft!
-
1 pointMy order from EMIAuto arrived earlier in the week after a bit of a delay at Customs (turns out if you read the invoice properly and pay the correct amount it tends to speed things along). The most exciting thing in this package is the sound insulation for under the rear seat. As I mentioned previously this is a newer item that at some point BMW has used to replace the original butyl item that came from the factory. I've been looking forward to receiving this to see what it's like and to check fitment. It does not disappoint! It's a nicely made piece, it's a soft felt on the outside with firmer layers inside to hold the shape, with the sound material in the core. I haven't got the scales out yet but its weight feels to align with what RealOEM quote. As you can see in the photo it comes with cutout flaps for accessing the fuel pumps. Nicely the cutouts aren't quite complete so there's some little tabs that hold it all in one piece, that you can easily cut with a knife if you need to access the fuel pumps. I haven't done a full fitting yet, but I did have time the other day to do a quick check, and it looks to fit well. The only thing I wasn't able to completely validate without removing the rear seats completely was whether the isofix fittings fit through the existing cutouts. I'll check this when I have some time to get everything out of the rear bench. The other exciting parts of the package were the bits and pieces that I needed to install the CSL centre console that picked up a couple of months ago. I had some time yesterday in between renovations and plastering and got to work removing the existing centre console. Step 1 being to remove the driver's seat. Removing the centre console is straightforward, you just have to remove enough of the trim pieces and inserts to get to the screws holding the rear of the console down. My console had, at some point, been leather wrapped, and whoever did it actually did a nice job of it, it looks and feels good and is much better that what I imagine the soft-touch plastic would look like by now. The flip side to this is that some of the inserts were a bit difficult to remove due to the extra thickness of the leather. On the inside of the console there is also a fair amount of over-spray of the adhesive that they used to affix the leather (not that this affects the end result). Once the gear selector trim is lifted and unscrewed as well, lifting up the handbrake boot means you can then remove the trim at the back of the console and then lift the whole thing up and over the arm rest. This then means you can access the bolts for the arm rest. Once the three bolts are removed (being careful not to lose the metal collars which are loose) the arm rest can be removed. I took this opportunity to then give the whole thing a good vacuum. The module resting on the carpet is the "genuine bluetooth module" which, given I don't use it, I took the opportunity to remove it and wrap up it, and the connector for the rear ashtray light in the soft wrap that the phone wiring is wrapped in. At the same time I installed the new bracket for the CSL/arm rest delete console. With this done I was able to get on to the exciting bit of fitting the console! Prior to this, and not photographed, I took the mirror control and hazard light switch units and spent some time going over them with some wet cotton buds to clean them up and get all the dust and grime out of them that tends to accumulate over time. The other thing that I needed to do as part of fitting the console was make some space for the depth of the hazard light switch by depressing the carpet underneath it. If you don't do this the carpet will offer too much resistance and pop the hazard light switch back out again. With the console in place the next thing was to replace the gear selector trim with the new titan shadow trim I ordered. The car was originally spec'd with this, and at some point it has been replaced with silver trim, which is in excellent condition and very nice, but I wanted to go back to the original colour. While I was doing this I gave the window controls the same cotton bud treatment. It was at this juncture that I discovered that what I thought was a spec of cola on one of the buttons does in fact appear to be collateral damage from when the contents of the rear view mirror leaked out (prior to my ownership). This is a shame as it is corrosive and can't be cleaned off the switch, so I'll need to order a replacement. Fortunately it has only affected one of the two switch units. Once that was done I was able to reinstall the trim. Almost done! Last thing for the console was the installation of the new boot. This is straightforward, just use the factory procedure of cable tying it on and then fit it in place! The last work for the day was to replace the 3 other dash trim pieces. This is easy if you have a set of trim removal tools and in no time I was done and had the driver's seat back in. I'm very happy with the end result. The CSL console very much suits the seats. I have a couple of things left to do to finish that particular project entirely. 1: The mirror control switch currently isn't wired in. With everything that I do with this car I want to make it easily reversible (why I don't know as I intend to keep the car for a long time) so rather than just hacking the existing wiring I'm working on building an extension harness to extend the wiring from it's current location in the driver's door back to the centre console. I wanted to actually move the console and check the mirror control switch before I ordered the parts for this side quest. 2: I need to order some foam-backed 9002 Alcantara to manufacture a copy of the OE tray-insert in the centre console (since these are NLA). Speaking of NLA, the titan shadow trim I ordered was manufactured in late 2004! Which is interesting and really highlights that with these cars now being 20 years old, when the spare parts run out a lot of these sorts of projects are going to become astronomically more difficult. Anyway, a good little project for a Saturday. When I get the time, Christmas probably, I'll get into the next steps on sorting out the rear seat!
-
1 pointSalzburgring, ETCC, 1977.