Leaderboard


Popular Content
Showing content with the highest reputation on 04/28/25 in all areas
-
3 pointsTime for some decent audio. This is something I've always been big on, maybe not to an audiophile extent, but life is too short to listen to stock car audio. My first car, my ford focus, was when I first got my feet wet with car audio. Just a bluetooth single din head unit, front components and a little active 250W sub in the rear. My last wagon, the white 325i e90, was a touch more in depth. It came with a mechless double din, most likely just for the bluetooth and reversing camera aspect, definitely a japanese addition. The stock e90 base audio is pretty sad, 4" door speakers all the way around with 6.5" woofers under the front seats. the front doors and underseats share a channel which is just a joke really. All 4 door speaker were then replaced with 4" kicker coax units, with the tweeter disabled for the rear doors. Adding a 4 channel Pioneer GM-D8704 amp to split the doors from the underseats helped massively. Between the headunit and amp HP and LP filters I managed to high pass the doors from 250hz and cross the underseats from 80hz to 250hz. Throwing a 10" 400w sub box in the rear then filled in everything under 80hz. Onto the latest wagon, I told myself I was going to hold off on doing audio for a while and learn to deal with the stock tunes, that didn't last long. The biggest hold back was the headunit, to get a wireless carplay double din headunit the entry cost is around $700, seems absurd campared to the $140 I paid for the single din in my focus back in the day. Anyways I bit the bullet and bought a Kenwood DMX7522S, the cheapest wireless carplay headunit on the market with active crossovers. Step one was mounting, some 3mm C channel kicking around in the back of Dad's garage got chopped up into right angle and shaped to make some brackets to fit it into the stock position. Step two was to wire it in, with this one I wanted to make an effort not to butcher the stock wiring, instead opting to make an adapter harness. An aliexpress fakra quadlock extension loom was butchered to join up to the kenwood harness. Temporarily the constant 12v and accessory power were connected to the terminal 15 pin in the quadlock harness, which means that the headunit has no memory and has to be switched off manually as terminal 15 takes 30 minutes to time out. This is fixed later on. And for carplay to function the gps must be plugged in, the centre dash speaker location is ideal for this. I printed a piece to bolt in where the speaker goes and stuck the gps onto that. And we have liftoff! This concludes step one of the process for the car audio upgrade. This has already taken some time to write up. I will carry on in my next post with: mounting amps, running new wires to all the speakers, powering the amps, making new rcas, replacing the doors speakers and underseats and adding tweeters.
-
2 pointsI have the new 2025 release of the evo AU/NZ maps of any one needs it.. ( map only. - you will need lifetime FSC. ) PM me.
-
1 pointThey had it up for ages, the had a “stocktake sale” where it was listed at half the original price and was sold before I even had chance to call them about it. Looks like a very well done car.
-
1 pointAs soon as I read this I thought I bet it is NZ new. NZ new cars have some of the most odd decisions for specs. They always seem to be missing something they would have anywhere else. no heated seats, no cruise control, no electric seats, poverty seats in a MSport... it is so common.
-
1 pointNow, is this mod #9, or just an aesthetic "fix"? I don't know but I hate these obnoxious labels... So, some research determined that I have the necessary elements in my garage (and kitchen) already, and some time on my hands, so let's get into it... Rear as well... And after about 90 mins (that included a lot of waiting) I'm happy with the result. I could easily do it in 40 mins or less now, I wasted much time by using IPA that too much alcohol had evaporated from, and I spent too much time fruitlessly trying to get rid of the resulting ghosting/shadows. I don't think you can get rid of the residual shadows, even acetone makes no difference. But it's hardly noticeable, and far less obnoxious, than the bright stickers... and a lot less expensive than buying new ones without stickers! You need IPA that's a least 91%, mine is 100% but I used the residual I had in a spray bottle and that had evaporated to the extent that it did nothing and I was about to walk away from the effort until I tried it straight from the original bottle and that worked fine. The key is to leave it on long enough to dissolve the adhesive without dissolving the actual label (or you'll spend hours picking off the tiny bits).
-
1 point240,200km Just returned from a school holiday trip down to Nelson. Ticked over 240k on the way and averaged around 10L/100km although it's not exactly a huge amount of km's from Wellington to Nelson but a nice open road drive with some hills and some twisties. Had terrible weather on the way down but lovely on the way home.
-
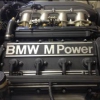
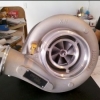
1 pointAnd so it begins in the 'actual' 530iT. The old drivetrain (M54B30, ZF 5 speed manual) and DSC system were removed and the DSC8+ module installed, with the necessary brake line fabrication: An E39 diesel coolant reservoir was installed in the factory location with rivnuts, though unfortunately we didn't get the placement quite right and this will need to be revised. With the use of an E39 'gulf' oil cooler the horns cannot be kept in the factory position. As I'll be using an E90 combined condensor / receiver-dryer unit, the E39 receiver-dryer was removed and the horns were relocated in its place. The brackets used to hold the E60 DSC pump are temporary while a more final bracket is fabricated. Using the E60 DSC pump also removes the need for a precharge pump, so that was removed and a new brake fluid reservoir installed. Onto preparing the new hardware, the gearbox was fitted with new pivot pin, slave cylinder, etc: A new factory clutch and dual-mass flywheel were installed on the engine: The engine and gearbox were then gently offered into the chassis:
-
1 pointStill missing it from time to time - a great all-rounder. e60 545i. my pic, Nikon D4 with Nikkor 70-200 2.8 FL/E + B+W Kassemann pol. Click on the image to open it - it's worth it.
-
1 pointThat was a good send off for the old girl; 1600km and 4 nights living out of her from Auckland to New Plymouth, Wanganui, Wellington, Coromandel and back to Auckland. After ten years in NZ, I fly out to the UK today, been a pleasure Bimmersporters!
-
1 pointI went through my parts list to harvest all the main rubber manufacturers. Note that as at April 2025 some of these parts are no longer available from the manufacturer I previously sourced: Front Suspension and Steering: Strut Mounts - Sachs Front Bump Stops - Rein Coil Spring Shims - mixture of Genuine BMW and Lemforder Front Swaybar Links - Meyle HD Lower Control Arms: Lemforder LCA Bushing kit (e36 solid) - Febi Tie rods - TRW OEM Steering Rack Bellows - Rein Tie Rod lock plate - gen BMW Drivetrain: Front Wheel Bearings: SKF Engine Mount - Febi Gearbox Mount - Corteco Shift Bushings - all Genuine BMW except the one at the back which was delrin from USA - not recommended. Diff Bush - Corteco Guibo - Corteco Rear Wheel Bearings - FAG Rear Suspension: Subframe Mounts - Meyle (FWIW I'd not use Meyle in future - Meyle HD is still great stuff). Rear shock upper mounts - Meyle HD RTAB set - Lemforder Coil Spring Shims - mixture of Genuine BMW and Lemforder ARB Bushes - Genuine BMW Rear ARB droplinks - Lemforder Hope that helps.
-
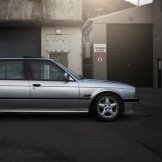
1 pointStumbled across this today.. NZ new too..


.thumb.jpg.cdcb7359c98f4cf880916eed908afa27.jpg)