Leaderboard


Popular Content
Showing content with the highest reputation on 04/29/18 in all areas
-
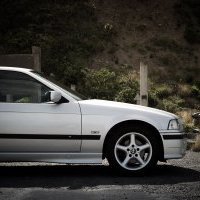
7 pointsNav. now upgraded from MK3 to MK4. Trialing a square setup with 275x35x18 all round. 5 mm spacers on the front. Great improvement to overall feel and handling.
-
2 pointsI see the LSB E46
-
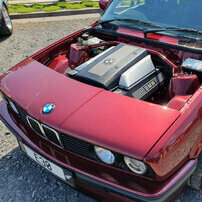
2 pointsWith the engine mounted it was time to focus on the engine bay and the location of the remote oil filter, power steering reservoir and coolant expansion tank, keeping in mind i wanted an uncluttered, smooth and clean bay. Cheers to Kerry for his time, efforts and communication at this point, where he nailed exactly what i had a vision for in this stage. Im running a Mishimoto e36 aluminium radiator, so this was mocked up to check clearances With everything starting to come together, the vision was becoming a reality so it was time for me to prep the bay to keep things moving forward. The messy job of removing all the ugly factory seam sealer for that smooth and shaved bay, filling in holes and getting some flat plate installed was a must for my vision. Jonseys Garage carried out the fabrication of the flat plates and getting the bay sprayed in primer, how good did that white look! Bringing back memories! while the engine was out i couldn't resist getting stuck into cleaning the block up, so with a tooth brush and 3-4 hours later, this was the result
-
1 pointApparently https://www.trademe.co.nz/motors/used-cars/bmw/auction-1616757641.htm?rsqid=203634b2457546c8ae97d8add3022b53
-
1 pointHi all, Just acquired a stock 1999 E36 318ti M-Sport as a DD for now, it runs well but I have interests to work on it further along the way... just in research phases as the moment and joining forums etc. So far I've just done a restoration the foggy headlights, pulled apart, cleaned and reassembled - will add pics soon. I have one Q thou, does Bimmersport NZ have a forum app or can someone recommend a good app for iPhone that allows you to add several forum accounts to it? Cheers, d///M
-
1 pointHaven't heard of that restaurant before - gets fantastic reviews on TripAdvisor - may have to check it out! FYI, on the website, I couldn't see the address anywhere - might be useful to add it
-
1 pointIn between stages theres always other small things that cannot be overlooked if i want to achieve the vision i have in mind so these jobs weren't missed. Genuine iS front lip and Splitter Blue Cloth Recaro sport seats that i picked up locally for a good deal that will eventually be recovered Rocker covers removed, blasted and powder coated black for that clean and tidy engine bay look Got around to fixing up my headlights, as my car only had one smiley light when purchased.
-
1 pointTo finish off the running gear i stuck with a standard flywheel with the ring gear pressed on and a standard clutch and pressure plate setup, just to keep it easy and cost effective to replace if needed. I decided to revisit my original brake set up plan and came across MRP's kit advertised on trademe so did some emailing and finalised a full kit consisting of: 280mm slotted Zinoelli Rotors front and rear with Dynapro 6piston callipers on the front and 4 piston callipers on the rear with the necessary adaptor plates along with braided lines all round. Custom lines were made to plumb in the brake booster and reservoir now located in the existing glove box location using Ergen Motorsports kit from the UK, which also had to be weld crack tested before fitted.
-
1 pointBump, $5.5k ONO https://www.trademe.co.nz/Browse/Listing.aspx?id=1616688916
-
1 pointGreat to meet you today Seb! Think we're accumulating a good supply of talented photographers
-
1 pointFinally made it to a WLG BMW Club meet. Thanks @andyb184 for driving while I figured out my panning settings.
-
1 pointNext came time to test fit the engine with the Garagistic engine mounts and subframe spacers i had purchased for the ease of a bolt in application. I got fellow member will to help out with this side of things. This discovered the kit design to have a few flaws, mainly the angle of the mount to the subframe, the fact that the steering geometry gets messed up by spacing the subframe down 20mm and there is no provision for the oil lines that run through the factory mounting arms and into the block. The decision was made to move on from the kit and custom fabricate some engine mounts and mount them off the chassis rails as will has done in the past, and also allowing the entire front subframe, steering rack and suspension to be removed while the engine can remain in the car. Finished mounts installed, with crush tubes located within the middle of the chassis and gussets to prevent the engine moving forward in a frontal impact, as requested by the certifier upon inspection. This allowed us to locate the engine where we thought was best to give us enough room behind and infront, and as low as possible, and also allowed us to run the factory m62 engine arms with the oil lines running through them and into the block. With the engine sitting so low, we had to notch the sump for clearance of the Z3 steering rack, work was carried out by Aero Machinists & Engineers in Hamilton With that done it was time to move on to mounting the driveline and 6 speed Getrag 420G gearbox and getting the alignment sorted with the driveshaft, an issue that many people run into, this was sorted when the engine mounting position was decided on without having to run and rear diff risers/ spacers in the rear. Im running Revshift 95A hard, street/track mounts throughout sourced from Mike at Euroturbo along with his driveshaft hoops that meet all certification specifications and are designed and made by his business here in NZ.
-
1 point
-
1 pointFirst update: When I bought the car it had the typical rocker cover leak onto the exhaust manifold . At first I attempted to clean up the original rocker cover (which was pretty dirty..) and refit but since I bought a rocker cover gasket for a face-lift M52, I figured I may as well upgrade to the plastic face-lift rocker cover and have now fitted it. Huge improvement over the old piece of rubbish! Thanks Brent @BM WORLD. NOTE: Check your torque wrench and make sure it clicks! I borrowed a friends and I was tightening the 10mm rocker cover bolts more and more until I realised something was wrong.. The thing was broken and wouldn't click at all. Lucky I didn't strip the thread.
-
1 pointLove it or hate it, I think it looks great in the driveway