Leaderboard


Popular Content
Showing content with the highest reputation on 01/12/23 in all areas
-
5 pointsHaving owned this wagon nearly eleven years (purchased 28 Mar 2012) and mentioned it several times over the years on this forum, "why not start a showroom thread" I wondered aloud yesterday - so here we are. A potted history I wanted another BMW, having sold my e30 325i Touring back in '01. Needed a replacement for our family car (A32 Maxima) and fancied an e39 Touring e39 eliminated as Mrs Olaf thought them ugly e46 fitted the bill, though in 2012 330i tourings were very rarely sold, and 325i's were generally ~$15-20k from dealers. e91 6 cyl were still over $20k and beyond my budget. This one had dropped from ~$16k to the $12k range. 112k kms, fresh import from Japan, good order, best colour - Orientblau metallic. Got it inspected, flew to Auckland and bought it. Drove it to Wellington, it broke down the next day (fuel gauge issue later sorted with replacement pump). Remedial maintenance sorted by BMW Specialist in Welly. Did an Easter Tour to Auckland and back laden with family and it performed flawlessly We've had lots of fun with it over the years and done a shedload of maintenance on it. Here it is about a fortnight after we bought it, after I'd spent time on full body detail. More later.
-
3 pointsWell, was fun while it lasted... All 5 minutes of it. The heatshield thing wouldn't give me peace so once again returned to Pick-A-Part and nabbed a front section of a similar heatshield and mashed together an extension. Quite pleased with myself with how it turned out. Bolted up the exhaust with new hangers and fresh braces, started her up again, bled the power steering and cooling system, topped up oil, then dropped her down, torqued up the sway bar brackets and wheel nuts, ready for its first run. Went for a quick run around the block. The clutch felt a bit weird and will take some getting used to. First time driving a manual BMW so not sure how it's supposed to feel like. Probably down to it being a double mass flywheel and the clutch not bedded in yet. Lifters ticking away as was to be expected, otherwise ran really well. Was absolutely buzzing to have her up and running again. All the good vibes got wiped away though as I checked the underside. FFS Not a small leak either. Left a good trail all along the road as well. Absolutely pissing out engine oil. Gearbox out it is... I suspect it's the rear main seal. Thinking back now, I do remember being a bit unsure about it. I ran it in flush with the housing but originally I think it sat about 1-2mm proud. Thought it'd be fine, obviously mistakenly so. Remember seeing FCP Euro mention a special installation tool in one of their videos but then again others have just ran it in using the old seal with a block of wood so went with that approach. Must have messed it up somehow. Will hopefully see the issue once the box is out. Will just get this kit if that's the issue, don't want to trust myself with that again. Bit disheartening after spending my whole Christmas break on it but it is what it is, learning things the hard way. Not giving up.
-
3 pointsMustered up some motivation to get back to the lemon. Found some more lemony goodness. Loom, glow plugs, turbo, radiator, intercooler and belly pans removed. Turbo found to have some lateral play on the shaft, so that'll be getting rebuilt/replaced (anyone have any experience with the DIY rebuild kits?). Looks like I caught it early enough and there's no shrapnel anywhere. 20230112_134521.mp4 When removing the belly tray, I found the little brass olive that goes in the fuel lines to the injector. Can't find the 2nd one. Royaly p*sses me off that the garage has had such sloppy workmanship. None of the fuel lines blanked. Injector left uncovered. Would be keen to send a sulky email as opposed to bad feedback on Google, but I doubt it'd achieve much. Plan from here is to remove the intake manifold and use my new leakdown tester to pinpoint where the air is escaping from. I'll also loan the borescope from work to see if there's any damage to cylinder bores before going any further.
-
2 pointsOn the bright side though, prior to all this I hooked up INPA and verified that it's getting the clutch switch signal, so at least that's all good. Didn't check cruise control but no rev hang so will take the small win. Might have messed up the one wire going to the EWS then. Least of my worries for now though.
-
2 pointsDate: 11 Jan 2023 Distance: 205,567 kms 1. Maintenance Replaced leaking water pump (weeping - was just over two years old) - this time went with GRAF. Last time was HEPU, same as previously. Refilled cooling system with fresh BMW coolant and distilled water at 1:1 ratio Replaced vacuum bungs on inlet manifold 11611437560 and 11611727176 Replaced High Pressure Fuel Line clamp 13311716049 Transmission Service with ZF kit (24152333915), filter, machine flushed/refilled with Lubeguard Complete full synthetic ATF. Front Brake Pads replaced with Hawk Performance HPS Rear brake calipers replaced with rebuilt units; rear brake pads replaced with Hawk Performance HPS Full brake system flush and bleed with DOT4 brake fluid Road tested Observed the previous service agent had used gasket cement on the Auto Trans oil pan and stripped one of the bolts. BIG shout out to Begley Motor Worx in Marton for exceptional care. 2. Next steps: replace windscreen wipers and rear wipers rebuild front calipers source and fit replacement touring rear caliper carriers new headlight lenses diff seals (input, both outputs), replace diff oil back box replacement (slow corrosion at top) Fit new sunroof seal (precautionary replacement) I really enjoyed the drive home last night. Trans is shifting like butter. Brakes offer much faster retardation with better feel than the old Akebono Euro that (finally) wore enough to be replaced. EDIT: for the avoidance of doubt, Akebono Euros are the Supercat of brake pads... they last for ever and don't grip! Avoid.
-
2 pointsIt did occur to me that some woman logic may be on display, but i thought it may simply be a case of needing some re-education on peak BMW design.
-
2 pointsYou must already know the correct answers to this: 1. My wife is of course perfect, how could one question her eyesight? Now, we shall step outside and discuss this like gentlemen as you've cast aspersions on my beloved wife (note we're not doing Will Smith). 2. The e39 is similar though sufficiently different; have you never witnessed (or participated in) the discussion of the difference between mauve and lilac? 3. In any marriage there is usually an unspoken language, where one's spouse may say one thing but mean completely another. For example the simple premise of 'that's ugly' might be code for 'looks difficult to park' or 'there's someone on the school run with one of these and I'd not be seen dead in the same car; or 'it's really ugly and I simply will not drive it'.
-
2 pointsok so over the past few weeks... - new after market water pump installed (metal not composite). Removed the clutch fan using a this guy to hold the water pump pulley while undoing the clutch fan nut. The proper tool I ordered last Dec still hasn't arrived. - new serpentine belt and drive belts installed - new OEM radiator and auxilary water pump installed. - new battery - rear right hand side door leaking water onto the floor well during recent dump of rain for the first couple of weeks of Jan 2023. A known problem with BMWs. But thanks to Nathans BMW Workshop i'm getting it sorted with the help of Permatex Super Weather strip Adhesive - rear vision mirror fell off. The metal button detached from the window so I used a vice to grip the button so I could rotate the metal mirror arm 90% to seperate the metal mirror arm from the button(see no. 7 in pic). Did some research and found this thread (https://www.bimmerfest.com/threads/rearview-mirror-fell-off.1222241/) which lead me to a here http://twrite.org/shogunnew/fixes/body.html#Reattach_rear_mirror. I used PERMATEX® EXTREME REARVIEW MIRROR PROFESSIONAL STRENGTH ADHESIVE. After posting this, I will attach the mirror. Next: - wetvac the carpets - put the door skin back on - maintain the sunroof as per Nathan's guidance. And test the sunroof is draining correctly from pillars A and B (im so glad my sunroof doesnt leak but worth a test anyway as the car has been sitting for years). - figure out why left/right indicator flash is not working on dash display. and this story is not over yet.
-
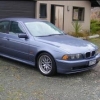
2 pointse46 Touring. Peak BMW, imo.
-
1 pointJust light curbing? Many places offer machining and re-coating services for them (Diamond cut). Probably degrees of quality depending on their setups. Id sell them as soon the tyres wore out and get some normal painted wheels. Easy to fix and are more durable, another dumb modern trend.
-
1 pointYeah definitely put sealant on the joins there, also thread sealer on the two big bolts that go all the way through. Not sure what the machine shop might have done beyond chuck it in the cleaner. Yeah I remember you mentioning resetting the springs. Think you also said they looked fine on the pictures so I just chucked it on. Wasn't sure what I was looking for with those anyway but will have to revisit and figure out how to reset. Will grab a puller off a mate. Was actually keen to keep the depress-clutch-to-start function. Good little precaution when left in gear as I often do.
-
1 pointDate: 16 Sep 2022 Distance: 203,854 kms 1. Maintenance replaced VANOS Oil line (11361705532) replaced high-pressure fuel hose (13537548987) oil and filter change - 5W40 Penrite HPR5 full synthetic air filter change replaced windscreen wiper cowling (51718189100) replaced cabin filter VANOS oil line breaks down over time from engine heat, starts to drip oil around the front of your engine, so worth replacing. High-pressure fuel hose - check yours in case it's getting crusty. Spraying fuel at injector line pressure - should it split - will see you meeting the team from FENZ. Best avoided, replace! They're all ~20 years old now...
-
1 pointThere will be a somewhat random and tangental listing on this thread as I recall or dredge up adventures/maintenance/experience with this vehicle. Broadly: Transmission shat the bed in late Dec 2012. Jan 2013 it was left with a local specialist for a couple of weeks while we holidayed abroad. The trans was fully rebuilt by Hutt Automatics, and a bunch of remedial maintenance addressed at the same time (the standard valve cover gasket, oil filter housing to block etc) Full set of coils. Sump gasket, engine mounts, trans mounts. Full suspension refresh (stock) with Sachs shocks. Revised suspension refresh (thanks again @Herbmiester) with MSport ARBs, e9x style 194 rims and e46 msport tyre setup MD stereo swapped for factory CD stereo. Sunroof slider repaired. Vacuum issues resolved - PCV system replacement and brake booster replaced after diaphragm contaminated by oil in the PCV system. A couple of cooling system refreshes (including metal pulley) Touch wood, it's never needed to be towed. More detail later. also replaced scrennwash pump a couple of times; then replaced the whole reservoir tank. Despite a diet of exclusively BMW screenwash for about 7 years, the tanks break down and produce a kind of white snot that clogs the pump. No issues since replacing pump and tank together. Replacement (heated) washer nozzles still await fitting.
-
1 pointFoam in the RHS lower bolster was starting to cave in at the top. Many SR seats use the same piece and its easily available from the Capital Seating in the UK for ~$160. Very little effort and straight forward to replace so why not. The SR3 seems to be getting more comfortable so im sticking with it for now. Will try it again on some 1hr+ drives.
-
1 pointHi everyone, Pete from West Auckland here. Just getting the ole BM back on the road again. Been sitting with Reg. on hold for 5 years now (outside). Amazingly, no rust. Have started from the Fuel tank (with a purge of 3ltres old fuel after jumping the fuel pump relay) and am working my way forward. All DIY thanks to forums like this and youtube. So far; fuel filter replacement stuck idle control valve solved by carb cleaner (no more idle surge) DISA checked out ok MAF is ok but some of the plastic from the MAF web has disintegrated Have dumped coolant from the block and radiator and now looking forward to jimmying up a water pump pulley holder tool to get the fan off (have ordered the proper tool and happy to lend out to other members). Replacing water pump and thermostat next..... Lots of things left on the to-do-list, lots to learn and having lots of fun getting there. Cheers
-
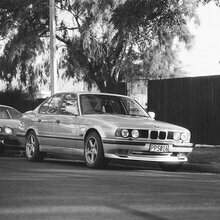
1 pointUp for sale is my 1996 BMW 540i I bought this for the BBS RKs it had and thought it would be a fun project to get legal and sell. It's got a bunch of AC Schnitzer stuff. It’s got the full kit: front and rear lip, side skirts, mirrors, spoiler, wheels, and it even has the ACS shifter, handbrake, and pedals on the inside. Performance wise it has the AC Schnitzer exhaust, an AC Schnitzer Strut Brace, ACS lowered suspension, and to finish it off it is running an Eibach sway bar at the front and some sway bar on the rear. I have also been told it has an AC Schnitzer tune, but I mean idk if that's actually true I haven't checked. In the time I have owned the car I have put a large amount of work into it to get it legal. The car has had a full service, I have replaced the oil, coolant, brake fluid, power steering fluid, and gearbox fluid and have replaced all associated filters along with the fuel filter and cabin filters as well. In addition to this routine maintenance, I have also replaced the front and rear rotors and pads, the alternator, the airbag clock spring, the centre tie rod, and almost all rear suspension arms and bushings, along with having the car aligned. The car is an absolute blast to drive, it outperforms and out-handles many lighter cars on the road. (Goes great on track too). It is also, owing to its ACS exhaust, the best sounding v8 I have personally heard in my life. The car still has a little bit of love required however. The car has a small amount of rust in the boot area that needs attending, there is a squeak coming from the front left suspension, and it seems like the power steering pump could be on its way out owing to a light whine while driving. Also the glove box is stuck closed and maybe the blower hedgehog is on the way out. In addition to this one its previous owners also decided to paint the engine cover and rocker covers blue. The front lip and wheels are unfortunately replica items, however all other ACS parts on the car are genuine. The car will also come with a genuine front lip for repair. Looking for somewhere around the 5k mark but am willing to negotiate. I've got more into the car than that but it is what it is and it's gotta go.
-
1 pointDoes she need glasses? They almost look the same.
-
1 pointWent to EWS coding and switched the transmission coding to manual which essentially gets rid of the need for the clutch switch to turn on. Happily started cranking away. Weird thing is, even before I did that I could have sworn I saw the clutch switch work looking at the live data, but now it does nothing. But that might have been the live data view in INPA instead. The real test will be whether it'll suffer from rev hang and fails to disable cruise control. Will see. If so then either the clutch switch has gone bad or I've messed up the wiring somehow. Anyway, cranked it for a good 10-15 seconds with the main relay and fuel pump fuse removed, then refitted them and... here we are. Didn't want to let it idle for long so shut it down after a steady 10 seconds or so. Plus the neighbours next door have barely a month old baby and this thing sounded like a bloody tractor with no exhaust on so didn't want to be a pest. Feels like the final mile of a long race. Didn't get as far as I hoped to today but touching distance now. Don't want to jinx it again so will just see how it goes. Also, don't know what people do with heat shields when manual converting but this really doesn't sit well with me. Did a quick post on FB asking what others have done and the recommended solution seems to be not to worry about it. Thinking I might pop by Pick-A-Part again, cut off a front section of a similar heat shield and tidily jam it in there somehow to fill the gap. Or, you know, might just hakuna matata.
-
1 pointIndeed, looks like the bumper needs to be adjusted up, which would hopefully fix the resting height of the bonnet. And FFS why don't people know how to hold a phone properly to take photos.
-
1 pointAnd those people who post a one line reply quoting the full three pages of images
-
1 pointGot the cover panel installed. Went to Mosen's here in Hamilton and Kerry let me cut it out. Wasn't easy getting a cutting it out with a clean cut, there are spot and mig welds along the edge and tools weren't the best for job. I also had to cut it in half and joint in when welding it in. I thought id try one of those air nibblers which are good as they don't distort the metal, not the most precise\neat things for trimming edges so i messed up cut too much off in some spots. When it's seam sealed and hidden it's not a big deal given its only a cosmetic panel. Sedan\touring have strenthening? indentations on the ends, coupe panels dont. If i had to do it all again i dont think id bother with the rear brace, im not convinced the benefit is worth the labour for this car. The front brace and the rear chassis legs are much less invasive to prep and install and fix the issue especially weaker fronts. You do see evidence of the front brace from the boot (trim raised due to spare) but if you have the liner then its basically hidden
-
1 pointFront end finished up with poor man camber\caster plates aka E36 M3 Evo strut mounts. Certainly nothing new about these for E36's, not much info about using them on E46's apart from being the same fitment. Unfortunately the OE and OEM brands now appear to be NLA, so its either a genuine set at around $600 or one of the numerous aftermarket Taiwanese brands for around the <$200. I went with these B&E ones from Amazon and Rockauto. Doesn't appear to be much different between them apart from the bearing design and i think the prices reflects this. They are probably all made in the same factory. These mounts are firmer with less rubber isolation and you feel it over certain bumps. Height wise are 5-10mm lower than my previous Lemforder mounts so more inline with the original OE design i think. The studs are also obviously longer which is good if you are installing a strut brace. I did have some slight rubbing of the spring on RH strut tower, the spring was rubbing seam sealer when the wheel was turned in a certain spot, but that has cleared up after some use. E36's appear to have a bit more room in the towers when comparing with my Ti. I originally had them swapped left to right (more camber over castor) but ended up with too much camber for street usage, was something around -3-3.5° total according to my diy gauge. Installing them normally yielded an additional around ~-0.8° of camber and ~2.5° of castor. I had the Z4M FCAB's still installed so ended up with 8.4° of castor. Not worth going into too much detail on it, but the weight jacking along with the vastly increased steering effort was dangerous in certain corners and at high speeds. I swapped back to Meyle HD bushings to bring it back down to degrees 7.5°. Having tried all the castor ranges from 5-8° this feels to the best in my setup (the M3 runs 6.5-7.5 i believe). No obvious extra steering input needed and combined with the extra camber for front turn in\grip, the car is now very close to neutral in the tighter corners. I picked up at least an extra 10kph on my test corners and around about with very little understeer compared to my previous settings. I dont know it would be like without the other mods ive done, but its a massive different in grip\turn in for very low cost. The camber settings below are maxed out front and rear on Eibach's. You should be able add back ~+0.7 front camber via strut slots, which puts you around -1.0 degrees depending on your spring choice. I don't see any real disadvantage of running this amount for improved handling if your toe is around 0. Tyre choice and how you drive the car will probably dictate whether you should run it these or not. CMP Monoballs - I've done over 100km on all sorts of crappy NZ B-roads and these are exactly as advertised. Rear end now much more stable\planted\composed, it does not jitter around noticeably and bump steer is reduced on all road surfaces. With my current setup i can now counter steer mid corner without the feeling like its loosing grip. On smooth seal at high speeds its a similar feeling. The extra camber, castor and chassis braces have probably helped to a degree but i think its mostly the new RTAB's at work here. They certainly are controlling the rear alignment like they claim to do. Even quite noticeable under normal road road driving, much more relaxing with less steering wheel movement. Long service life and much easier to bolt up the trailing arm bracket with no preload or alignment make these i must have IMO. They are expensive for what they are but you are getting good benefits for a few hundred. Makes me wonder why BMW didnt use them in the CSL. Only disadvantage which is widely reported is driving over sharp bumps - square seal patch edges, reflectors, sharp curbs etc produces a rear end whack\thump similar to stiff bushings. May not be the best mod if you driving a lot on crappy roads or want max comfort\quiet, but the benefits easily outweigh that.
-
1 pointHo ho ho bimmerheads. Merrily having myself some festive wrenching here. With the engine rebuild near enough finished, I'm now just tying up all the other loose ends to hopefully drop it in before the end of the year. To start off, got a nice wee letter in the mail the other day. I'd asked on E46 Fanatics if anyone might have a spare manual cluster backing plate to block out the automatic gear screen and one fella gladly obliged. Bloody awesome community that. Came all the way from Pennsylvania and is a nice cherry on the cake. Had a bit of a dilemma with the power steering situation. The donor car came with an LF-30 pump that I had already pulled apart, cleaned up and refreshed with all new seals. Was prepared to bite the bullet and get a new high pressure hose from BMW for something like $400+ as those are different between the LF-20 and LF-30. Got a quote from BMW a few weeks prior and was told it's available on order from Auckland. Gave them a call to get one in and was instead told it'd need to be ordered from Malaysia and would be unlikely to arrive until sometime in January at the earliest. Looked over the current LF-20 hoses and they're actually in decent enough nick, problem is the LF-20 pump itself seemed to have some play in the shaft making an audible rattle, which left me a bit uneasy. Ended up going for another scavenger hunt to Pick-A-Part, hoping to either find a pressure hose for an LF-30 or a decent enough LF-20. Out of the 7 E46's there, the LF-20's had either been taken or they'd come with LF-30's so I ended up grabbing a pressure hose for the latter for just $16... then took it to Enzed and dropped $300 to get it refurbished. Smort. Finally got the final stubborn low pressure power steering line removed from the coil on the car that I'd given up on previously. Annoyed the hell out of me. Would not budge at all pressing the white clip in. Tried jamming in a cut up strip from a plastic bottle to no avail. Resorted to cutting it open with a rotary tool in the end. Stupid thing. Managed without any damage to the cooling coil and have a new line to go on anyway. The steering rack itself seems in decent nick and I found this engraved in it when wiping it down. It seems to say "03.15 209k" so wondering if it's been refurbished in March 2015, at 209k km? Bit weird as I bought the car at 214k km's in 2021 and it's unlikely it'd only done 5k km in the 6 years, so assume the rack must have come from some other car at some point. Anyway, tangent. Tackled the wiring looms next. Did a thorough inspection and gave everything a clean, cleaned off a few oily connectors with some contact cleaner and replaced the bits of plastic corrugate sleeving in places where it had crumbled away it. Also removed the auto transmission / O2 sensor loom from the ECU/relay box and tidied up the reverse light wiring I'd left in a bit of a dodgy state previously. Properly crimped and heat shrunk everything in place and culled or tidily tucked away the remaining automatic transmission wiring bits going into the cabin. Also found some sort of... repair someone had taken on previously? Bolted up the new dual mass flywheel and clutch kit I'd bought off @Eagle and mated up the engine and gearbox. Finally found a good use for two old bean bags my partner's been nagging me to throw away for a good part of two years now. Make a good cushy bed for the engine to take some pressure off the crane. There's two E14 bell housing bolts that are longer on a manual box than they are on an auto so I made sure to order those in (part no. 23001222894). Looking at it, the auto ones would probably do the job but wouldn't engage the threads fully so best to be safe. Got pretty annoyed when I got onto bolting on the main tensioner and it started spewing oil all over the place. Frustrating as it's barely a few years old. Bought it from FCP Euro as well so would be covered by warranty but can't imagine the return shipping costs would make the exercise worthwhile. Also discovered that I'd bought the wrong type of AC tensioner so have ordered new ones of both, should be here beginning of the coming week. Gave the exhaust manifolds a good scrub and will look to throw those on prior to the engine install. Not a fun task bolting those on in the car. Gave the whole car and the engine bay a good clean, it'd done a great job collecting pollen, dust and bird sh*t these last few months. Getting really annoyed at the horrid state of the paint now. All going well with the mechanical side of things, I suspect a full respray is on the cards in the not too distant future. Have rolled the car back into the garage finally, tidying up the last few bits and will start tackling the engine install. Plan is still to get the car up and running, break the engine in properly, go for WoF and start tackling the other missions that will knock the wheel alignment out of whack. Front subframe will get all new control arms, bushes, wheel bearings and tie rods, whole rear subframe will be refurbished and will probably throw in adjustable camber arms for good measure. With the subframe out, also aiming to tick off the reinforcement plate mission. Got a full kit from CMP as well as the weld in beam that goes along the back of the rear seats. Not sure if I'll end up going all the way with it but best to have it on hand anyway. Will also try out their solid steering coupling. Currently has a poly coupler that is a squeaky little piece of sh*t so definitely getting rid of that; more on it in a future post. 330 brakes are still waiting to be rebuilt. Some might have also noticed boxes of suspension bits on the shelf in one of the photos. Got a set of Eibach Pro Kit springs and Bilstein B4's all round on a decent deal from Demon Tweeks. Big pile of plans there but should feel brand new when I'm done with her. As far as more immediate tasks, will probably take the driveshaft to a shop to get tested/balanced. Pair extra to get the rear part of the driveshaft send over along with the manual conversion from the UK but the dude didn't mark it at all when removing so no idea how it's supposed to line up. Bit silly. Also haven't quite settled on what to do with the exhaust. Lined the 325 & 330 ones side by side and apart from the flap at the tail pipe on the 330, they seem to be pretty much identical? Leaning towards going with the 325 one if so. Am also thinking I'd like a bit more volume out of it so keen to hear some suggestions as to the best course of action, short of dropping a few grand on a full new setup. Don't want it to be stupid loud but in stock form it seemed barely even noticeable so just after a slight increase. What sort of difference would cutting out the secondary cats / resonator make? I assume deleting the muffler is sure to make it obnoxiously stupid?
-
1 pointAs I'm not that well versed in electronics, I took my sweet time sorting the wiring. Wanted to make a tidy job of it and pretty happy with how it turned out. Started with dissecting the EGS wiring, using the donor car harness as a guide to what's safe to cull. Cut off the plugs going to the old transmission and got rid of the excess wires by pulling them through the tubing, leaving only a few that I reused for the reverse switch wiring. Crimped on a generic plug that I'd lifted off a temperature sensor and shrink wrapped it in place. Took me a while to figure out the fuse box side of it. There seemed to be two different ways of doing it - hooking up the two reverse switch wires to Pins 2 & 6 of X6325 according to this guide OR tap into the black/brown wire (Pin 4) and ground the other as shown in ShopLifeTV's & 50skid's videos. Had to educate myself on how relays work to figure out that both ways will work. Decided to go with Pin 4 and ground, retaining the relay so as to not run the main current through the light switch. The black/brown wire was the last one remaining on a EGS plug after getting rid of all the wires going to the transmission so that got spliced together. For ground I just plugged into the one of the other abandoned EGS plugs. Will do for now, will tidy the remaining loose ends after I've gotten the car up and running. On the inside I ended up also removing the steering column as I noticed the steering angle sensor being a bit too loose for my liking so wanted to check it out. Not sure how much play is normal but did notice the plastic bit on the column where the end of the pin is held in place was slightly cracked. Strengthened it with a bit of epoxy which seems to have solidified it a bit. Also fixed the annoying orientation of the column where the positioning slots on the end of the column and the steering wheel would end up on opposite sides. PO's attention to detail is a joy to behold. https://www.dropbox.com/s/ec2uskchmfbs6w9/2022-11-04 12.11.18.mp4?dl=0 https://www.dropbox.com/s/bmg6ngv6po6y1h8/2022-11-04 13.04.49.mp4?dl=0 Clutch switch wiring was pretty straightforward. Also did the reverse light dip wiring as per this guide. Reused the discarded wires from the auto transmission looms. Had two to play with so managed to string longer runs together with matching colours. Also disconnected the previously run cruise control wire to route it more properly. Fished the wires along the factory wiring routes wherever possible, using an old wire coat hanger to route the wires through in behind the heater core. Blue - cruise control to DME Pin 27 Green - clutch switch Pin 2 to DME Pin 23 Yellow - reverse dip X11176 Pin 7 to X428 Taped together the loose wires previously going to the auto shifter and cable tied them out of the way. Also tidied up other wiring where the tape had come loose over time with some new OEM-looking cloth electrical tape. The shift cable hole got plugged with an OEM blind plug (Part #07147140849 but and 35mm plug should do) and threaded some short bolts I found to the other shifter mounting bolt holes. Figured out why the wiring around the steering column had looked pretty hectic previously. While digging through the newest parts car I noticed the black plastic channel bolted to the side of the steering column - on Barbara it was missing completely. Lovely. While in there... I also took out the heater core for a thorough flush and some fresh O-rings. Getting the pipes back in is an absolute prick of a job, would recommend a second set of hands when tackling this. Ripped out the dash from the parts car that, underneath all the filth, looked in better shape than the old one. Gave it a good thorough clean with a steam cleaner and applied 2 coats of Aerospace 303 protectant to make it look nice and crisp. No more footprint or phone holder dildo smack in the middle of it. Love it. Dug out the armrest-less center console bit and set of cupholders I'd picked up from the wrecker's some months ago and spent a good few hours rubbing off the scratched up rubberised coating to expose the clean plastic underneath. Those also got a couple of coats of 303 to freshen them up. Cut a hole in the underside dash panel for the clutch pedal and pretty much put the interior back together. All that's missing is the shiftknob. Three pedals at last.
-
1 pointI bought OEM ones (you can buy just the rubbers) when I got my E39. Within 18 months they had shrunk so the metal strips stick out 10mm from the end. More shite quality from BMW. I'll throw them on the pile with the vanos seals, remains of the underbody plastic shields, broken sun shade sliders, the fabric that fell off the C pillars etc...
-
1 pointBuy Bosch or Wurth real rubber ones. (I used to be a Wurth rep, so am a bit biased!) The steel backed Wurth ones are brilliant! Quiet, streak free etc! Cheap shitty ones are cheap and shitty. Unless they're from Ripco - then they're expensive and shitty. Bosch from Partmaster are a good price.