Leaderboard


.thumb.jpg.04807d42ad69838062fa7df5f4a7a884.jpg)
Popular Content
Showing content with the highest reputation on 10/11/18 in all areas
-
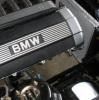
4 pointshttps://www.trademe.co.nz/1787938122 Car looks to be in excellent condition for 200,000 kms someone got a good deal I reckon
-
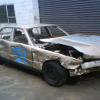
4 pointsFairly certain this is the one that crashed on Ian Mckinnon Dr. Guessing they were coming down from Piwakawaka and lost control, demolishing a road sign and a traffic light. Drove past the place a few hours later and wondered what'd happened and then saw a post on fb with some photos. Walked my dog there the next morning, crap was all over the place, picked up an M5 guard grille as a trophy
-
3 pointsSonax Profiline CC36 ceramic coating, looks as shiney as wax, and not even bird sh*t sticks to it!
-
2 pointsI think T/M stands for traffic management in the UK, the knob allows you to scroll through UK maps. My M5 had it but was useless here so I removed it and fitted the cupholders again.
-
2 pointsDirect upload to TradeMe when you've got it home and realise that with unleaded 98 at $2.65+ you aren't going anywhere... Or perhaps something to do with radar detector... but looks factory...?
-
1 pointI think it sold for the "correct" market price. $18k the reserve would have been bargain buying. $20k ideal and $22k a top dollar price. Nice colour, good options and facelift, has a europlate and michelin tyres, looks to have been well cared for during long ownership properly used. It would be the perfect car to actually use and enjoy without worrying about it every time you park it somewhere. kms are highish for NZ standards but nothing in the grand scheme of things, 125k miles is nothing
-
1 pointWeird, carjam tells me an Audi Coupe S2.
-
1 pointAll good, I replaced one side but no signs of a leak so who knows might have been a valve sticking open. Rebuilt the starter and now chasing creaky suspension so it just goes on. Trying to sell it but who wants a V8 with 280ks on it when gas is $2.30...did you sell your wagon?
-
1 pointPlate is off a white Mitzi Pajero?
-
1 pointNo one is doing a burnout? ?
-
1 pointOr someone drove in it. Interesting how people always assume it was the drivers fault
-
1 pointThese things are apparently impossible to crash unless you're stupid. People should have to pass an advanced driving test to purchase any car with more than 200bhp.
-
1 pointTake everything off your keyring!! ?
-
1 pointall the technology but still doesnt make you a better driver after all..
-
1 pointThere are two different bulb wattage's. You need to remove the bulb holder and carefully breakdown the plastic mould that holds the bulb into the bulb holder without destroying the holder / lense assembly. When removed the voltage & wattage is visible on the bulb barrel. Its a bayonet fitting that only needs to be secured by a very good loctite type adhesive. It all comes down to how you value your time. If I cannot achieve a dollar / time result ... I pay... I value my time at $100 per hour
-
1 pointSee where those two pipes bolt to the forward section? Space them apart with washers. Job done
-
1 pointIronically I just watched this about an hour ago - just seen this thread now.
-
1 pointI agree with EVERYTHING he said about the E38 It's always been one of those iconic benchmark cars. Once again I'm thinking of buying a cheap 728i to tidy up and cruise around in for more daily activities, perfect for putting Soarer parts in that big boot!
-
1 pointUpdate #14 Time for a big update! Lots has happened since my last update... Hopefully I don't forget anything as I write this. The weekend after my last update ended we disassembled the front end. Pretty easy and straightforward process, and unfortunately I didn't get any photos of it. We then moved straight on to the rod bearings. Removed the oil pan, associated hardware, etc. Oil pump removed: We then moved on to doing the rod bearings... To begin with it was actually an absolute mission. It just isn't possible for a single person to manage 105 degrees of angle torque when lying under the car (in our experience anyway). We burned through a couple of spare bolts practicing, and trying different approaches, but we just couldn't make it work. 70 degrees would have been fine, so I can understand how this would have worked for the older E46's, but we just couldn't reliably pull 105 degrees in a single stroke. After some trial and error, and a fair amount of frustration on my part we came up with an approach that worked. It takes 3 people, but it's a reliable approach. Basically the tool is as follows: Bit -> Angle gauge -> 12 in extension -> long breaker bar -> breaker bar extension (pipe). Person #1: Holds the bit, gauge, extension assembly in the right place, cradling the angle between the extension and the breaker bar against their shoulder. They're responsible for maintaining the tool on axis as person #3 rotates the assembly. Person #2: Their sole job is to locate the gauge and call out progress to Person #3. Person #3: Rotates the tool through 105 degrees. Person #1 & #2 are underneath the car. Person #3 is near the front left wheel well. It's important before each pull that you check that you have 105 degrees of motion available to you. We found that if we got it wrong we would collide with the front left jack stand. This approach made the tightening procedure fairly straightforward and reproducible. We did run into one further issue. We noticed that the bearings coming off the car had 437/438 stamped into them, and the new ones going on had 439/440 stamped into them. We were immediately concerned that we had different part numbers. A lot of investigation research and measurement later and we concluded that we had the same part, although we can't explain why the number stamped on the bearings is different... Part numbers ending 437/438 don't appear to have ever been BMW bearing parts, so we're a bit uncertain. The real kicker though was that in the process of investigating all of this and measuring bearings, etc. we managed to damage one of the new bearing shells. This meant that we were only able to get 5 of the 6 bearings done while a replacement bearing winged it's way to Auckland... It was a bit annoying to not be able to get it done in a day, but ultimately worthwhile getting a pristine replacement. I was away over Easter volunteering at a large Easter Camp event for high school kids (6500 kids), and then was also away the weekend after Easter with friends. By the time the next weekend came around the replacement bearing shell had arrived, and 20 minutes later we had it in place. Before I move on here's photos of the bearings. Yes, I know, there's only 5 in the photo. I'm a fail photographer, will replace this pic as soon as I get a new one with all 6 :facepalm: Cyl 1 (Cap side) Cyl 1 (Rod side) Cyl 2 (Cap side) Cyl 2 (Rod side) Cyl 3 (Cap side) Cyl 3 (Rod side) Cyl 4 (Cap side) Cyl 4 (Rod side) Cyl 5 (Cap side) Cyl 5 (Rod side) Cyl 6 (Cap side) Cyl 6 (Rod side) For a car with 85,000 miles on them these seem pretty bad. I'm very, very glad that I didn't wait any longer to do them, and I consider myself pretty lucky that the journals are fine and nothing's damaged. Given I don't know the full service history of the car, I can't be sure how it's been looked after, especially in terms of oil changes. But at least going forward I know where things are at. With the rod bearings done we then reinstalled the oil pump, etc. and refitted the oil pan (after a good clean). This took a surprisingly long time to torque everything up, but by the end of the day we had the subframe back on and the steering rack reinstalled. During the week Dad reassembled the front struts ready for reinstallation. All looking good! Also here's a pic of the front hubs painted up. The next weekend we kicked into further reassembly. We started the day with fitting the new oil filter and refilling the motor. And reassembly of the front end: We then kicked into draining the transmission oil. We'd been holding off on doing this for ages as I'd been having real trouble sourcing MTF-LT-2 fluid. I finally managed to track so down so we were good to go. Some family stuff meant that we didn't get anything more done that day, nor the following weekend... This afternoon though Dad refilled the transmission. Custom oil filler ready to go! In it goes... And here's the comparison of the old "lifetime" oil and the new. This weekend we'll get stuck into finishing the reassembly on the front end. Turn the engine over to get some oil around the place and hopefully do a compression/leakdown test as well. Then it'll be on to reinstallation of the driveshaft, exhaust etc. The end is in sight!