Leaderboard


Popular Content
Showing content with the highest reputation on 04/26/19 in all areas
-
3 pointsSome cleaning update pics while I try track down some products.
-
2 pointsDid one of the best mods you can make to any car imho. Not only to protect your own investment but I remember, years ago now, a young woman on an Auckland motorway trapped in a burning car and an extinguisher could have saved her life.
-
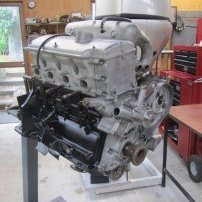
2 pointsOver the last few days... Pulled the aircon compressor out of the 328, it's dripping fluid and aircon has never worked... was already missing one mounting bolt and one of the remaining three sheared off as soon as I twisted it. The bottom two are easily rotted way down there. It's unlikely to ever go back on, might remove the tensioner from that side also as well as the rest of the aircon gubbins. Got the steering wheel straightened on the M3, it was a tiny (but annoying) bit off after the last alignment (for the new steering rack). Called the shop and they were like 'that's no good, bring it straight in' and it took less than 10 mins. Happy. Re-hung the exhaust on the M3, the tips were hanging too low (for a number of years, since I had my diff seals done) and now, after using a different hanger mounting hole, are perfectly aligned. Happy with that. Still chasing some front end imbalance on the 328...
-
1 pointI have a very rare Schnitzer Roof Spoiler available for Z3M Coupe for sale due to change of plan, requires painting. $1,000. Located in Auckland
-
1 pointI did check if I could find replacement used ones in better quality and wasnt happy with what sellers were offering, so we decided to make a couple of days out of it and combined skills to refurb what we have. Basically: - No foam/sponge left in originals, no softness in the horsehair molded bases. Cloth itself in pretty good condition. - Forced stripes of cotton wadding inside "piping" on the back piece - Kept the horse hair mold but added middle strips of 35-160U High Density foam and side bolsters of 28-170U Medium density foam - Hand washed rear cloth, did not remove from seat as it was riveted to the frame (and no need). - Machine washed base - Wife sewed in "Interface" material into the base stips to create new "loops" to hold the side-centre-side metal bars in place (original channels disintegrated - Initially used OEM like Bull Ring pliers to reattached metal bars etc but found that large cable ties work a lot better. Used lots of them (13per base, 5 on each side and 3 in the middle). Very happy with result, firm but soft, smells great too thanks to the washing and cloth shampoo!
-
1 pointBEFORE YOU READ ON: After doing the initial installation of the retrofit the kit I was faced with PDC sound and steering wheel track select issues. No amount of coding would fix it, and Bimmer Retrofit suggested a firmware update to the FeNBT box to address it. The problem may have arisen from the fact that my car has a ZGW2-High from factory, and the FeNBT is not 100% compatible with it. Another strange issue was that the NBT would not save my unit settings, so every time the car booted up it would reset to default, which in my car's case is UK MPG etc. So I did install version two today: * Removed the FeNBT retrofit adapter * Updated SWFL (both) and BTLD of the ZGW2-High with 8SK software. For my ZGW2-High they were btld_000010f5-003_004_090, SWFL_0000092b-005_018_00, SWFL000010f6-003_004_160. The ZGW now shows up as ZGW2 in esys, where before it was just ZGW (despite being a ZGW2-High) * Tapped the CAN2 high and low at the CAS * ZBE3 and Touch ECU are also tapped into CAN2 * Restored original PDC button wiring The retrofit works 100%. Initially the NBT would not display my top view or PDC, but the sounds worked. I resolved this by doing a fresh FA code with my original FA but with the Zeitkriterium updated to 0712. The retrofit is 100% feature complete and I did not have to do any module swaps or modifications other than flashing the ZGW2 with 8SK software. Also, the car's original wiring is 100% intact, except for 2 splice connectors ? FeNBT adapter removed PDC TSRVC original button wiring restored and working PDC TSRVC working 100% Steering wheel list wheel functionality restored The information above is still relevant as a guide if the ZGW2 route is not viable in your case. Steps like the removal of the COMBOX and USB cable routing as well as the disassembly steps are also still required, even with the 8SK method. Also, the standard disclaimer applies. The information below is based on my experience and I give no guarantee that the information is applicable or relevant to any other car configuration. Here we are folks. It's been a wee wait while the kit was assembled but it arrived and was installed in an afternoon (no jokes). It is a challenging retrofit if you have no experience with these things. At the very least you need to be able to read wiring diagrams and also have either the knowledge required to disassemble the interior of your car or know how to sear and read the info on TIS. Others have covered more technical details of the install. My writeup will be step-by-step of what I did. Before starting removed the footwell side carpets, centre console side plastic trim, and trim roof in driver's footwell. Info on how to do this can be found on TIS. This is the kit. It includes MOST cable, USB cable, Adapter, Touch Module, 2x wiring sets for touch and controller, harness, touch controller, APIX cable, Bluetooth Antenna, HU_NBT. Roof down and rear head rests out. These are a royal PITA to remove. I find that grabbing on to them and moving side to side is the easiest way to get them out. Front seats forward as far as they will go. Rear bench out. Again, PITA to get out. Grabbing the outer edges and pulling up is the easiest way to get it out. It takes some effort, but eventually it will budge. Rear backrest is held in place by two bolts, and once removed can be tilted forward. No need to remove the seatbelts. You have more than enough access to the COMBOX. Note the brace. This has to be removed. Said brace removed. Little bolt is example of one of the 4 bolts securing the COMBOX to its frame. COMBOX removed. COMBOX wiring and MOST disconnected. The little blue tab needs to be pushed out in order for the most cables to be removed. COMBOX MOST terminated. At this stage we move to the front. Recline the front seats as far as they can, and move them all they way back. Locate the ZGW underneath the driver's side dashboard. Remove the MOST connecter, and disassemble it in the same manner as the COMBOX MOST. ZGW MOST terminated. Old CID removed. Next remove the backing plate. Basic disassembly done. This is what a 6-series console looks like when it's stripped out like a nuclear winter ? Bind up the old CID Apix and power connectors and secure behind the dashboard. Connect MOST cable supplied with the retrofit kit to the ZGW. Feed MOST through sidewall into cavity behind the HU. Connect MOST to the FeNBT adapter. Remove beige connecter from USB port in armrest storage. Feed new USB cable underneath the console carrier from HU to armrest storage. New USB cable connected. New bluetooth antenna in a neat little wedge between the HU and air vents. NBT hooked up and ready to be tested for the first time. At this stage the old idrive controller (ZBE2) is still connected. It works! USB connection in armrest works. Touch controller (ZBE3) and Touch ECU connected. This was a more technical step as it requires you to wire the ZBE3 and ECU to the CAN-H, CAN-L, Battery and Ground cables. Not that big a deal. I used splice connectors for a super clean install. Touch works. I'm still not convinced about the usefulness of touch input since we drive on the right side of the road, and writing with the left hand is average at best. The trim surround of the ZBE3 has to be removed since the surround from the ZBE2 stays in the centre console, and fits perfectly around the ZBE3. This can be done without destroying the surround. All you need is a small flat head screw driver and some patience. ZBE3 in place and fits perfectly. The instructions call for the PDC Camera buttons to be connected to the FeNBT adapter. Three wires in a 4-pin connector is all it takes. I actually replaced this blue one with a new one which I purchased from BMW, along with new crimp connectors. First drive outside with the roof down. The screen is excellent (remember that this is one I ordered from China...not one that came with the kit). And there you have it. I took the photo of the complete kit on 23 April 2019 at 2:58 PM and the install was done by 5:30pm. As smoothly as the install went, it is not without challenges. Currently my PDC sounds and steering wheel track buttons do not work. Bimmer Retrofit are working with me to resolve the problem. I also cannot connect to the NBT though OBD despite having ZGH High installed. I will update the ZGW tomorrow to see if that solves the problem, or else connect directly to the NBT using an RJ45 cable. Once I can connect to it I can complete the coding and get my cameras back ? To help troubleshoot any potential wiring issues I removed all the unused wires from the harness (more than half of them, in fact). I also initially cut the connector from the 4-pin connected to the PDC button, but have since re-pinned it to a new connector, just in case it ever needs to be reconnected. Overall I am very happy with the kit and the support from Bimmer Retrofit. Beyond the headlights there is no way to tell that my car is Pre-LCI, and even then very few of the LCI models (even those with EVO) have the glass screens. Happy to answer any questions ?
-
1 pointWould love it, but is it really worth $14k with all the work required to bring it up to standard. Plus dont even know the history on the car and if it could be registered here
-
1 pointMercury Outboard Quicksilver Corrosion Guard.... best on the market in spray cans
-
1 pointSeller seems to be getting a tad bothered in the q&a now. I still bet though, that despite their insistance that you will see the value when viewing it, it won't be more than a 25k car max. I'd be curious if things like the vanos have been done, but I'm not one to waste time asking.
-
1 pointI have plate “BMW Z3M” available for $500, plans have changed. Sorry no picture as plate not made yet.