Leaderboard


Popular Content
Showing content with the highest reputation on 03/05/17 in all areas
-
3 points
-
2 pointsThese are all new, genuine parts, most still in original packaging, can put up photos if you need but dont really want to unwrap stuff and photos of packaging are not much use! All free, if you want me to ship stuff, you pay for that. E53 X5 cupholder p/n 51 16 7 127 150 E85/6 right hand cover, goes down by wheel, has little rubber mud flap attached p/n 51 17 7 029 694 E70/71/72 right hand mirror lower cover p/n 51 16 7 180 730 E30 front right window mechanism, no motor p/n 51 32 1 965 078 E46 right hand fog light cover p/n 51 11 7 030 610
-
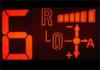
1 pointThey can only go off whats on the dash, so its fair enough to say thats what the car is "showing". Better than claiming it has the KM of the new engine like most trademe listings
-
1 pointThose that have met me in person could confirm that I am in fact the waif and not using child labour lol
-
1 pointthat looks awesome!
-
1 pointLooks great in red, you'll enjoy the extra power for sure.
-
1 pointModern epoxy is stronger than welding. a lot of new cars are now bonded with adhesive ... actually almost all new modern composite supercars have non composite crash structures bonded to composite. Since I think 2005, BMW have been using adhesives as an approved repair method for repairing front ends of a lot of their new cars. The reality with the way the RACP is layered (4 layers including the stud mount) in the rear boot floor of the E46 chassis also means it is impossible to rust proof every single surface that welding comes into contact with. Not to mention the fact that welding is impossible for this car as the rear mounting has already been injected with bmw approved epoxy filler. Which I might add has proven to be an effective repair method for a road car. In my humble opinion, the only sure way this can be prevented or repaired without future failures elsewhere is a GTR style rear bar that spreads the load correctly into the rear main chassis, a full coilover style rear suspension and solid mounting the rear subframe craddle. It is a shame that all of this could have been prevented by BMW had they created a different rear subframe stud mount that actually tied into the rear chassis legs in the first place.
-
1 pointUpdate #11 So last weekend we didn't get too much done. Dad and I went to the Bruce Springsteen gig in Auckland on Saturday night :parrot: SO GOOD! We did get a few bits and pieces done before we went... We swapped out the transmission mounts, and took the opportunity to clean up the support bracket, etc. at the same time. Here's the bracket and mounts as they came off the car: And here's a pic of the bracket & mounts back on the car. Bracket was bead-blasted to clean it up, and the mounts are new: The second thing we got done was fitting the new seals on the diff and reassembling. The diff body has been painted, the rear cover has been bead blasted, and in the input and output flanges have been painted as well: And today was RACP reinforcement plates day! First up we did a test fit of all components, and a dry run through of the process. Then we started with cleaning up the surfaces that the epoxy will be applied to. We put the finished plates into an acid pickle: While the acid did its work we got onto cleaning the RACP. The mounting areas had previously had the paint and underbody protection cleaned up as part of the manufacture of the plates, but they still need a final clean up before they're ready for the epoxy. We cleaned up the surfaces with a sanding disk on the die grinder, and then cleaned the surface with 5 rounds of kitchen roll and acetone (ensuring to clean from the centre out, so as to not drag dirt from the edges onto the clean surface. You can see in this photo that there is some residue from the paper towels, we used a lint-free cloth to clean off this residue and finalise the surface. Below is a pic of one of the mounts after cleaning with the lint-free cloth. We then put together a custom adapter to be able to use the 3M 7333 2-part epoxy with a standard caulking gun. The adapter is simply a plate with two pieces of rod welded to it, along with some washers to spread the load, and a second plate to add reinforcing to the arrangement. Here's a couple of pics showing the design and assembly. While we were working on cleaning the RACP surfaces and building the caulking gun adapter the acid pickle was doing its work. With the pickling complete, we neutralised the acid with baking soda, and dried the plates. Next up was to apply the epoxy. We were pleasantly surprised at how well our gun adapter worked. Here's a photo of it being prepared for use. The epoxy nozzles are seriously cool, the way they're designed to mix the two parts of the epoxy completely really makes the whole process a lot quicker and easier. With the surfaces fully cleaned and prepared, the process we followed to epoxy each plate was as follows: 1: Apply epoxy to the plate, and spread using the supplied brush. We applied an even layer (The consistency of the epoxy makes it easy to spread, and makes the appropriate thickness fairly self-explanatory). Note that we didn't brush to the very edge of the mounting hole, as we wanted to ensure that we didn't end up with too much epoxy squeezing into the hole when we clamped the plate in place. 2: Apply epoxy to the RACP surface. Applying the epoxy to the vertical surfaces isn't too bad, it sticks pretty well and can then be spread by the brush. We found with the horizontal surfaces that it was best to follow the nozzle fairly closely with the brush, doing an initial spread of the epoxy as we went, to get it to stick to the surface and not drip. :thumbsup2: 3: Apply an extra bead of epoxy to the plate along large surface areas, etc. and in places where the may be a slightly larger gap (e.g. around curves, etc.). 4: Mate the plate to the RACP, and bolt it up (we partially greased the bolt thread, in case we had a lot of epoxy spillage into the bolt carrier. We were careful to not get the grease anywhere near the bonding surfaces). Note that we manufactured clamping plates out of 5mm sheet steel, to act as large "washers" and spread the clamping force of bolt out over the surface. 5: We then did the same with the rear mount on the same side (as we would add further clamping and bracing in pairs. 6: We then added additional bracing using strategically cut pieces of timber. 7: With the plates well clamped in place, we then removed the bolt for each plate in turn, and ensured that it wasn't going to end up getting epoxied in place from the epoxy that had been squeezed into the bolt carrier. Fortunately we'd judged the spread well, the epoxy and spread to the inner edge of the bolt hole, but hadn't pooled in the bolt carrier. We cleaned up the thread and re-greased the thread and tightened it back up. We also took the opportunity to clean up any epoxy that had leaked out beyond the bead, and we inserted sheet plastic between the 5mm clamping plates and the reinforcement plates, so that we didn't accidentally end up with things epoxied to other things they shouldn't be! :rofl3: And with that we were done! The plates are all epoxied, and clamped/wedged in place. We've got good beads all the way around on the plates, and not too much excessive spillage. We found the whole process easier and quicker than we were expecting. The 3M 7333 epoxy is really great to work with. The mixing nozzle is awesome, and the epoxy is easy to spread and work with. The long work time also helps a lot. :thumbsup2: The clamp time is 8 hours, but we're in no rush, so it will stayed clamped until some time tomorrow. Dad has been loosening and retightening the bolts every couple of hours just as an extra check - would be a shame to have a :facepalm: moment at this point! The epoxy turns purple when it's cured. When I left my parents place this evening the epoxy was already starting to turn purple :parrot: Tomorrow will be more cleaning on the underbody, as well as clean up, seam sealing and undercoating the plates. Good day's work!
-
1 pointNo - you are right you are the second person to give me that advice! A friend is buying them new (both) and bringing them down from Auckland ? Fascinating what you say about RF v Non RF - I like RFTs tho!
-
1 pointDue to the emergency nature, just dropped it off at Autobahn in Grey Lynn this morning. I was so flustered that I got myself lost, pulled into a driveway to make a U-Turn and crashed into their wheelie bin and the guy happened to outside to witness this.. I go to reverse away with embarrassment and end up jamming my bin against the fence with my car then completely knock it over. That's how my weekend has started haha
-
1 pointHey, have you got one of these left? Thanks Rae
-
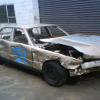
1 pointYou know how crumple zones work, eh?
-
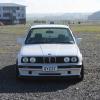
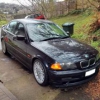
1 pointHello all! Been a little while since I've posted some photos on me mtech! I've since sold the white BMW as I didn't give it enough attention with the black BMW being on the road. Got a friend to take a couple of photos of my car the other day! Still haven't fitted the rest of the kit it's on the to do list! Enjoy
-
1 pointBrand & model: Star Form Size & offset: 17x8 15p 17x9 26p PCD: 5X120 location: Auckland Willing to ship: Yes Price: $2400 Polished lips and bolts, powder coated centers and brand new nuts!
-
1 pointBeautiful, that 530 of yours Chris!!
-
1 pointHey fellow E60 owners and congrats on your purchases Chris - like the aftermarket alloys and understated body kit. I-Drive - if your car is a jap import and you want NZ Nav then typically you will need a conversion job done (with hardware changes) by someone like EuroSurgeon - it's not just a case of getting the local DVD. I got my radio localised by recoding (cheap) and had the Nav done and all up it cost $750 from memory. The Nav is Ok but won't be as up to date as your phone. Not long after I had mine done the whole computer died - it looks like the cooling unit on the back of it had not be refitted - either by EuroSurgeon or by the muppet (previous owner/car yard presumably) who tried to fit a band expander. Luckily I had AutoSure Extreme cover and the failure was covered - otherwise it would have been best part of $2K for replacement and fitting/recoding. So - just be careful and if you don't need the Nav then maybe don't worry about it. After getting the unit replaced by Autosure via Jeff Gray BMW I only had the radio re-code done and left the Nav as I didn't want anything more to go wrong. A replacement I-Drive will match the car original spec - Japanese!!! OEM Bluetooth kits work well but are ~$1K so I've never bothered with that - have a Bluetooth visor unit that I can switch between my 2 BMWs Much cheaper and works fine. If you don't have a service history showing coolant and oil seal stuff being sorted then be prepared for a bunch of stuff possibly. Don't know how different this is for a 530i. Usually no expensive parts involved but can be a lot of labour changing oil seals in difficult places. The cars might be solid but the plastic and rubber in them just doesn't last more than 10 years. Highly recommend having a Mechanical Breakdown Insurance policy on your vehicles - I have them on both and they have easily paid for themselves within the first year of ownership- which is good (and bad). You can buy policies for vehicles you already own from MTA Mount Victoria - [email protected] or 027 22 44 295. I do wish the V8 had a better exhaust note but sorting that properly with a performance exhaust would be an investment I don't want to make after what I've spent on the car. Sam - glad I've warned you off the muffler delete - I'm sure it could be done with better results using a dual pipe approach rather than the dumb basic single pipe PitStop did for me but overall it was just *horrible*. Overall I love my E60 - the lines, the cabin quality, stereo quality, space and the performance when you give it some welly. After driving @treone's M5 (wow!) I seriously intend to get an M5 but need to own my 545i for a while longer to make sense of what I've spent in getting it sorted. Anyway - enjoy your E60s! Pete
-
1 pointTunnels and s54 engines. ?


.thumb.jpg.3e55b06a1ff2e119162ba5f32869c8dc.jpg)