Leaderboard


Popular Content
Showing content with the highest reputation on 12/01/15 in all areas
-
5 pointsSort out your camber and spacing at the same time :banghead:
-
5 pointstree30
-
4 pointsGot bored and decided to experiment with the grills. I had a couple from the spare parts car with good chrome outer rings and thought I'd try some chrome paint on the inner black grills. Looks quite striking even if I do say so myself..lol One more to go but you get the idea. Will finish it tomorrow.
-
3 pointsThought I'd revive this with some more recent photos and my plans for it at this stage. I am planning to replace it soon, but with a few new models of cars being released soon, I am holding off in the hopes that the new models bring more trade-ins to the market, and hopefully reduce the price. As for upcoming plans for the car: -Coilovers or springs -Spacers -Front Lip or Splitters -De-cat and Evolve tune -LCI Tail lights -Refurb wheels -Headlight polish + blackout (pictured below) The de-cat will probably make the car far too loud with the current exhaust mod so I plan to use my spare exhaust backbox, and replace the 2 perforated pipes in the central chamber with solid pipe to release more of the V8 growl. This, combined with the decat, should be far more acceptable as opposed to the current setup.
-
3 pointsnow all you need are some chrome spinners and a chrome chain around the rear view mirror
-
3 pointsWhy is it when you tackle a job like this outside it decides it's going to rain. A whole lot more work than the rear to give it a bit more fresh chrome but the fronts looking a bit better now. Old chrome sitting over the new for comparison. Looking much better. Still need new grills but that'll have to wait till after it's been re-painted.
-
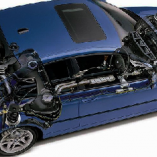
3 pointsThe third photo is of the oil filter housing and cap has the 25 Nm arrow on top going out on a limb it should not have a gap between it an the alloy housing ( as Andy has pointed out) hence the oil staining around it this then heads down wards and creates a mess. Would check it out first undo the oil filter cap and check the "O" ring has not been damaged, nicked due to incorrect fitting. If all good then lightly smear "O" ring with clean oil seat it in the groove and tighten it back up unit it seats correctly clean the area concerned keep a eye on it. 2 cents
-
2 pointsSmall update. Finished my exams and finally had the hours to put in. Ended up going with the full front end under tray/splitter so its best of both worlds. 7mm CD bunnings plywood w/ 3msq 200g weaved fibreglass with approx 500ml marine grade epoxy resin applied. All hardware is 316 SS and supporting mounts all bolt up to the chassis so it is very sturdy, will easily hold my weight (79KG). Total weight without the bumper is approx 7-8KG and total cost to build this was around 200 .... ish. Could have been a lot cheaper if i went with zinc/galvanized hardware. Made a couple mistakes, first being the front being not long enough, which was my mistake. Measure twice, cut once! Just need to complete the rear diffuser, will add more progress pics of that later.
-
1 pointYou don't need a spare tyre for a wof
-
1 point$765 haha About right...
-
1 point
-
1 pointYou lucky bugger.
-
1 pointI've just been given one, 3 owners, genuine 79thou on the clock, mint interior, no rust at all,sun damage to paint on roof, hood and boot. The main problem is any plugs in the wiring loom I touch crumble in my hands. Apart from a new battery, couple of bulbs and wiper blades it hasn't cost me a cent yet but I can see issues coming up in the future, and parts are hard to find unless you are rich lol Sent from my NX007KL8G using Tapatalk
-
1 pointi found the same when i sold the 535.People pay more for an E30.?!
-
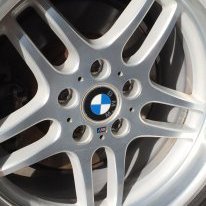
1 pointA sneek peek into next week prior to refurb.
-
1 pointAll that chrome and clean up, it'll really pop Dave, awesome job
-
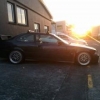
1 pointHaven't got around to giving it a wash but here is a pic of the 130i
-
1 pointi had a 1989 r100 gs pd. Do not be fooled,a GS is a road bike in disguise.But they are comfortable road bikes which can tackle all roads in NZ .
-
1 pointThanks. It was satisfying to get rid of that pitted chrome. Yup. Was a big job but glad to have it done. The washer nozzles are bolted through the bumper and chrome and the only way to undo them is take the bumper off..lol And because this arrived in the mail today and I'm well and truly over driving without drivers side mirror I replaced this. Another time consuming but satisfying job done. Not only was the mirror gone all the mounts where broken so I had to replace the entire mirror housing and wiring loom. And the new one all cleaned up.
-
1 pointJust a bit of extra work LOL, pull the whole front apart. Looks amazing though, big difference
-
1 pointSatisfying! Great work. Sent from my iPhone using Tapatalk
-
1 pointVery slow progress atm as have changed jobs recently and waiting for commissions and parts to arrive. so while waiting for all my bits to start work on the pull down and rebuild of the motor ive had done a few little bits to keep it moving forward. Also done a bit of work in the engine bay stripping and shaving/sanding before welding work begins hopefully get stuck into the engine bay after xmas Firstly i updated the speedo cluster a bit with carbon fibre trim (not 3m rubbish) black chrome trim rings and blue needles And also sent my hartge wheels away to be re-drilled (luckily just fits under the centre cap) and the lips split so i can start the re-build process they remind me of BBS RM's Looking at going with 2" front and 2.5" rear lips so the fit nicely (lips are currently 1.5")
-
1 pointTry your luck asking the C130 pilot that lurks about these parts? An inactive member/mate is a load master also.
-
1 pointAbout 1". But that's an estimate.. I'll wait and see. Ride is said to be close to stock comfort wise and the best drop of them all.. But opinions are opinions. My Eibachs were nose heavy before.
-
1 pointWhat the hell are those reflector thingies on the corners? (Btw how much was it?)
-
1 pointI dont get people on TM who aren't willing to post or courier at the buyers expense. Way to limit your market.
-
1 pointVery cool stuff. Quite neat when you think about you can buy an E38 for peanuts and get a car which you can then personalise. When you're finished it does not really feel out of date or old at all. In a lot of ways I think there is more cool factor in an older car which has been superbly maintained and upgraded than a newer, more generic car.
-
1 pointI'm a fan of CSL style wheels on the M3, you can't go wrong with them
-
1 point
-
1 pointFunny how things work out. I really didn't like it in the 750i. But if you check my 740i thread you'll see that I put it in there. And I love it. I think it matches the black interior of the 740i where as with the blue in the 750i it looked like a big black hole in the middle of the console. The guy who gave me the wood pieces I've just installed is looking at doing a wood bezel for the 16:9. When he does I may look at it again. lol
-
1 pointA very nice fellow(Xboss) in the US who has been watching my thread on Bimmerforums sent me these a while ago. They where prototypes and had no clips on the back and no holes in the homelink panel. He gave them to me to see if I could do something with them. So I spent the day very very carefully attaching some metal clips I made and cutting holes in the homelink panel for the mic and sunroof switch. Have to say the result was stunning. Heres the old panel for comparison. lol And heres the panel I was sent sitting in place. And there's usually a leather covered panel under the center console armrest. Here's the one he gave me. His workmanship is incredible. He's now doing piano black finishes with chromeline edging as well as the wood finished panels which now come with clips already attached. Heres a link to his thread if anyone's interested. http://www.bimmerforums.com/forum/showthread.php?2085016-Wood-home-link-panel-prototype-is-finally-done
-
1 pointI'll accept coinbox donations?
-
1 pointSounds like buying a rotary on trademe. "Full rebuild, no receipts"
-
1 pointI dont get it, why does the first one/few/any have to be carbon? to the op, get stuck in, use the materials you can source and are familiar with. If it works as intended, functionality will far outweigh form or materials... watching with interest.